
Azure Blob Storage Operation Notes
 You can use Azure Storage Explorer (Free tool to easily manage your Azure cloud storage resources anywhere, from Windows, macOS, or Linux)
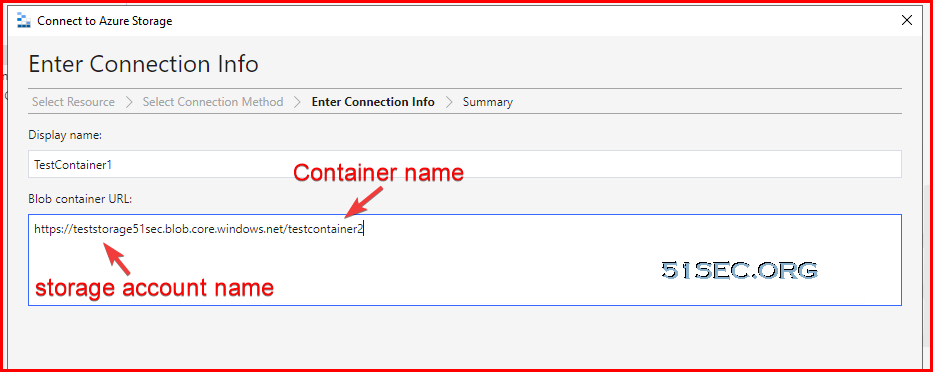
Enter your blob container URL: https://teststorage51sec.blob.core.windows.net/testcontainer2
Mounting on Linux is simple, but you’ll need to have an NFS client install first. Some distros have this automatically installed, but others will need to install it.
Once it’s installed, create a mountpoint with mkdir. You may need sudo if you aren’t a root user or don’t have permissions.
After creating the mountpoint, mount the Storage Account with the mount command.
Reference link: https://hovermind.com/azure-virtual-machine/mounting-blob-storage.html#points-to-be-noted
Enable cloud shell (https://shell.azure.com.) will cause a small charges since it will requires a storage account with a new resource group to store some information.

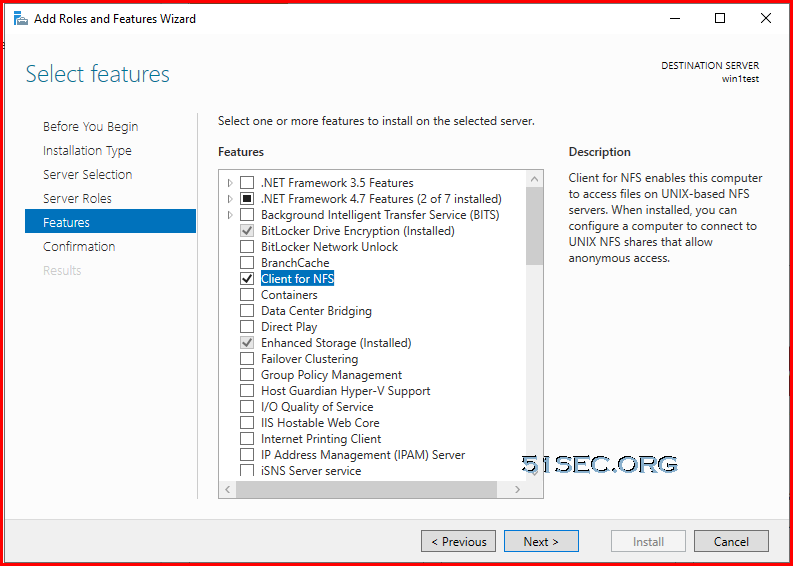
On your VM, install client for NFS.
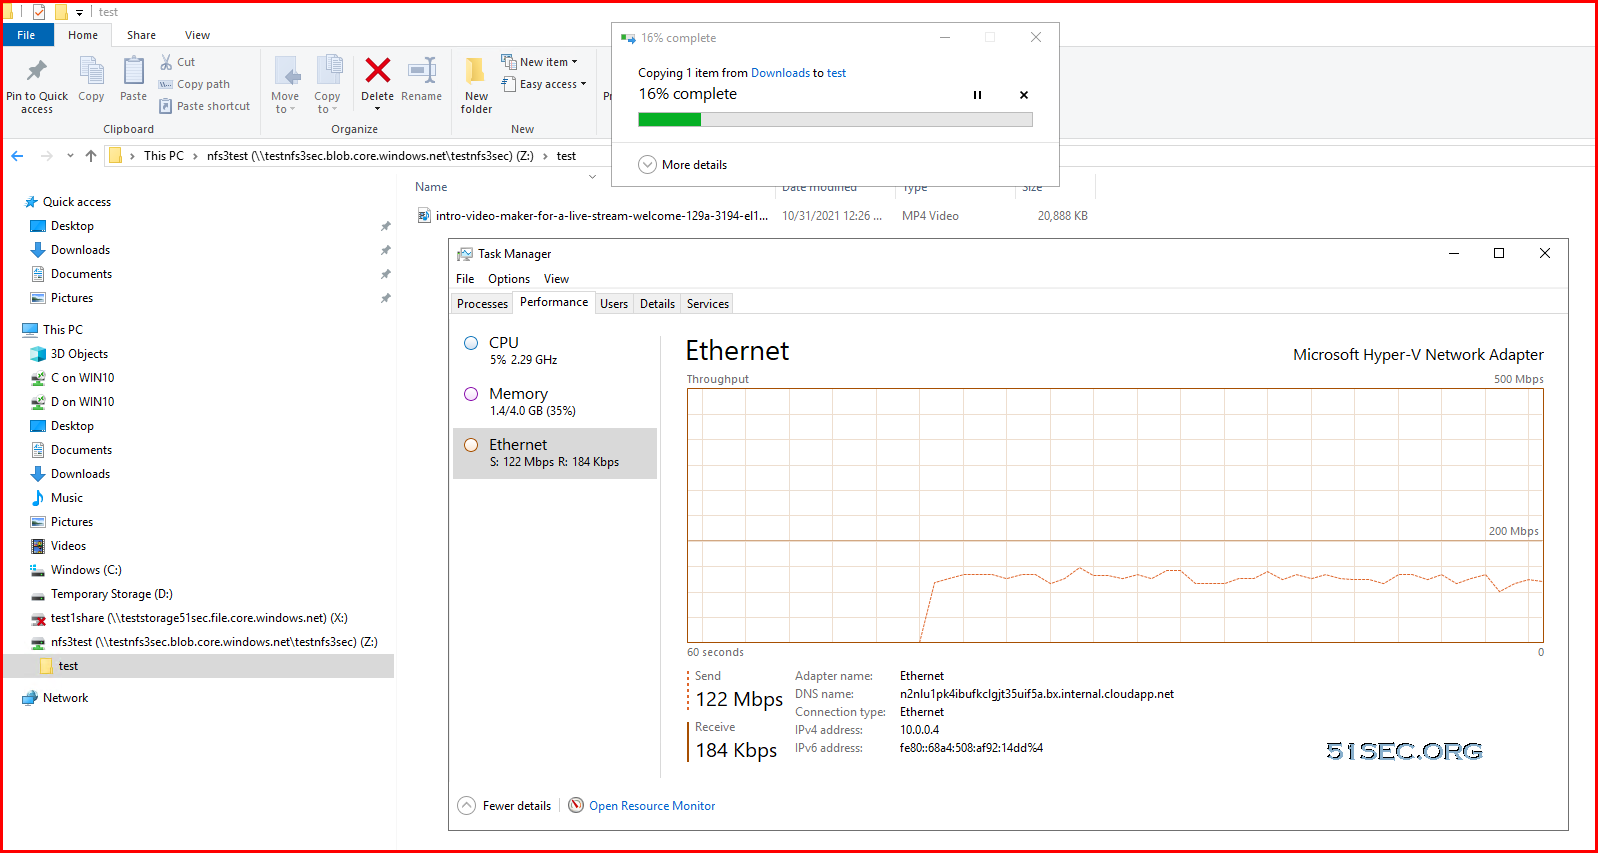
The uploading speed is about 120Mbps from local to mounted NFS share.
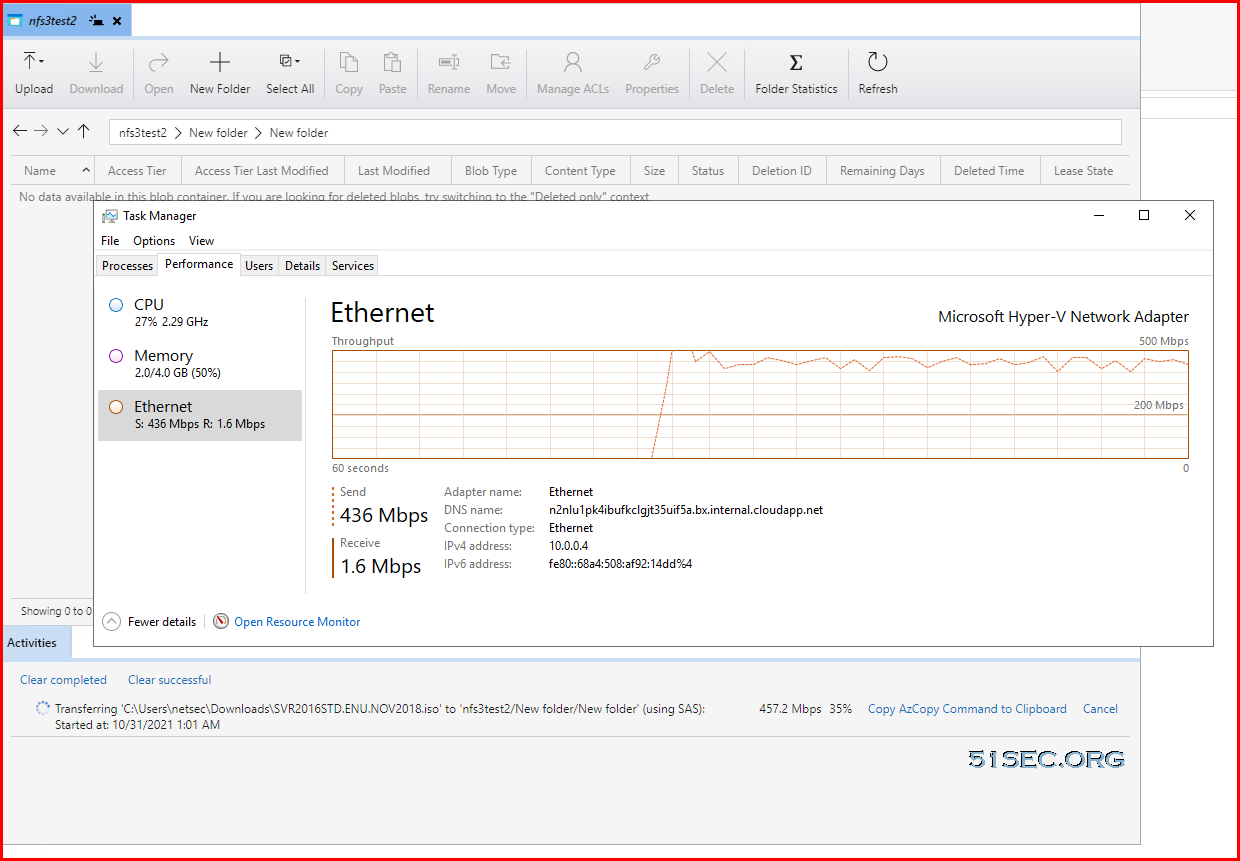
But when using Azure Storage Explorer, it can reach around 430Mbps.
via Blogger http://blog.51sec.org/2021/10/azure-blob-storage-operation-notes.html
October 30, 2021 at 09:22PM Cloud
This post is to show you the methods how to access your Azure Blob storages, especially under Windows.
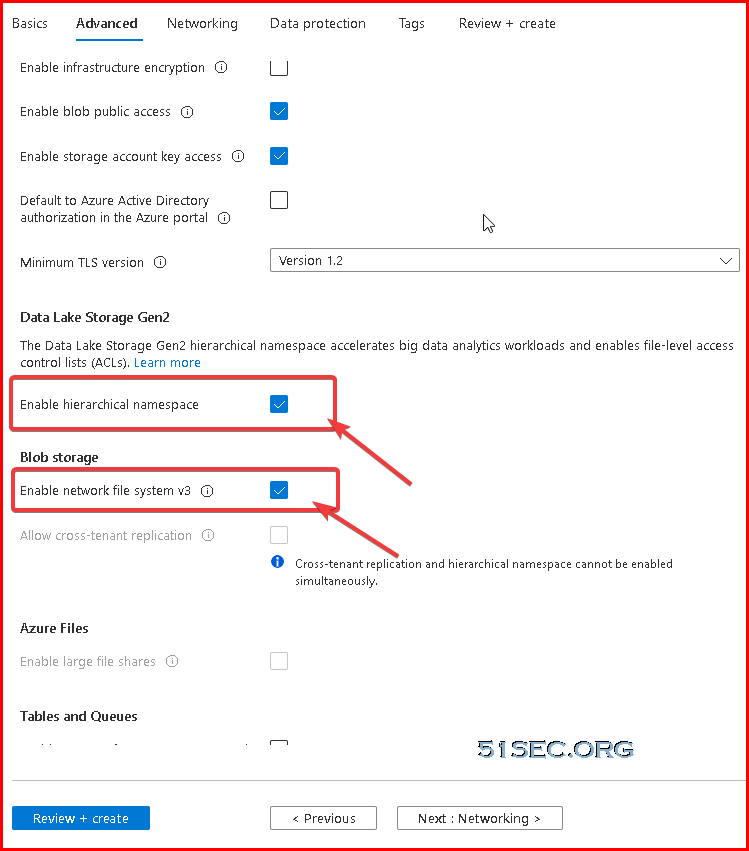
You will be able to use NFS 3.0 protocol to mount Blob storage container.
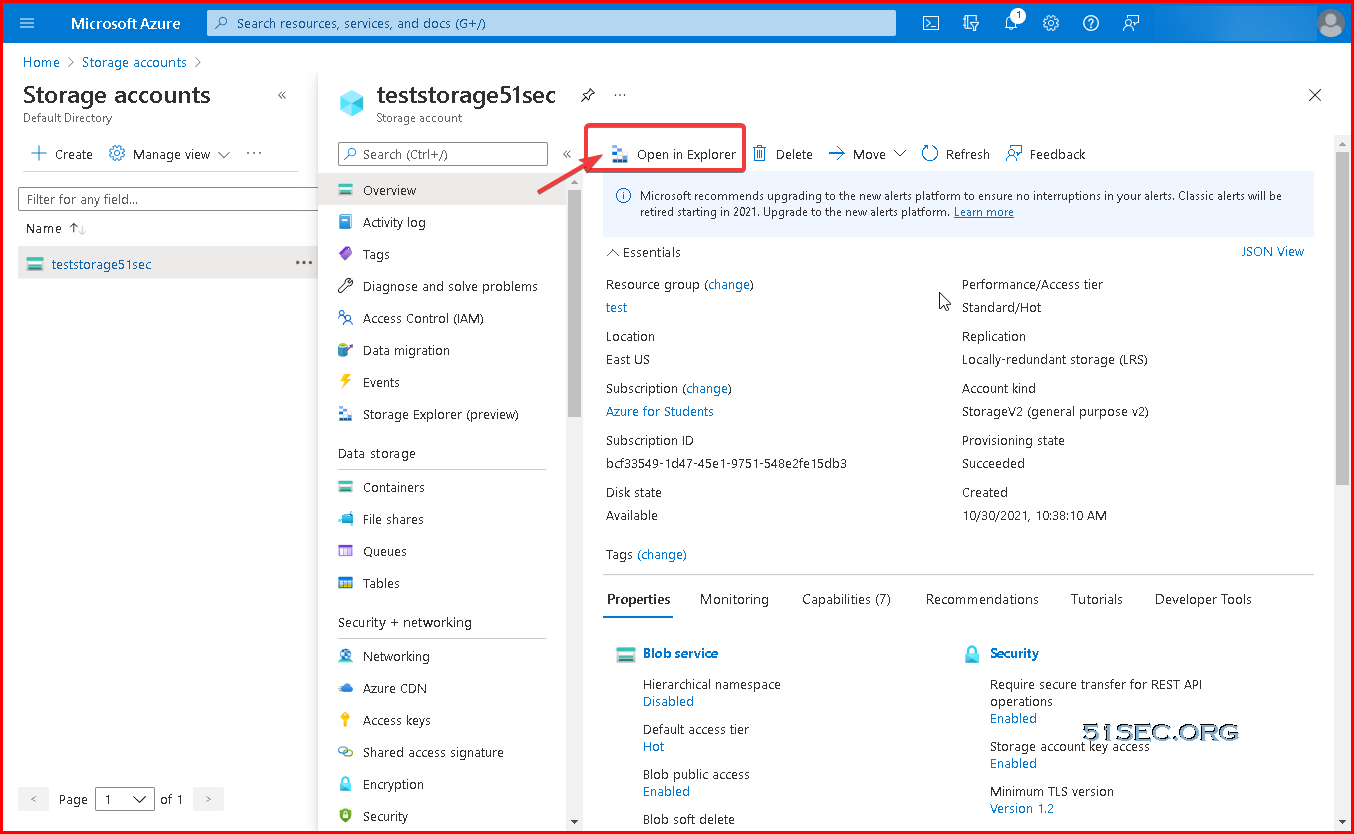
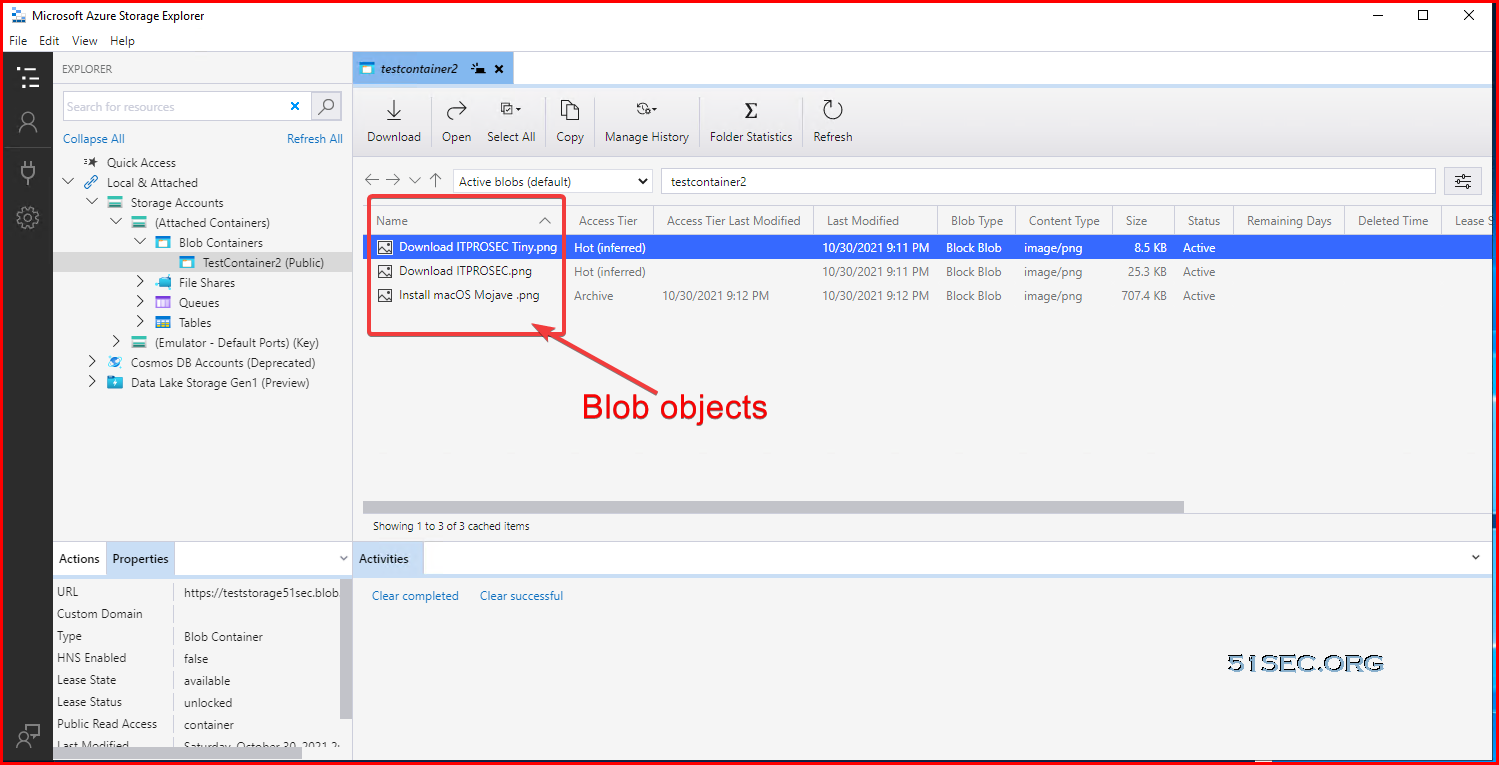
Azure Storage Explorer
Azure Portal, from storage accounts page, you can click "Open in Explorer":
Download link:https://azure.microsoft.com/en-in/features/storage-explorer/
More details can be found from this link: Manage Azure Blob Storage resources with Storage Explorer
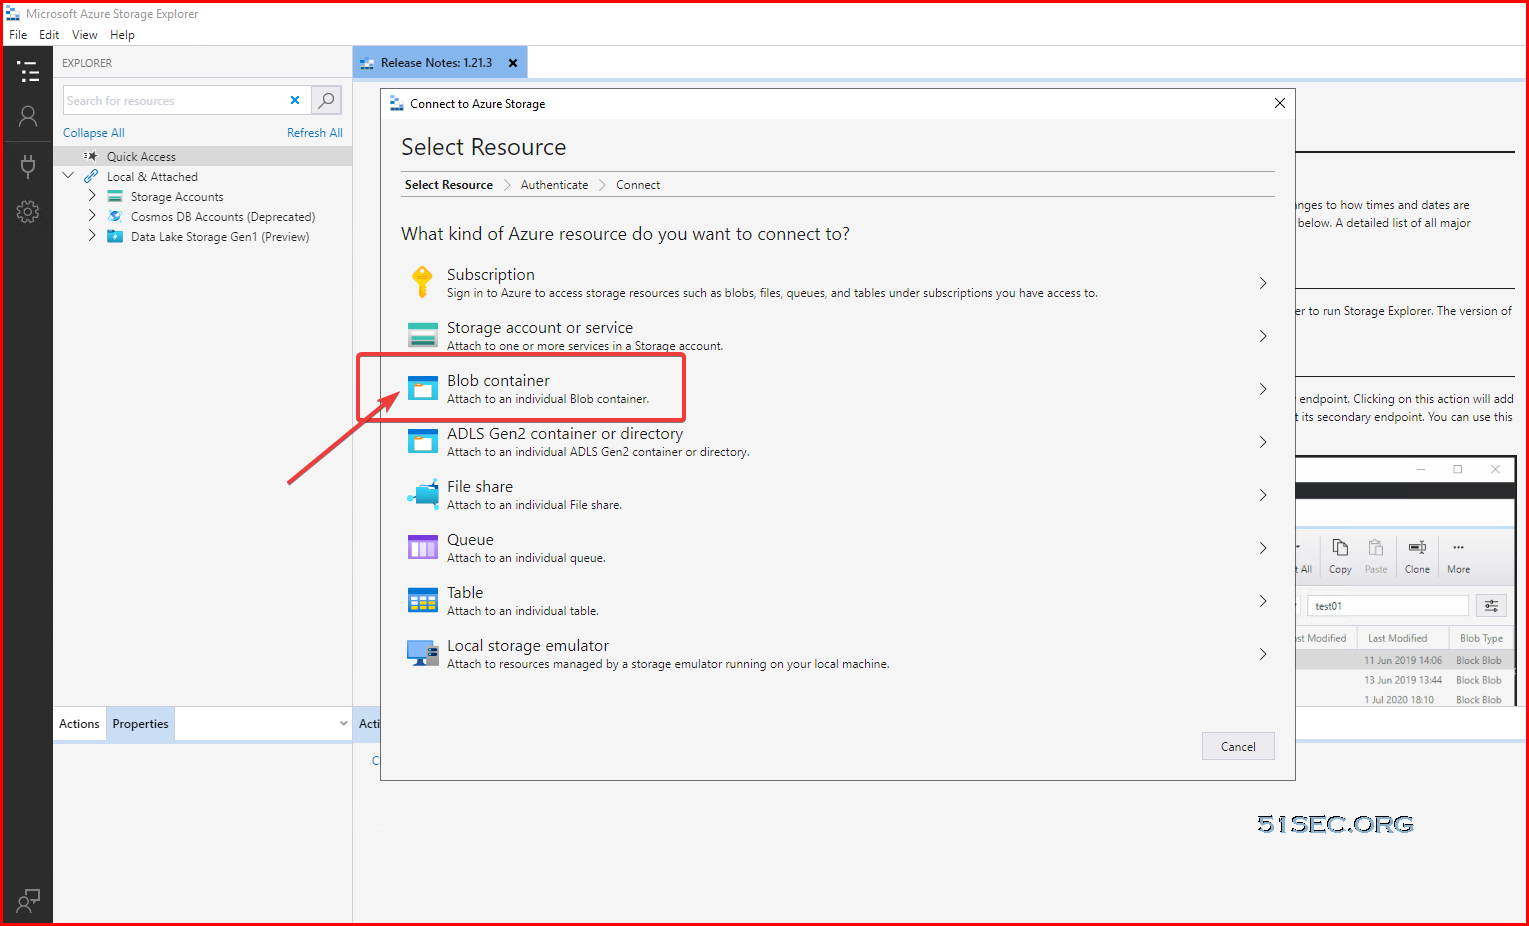
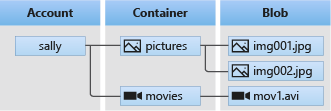
Connect to Blob container:
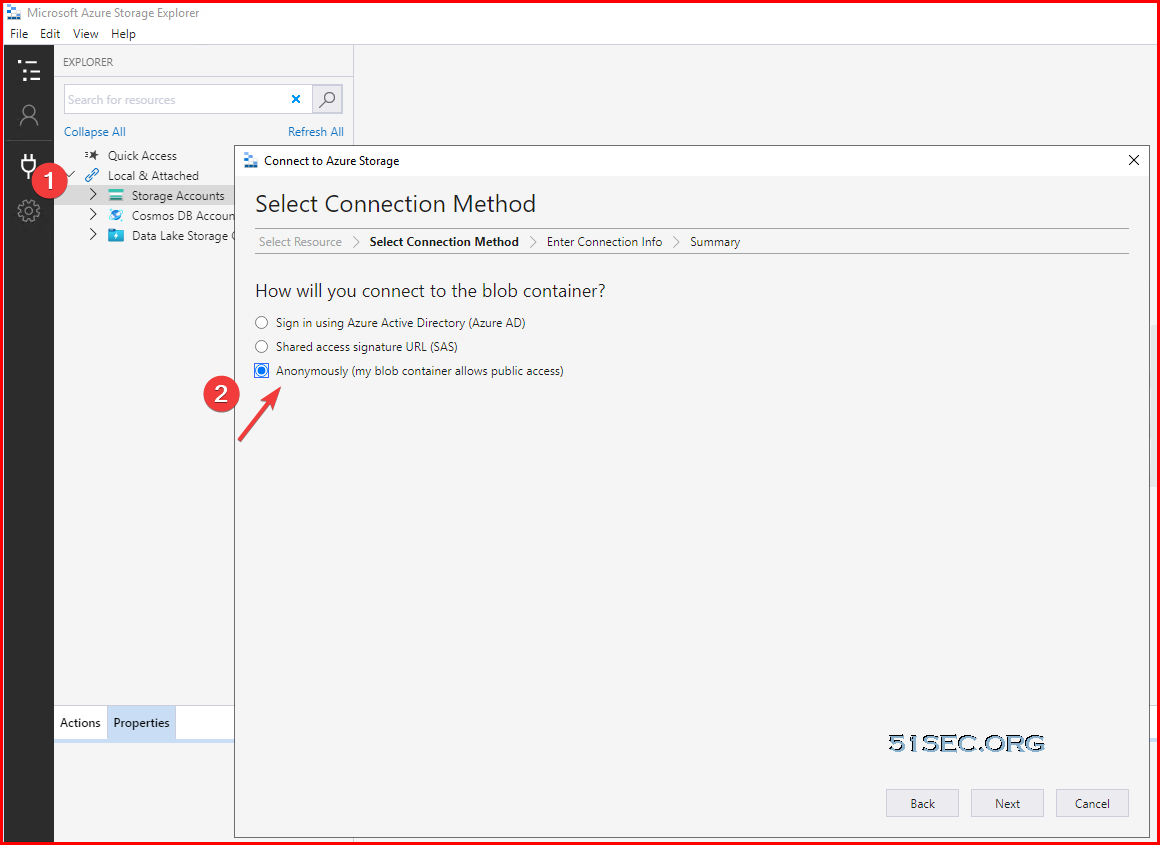
Anonymously access:
teststorage51sec is storage account name
testcontainer2 is container name
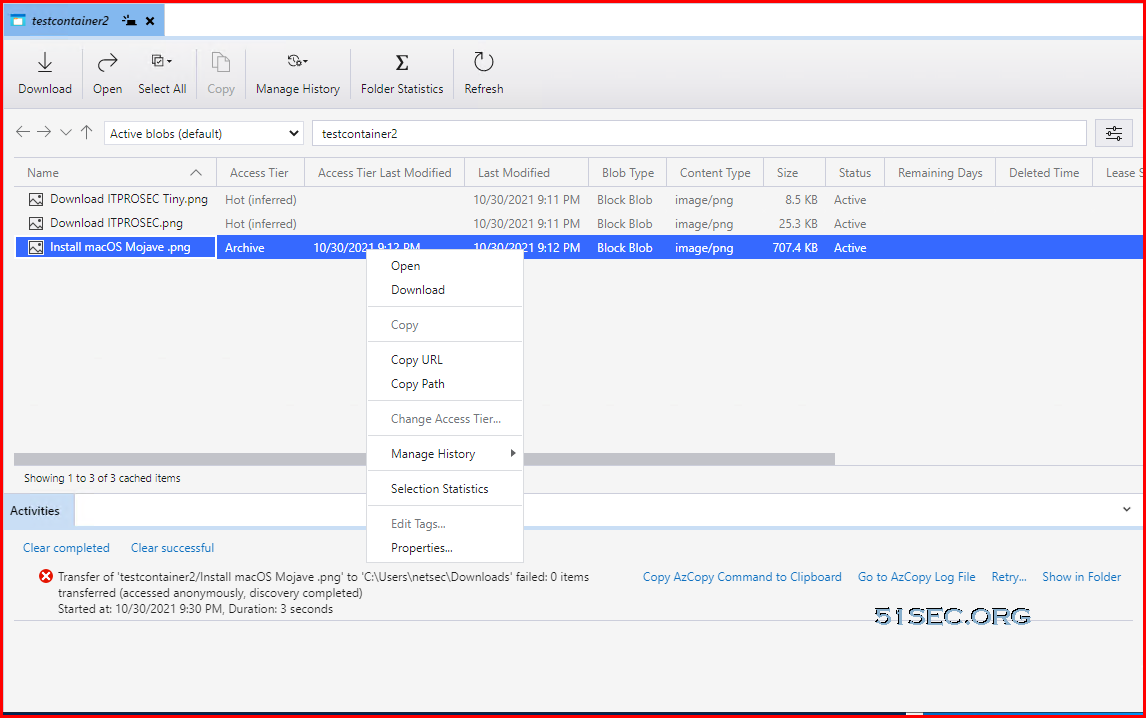
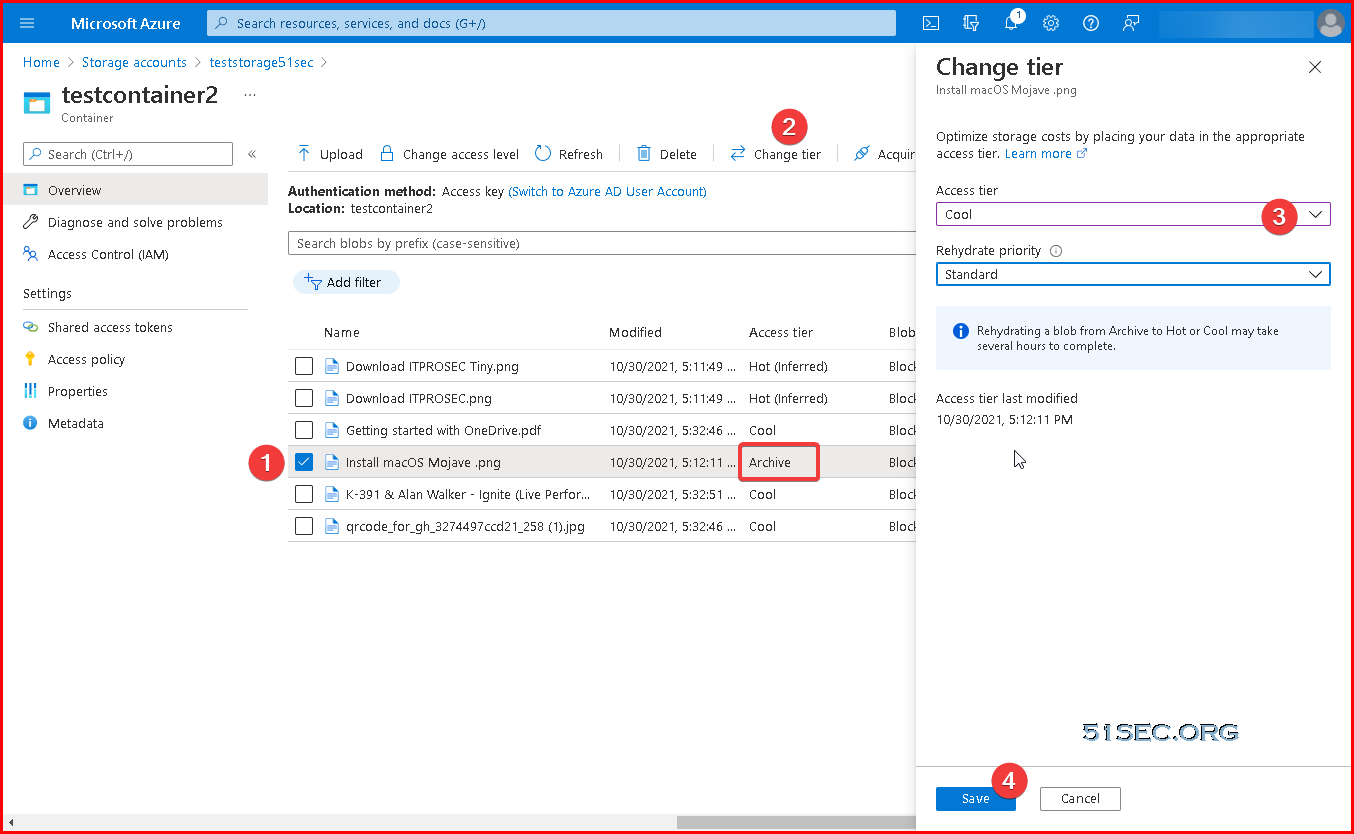
Change access layer for archive file. It is dehydrate process.
Download an Archived file will be failed, but hot/cool will be ok. Cool download has no delay based on testing.
You can choose to upload to a new folder to create a folder under Blob container when uploading files. You also can choose multiple files to upload at one time.
Access Blob Storage Using Linux
References: Mount Blob storage by using the Network File System (NFS) 3.0 protocolMounting on Linux is simple, but you’ll need to have an NFS client install first. Some distros have this automatically installed, but others will need to install it.
Once it’s installed, create a mountpoint with mkdir. You may need sudo if you aren’t a root user or don’t have permissions.
mkdir /mnt/mystuff
After creating the mountpoint, mount the Storage Account with the mount command.
mount -o sec=sys,vers=3,nolock,proto=tcp testnfs3sec.blob.core.windows.net:/testnfs3sec/nfs3test /mnt/mystuff
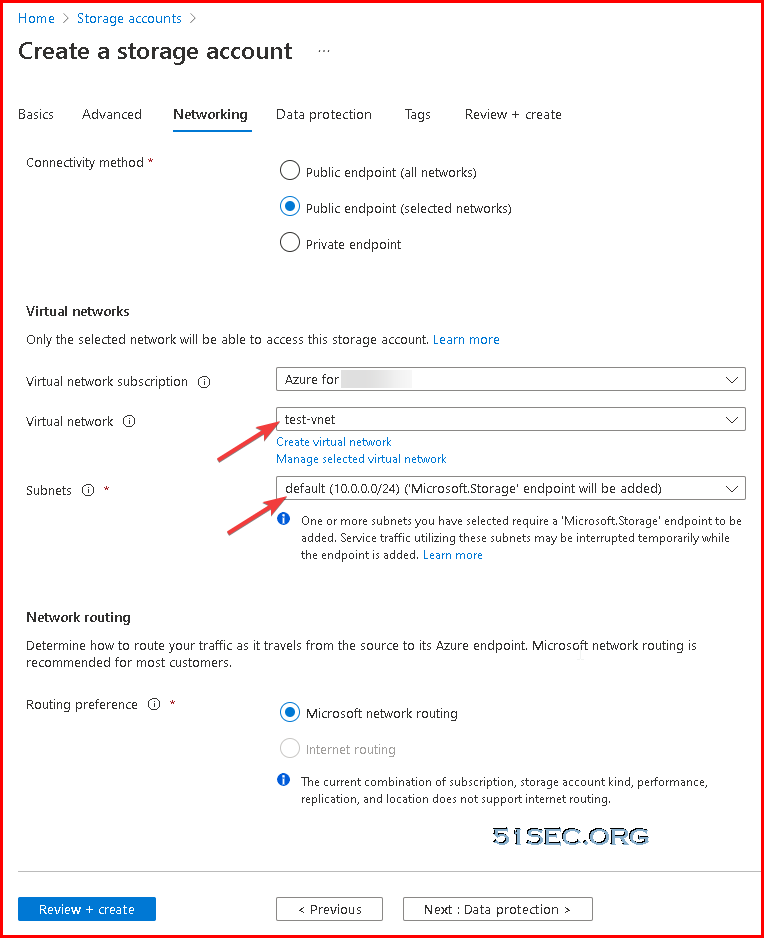
Access Blob Storage in Windows
Mounting Blob Storage using NFS 3.0
Reference link: https://hovermind.com/azure-virtual-machine/mounting-blob-storage.html#points-to-be-noted
Enable cloud shell (https://shell.azure.com.) will cause a small charges since it will requires a storage account with a new resource group to store some information.
Requesting a Cloud Shell.Succeeded.
Connecting terminal...

Welcome to Azure Cloud Shell

Type "az" to use Azure CLI
Type "help" to learn about Cloud Shell


MOTD: Save files to $home/clouddrive for persistence across sessions

VERBOSE: Authenticating to Azure ...
VERBOSE: Building your Azure drive ...
PS /home/netsec>
PS /home/netsec> Register-AzProviderFeature -FeatureName AllowNFSV3 -ProviderNamespace Microsoft.Storage

FeatureName ProviderName      RegistrationState
----------- ------------      -----------------
AllowNFSV3  Microsoft.Storage Registering

PS /home/netsec>
PS /home/netsec> Register-AzResourceProvider -ProviderNamespace Microsoft.Storage

ProviderNamespace : Microsoft.Storage
RegistrationState : Registered
ResourceTypes     : {storageAccounts/encryptionScopes, deletedAccounts, locations/deletedAccounts, storageAccounts…}
Locations         : {East US, East US 2, West US, West Europe…}


PS /home/netsec>
Verify that NFS is registered
PS /home/netsec> Get-AzProviderFeature -ProviderNamespace Microsoft.Storage -FeatureName AllowNFSV3

FeatureName ProviderName      RegistrationState
----------- ------------      -----------------
AllowNFSV3  Microsoft.Storage Registering


PS /home/netsec>
On your VM, install client for NFS.
You will need to enable write access to the NFS share by creating two registry settings. You can do this by launching PowerShell and running the following two commands. Once this is done, you need to reboot or restart the NFS service. Failed to do this step, you will only be able to mount the NFS container, but not able to access it. It will show you error to say no permission.
New-ItemProperty -Path HKLM:\SOFTWARE\Microsoft\ClientForNFS\CurrentVersion\Default -Name AnonymousUid -PropertyType DWord -Value 0

New-ItemProperty -Path HKLM:\SOFTWARE\Microsoft\ClientForNFS\CurrentVersion\Default -Name AnonymousGid -PropertyType DWord -Value 0
Restart client VM.
C:\Users\netsec>mount -o nolock testnfs3sec.blob.core.windows.net:/testnfs3sec/nfs3test *
Z: is now successfully connected to testnfs3sec.blob.core.windows.net:/testnfs3sec/nfs3test

The command completed successfully.

C:\Users\netsec>
Performance:
The uploading speed is about 120Mbps from local to mounted NFS share.
But when using Azure Storage Explorer, it can reach around 430Mbps.
References
via Blogger http://blog.51sec.org/2021/10/azure-blob-storage-operation-notes.html
October 30, 2021 at 09:22PM Cloud


 RSS Feed
