Info Security Memo
  • Blog
  • Sitemap
    • Categories
  • Contact
  • About
  • Resources
  • Tools
  • 51sec.org

Build Confidence

Focusing on Information Security 

Info Security Notes

Install and RDP Access Ubuntu Desktop in Oracle ARM Server with Troubleshooting

1/29/2022

0 Comments

 
Oracle Cloud provides free ARM server to use, which we can install Ubuntu Desktop and xRDP, then you can RDP into it. Unfortunately, it is not that straightforward. There are some special settings need to adjusted to make it working. In this video, you will see all steps to show you how to do this. Steps: 1. Log into Oracle Cloud and Create a ARM based Ubuntu instance 2. System update and add a new user for Desktop log in 3. Install Desktop 3.1 apt install ubuntu-desktop 3.2 apt install xrdp 4. Verify port 3389 status and modify xrdp configuration 5. Troubleshooting connectivity issue and disable filewall to fix the issue Related Post; ✍,https://blog.51sec.org/2022/01/install-xrdp-with-ubuntu-desktop-on.html Related Videos: ?Oracle Cloud Account Sign Up and Create a New Computing Instance - https://youtu.be/ZYvkJLoIhjY ?Benchmark Oracle Cloud Free Tier VM (1/8 OCPU and 1GB memory) - https://youtu.be/qHsedxUrvYE ?Get Two Free and Permanent VPS from Oracle Cloud Platform - https://youtu.be/E9dHA3NBbN8 ?Oracle Cloud Free ARM Compute Instance (4 oCPUs and 24GB RAM) - https://youtu.be/FbihlMBNuro ?Create VNC Console Connection for Oracle Cloud Instances - https://youtu.be/JZlp9Xfg980 ?Enable IPv6 for Oracle Cloud Infrastructure and Assign it to CentOS Instance - https://youtu.be/yxm3Bn7uHyw ?DD Win2022 EN to Oracle Cloud Free Tier VM in 30 Minutes - https://youtu.be/Y-WN258JrHQ ?Install and RDP Access Ubuntu Desktop in Oracle ARM Server with Troubleshooting - https://youtu.be/C0nxOZBo6Dw ==================================================================== If you found this video has some useful information✍, please give me a thumb up ✅ and subscribe this channel ?to get more updates?: ⚡https://www.youtube.com/c/Netsec?sub_confirmation=1 ⚡Resource Collection and Bookmarks: https://sites.51sec.org/ Learning and Sharing - 海内存知己,天涯若比邻 - ⚡https://51sec.org ?https://itprosec.com

Watch video on YouTube here: https://youtu.be/C0nxOZBo6Dw by Johnny Netsec
0 Comments

Thycotic Secret Server Report Script Collection

1/24/2022

0 Comments

 
Thycotic Secret Server Report Script Collection

 This post is to summarize the reports from TSS. 


Built-in Reports

Secret Server includes many pre-configured reports that you can run or use as templates for creating custom reports. Below are the reports shipped with current release of SS:

Note: https://docs.thycotic.com/ss/11.1.0/reports/built-in-reports/index.md


Activity

  • Custom Report Activity
  • Database Configuration Audit
  • Distributed Engine Activity (Professional)
  • Dual Control Audit
  • Event Subscription Activity (Professional)
  • Folder Activity
  • Internal Communication Changes
  • IP Address Range Audit
  • License Audit
  • Secret Activity
  • Secret Activity Today
  • Secret Activity Yesterday
  • Secret Template Activity (Professional)
  • Session Recording Errors
  • Unlimited Administrator Behavior
  • Users Activity

Discovery Scan

Note: These are available in Professional edition. In prior versions they are available only in Enterprise Plus.

  • Discovery Scan Status
  • What computers in Active Directory no longer exist?
  • What computers have been successfully scanned?
  • What computers that exist have not been successfully scanned?
  • What Secrets failed to import by Discovery?
  • What Secrets are pending import by Discovery?

Folders

  • What folders can a user see?
  • What folders can all users see?
  • What folder permissions exist?
  • What folder permissions exist for groups?

Groups

  • Group Membership
  • Group Membership By Group

Legacy Reports

  • Secret Server Usage
  • Secret Expiration Health
  • Secret Template Distribution
  • Top Ten Viewers (Professional)

Password Compliance

  • What Secrets Do Not Meet Password Requirements?
  • Secret Password Compliance Statuses

Report Schedules

Report Schedules (Professional)

Roles and Permissions

  • What role permissions does a user have?
  • What role assignments exist?
  • What role permission assignments exist?

Secrets

  • Secret Count per Site
  • Secret Permissions Mismatch
  • What file types have been uploaded to Secrets?
  • What file types have been uploaded to Secrets? (Pie Chart)
  • What Hooks and Dependencies use a script? (Enterprise Plus/Premium add-on)
  • What Secret permissions exist for a group?
  • What Secret permissions exist for a user?
  • What Secret permissions exist?
  • What Secrets are expiring this week?
  • What Secrets can a user see?
  • What Secrets can all users see?
  • What Secrets changed passwords in the last 90 days?
  • What Secrets Do Not Have Distributed Engines? (Professional)
  • What Secrets don’t require approval? (Enterprise/Premium)
  • What Secrets have been accessed by a user?
  • What Secrets have been accessed by an impersonated user?
  • What Secrets have been accessed?
  • What Secrets have Distributed Engines?
  • What Secrets have Expiration?
  • What Secrets have failed Heartbeat? (Professional)
  • What Secrets have not changed passwords for over 90 days?
  • What Secrets require approval? (Enterprise/Premium)
  • What Secrets require Comments?

Secret Policy

  • What Folders have Policies Assigned?
  • What Secrets have different Policies than their folders?
  • What Secrets have policies assigned?

Users

  • Failed login attempts
  • Who hasn’t logged in within the last 90 days?
  • What users have had an admin reset their password?
  • Secret Template Permission by User

Note: You can find additional reports in the Custom Report Gallery.


Built-in Security Hardening Reports

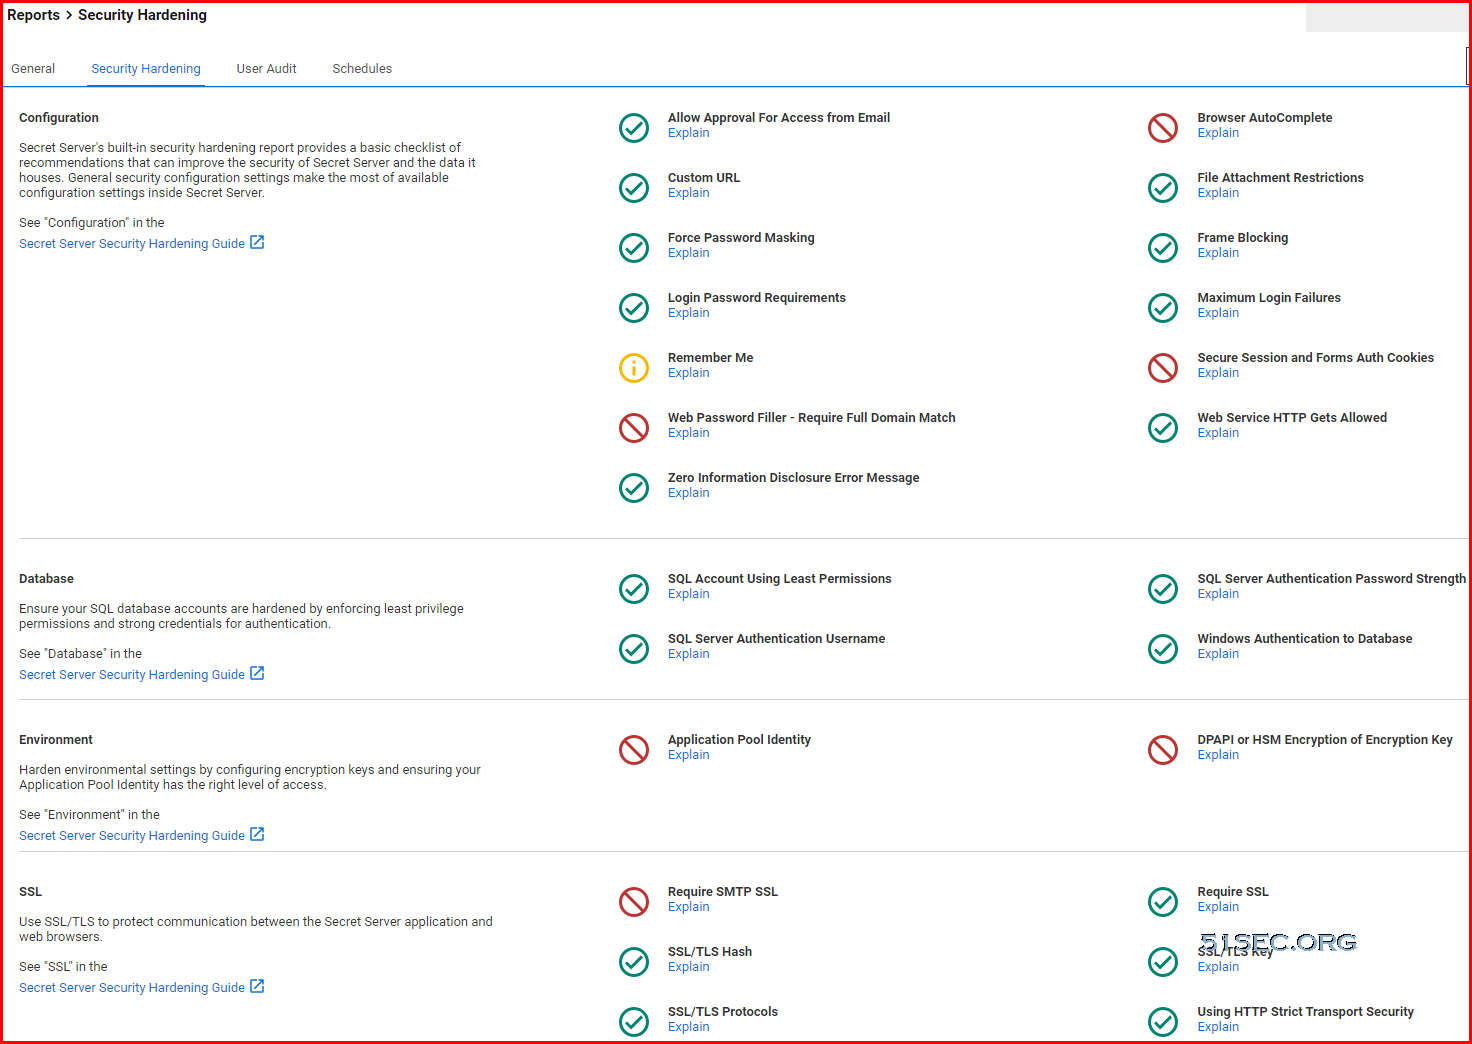
The Security Hardening Report checks aspects of SS to ensure security best practices are being implemented. While SS runs with all the items failing, administrators should be aware of possible security issues within an installation. For details on this, see Reports Security Hardening Tab.


Local Account Discovery Report

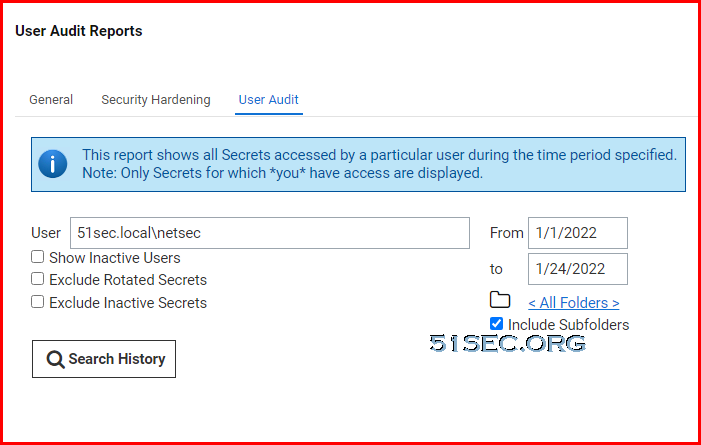
The User Audit Report shows all secrets accessed by a user during a specified period.


Custom Report Download

31 Custom report available for downloading: https://my.thycotic.com/products_secretserver_customreportgallery.html

Name Description Download Published Uploaded By
Which users have accessed Secrets that they did not create? Shows a log of all actions done to Secrets by users who did not create the secret. This report is useful if you expect most users to be primarily using their own Secrets. 237 7/7/2010 David A
Which Secrets are expired? Shows all Secrets that have expired. This is useful for showing which passwords should be changed. 255 7/7/2010 David A
Which Secrets will expire by a certain date? Shows which Secrets will expire by a given date. This is useful for finding out which Secrets will soon expire. 104 7/7/2010 David A
Which Secrets expire in a certain date range? This is useful for finding out which Secrets will expire in a certain date range in the future. 65 7/7/2010 David A
Which Secrets are out of sync? Shows which Secrets have the incorrect password stored in Secret Server. 170 7/7/2010 David A
Which users have two factor authentication enabled? Shows which users have two factor enabled and what form of two factor they are using. This is useful for security hardening purposes. 348 7/7/2010 David A
Which remote password changing secrets will never expire? Shows all remote password changing secrets that will never expire. This is useful for assessing vulnerability on network passwords that may never change. 73 7/7/2010 David A
Which remote password changing secrets are set to expire but do not have autochange enabled? Shows the secrets that can have their passwords remotely changed, but are not set to change on expiration. 145 7/7/2010 David A
Which Secrets have been accessed by users who do not currently have view permissions on the Secret? Shows all Secrets that have been accessed in the past where the users currently do not have view permissions. This is useful for assessing vulnerabilities for passwords that should be changed. 140 7/7/2010 David A
Which secrets are DoubleLocked? Shows a list of all secrets that are DoubleLocked. This allows admins to see if they have forgotten to DoubleLock any sensitive secrets. 53 7/7/2010 David A
Which secrets have Check Out enabled? This report shows which Secrets have Check Out enabled. It also shows which Secrets are checked out. 124 7/7/2010 David A
Which Secrets Require Approval to Access? This report will indicate which Secrets require users to request access to view. 66 8/14/2014 Tucker
What Folders Does User Have Owner? Displays all folders the selected user has owner on. 112 7/29/2011 Tucker
What Folder Permissions Exists For Folders the User Has Owner? 135 7/29/2011 Tucker
Secret Activity by Owner Shows the Secret Activity for all Secrets where the selected user is an Owner. 177 9/20/2011 Jacob
Password Compliance Distribution Shows the distribution of passwords that are compliant and non-compliant with their Password Requirements. 127 12/5/2011 Jonathan Cogley
Show Secrets with Duplicate Secret Names Shows active Secrets that have the same Secret Name (possible duplicates?). 321 12/6/2011 Jonathan Cogley
Event Subscription Log Shows all the events that each user has received 33 1/24/2012 Jonathan Cogley
Which folders are not inheriting permissions? 59 1/25/2012 Jonathan Cogley
Ran out of user licenses Shows a message when we have run out of user licenses in the last 7 days. 85 1/26/2012 Jonathan Cogley
What folders can groups see? Shows all the folders visible by group 100 1/27/2012 Jonathan Cogley
Which folders are not inheriting permissions? (showing permissions) Shows folders that are not inheriting permissions and who has access to them 71 1/30/2012 Jonathan Cogley
What Secrets can a user not see? Shows all the Secrets that a user cannot access. 77 1/30/2012 WebUploadUser
Show Owners of all Secrets Shows all the owners of Secrets in Secret Server. 262 2/7/2012 Jonathan Cogley
Secrets that do not inherit permissions Shows Secrets that have explicit permissions set on them 292 4/20/2012 Jonathan Cogley
What Secrets Have Dependencies Shows Secrets with Dependencies and the current status of those Dependencies. 102 7/31/2012 Ben Yoder
Secret Activity by Group Shows Secret activity by Group 138 8/14/2014 WebUploadUser
Secrets Exported Shows Secrets Exported through the administrator clear text export by date range. 653 10/4/2013 WebUploadUser
What errors occured for Computers in Active Directory that no longer exist? Shows computers that have not connected to Active Directory 3 months prior to the selected date and the most recent error message from the scan. 72 7/1/2014 Ben Yoder
Which Secrets does no one have access to? This can be useful in the case that you need to retrieve Secrets that currently have no permissions assigned because they were only accessed by a user who is now disabled 121 8/14/2014 WebUploadUser
Secrets in middle of password change This could tell you which secrets are possibly stuck in the middle of a password change 96 3/28/2017 WebUploadUser

Local Account Discovery Report


SELECT 
        c.ComputerName AS 'Host', 
        ca.AccountName AS 'Account_Name',
        ST.ScanItemTemplateName AS 'Account_Type',
        c.ComputerVersion AS 'Operating_System',
        CASE 
                WHEN ca.PasswordLastSet IS NULL then 'Never'
                ELSE CONVERT(nvarchar,ca.PasswordLastSet)
        END AS 'Password Last Set',
        CASE
                WHEN ca.ScanItemTemplateId =13 and ca.IsLocalAdministrator = 1 THEN 'Built-in Administrator'
                WHEN ca.ScanItemTemplateId =13 and ca.IsLocalAdministrator = 0 THEN 'Standard_User'
        END AS 'Account Privilege',
        CASE 
                WHEN ca.ScanItemTemplateId =13 and ca.HasLocalAdminRights = 1 THEN 'Yes'
                WHEN ca.ScanItemTemplateId =13 and ca.HasLocalAdminRights = 0 THEN 'No'
        END AS 'Has Local Admin Rights',
        ou.Path 'Organizational Unit'
FROM 
                tbComputer c
        JOIN    tbComputerAccount ca 

        ON 
                ca.ComputerID = c.ComputerId

        JOIN tbOrganizationUnit OU

        ON c.OrganizationUnitId = ou.OrganizationUnitId
        JOIN tbScanItemTemplate ST
        on ca.ScanItemTemplateId = ST.ScanItemTemplateId


Show All Secrets, Users, Folder Path and Last Access Date


Select distinct a.SecretId, SecretName, UserName, FolderPath, LastAccessedDate
from
(select SecretID, max(DateRecorded) as LastAccessedDate 
from tbAuditSecret
where Action like 'VIEW%'
group by SecretID) a
inner join tbSecret s on s.SecretID = a.SecretId
inner join tbFolder f on f.FolderID = s.FolderId
inner join tbAuditSecret au on au.SecretId = a.SecretId and LastAccessedDate = au.DateRecorded
inner join tbUser u on u.UserId = au.UserId
order by SecretId


Active Secret Sessions and Count


SET TRANSACTION ISOLATION LEVEL READ COMMITTED
                SELECT IsNull(f.FolderPath, 'No Folder') AS 'Folder Path', s.SecretId, SecretName, st.SecretTypeName AS [Secret Template], StartDate from tbSecretSession ss
INNER JOIN tbSecret s on s.SecretID = ss.SecretId
INNER JOIN tbSecretType st on s.SecretTypeID = st.SecretTypeID
LEFT JOIN tbFolder f on s.FolderID = f.FolderID
WHERE ss.Active = 1 and LaunchedSuccessfully = 1


SET TRANSACTION ISOLATION LEVEL READ COMMITTED
                SELECT count(1) as 'Session Count' from tbSecretSession ss
INNER JOIN tbSecret s on s.SecretID = ss.SecretId
WHERE ss.Active = 1 and LaunchedSuccessfully = 1


Service Accounts Discovery Report

a 

SELECT 
               CASE 
                              WHEN ds.DomainId = '1' THEN 'EDITSQLTOPUTDOMAINHERE' -- Adjust for your domains 
               END AS 'Domain', 
               c.ComputerName AS 'Host Name', 
               c.ComputerVersion AS 'Operating System', 
               cd.AccountName AS 'Account Name', 
               cd.DependencyName AS 'Dependency Name', 
               sdt.SecretDependencyTypeName AS 'Dependency Type', 
               c.LastPolledDate AS 'Last Scanned', 
               s.SecretName AS 'Secret Name' 
FROM 
               tbComputer c 
               JOIN tbComputerDependency cd ON cd.ComputerID = c.ComputerId 
               JOIN tbSecretDependencyType sdt ON sdt.SecretDependencyTypeId = cd.SecretDependencyTypeID 
               JOIN tbSecretDependencyTemplate sdtm ON cd.ScanItemTemplateId = sdtm.ScanItemTemplateId 
               AND cd.SecretDependencyTypeID = sdtm.SecretDependencyTypeId 
               JOIN tbDiscoverySource ds ON c.DiscoverySourceId = ds.DiscoverySourceId 
               LEFT OUTER JOIN tbSecret s ON s.SecretID = cd.SecretId 
Where 
               cd.AccountName like '%' + #CUSTOMTEXT + '%' 
               AND -- Custom filters to remove non-important tasks 
               cd.DependencyName NOT like 'Optimize Start Menu Cache Files%' 
               AND 
               cd.DependencyName NOT like 'User_Feed_Synchronization%' 
               AND 
               cd.DependencyName NOT like 'CreateExplorerShellUnelevatedTask' 
ORDER BY c.ComputerName asc


References

  • Built-in Reports


via Blogger http://blog.51sec.org/2022/01/thycotic-secret-server-report-script.html
January 24, 2022 at 10:54AM Thycotic
0 Comments

Install xRDP with Ubuntu Desktop on Oracle ARM VM

1/23/2022

0 Comments

 
Install xRDP with Ubuntu Desktop on Oracle ARM VM

Remote Desktop Protocol allows users to access remote systems desktop. The XRDP service provides you a graphical login to the remote machines using Microsoft RDP (​Remote Desktop Protocol). The XRDP also supports two-way clipboard transfer (text, bitmap, file), audio redirection, and drive redirection (mount local client drives on the remote machines).

XRDP is an easy-to-install and configurable service for Ubuntu systems. This post is going to show you the steps how you can get your Ubuntu desktop and xRDP installed on Oracle ARM based VM. 


System Update and Add a new user

update system repositories

apt update -y

optional: apt upgrade -y


add a new user netsec which later you can use it to log in

adduser netsec


Enable Password Log In  (Optional)

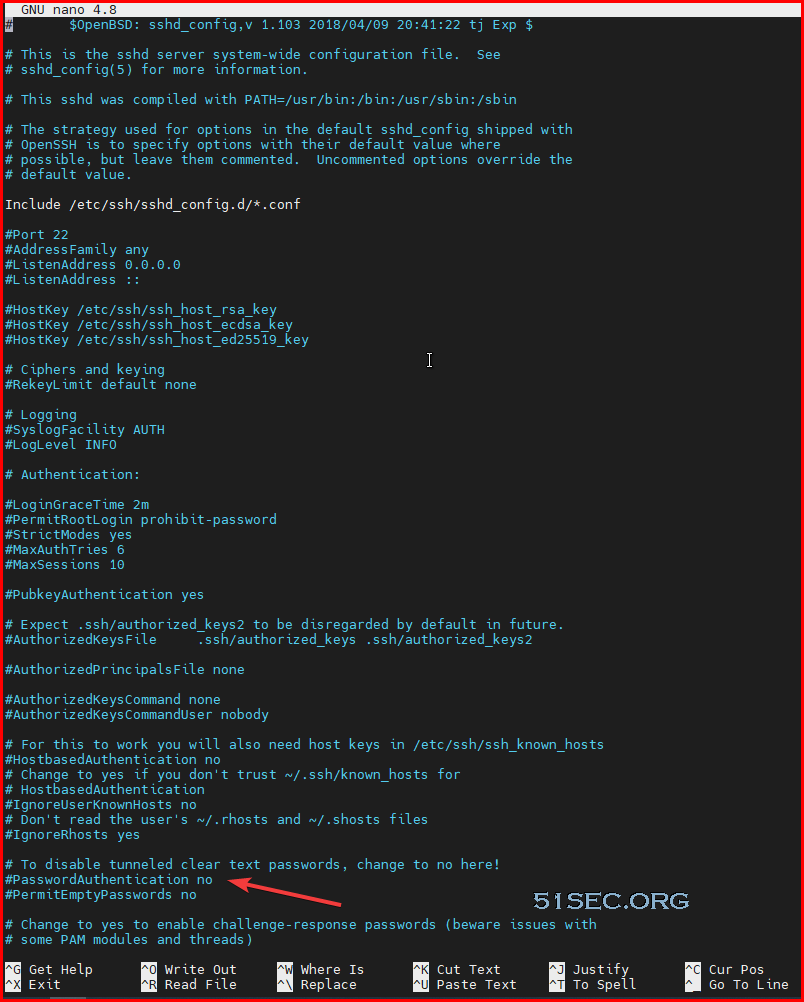
By default, Oracle vm is using certificate to log in and password login has been disabled. 

nano /etc/ssh/sshd_config

comment the line

#PasswordAuthentication no


Install Desktop 

There are various desktop environments available in Ubuntu repositories that you can choose. One option is to install Gnome, which is the default desktop environment in Ubuntu 20.04. Another option is to install Xfce . It is a fast, stable, and lightweight desktop environment, which makes it ideal for usage on a remote server.

Run one of the commands below to install the desktop environment of your choice.

  • Install Gnome:

    sudo apt updatesudo apt install ubuntu-desktop
    
  • Install Xfce:

    sudo apt updatesudo apt install xubuntu-desktop
    

Depending on your system, downloading and installing GUI packages will take some time.


Install and Configure xRDP

Xrdp is incuded in the default Ubuntu repositories. To install it, run:

sudo apt install xrdp 

Once the installation is complete, the Xrdp service will automatically start. You can verify it by typing:

sudo systemctl status xrdp


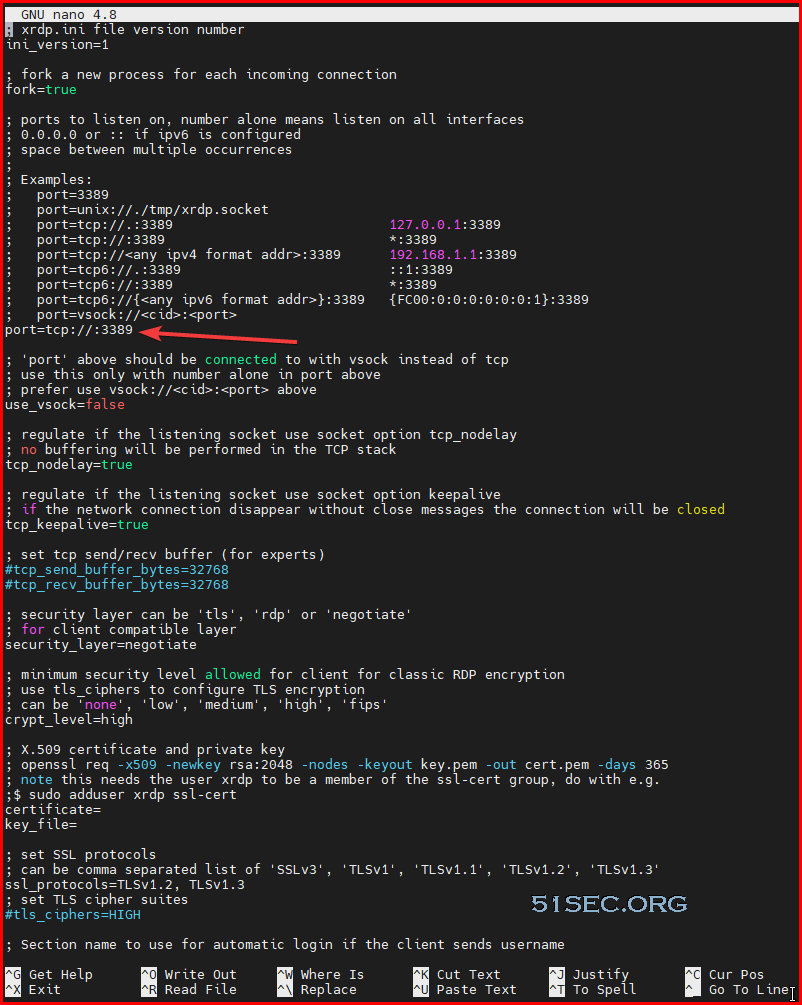
Enable 3389 port on IPv4 interface. By default , port=3389, which will cause 3389 port running on inet6 interface. You can verify port running status from following two commands

  • apt install net-tools
  • netstat -na | grep 3389

To change the configuration, edit xrdp.ini file using following command:
sudo nano /etc/xrdp/xrdp.ini

Reboot the service to take the configuration change into effect. 

  • systemctl restart xrdp 


Disable Built-in Firewall


If you are using Oracle's Ubuntu image, you will have connectivity issue to the port 3389 since built-in iptables will block the external connection. Testing from local will still work, but not from remote. 

Here is command to disable iptables. You might need to install netfilter-persitent using command first : "apt install netfilter-persistent -y"

sudo iptables -F
sudo netfilter-persistent save

Explanation:

  • iptables -F: Flush (remove all) iptables rules
  • netfilter-persistent save Save empty ruleset to disk so it 
Checking iptables rules using iptables -L or iptables --list command.

If the iptables ruleset is empty, it will look like this:

Default output is:

Chain INPUT (policy ACCEPT)
target     prot opt source               destination

Chain FORWARD (policy ACCEPT)
target     prot opt source               destination

Chain OUTPUT (policy ACCEPT)
target     prot opt source               destination


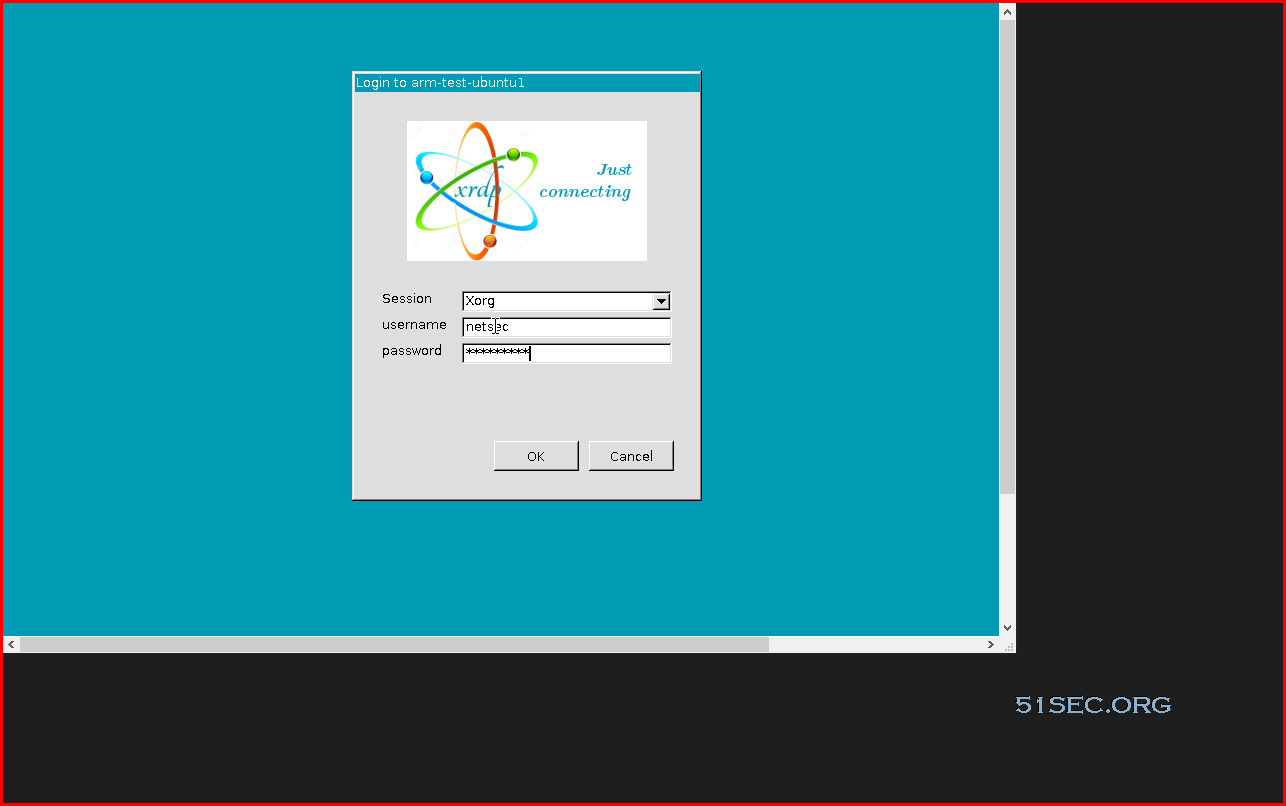
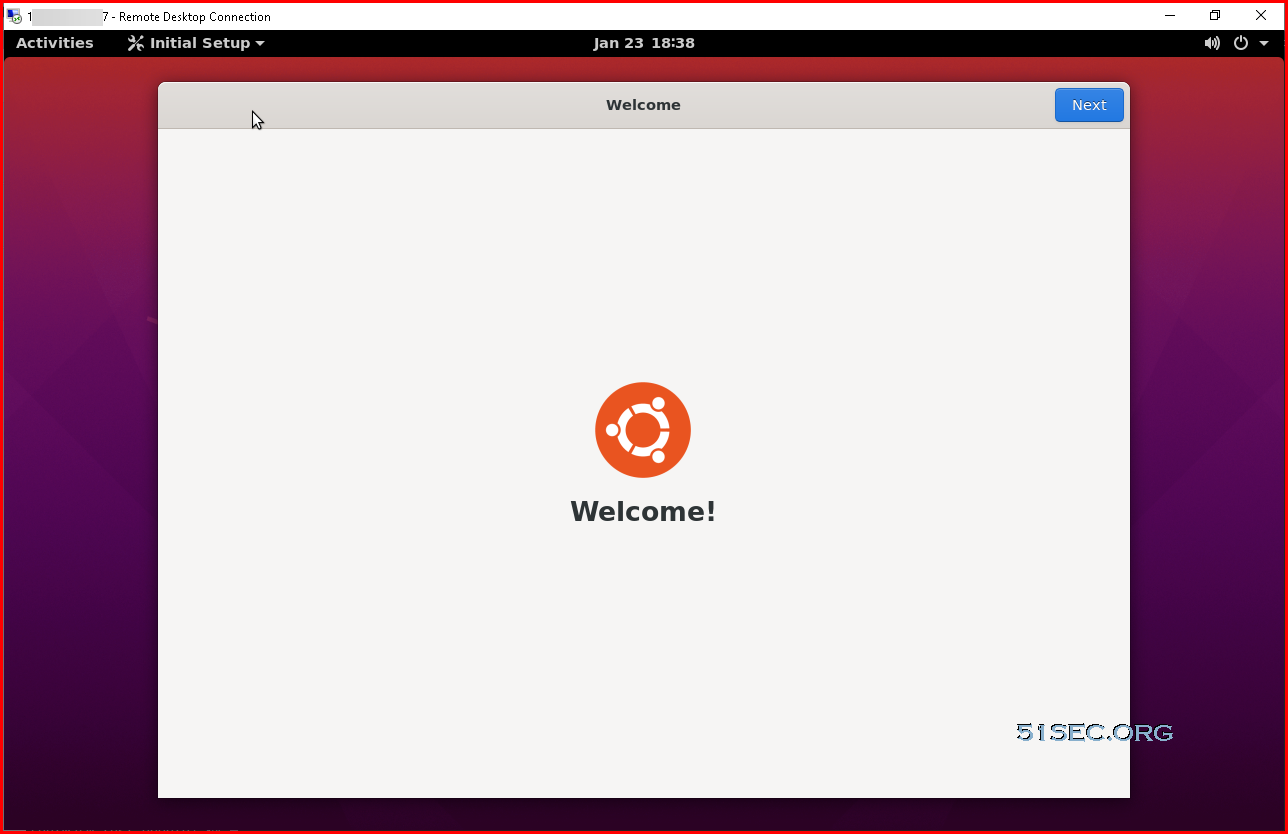
MSTSC (RDP Client) Log in


Issues

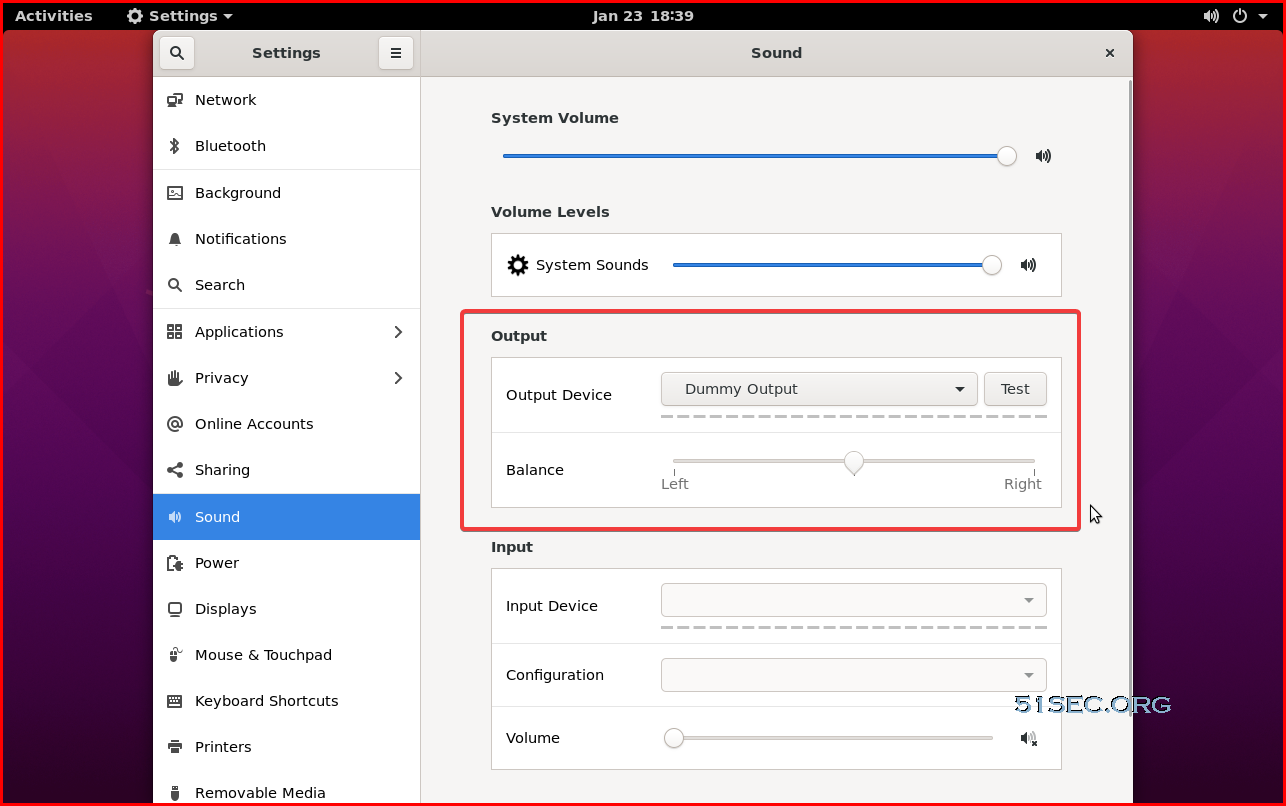
No sound


References

  • DD Original Ubuntu Image to Oracle Cloud ARM VM and Install RDP with Sound Forwarding Support
  • 甲骨文ARM Gnome桌面配置
  • How to disable instance firewall on Ubuntu on Oracle Cloud


via Blogger http://blog.51sec.org/2022/01/install-xrdp-with-ubuntu-desktop-on.html
January 23, 2022 at 04:21PM Cloud
0 Comments

Step by Step Guide to Deploy Fortigate VM with Trial License in Azure

1/21/2022

0 Comments

 
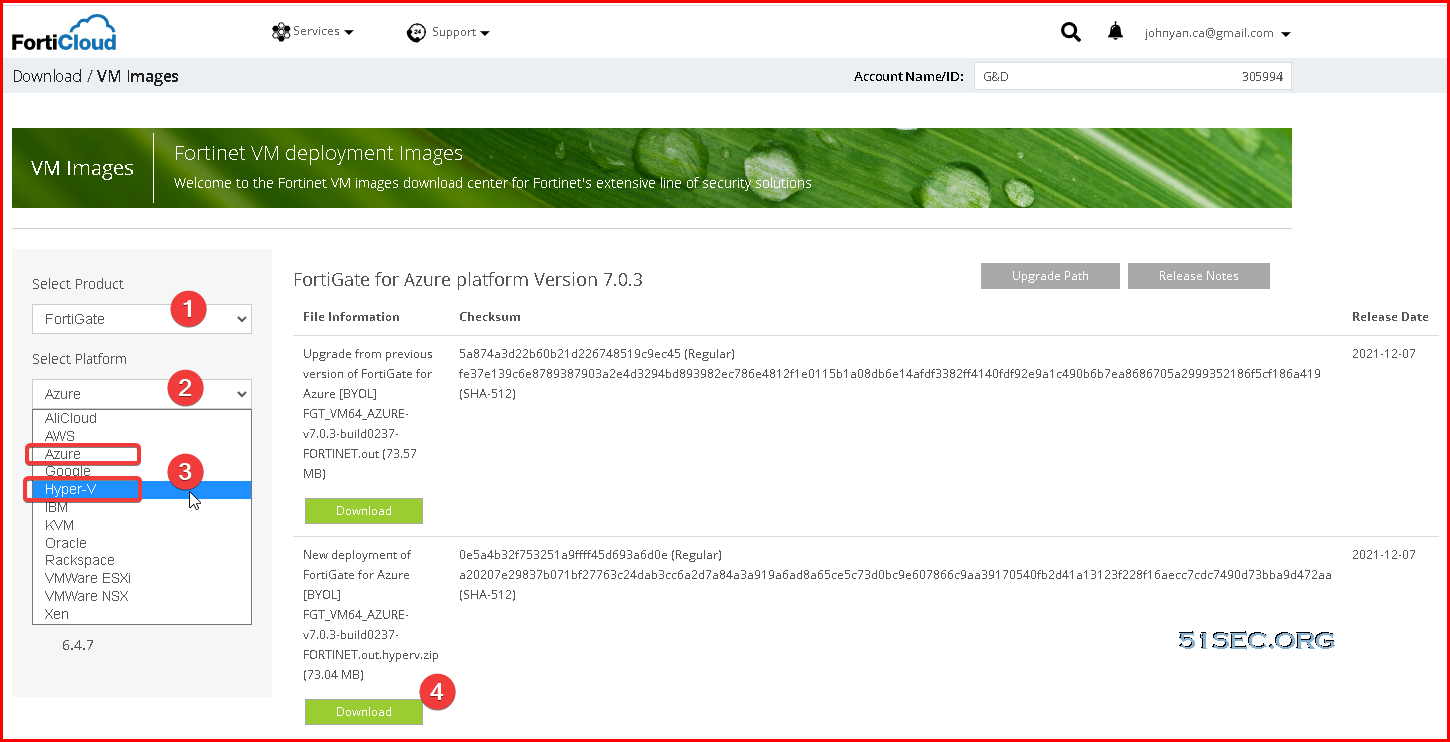
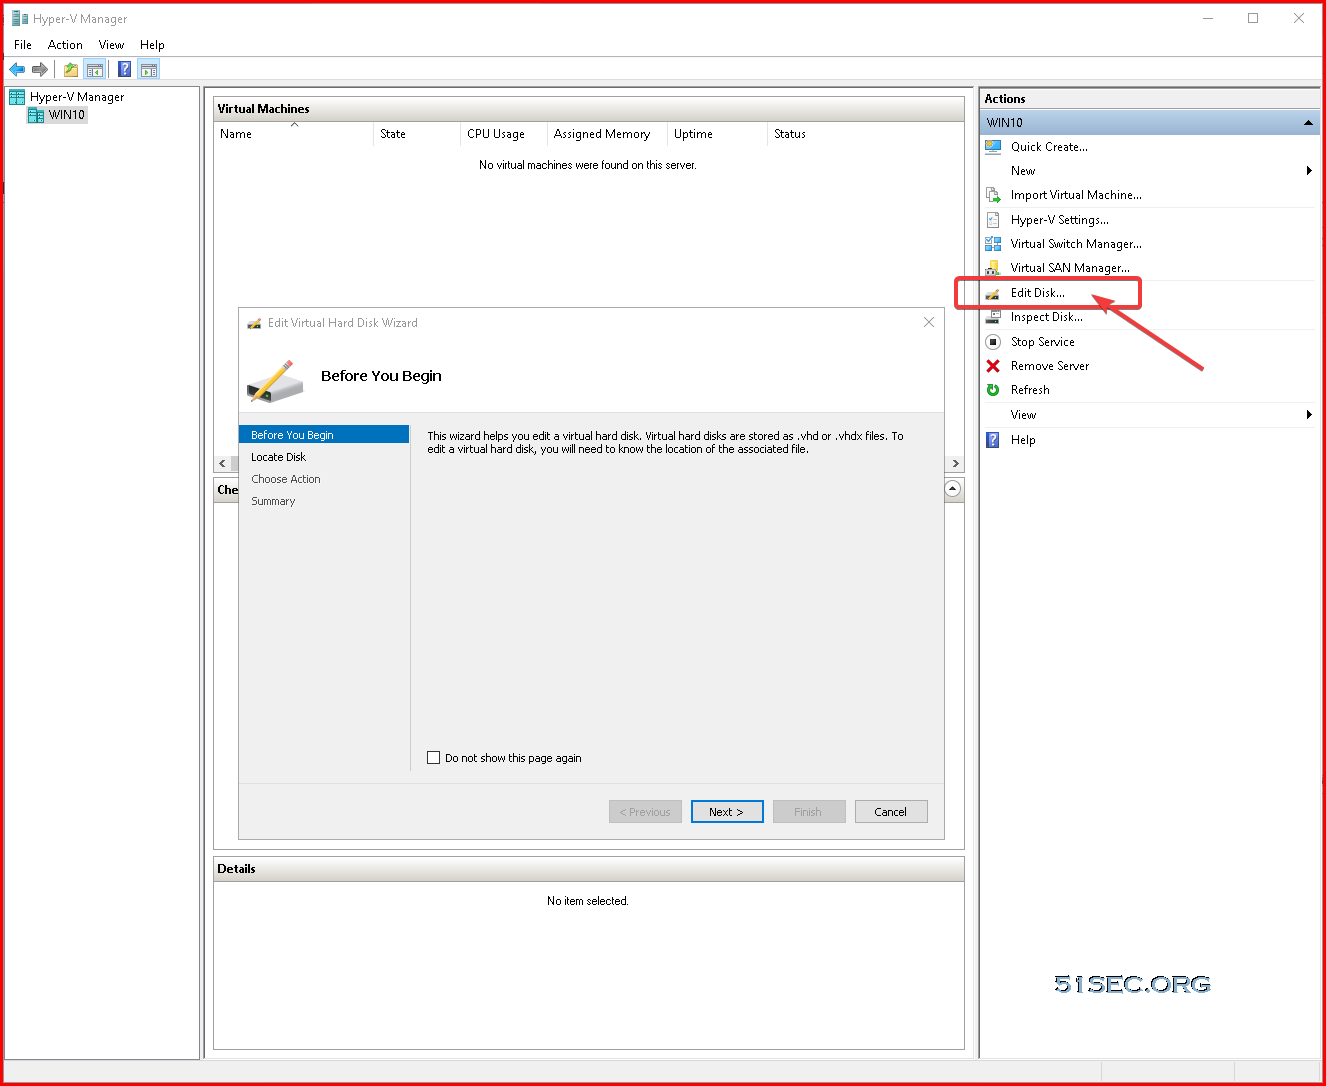
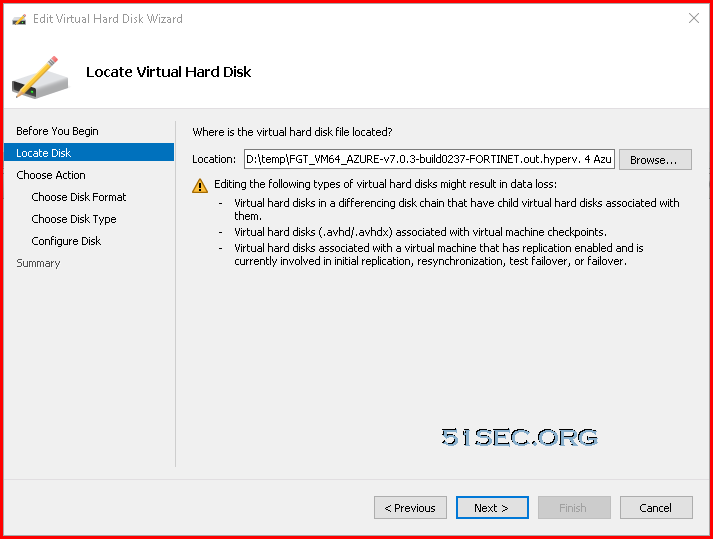
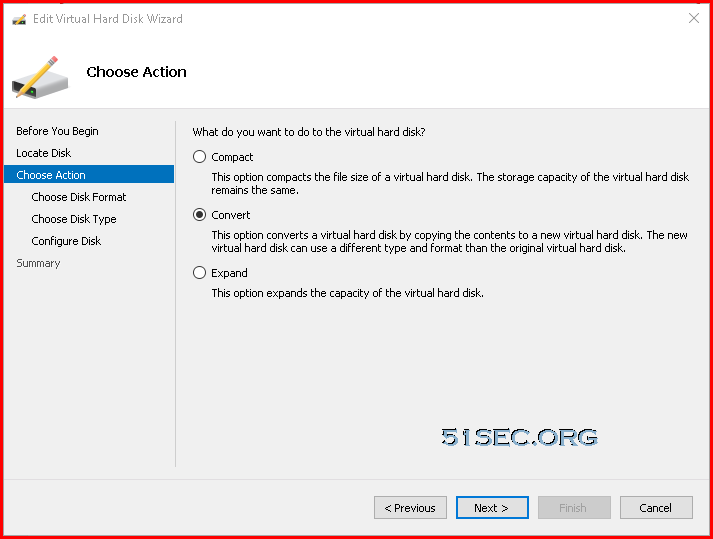
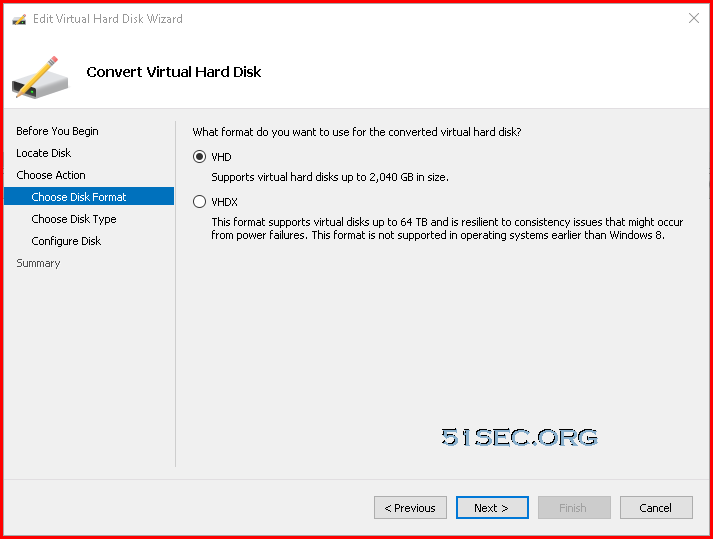
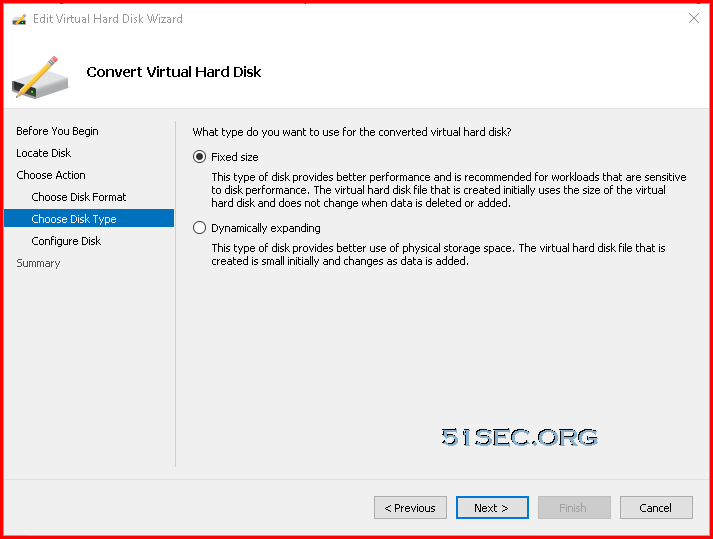
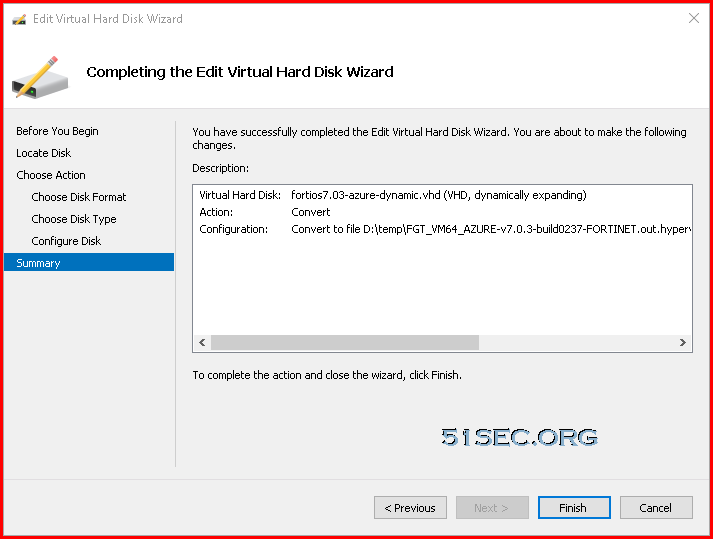
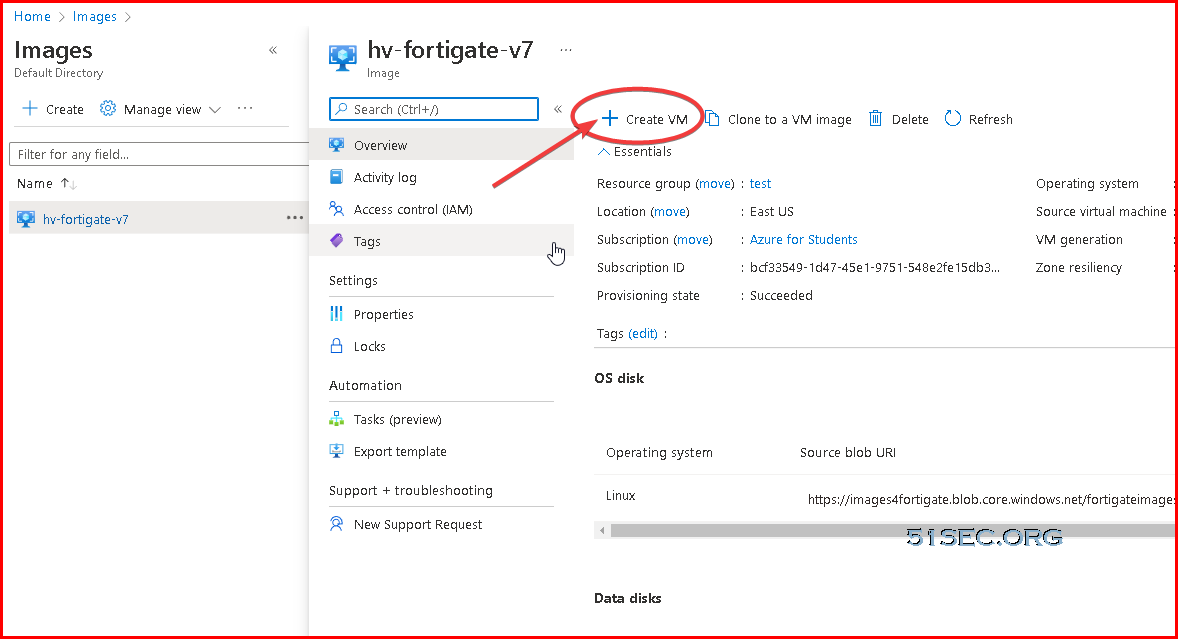
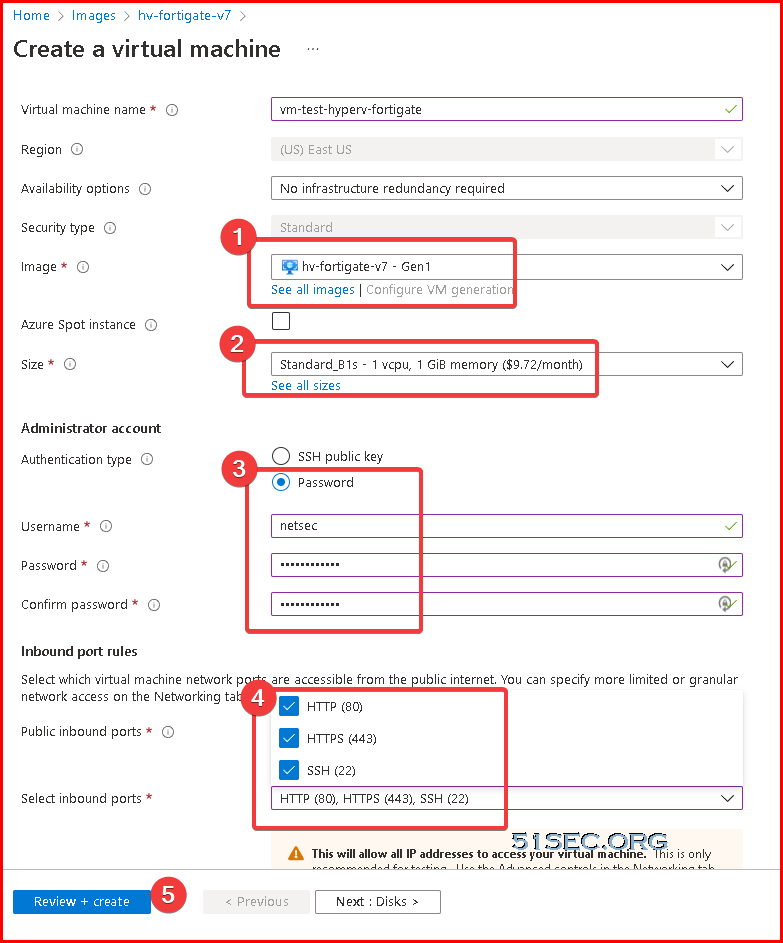
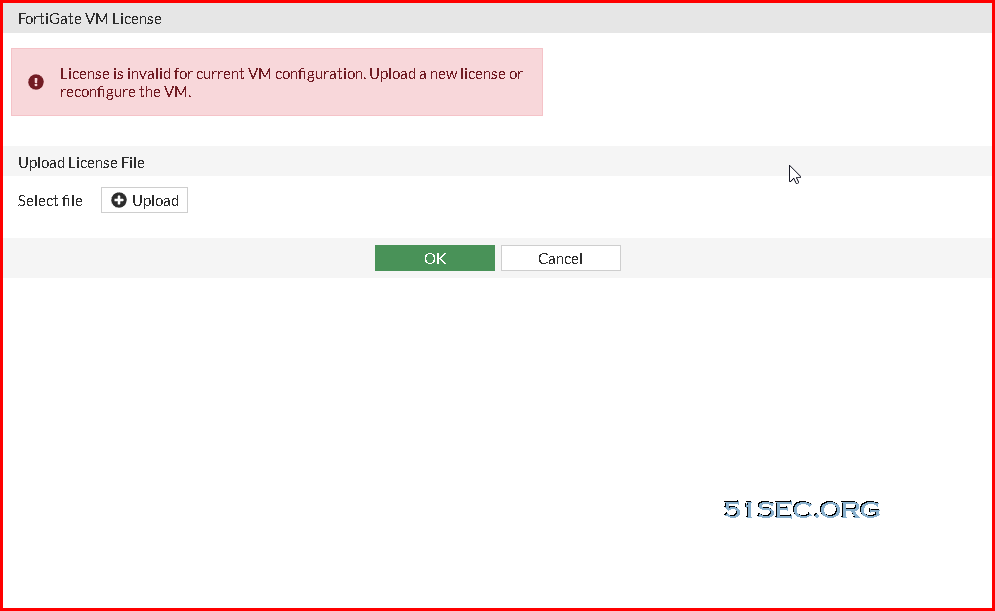
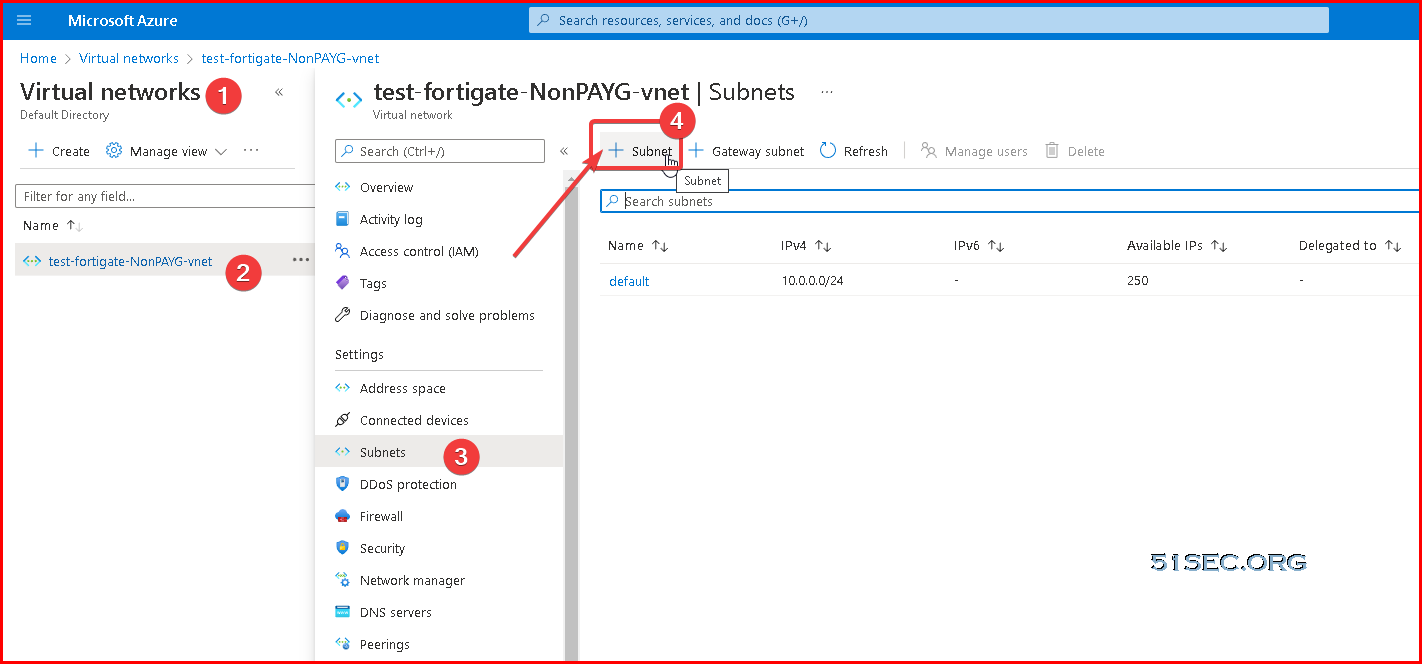
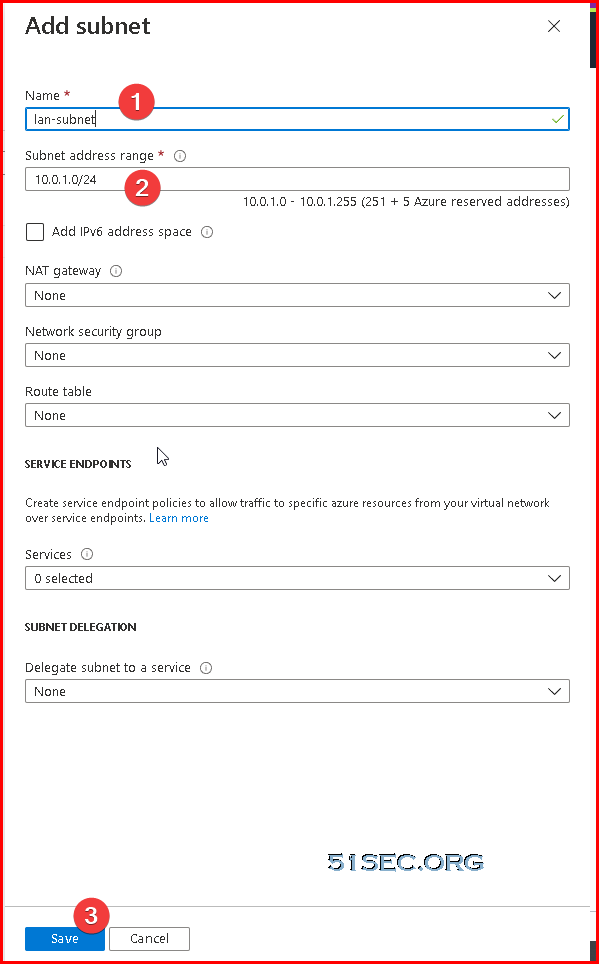
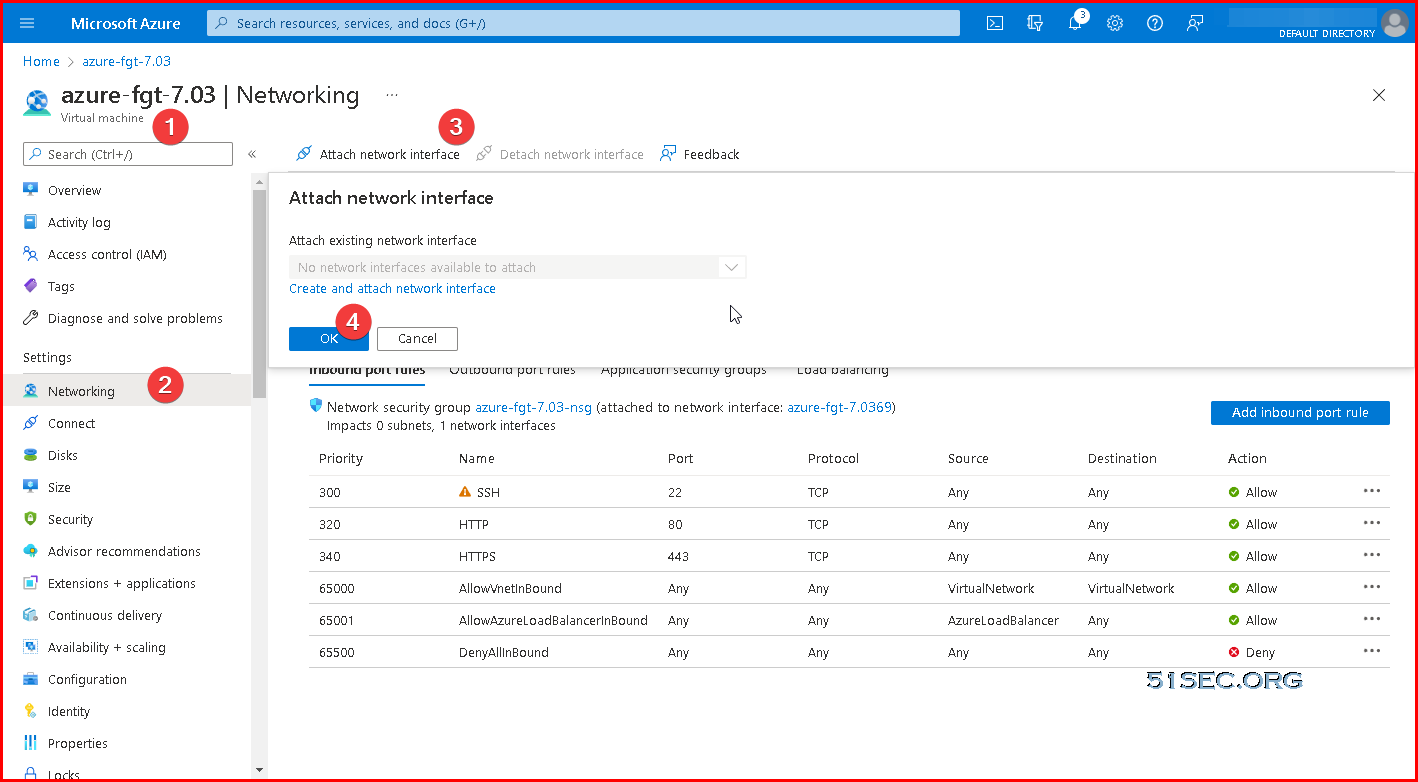
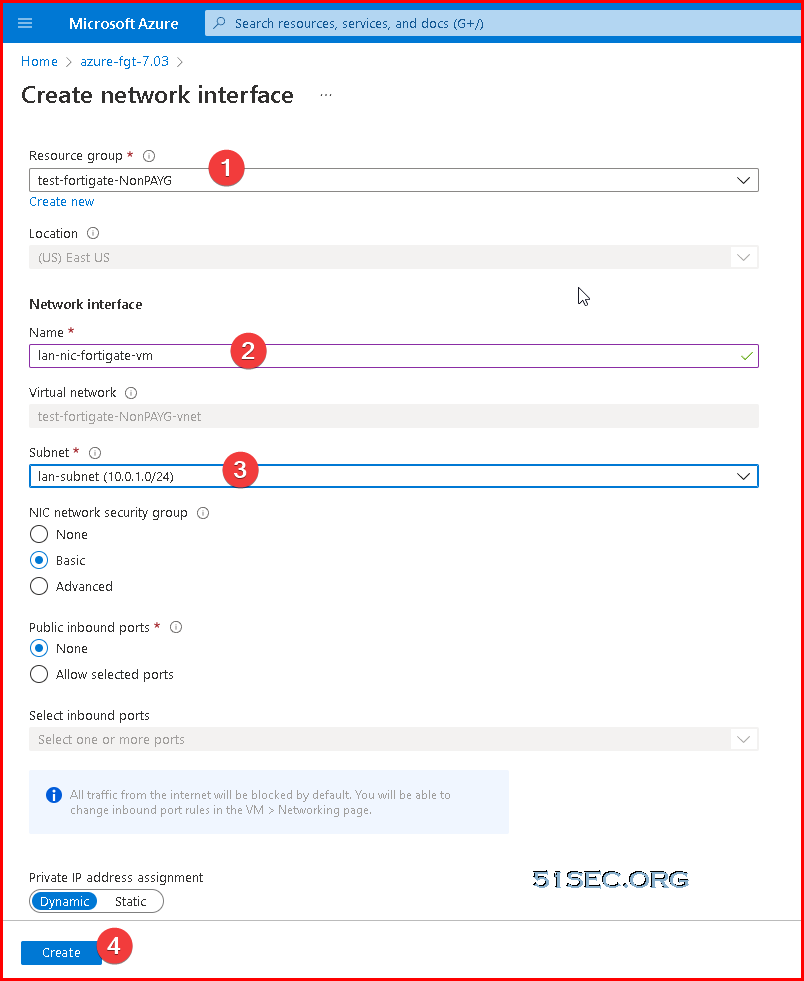
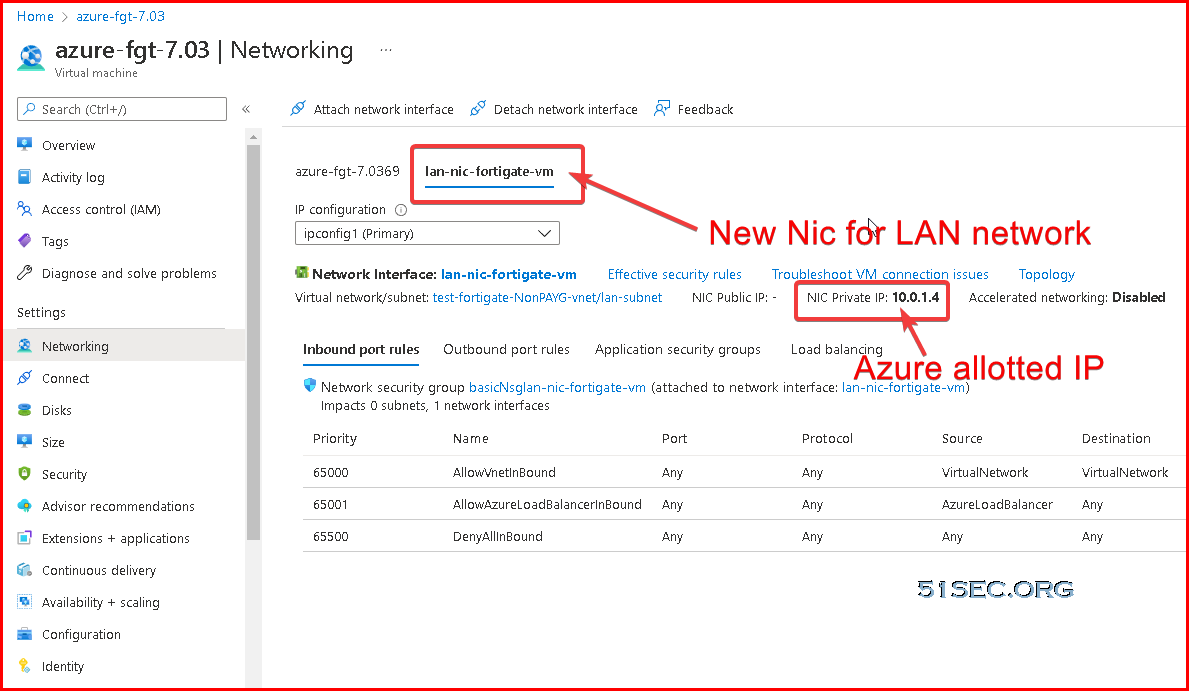
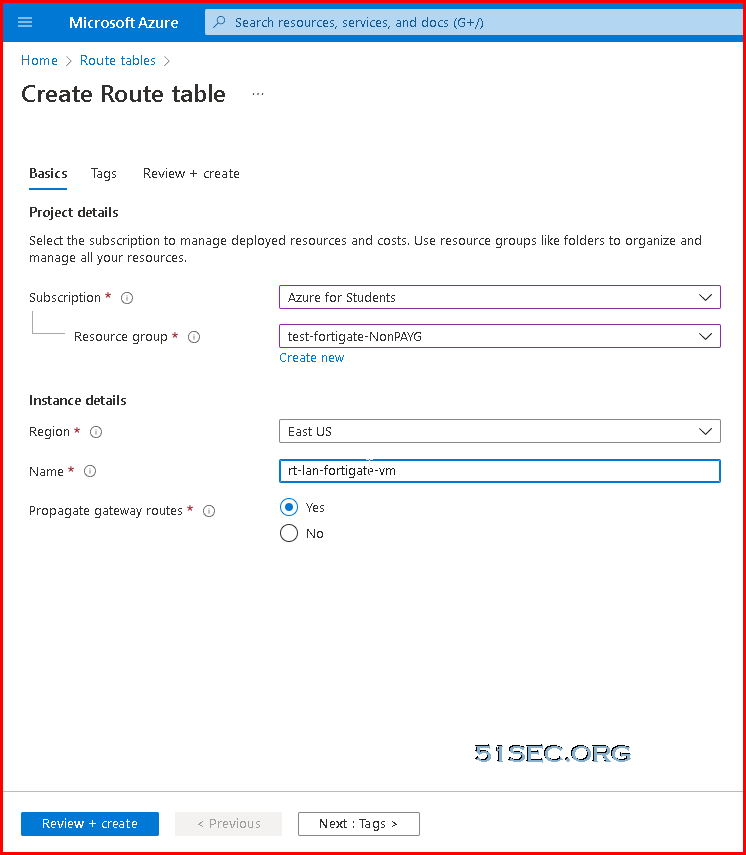
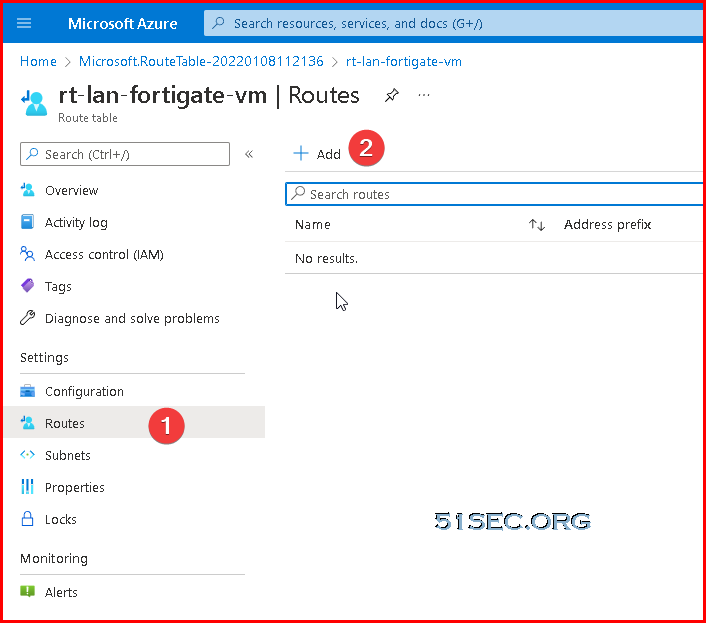
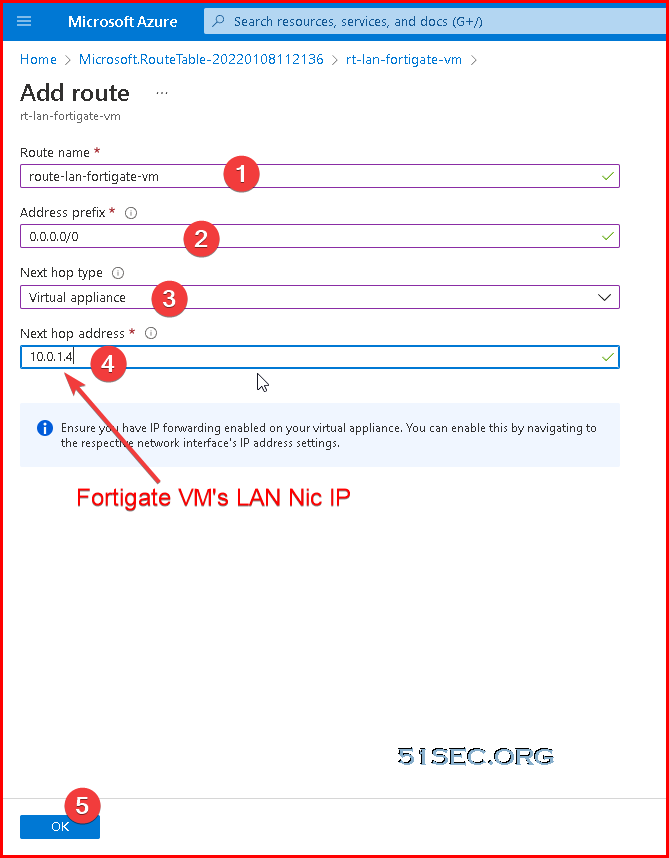
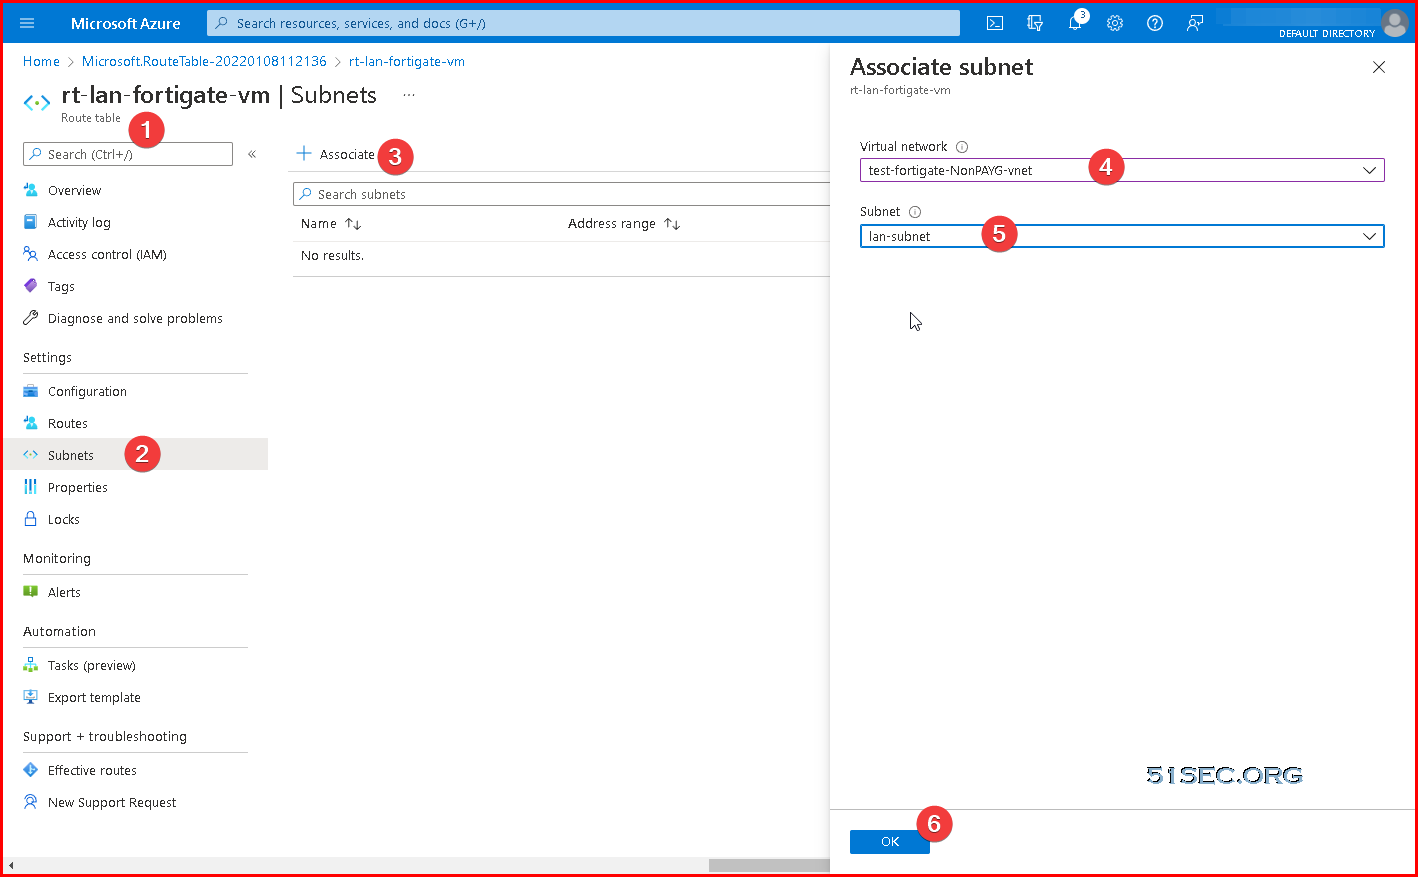
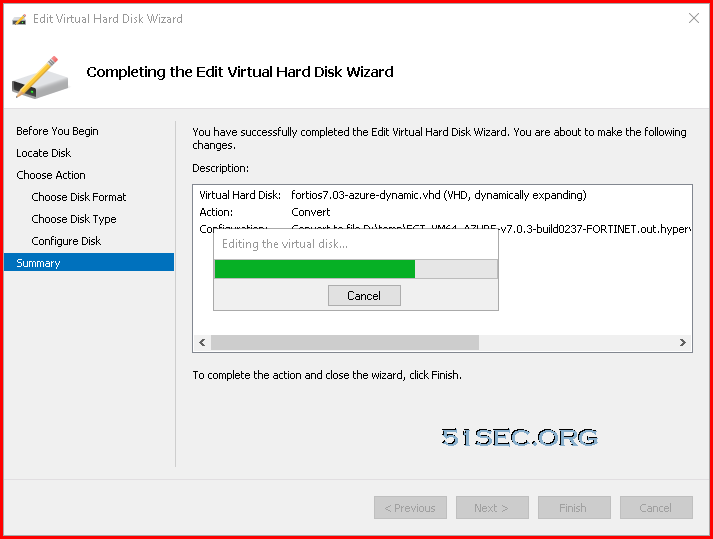
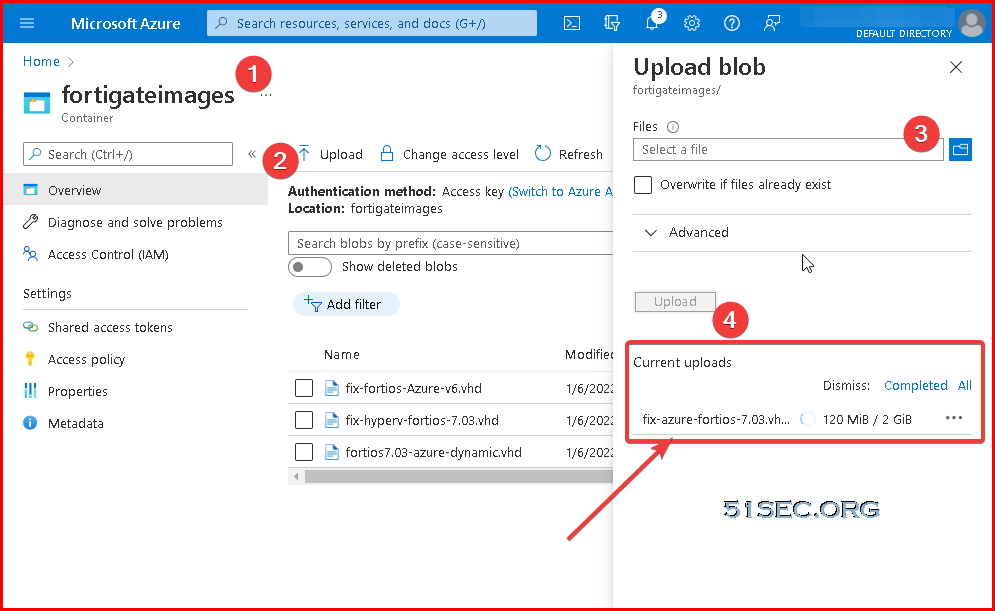
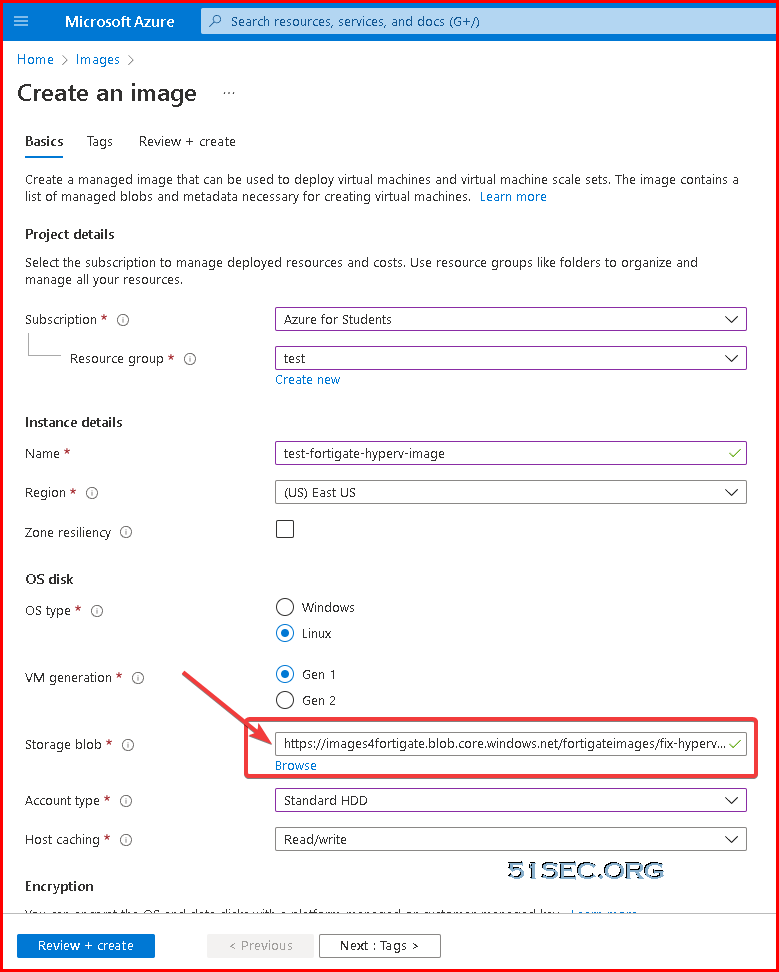
This video shows how to deploy a Fortigate firewall into Azure small size VM with just 1vCPU and 1GB ram, also it includes trial license for 14 days. Steps: 0. Topology - 1:48 1. Download Fortigate Hyperv VM - 3:25 2. Covernt VHD file to fixed size file - 4:35 3. Uploadto Azure storage - 5:41 4. Create Image - 6:10 5. Create Fortigate VM - 7:15 6. Add a new nic and new subnet for LAN network- 13:25 7. Create Win10 test vm with bastion connection - 15:00 8. Create route table for LAN subnet - 19:42 9. Create Fortigate rule - 25:16 10. test Internet access from Win10 machine - 26:14 Related posts: ✍Download and Launch Fortigate Virtual Machine in VMWare WorkStation - https://blog.51sec.org/2022/01/download-and-launch-fortigate-virtual.html ✍Azure Fortigate VM Test Drive - https://blog.51sec.org/2022/01/azure-fortigate-vm-test-drive.html ✍Deploy Fortigate Firewall with Trial License to Azure Free Tier VM - https://blog.51sec.org/2022/01/deploy-fortigate-firewall-with-trial.html Related videos: ?Download and Deploy Fortigate Firewall into VMWare Workstation Lab - https://youtu.be/Ny6IQFTPeFI ?Fortinet Fortigate Next-Generation Firewall VM Test Drive in Azure - https://youtu.be/w8nacYGiAbM ?Deploy Fortigate Firewall VM Using Azure Marketplace and From A VHD File with VM Size (1vCPU,1G RAM) - https://youtu.be/Kbj40Xf1shg ?Fortinet Fortigate Next-Generation Firewall VM Test Drive in Azure - https://youtu.be/w8nacYGiAbM ?Step by Step Guide to Deploy Fortigate VM with Trial License in Azure - https://youtu.be/oBl1aPBEadA ==================================================================== If you found this video has some useful information✍, please give me a thumb up ✅ and subscribe this channel ?to get more updates?: ⚡https://www.youtube.com/c/Netsec?sub_confirmation=1 ⚡Resource Collection and Bookmarks: https://sites.51sec.org/ Learning and Sharing - 海内存知己,天涯若比邻 - ⚡https://51sec.org ?https://itprosec.com

Watch video on YouTube here: https://youtu.be/oBl1aPBEadA by Johnny Netsec
0 Comments

DD Win2022 EN to Oracle Cloud Free Tier VM in 30 Minutes

1/14/2022

0 Comments

 
This video is to demonstrate the process to DD windows 2022 into Oracle Cloud free tier Ubuntu VM. Previous videos have shown how to do this for Win2012, Win2016 and Win7. Steps: 1. Login Oracle Cloud and Create a Ubuntu Instance 2. Login to your Ubuntu Instance using Putty & Puttygen 3. Get your Image url (win7, 2012, 2016, 2019, 2022). re-write following command to include the URL. Paste URL into Ubuntu: wget --no-check-certificate -qO InstallNET.sh 'https://moeclub.org/attachment/LinuxShell/InstallNET.sh' && bash InstallNET.sh -dd 'https://vps0.net/natee/win/lite/winsrv2022-data-x64-us/winsrv2022-data-x64-us-efi.vhd.gz' 4. Open RDP 3389 in Network Security Group. Wait 30 minutes then RDP into it. Command can be found from following posts: ✍Commands and Image Links : https://blog.51sec.org/2020/05/dd-windows-7-64b-to-oracle-cloud-ubuntu.html Related Videos: ⚡ DD Install Windows System to Google Cloud Linux VM - https://youtu.be/rru1hRWp19E ⚡ Create VNC Console Connection for Oracle Cloud Instances - https://youtu.be/JZlp9Xfg980 ⚡ DD Windows 2016 into Oracle Cloud Free Tier Ubuntu VM Instance - https://youtu.be/owe4CsbTG7E ⚡Oracle Cloud Free ARM Compute Instance (4 oCPUs and 24GB RAM) - https://youtu.be/FbihlMBNuro ⚡Get Two Free and Permanent VPS from Oracle Cloud Platform - https://youtu.be/E9dHA3NBbN8 ⚡Use Portainer to Install Nginx Docker and Install CertBot to Issue Nginx SSL Certificate - https://youtu.be/YKH2RwHqOck ⚡Create WordPress Site on Arm64 OS Using Portainer Custom Template - https://youtu.be/rdPNPXYCVek ⚡Install aaPanel (BT) into ARM-based Oracle Linux 8 Instance - https://youtu.be/OG4qdLlSapg ==================================================================== If you found this video has some useful information✍, please give me a thumb up ✅ and subscribe this channel ?to get more updates?: ⚡https://www.youtube.com/c/Netsec?sub_confirmation=1 ⚡Resource Collection and Bookmarks: https://sites.51sec.org/ Learning and Sharing - 海内存知己,天涯若比邻 - ⚡https://51sec.org ?https://itprosec.com

Watch video on YouTube here: https://youtu.be/Y-WN258JrHQ by Johnny Netsec
0 Comments

Simplified Cybersecurity Policy Framework Documents

1/13/2022

0 Comments

 
Simplified Cybersecurity Policy Framework Documents
Every organisation needs to implement a good policy framework with a document hierarchy.  Cybersecurity frameworks are generally applicable to all organizations, regardless of their size, industry, or sector. The hierarchy flows like this:


Cybersecurity Policy

Policy relates to a decision of the governing body of an organisation. A policy is typically an internal organisational decision that aids how it functions. A policy is a formal statement of a principle that should be followed by its intended audience. Each policy should address an important issue concerning the achievement of the overall purpose of the organisation. So a policy on health and safety in the workplace addresses the relevance of safety to the enterprise and to whom the principles apply. The policy must link with the strategic objectives (such as improved service quality, reduced costs and fewer injuries). 

An example of a policy that you will typically find in organisations is: “Legal services review all third party contracts”. In this example, the decision from the governing body is that legal services review third party contracts. This means that no other department in the organisation has permission to review third-party contracts other than legal services.

Policy is mandatory.


1 Charter


2 Policy

Acceptable Use Policy Password Policy
Backup Policy Network Access Policy
Incident Response Policy Remote Access Policy
Virtual Private Network (VPN) Policy Guest Access Policy
Wireless Policy Third Party Connection Policy
Network Security Policy Encryption Policy
Confidential Data Policy Data Classification Policy
Mobile Device Policy Retention Policy
Outsourcing Policy Physical Security Policy
E-mail Policy

https://www.sans.org/information-security-policy/

3 Employment handbook


4 Others


Procedures & Controls

A procedure provides detailed mandatory steps (sometimes in the form of a checklist) someone needs to follow to achieve a recurring task or comply with a policy. These procedures can include step by step instructions or statements telling you where something needs to go. A procedure informs employees how to carry out or implement a policy. Procedures usually contain written instructions in logical numbered steps.

  • COVID-19 Guidance For Working Remotely
  • Business Continuity Requests
  • Credit Card Processing Procedures
  • Data Privacy Procedures
  • Patch Management Procedure
  • Third Party Security Procedures
  • Export Control (ITAR, EAR, etc.)
  • Incident Response Procedure
  • Vulnerability Management Procedure
  • Policy Exception Procedure
  • PCI DSS Assessment Procedure
  • DFARS 7012 System Security Plan (SSP) and Assessment Procedure


Standard

A standard specifies uniform uses of specific technologies or configurations. Here we are talking about a specific internal standard of an organisation. People sometimes talk about employment standards or rules (like rules of conduct or performance). These do fall within this category. 

The other kind of standard is one that is issued by a third party (for example an industry body like ISO). For example, the ISO 27000 suite or data protection standards. Third-party rules (like professional rules) or codes (like the code of conduct of an association) are often associated with third-party standards.

An example of a standard is: “All contracts have the following typography: Font: Arial; Font Size: 8; Margin Type: Normal”. Standards are often standalone and referenced in policies. In your policy, you will find the following statement: “We use the contract standard to review our contracts”. In this example, the policy refers to the standard and the standard assists the target audience comply with the policy.


1 Name Convention


2 Patching and Updates 


3 Vulnerability Scanning and Remediation Standard 


4 Device, Server, Host Hardening 


5 Compliance - PCI, CIS, ISO27001, NIST, etc


  • Approved Endpoint Software
  • Data Protection Safeguards
  • Data Protection Safeguards - Cloud Computing
  • Data Protection Safeguards - Endpoints
  • Data Protection Safeguards - Mobile Devices
  • Data Protection Safeguards - Servers
  • Data Categorization
  • Encryption Standard
  • Network Firewall Standards
  • Terms of Use (login banner)
  • SSH Server Standard
  • Email Standard
  • Web Server Standard


Guide & Forms

A guideline provides general guidance, and additional advice and support for policies, standards or procedures. A guideline gives the reader guidance and additional information to help the audience. It will also assist the policymaker in explaining the policy to the policy audience in simpler terms. Many people confuse a guideline with a policy because a guideline contains similar content to a policy. The biggest difference between the two is that a guideline is voluntary and policy is always mandatory.

An example of a guideline is: “Before reviewing a contract, try to gather as much relevant information about the transaction as possible. Find out what the parties believe to be the significant risks“. One of the modules in our programme called having good policies in place is also an example of guidance for policies.

1 Operation Schedule

Patching/Updating

Scanning

Compliance


2 Change Request


3 Risk Registrar


4 Incidence List


5 Travelling request form

  • Incidental Use Guidelines


References


via Blogger http://blog.51sec.org/2022/01/simplified-cybersecurity-policy.html
January 13, 2022 at 11:19AM Architecture
0 Comments

Config Raspberry Pi As Picture Frame

1/12/2022

0 Comments

 
Config Raspberry Pi As Picture Frame

Here is a guide to set up your Raspberry Pi as a picture frame to show pictures stored on your local Raspberry pi's disk. 


Disable Low Voltage Warning

1.To disable the low voltage warning, we will need to modify the boot config file.

You can begin modifying this file by running the following command on your device.

sudo nano /boot/config.txt

This config file is available on the boot partition when you plug the SD Card on your Raspberry Pi.

2. Within this file, you will need to add the following line to the bottom of the file. By setting this value to 1, we are telling it to disable all warning overlays.

avoid_warnings=1

Please note this means you will no longer receive any more warnings about your Pi not receiving enough voltage.

3. Once you have added this line, save the file by pressing CTRL + X, then Y, followed by the ENTER key.

4. We also need to remove the “battery monitor” plugin. This plugin is responsible for showing the notification you may see in the top-right corner of your screen.

You can remove this LXPanel plugin by using the following command on your device.

sudo apt remove lxplug-ptbatt

5. For this change to take effect, you will need to restart your Raspberry Pi.

You can restart by using the following command in the terminal.

sudo reboot


Fix Raspberry Pi Apt update issue


1.Let’s begin modifying this file by running the following command on the Raspberry Pi.

sudo nano /etc/apt/sources.list

2. Within this file, you will see the following text.

deb http://raspbian.raspberrypi.org/raspbian/ stretch main contrib non-free rpi
# Uncomment line below then 'apt-get update' to enable 'apt-get source'
#deb-src http://raspbian.raspberrypi.org/raspbian/ stretch main contrib non-free rpi

This text defines which repository the package manager will connect to when updating.

uncomment last line will allow apt update to get source list.


Turn Off Screen Blaning


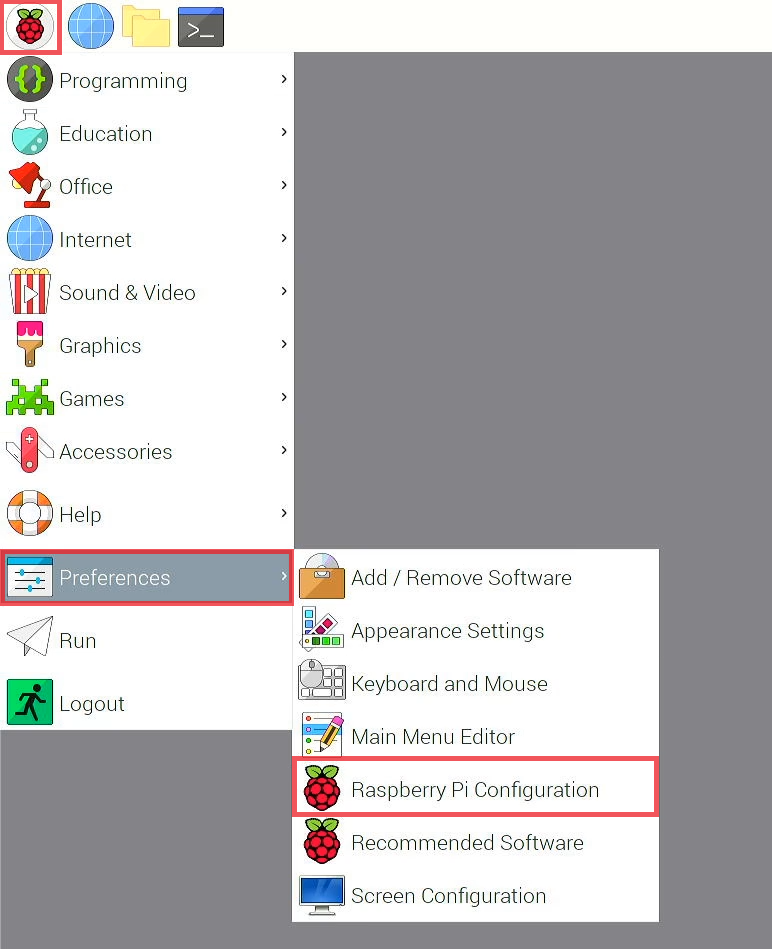
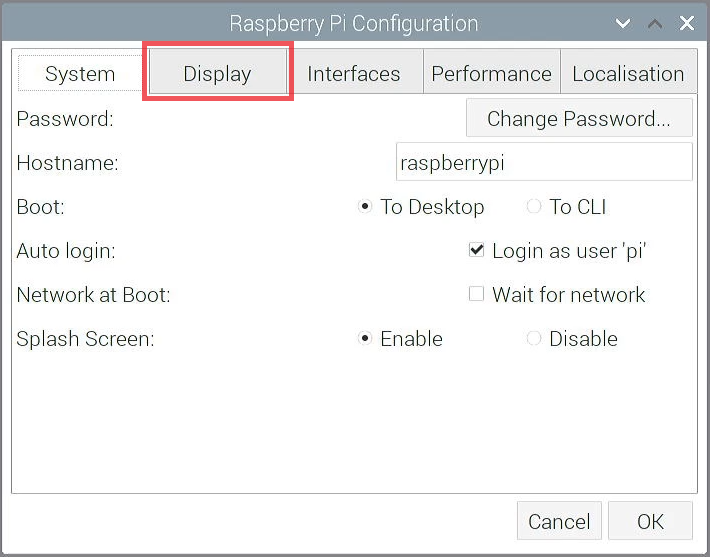
Click on the Menu button on the upper right (Raspberry Pi Icon) >> Preferences >> Raspberry Pi Configuration.

In Raspberry Pi Configuration Window, click on Display Tab.

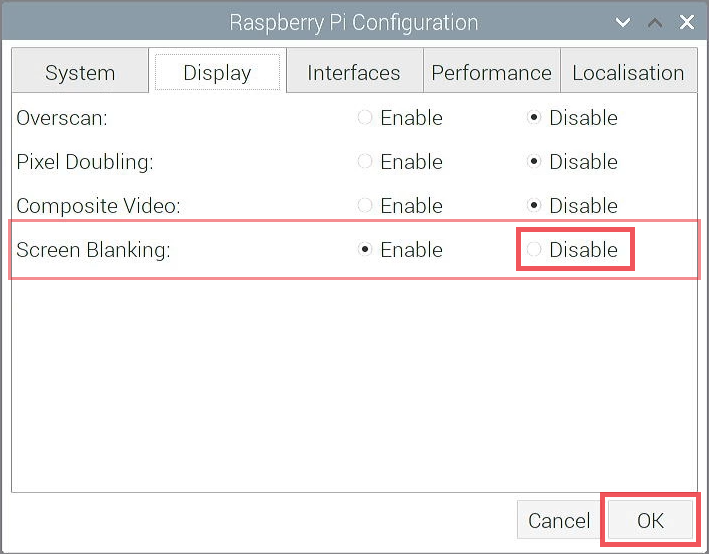
Look for the Screen Blanking row, click Disable.

Then click OK.


Apt Update and Install Package


pi@raspberrypi:~ $ sudo -i
root@raspberrypi:~# apt update

Feh can show different size photos to your LCD. 

1. To install the package, use the following line:

sudo apt-get install feh

2. Now to test that it works enter the following line. Replace /media/NASHDD1/test with the directory that contains all your image (/home/pi/Pictures).

DISPLAY=:0.0 XAUTHORITY=/home/pi/.Xauthority /usr/bin/feh --quiet --preload --randomize --full-screen --reload 60 -Y --slideshow-delay 15.0 /media/NASHDD1/test

3. Now we can use short tags to make this command a lot shorter. You can read more about all the flags you can use over at the feh manual page.

DISPLAY=:0.0 XAUTHORITY=/home/pi/.Xauthority /usr/bin/feh -q -p -Z -F -R  60 -Y -D 15.0 /media/NASHDD1/test

4. Now as you will notice this locks up the command line bar. To fix this, add the & after the command and the script/process will launch in the background.

5. So now let’s store this in a simple script file. This way you can add or change it later. To make the file enter the following command:

sudo nano /home/pi/start-picture-frame.sh

6. In here, enter the following lines.

#!/bin/bash
DISPLAY=:0.0 XAUTHORITY=/home/pi/.Xauthority /usr/bin/feh -q -p -Z -F -R  60 -Y -D 15.0 /media/NASHDD1/test

7. Now that’s done you can test it by running the following command.

bash /home/pi/start-picture-frame.sh

8. Finally, let’s have it start at boot. Now it is important that you have SSH enabled so you can access the Pi remotely as you will lose access to the GUI/Screen. So make sure you have done this before setting it to launch at boot up.

9. To do this open up the rc.local file by entering the following command.

sudo nano /etc/rc.local

10. Add the following before the exit 0 line in this folder.

sleep 10
bash /home/pi/start-picture-frame.sh &

11. If you ever need to kill the process as you may want to be able to access the desktop, simply enter the following line.

sudo pkill feh

You should now have your very own slideshow of pictures going. If you end up with any troubles, then double check all the steps and look for any errors. If you’re still having trouble, then be sure to seek help on our forums.


Autostart Slideshow

Depend on your LCD screen resolution, image size will be vary. For my LCD screen 3.5 inch, it is 480 x 320 pixels. 


Autostart is the best way to run GUI-based Raspberry Pi programs on startup. It works by ensuring that both the X Window system and the LXDE desktop environment are available before the system runs any of the scheduled programs.

If you have a script that runs in the windowed mode, or you want to run any of the GUI-based programs/applications at startup on your Raspberry Pi, you should schedule them to run using autostart. Here are the steps to do this.
  1. First, open the terminal and enter the following command to create a .desktop file in the autostart directory: sudo nano /etc/xdg/autostart/display.desktop. We've used display.desktop as file name, but you can name your desktop file anything you want.
  2. In the .desktop file, add the following lines of code:
    [Desktop Entry]
    Name=Slideshow
    Exec=bash /home/pi/start-picture-frame.sh
  3. In this file, replace the value for the Name field with your project/script name. Similarly, we've added our display.py program to run every time the Raspberry Pi boots up.
  4. However, you can replace it with any program that you want to run. In fact, you can even schedule to run a third-party program, like the Chrome browser; in which case, the .desktop file should include the following code:
    [Desktop Entry]
    Name=Chrome
    Exec=chromium-browser
  5. After that, hit CTRL + O to save the file, and then enter sudo reboot to restart the Pi
As soon as your Pi boots up, your GUI program should automatically start as well. In case you'd like to stop your program from running at startup anymore, simply go to the autostart folder and remove the .desktop file you just created.

References

  • Dealing with the Low Voltage Warning on the Raspberry Pi
  • How to change the Repository Mirror on Raspbian
  • A Simple Raspberry Pi Photo Frame


via Blogger http://blog.51sec.org/2022/01/config-raspberry-pi-as-picture-frame.html
January 11, 2022 at 10:17PM Raspberry Pi
0 Comments

DD Win2012 to Oracle Cloud Free Tier Linux Instance

1/10/2022

0 Comments

 
To respond some requests for my DD windows videos to Oracle Cloud Free Tier VM, I created this one to show all necessary steps . 1. Log into your Oracle Cloud account and create a new Ubuntu VM. If you don't have an account, check below related videos to find out how. 2. Generate SSH Key, use Puttygen to convert it to Putty private key format. Log in to Ubuntu VM using Putty. 3. One command to DD windows 2012 into Ubuntu VM. Following command is using a CN Version 2012 image: wget --no-check-certificate -qO InstallNET.sh 'https://sunpma.com/other/oss/InstallNET.sh' && bash InstallNET.sh -dd 'https://oss.sunpma.com/Windows/Oracle_Win_Server2012R2_64_Administrator_nat.ee.gz' [Updated Jan 10 2022] I found another Win2012 EN image URL at 'https://vps0.net/natee/win/lite/winsrv2012r2-data-x64-us/winsrv2012r2-data-x64-us-efi.vhd.gz' You also can found more from my post: https://blog.51sec.org/2020/05/dd-windows-7-64b-to-oracle-cloud-ubuntu.html Please replace the DD url based on your needs. 4. Open 3389 port in a new security group. RDP test to log into remote Win2012 machine. note: in the video, I were using Win2012 image file hosting at http://d.nat.ee site, which has been shutdown. I used another Win2012 image file from https://oss.subpma.com. The process and steps are exactly same. Related Post: ✍Commands and Image Links : https://blog.51sec.org/2020/05/dd-windows-7-64b-to-oracle-cloud-ubuntu.html ✍VNC Console: https://blog.51sec.org/2021/08/oracle-cloud-vps-vnc-console-connection.html Related Videos: ⚡ DD Install Windows System to Google Cloud Linux VM - https://youtu.be/rru1hRWp19E ⚡ Create VNC Console Connection for Oracle Cloud Instances - https://youtu.be/JZlp9Xfg980 ⚡ DD Windows 2016 into Oracle Cloud Free Tier Ubuntu VM Instance - https://youtu.be/owe4CsbTG7E ⚡Oracle Cloud Free ARM Compute Instance (4 oCPUs and 24GB RAM) - https://youtu.be/FbihlMBNuro ⚡Get Two Free and Permanent VPS from Oracle Cloud Platform - https://youtu.be/E9dHA3NBbN8 ⚡Use Portainer to Install Nginx Docker and Install CertBot to Issue Nginx SSL Certificate - https://youtu.be/YKH2RwHqOck ⚡Create WordPress Site on Arm64 OS Using Portainer Custom Template - https://youtu.be/rdPNPXYCVek ⚡Install aaPanel (BT) into ARM-based Oracle Linux 8 Instance - https://youtu.be/OG4qdLlSapg ==================================================================== If you found this video has some useful information✍, please give me a thumb up ✅ and subscribe this channel ?to get more updates?: ⚡https://www.youtube.com/c/Netsec?sub_confirmation=1 ⚡Resource Collection and Bookmarks: https://sites.51sec.org/ Learning and Sharing - 海内存知己,天涯若比邻 - ⚡https://51sec.org ?https://itprosec.com

Watch video on YouTube here: https://youtu.be/qsTE62Ar9OY by Johnny Netsec
0 Comments

DD Original Ubuntu Image to Oracle Cloud ARM VM and Install RDP with Sound Forwarding Support

1/9/2022

0 Comments

 
DD Original Ubuntu Image to Oracle Cloud ARM VM and Install RDP with Sound Forwarding Support

Oracle Cloud provides free tier ARM machines which you can have maximum 4 Core OCPU and 24G RAM to use. There are lots of usage for this generous offer. In this post, I am going to show you how to change OS to a clean and original OS release without Oracle builtin plugins or agents, also show you how to install a remote desktop environment with sound support.


Create a Free Oracle Cloud ARM VM

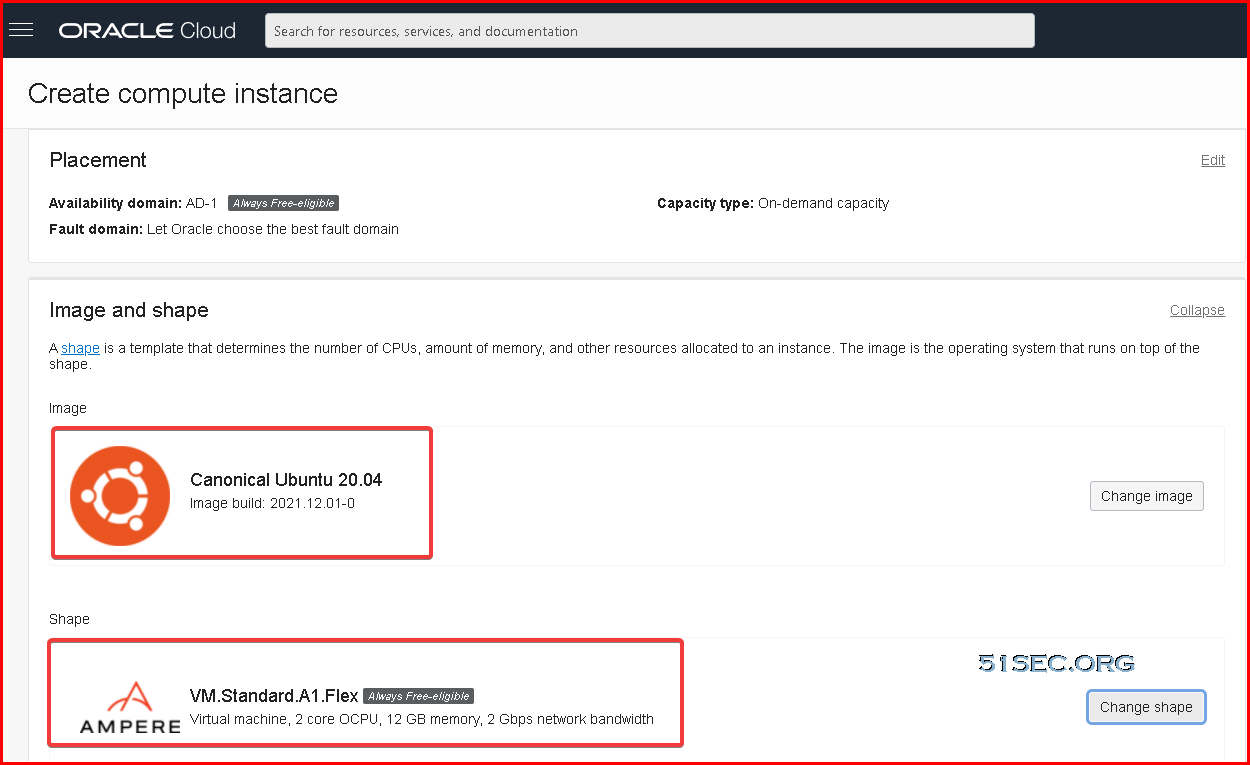
In this lab, we are going to create a Ubuntu VM using shape VM.Standard.A1.Flex (Always free eligible) which has 2 Core OCPU, and 12GB memory, with 2G network bandwidth. 


DD Original Ubuntu Image 20.04 to Oracle Cloud ARM VM

We will need a clean Ubuntu installation to start this lab. If you are using Oracle Ubuntu Template, the process might not work as expected. At least Oracle Ubuntu template does not work for me.

You can use following command to change your ARM VM Oracle Ubuntu OS to a clean Ubuntu 20.04 OS. You also can customize your own root password and own SSH port. 

bash <(wget --no-check-certificate -qO- 'https://raw.githubusercontent.com/MoeClub/Note/master/InstallNET.sh') -u 20.04 -v arm64 --mirror http://archive.ubuntu.com/ubuntu -p "Your Own Root Password" -port "Your Own Customized SSH Port"


Following is the one I were using

bash <(wget --no-check-certificate -qO- 'https://raw.githubusercontent.com/MoeClub/Note/master/InstallNET.sh') -u 20.04 -v arm64 --mirror http://archive.ubuntu.com/ubuntu -p "netsecP@55w0rd" 


After DD, you will find all monitoring data (CPU, Memory, Disk, Network, Load) will be gone since there is no built-in agent installed on the VM.


Run Script to Install Desktop Environment, xRDP, Sound , etc


English version:

#/bin/bash
# Ubuntu20 desktop configuration (arm supported)

# quit immediately if there is an error
set -e
# ...
set -x

# Xrdp
function install_xrdp() {
        apt-get install -y xrdp
} 

# install desktop environment lxde. 
function install_desktop_env() {
        DEBIAN_FRONTEND=noninteractive apt-get install -y lxde
}

# Xrdp PulseAudio
function install_xrdp_pa() {
        apt-get install -y git libpulse-dev autoconf m4 intltool build-essential dpkg-dev libtool libsndfile1-dev libspeexdsp-dev libudev-dev pulseaudio
        cp /etc/apt/sources.list /etc/apt/sources.list.u2ad
        sed -Ei 's/^# deb-src /deb-src /' /etc/apt/sources.list
        apt-get update -y
        apt build-dep pulseaudio -y
        cd /tmp
        apt source pulseaudio
        pulsever=$(pulseaudio --version | awk '{print $2}')
        cd /tmp/pulseaudio-$pulsever
        # ./configure --without-caps
        ./configure
        git clone https://github.com/neutrinolabs/pulseaudio-module-xrdp.git
        cd pulseaudio-module-xrdp
        ./bootstrap
        ./configure PULSE_DIR="/tmp/pulseaudio-$pulsever"
        make
        cd /tmp/pulseaudio-$pulsever/pulseaudio-module-xrdp/src/.libs
        install -t "/var/lib/xrdp-pulseaudio-installer" -D -m 644 *.so
        # systemctl restart dbus
        # systemctl restart pulseaudio
        systemctl restart xrdp
        # Issue: https://github.com/neutrinolabs/pulseaudio-module-xrdp/issues/44
        fix_pa_systemd_issue
}

# resolve PA no sound issue
# Issue: https://github.com/neutrinolabs/pulseaudio-module-xrdp/issues/44
function fix_pa_systemd_issue() {
mkdir -p /home/rdpuser/.config/systemd/user/
ln -s /dev/null /home/rdpuser/.config/systemd/user/pulseaudio.service
mkdir -p /home/rdpuser/.config/autostart/
cat <<EOF | \
  sudo tee /home/rdpuser/.config/autostart/pulseaudio.desktop
[Desktop Entry]
Type=Application
Exec=pulseaudio
Hidden=false
NoDisplay=false
X-GNOME-Autostart-enabled=true
Name[en_US]=pulseaudio
Name=pulseaudio
Comment[en_US]=pulseaudio
Comment=pulseaudio
EOF
chown -R rdpuser /home/rdpuser/.config/
chmod -R 755 /home/rdpuser/.config/
}

# create desktop user
function create_desktop_user() {
useradd -s /bin/bash -m rdpuser
usermod -a -G sudo rdpuser
echo "rdpuser ALL=(ALL) ALL" >> /etc/sudoers
echo "rdpuser_password
rdpuser_password
" | passwd rdpuser
}

# Xrdp environment configuration
function xrdp_conf() {
touch /home/rdpuser/.Xclients
echo "lxsession" > /home/rdpuser/.Xclients
chmod a+x /home/rdpuser/.Xclients
# sudo sed -e 's/^new_cursors=true/new_cursors=false/g' -i /etc/xrdp/xrdp.ini
cp /etc/xrdp/xrdp.ini /etc/xrdp/xrdp.ini.backup.u2ad
echo "$xrdp_config_base64" | base64 -d > /etc/xrdp/xrdp.ini
cat <<EOF | \
  sudo tee /etc/polkit-1/localauthority/50-local.d/xrdp-color-manager.pkla
[Netowrkmanager]
Identity=unix-user:*
Action=org.freedesktop.color-manager.create-device
ResultAny=no
ResultInactive=no
ResultActive=yes
EOF
systemctl restart xrdp
systemctl restart polkit
}

# desktop environment configuration
function desktop_env_conf() {
        # remove network icon
        apt-get remove -y network-manager-gnome
        # chrome has no arm64 version, install chromium
        apt-get install -y chromium-browser
}


apt-get update -y
apt-get install -y sudo screen

# create a desktop user 
create_desktop_user

# Install desktop environment
install_desktop_env

# install XRDP
install_xrdp

# install XRDP PA
install_xrdp_pa

# XRDP Environment Configuration
xrdp_config_base64="W0dsb2JhbHNdDQo7IHhyZHAuaW5pIGZpbGUgdmVyc2lvbiBudW1iZXINCmluaV92ZXJzaW9uPTENCg0KOyBmb3JrIGEgbmV3IHByb2Nlc3MgZm9yIGVhY2ggaW5jb21pbmcgY29ubmVjdGlvbg0KZm9yaz10cnVlDQoNCjsgcG9ydHMgdG8gbGlzdGVuIG9uLCBudW1iZXIgYWxvbmUgbWVhbnMgbGlzdGVuIG9uIGFsbCBpbnRlcmZhY2VzDQo7IDAuMC4wLjAgb3IgOjogaWYgaXB2NiBpcyBjb25maWd1cmVkDQo7IHNwYWNlIGJldHdlZW4gbXVsdGlwbGUgb2NjdXJyZW5jZXMNCjsNCjsgRXhhbXBsZXM6DQo7ICAgcG9ydD0zMzg5DQo7ICAgcG9ydD11bml4Oi8vLi90bXAveHJkcC5zb2NrZXQNCjsgICBwb3J0PXRjcDovLy46MzM4OSAgICAgICAgICAgICAgICAgICAgICAgICAgIDEyNy4wLjAuMTozMzg5DQo7ICAgcG9ydD10Y3A6Ly86MzM4OSAgICAgICAgICAgICAgICAgICAgICAgICAgICAqOjMzODkNCjsgICBwb3J0PXRjcDovLzxhbnkgaXB2NCBmb3JtYXQgYWRkcj46MzM4OSAgICAgIDE5Mi4xNjguMS4xOjMzODkNCjsgICBwb3J0PXRjcDY6Ly8uOjMzODkgICAgICAgICAgICAgICAgICAgICAgICAgIDo6MTozMzg5DQo7ICAgcG9ydD10Y3A2Oi8vOjMzODkgICAgICAgICAgICAgICAgICAgICAgICAgICAqOjMzODkNCjsgICBwb3J0PXRjcDY6Ly97PGFueSBpcHY2IGZvcm1hdCBhZGRyPn06MzM4OSAgIHtGQzAwOjA6MDowOjA6MDowOjF9OjMzODkNCjsgICBwb3J0PXZzb2NrOi8vPGNpZD46PHBvcnQ+DQpwb3J0PTMzODkNCg0KOyAncG9ydCcgYWJvdmUgc2hvdWxkIGJlIGNvbm5lY3RlZCB0byB3aXRoIHZzb2NrIGluc3RlYWQgb2YgdGNwDQo7IHVzZSB0aGlzIG9ubHkgd2l0aCBudW1iZXIgYWxvbmUgaW4gcG9ydCBhYm92ZQ0KOyBwcmVmZXIgdXNlIHZzb2NrOi8vPGNpZD46PHBvcnQ+IGFib3ZlDQp1c2VfdnNvY2s9ZmFsc2UNCg0KOyByZWd1bGF0ZSBpZiB0aGUgbGlzdGVuaW5nIHNvY2tldCB1c2Ugc29ja2V0IG9wdGlvbiB0Y3Bfbm9kZWxheQ0KOyBubyBidWZmZXJpbmcgd2lsbCBiZSBwZXJmb3JtZWQgaW4gdGhlIFRDUCBzdGFjaw0KdGNwX25vZGVsYXk9dHJ1ZQ0KDQo7IHJlZ3VsYXRlIGlmIHRoZSBsaXN0ZW5pbmcgc29ja2V0IHVzZSBzb2NrZXQgb3B0aW9uIGtlZXBhbGl2ZQ0KOyBpZiB0aGUgbmV0d29yayBjb25uZWN0aW9uIGRpc2FwcGVhciB3aXRob3V0IGNsb3NlIG1lc3NhZ2VzIHRoZSBjb25uZWN0aW9uIHdpbGwgYmUgY2xvc2VkDQp0Y3Bfa2VlcGFsaXZlPXRydWUNCg0KOyBzZXQgdGNwIHNlbmQvcmVjdiBidWZmZXIgKGZvciBleHBlcnRzKQ0KI3RjcF9zZW5kX2J1ZmZlcl9ieXRlcz0zMjc2OA0KI3RjcF9yZWN2X2J1ZmZlcl9ieXRlcz0zMjc2OA0KDQo7IHNlY3VyaXR5IGxheWVyIGNhbiBiZSAndGxzJywgJ3JkcCcgb3IgJ25lZ290aWF0ZScNCjsgZm9yIGNsaWVudCBjb21wYXRpYmxlIGxheWVyDQpzZWN1cml0eV9sYXllcj1uZWdvdGlhdGUNCg0KOyBtaW5pbXVtIHNlY3VyaXR5IGxldmVsIGFsbG93ZWQgZm9yIGNsaWVudCBmb3IgY2xhc3NpYyBSRFAgZW5jcnlwdGlvbg0KOyB1c2UgdGxzX2NpcGhlcnMgdG8gY29uZmlndXJlIFRMUyBlbmNyeXB0aW9uDQo7IGNhbiBiZSAnbm9uZScsICdsb3cnLCAnbWVkaXVtJywgJ2hpZ2gnLCAnZmlwcycNCmNyeXB0X2xldmVsPWhpZ2gNCg0KOyBYLjUwOSBjZXJ0aWZpY2F0ZSBhbmQgcHJpdmF0ZSBrZXkNCjsgb3BlbnNzbCByZXEgLXg1MDkgLW5ld2tleSByc2E6MjA0OCAtbm9kZXMgLWtleW91dCBrZXkucGVtIC1vdXQgY2VydC5wZW0gLWRheXMgMzY1DQo7IG5vdGUgdGhpcyBuZWVkcyB0aGUgdXNlciB4cmRwIHRvIGJlIGEgbWVtYmVyIG9mIHRoZSBzc2wtY2VydCBncm91cCwgZG8gd2l0aCBlLmcuDQo7JCBzdWRvIGFkZHVzZXIgeHJkcCBzc2wtY2VydA0KY2VydGlmaWNhdGU9DQprZXlfZmlsZT0NCg0KOyBzZXQgU1NMIHByb3RvY29scw0KOyBjYW4gYmUgY29tbWEgc2VwYXJhdGVkIGxpc3Qgb2YgJ1NTTHYzJywgJ1RMU3YxJywgJ1RMU3YxLjEnLCAnVExTdjEuMicsICdUTFN2MS4zJw0Kc3NsX3Byb3RvY29scz1UTFN2MS4yLCBUTFN2MS4zDQo7IHNldCBUTFMgY2lwaGVyIHN1aXRlcw0KI3Rsc19jaXBoZXJzPUhJR0gNCg0KOyBTZWN0aW9uIG5hbWUgdG8gdXNlIGZvciBhdXRvbWF0aWMgbG9naW4gaWYgdGhlIGNsaWVudCBzZW5kcyB1c2VybmFtZQ0KOyBhbmQgcGFzc3dvcmQuIElmIGVtcHR5LCB0aGUgZG9tYWluIG5hbWUgc2VudCBieSB0aGUgY2xpZW50IGlzIHVzZWQuDQo7IElmIGVtcHR5IGFuZCBubyBkb21haW4gbmFtZSBpcyBnaXZlbiwgdGhlIGZpcnN0IHN1aXRhYmxlIHNlY3Rpb24gaW4NCjsgdGhpcyBmaWxlIHdpbGwgYmUgdXNlZC4NCmF1dG9ydW49DQoNCmFsbG93X2NoYW5uZWxzPXRydWUNCmFsbG93X211bHRpbW9uPXRydWUNCmJpdG1hcF9jYWNoZT10cnVlDQpiaXRtYXBfY29tcHJlc3Npb249dHJ1ZQ0KYnVsa19jb21wcmVzc2lvbj10cnVlDQojaGlkZWxvZ3dpbmRvdz10cnVlDQptYXhfYnBwPTMyDQpuZXdfY3Vyc29ycz1mYWxzZQ0KOyBmYXN0cGF0aCAtIGNhbiBiZSAnaW5wdXQnLCAnb3V0cHV0JywgJ2JvdGgnLCAnbm9uZScNCnVzZV9mYXN0cGF0aD1ib3RoDQo7IHdoZW4gdHJ1ZSwgdXNlcmlkL3Bhc3N3b3JkICptdXN0KiBiZSBwYXNzZWQgb24gY21kIGxpbmUNCiNyZXF1aXJlX2NyZWRlbnRpYWxzPXRydWUNCjsgWW91IGNhbiBzZXQgdGhlIFBBTSBlcnJvciB0ZXh0IGluIGEgZ2F0ZXdheSBzZXR1cCAoTUFYIDI1NiBjaGFycykNCiNwYW1lcnJvcnR4dD1jaGFuZ2UgeW91ciBwYXNzd29yZCBhY2NvcmRpbmcgdG8gcG9saWN5IGF0IGh0dHA6Ly91cmwNCg0KOw0KOyBjb2xvcnMgdXNlZCBieSB3aW5kb3dzIGluIFJHQiBmb3JtYXQNCjsNCmJsdWU9MDA5Y2I1DQpncmV5PWRlZGVkZQ0KI2JsYWNrPTAwMDAwMA0KI2RhcmtfZ3JleT04MDgwODANCiNibHVlPTA4MjQ2Yg0KI2RhcmtfYmx1ZT0wODI0NmINCiN3aGl0ZT1mZmZmZmYNCiNyZWQ9ZmYwMDAwDQojZ3JlZW49MDBmZjAwDQojYmFja2dyb3VuZD02MjZjNzINCg0KOw0KOyBjb25maWd1cmUgbG9naW4gc2NyZWVuDQo7DQoNCjsgTG9naW4gU2NyZWVuIFdpbmRvdyBUaXRsZQ0KI2xzX3RpdGxlPU15IExvZ2luIFRpdGxlDQoNCjsgdG9wIGxldmVsIHdpbmRvdyBiYWNrZ3JvdW5kIGNvbG9yIGluIFJHQiBmb3JtYXQNCmxzX3RvcF93aW5kb3dfYmdfY29sb3I9MDA5Y2I1DQoNCjsgd2lkdGggYW5kIGhlaWdodCBvZiBsb2dpbiBzY3JlZW4NCmxzX3dpZHRoPTM1MA0KbHNfaGVpZ2h0PTQzMA0KDQo7IGxvZ2luIHNjcmVlbiBiYWNrZ3JvdW5kIGNvbG9yIGluIFJHQiBmb3JtYXQNCmxzX2JnX2NvbG9yPWRlZGVkZQ0KDQo7IG9wdGlvbmFsIGJhY2tncm91bmQgaW1hZ2UgZmlsZW5hbWUgKGJtcCBmb3JtYXQpLg0KI2xzX2JhY2tncm91bmRfaW1hZ2U9DQoNCjsgbG9nbw0KOyBmdWxsIHBhdGggdG8gYm1wLWZpbGUgb3IgZmlsZSBpbiBzaGFyZWQgZm9sZGVyDQpsc19sb2dvX2ZpbGVuYW1lPQ0KbHNfbG9nb194X3Bvcz01NQ0KbHNfbG9nb195X3Bvcz01MA0KDQo7IGZvciBwb3NpdGlvbmluZyBsYWJlbHMgc3VjaCBhcyB1c2VybmFtZSwgcGFzc3dvcmQgZXRjDQpsc19sYWJlbF94X3Bvcz0zMA0KbHNfbGFiZWxfd2lkdGg9NjUNCg0KOyBmb3IgcG9zaXRpb25pbmcgdGV4dCBhbmQgY29tYm8gYm94ZXMgbmV4dCB0byBhYm92ZSBsYWJlbHMNCmxzX2lucHV0X3hfcG9zPTExMA0KbHNfaW5wdXRfd2lkdGg9MjEwDQoNCjsgeSBwb3MgZm9yIGZpcnN0IGxhYmVsIGFuZCBjb21ibyBib3gNCmxzX2lucHV0X3lfcG9zPTIyMA0KDQo7IE9LIGJ1dHRvbg0KbHNfYnRuX29rX3hfcG9zPTE0Mg0KbHNfYnRuX29rX3lfcG9zPTM3MA0KbHNfYnRuX29rX3dpZHRoPTg1DQpsc19idG5fb2tfaGVpZ2h0PTMwDQoNCjsgQ2FuY2VsIGJ1dHRvbg0KbHNfYnRuX2NhbmNlbF94X3Bvcz0yMzcNCmxzX2J0bl9jYW5jZWxfeV9wb3M9MzcwDQpsc19idG5fY2FuY2VsX3dpZHRoPTg1DQpsc19idG5fY2FuY2VsX2hlaWdodD0zMA0KDQpbTG9nZ2luZ10NCkxvZ0ZpbGU9eHJkcC5sb2cNCkxvZ0xldmVsPURFQlVHDQpFbmFibGVTeXNsb2c9dHJ1ZQ0KU3lzbG9nTGV2ZWw9REVCVUcNCjsgTG9nTGV2ZWwgYW5kIFN5c0xvZ0xldmVsIGNvdWxkIGJ5IGFueSBvZjogY29yZSwgZXJyb3IsIHdhcm5pbmcsIGluZm8gb3IgZGVidWcNCg0KW0NoYW5uZWxzXQ0KOyBDaGFubmVsIG5hbWVzIG5vdCBsaXN0ZWQgaGVyZSB3aWxsIGJlIGJsb2NrZWQgYnkgWFJEUC4NCjsgWW91IGNhbiBibG9jayBhbnkgY2hhbm5lbCBieSBzZXR0aW5nIGl0cyB2YWx1ZSB0byBmYWxzZS4NCjsgSU1QT1JUQU5UISBBbGwgY2hhbm5lbHMgYXJlIG5vdCBzdXBwb3J0ZWQgaW4gYWxsIHVzZQ0KOyBjYXNlcyBldmVuIGlmIHlvdSBzZXQgYWxsIHZhbHVlcyB0byB0cnVlLg0KOyBZb3UgY2FuIG92ZXJyaWRlIHRoZXNlIHNldHRpbmdzIG9uIGVhY2ggc2Vzc2lvbiB0eXBlDQo7IFRoZXNlIHNldHRpbmdzIGFyZSBvbmx5IHVzZWQgaWYgYWxsb3dfY2hhbm5lbHM9dHJ1ZQ0KcmRwZHI9dHJ1ZQ0KcmRwc25kPXRydWUNCmRyZHludmM9dHJ1ZQ0KY2xpcHJkcj10cnVlDQpyYWlsPXRydWUNCnhyZHB2cj10cnVlDQp0Y3V0aWxzPXRydWUNCg0KOyBmb3IgZGVidWdnaW5nIHhyZHAsIGluIHNlY3Rpb24geHJkcDEsIGNoYW5nZSBwb3J0PS0xIHRvIHRoaXM6DQojcG9ydD0vdG1wLy54cmRwL3hyZHBfZGlzcGxheV8xMA0KDQo7IGZvciBkZWJ1Z2dpbmcgeHJkcCwgYWRkIGZvbGxvd2luZyBsaW5lIHRvIHNlY3Rpb24geHJkcDENCiNjaGFuc3J2cG9ydD0vdG1wLy54cmRwL3hyZHBfY2hhbnNydl9zb2NrZXRfNzIxMA0KDQoNCjsNCjsgU2Vzc2lvbiB0eXBlcw0KOw0KDQo7IFNvbWUgc2Vzc2lvbiB0eXBlcyBzdWNoIGFzIFhvcmcsIFgxMXJkcCBhbmQgWHZuYyBzdGFydCBhIGRpc3BsYXkgc2VydmVyLg0KOyBTdGFydHVwIGNvbW1hbmQtbGluZSBwYXJhbWV0ZXJzIGZvciB0aGUgZGlzcGxheSBzZXJ2ZXIgYXJlIGNvbmZpZ3VyZWQNCjsgaW4gc2VzbWFuLmluaS4gU2VlIGFuZCBjb25maWd1cmUgYWxzbyBzZXNtYW4uaW5pLg0KW1hvcmddDQpuYW1lPVhvcmcNCmxpYj1saWJ4dXAuc28NCnVzZXJuYW1lPWFzaw0KcGFzc3dvcmQ9YXNrDQppcD0xMjcuMC4wLjENCnBvcnQ9LTENCmNvZGU9MjANCg0KIyBbWHZuY10NCiMgbmFtZT1Ydm5jDQojIGxpYj1saWJ2bmMuc28NCiMgdXNlcm5hbWU9YXNrDQojIHBhc3N3b3JkPWFzaw0KIyBpcD0xMjcuMC4wLjENCiMgcG9ydD0tMQ0KI3hzZXJ2ZXJicHA9MjQNCiNkZWxheV9tcz0yMDAwDQoNCiMgW3ZuYy1hbnldDQojIG5hbWU9dm5jLWFueQ0KIyBsaWI9bGlidm5jLnNvDQojIGlwPWFzaw0KIyBwb3J0PWFzazU5MDANCiMgdXNlcm5hbWU9bmENCiMgcGFzc3dvcmQ9YXNrDQojcGFtdXNlcm5hbWU9YXNrc2FtZQ0KI3BhbXBhc3N3b3JkPWFza3NhbWUNCiNwYW1zZXNzaW9ubW5nPTEyNy4wLjAuMQ0KI2RlbGF5X21zPTIwMDANCg0KIyBbbmV1dHJpbm9yZHAtYW55XQ0KIyBuYW1lPW5ldXRyaW5vcmRwLWFueQ0KIyBsaWI9bGlieHJkcG5ldXRyaW5vcmRwLnNvDQojIGlwPWFzaw0KIyBwb3J0PWFzazMzODkNCiMgdXNlcm5hbWU9YXNrDQojIHBhc3N3b3JkPWFzaw0KDQo7IFlvdSBjYW4gb3ZlcnJpZGUgdGhlIGNvbW1vbiBjaGFubmVsIHNldHRpbmdzIGZvciBlYWNoIHNlc3Npb24gdHlwZQ0KI2NoYW5uZWwucmRwZHI9dHJ1ZQ0KI2NoYW5uZWwucmRwc25kPXRydWUNCiNjaGFubmVsLmRyZHludmM9dHJ1ZQ0KI2NoYW5uZWwuY2xpcHJkcj10cnVlDQojY2hhbm5lbC5yYWlsPXRydWUNCiNjaGFubmVsLnhyZHB2cj10cnVlDQo="
xrdp_conf

# Desktop Environment Configuration
desktop_env_conf

apt-get autoremove -y

echo "Install Done!"
echo "Now you can reboot and connect port 3389 with rdp client"
echo "Note: chromium-browser is not displayed on the desktop, please start it manually if necessary"
echo "Default Username: rdpuser"
echo "Default Password: rdpuser_password"


Original Chinese Version from https://gist.github.com/jianping0754/869b3de0e79c738f368d38217aa233cf


#/bin/bash
# Ubuntu20 桌面环境配置(arm兼容)
# 2021 flyqie

# 遇到错误马上退出,避免出现其他问题
set -e
# ...
set -x

# Xrdp
function install_xrdp() {
        apt-get install -y xrdp
} 

# 桌面环境
function install_desktop_env() {
        DEBIAN_FRONTEND=noninteractive apt-get install -y lxde
}

# Xrdp PulseAudio
function install_xrdp_pa() {
        apt-get install -y git libpulse-dev autoconf m4 intltool build-essential dpkg-dev libtool libsndfile1-dev libspeexdsp-dev libudev-dev pulseaudio
        cp /etc/apt/sources.list /etc/apt/sources.list.u2ad
        sed -Ei 's/^# deb-src /deb-src /' /etc/apt/sources.list
        apt-get update -y
        apt build-dep pulseaudio -y
        cd /tmp
        apt source pulseaudio
        pulsever=$(pulseaudio --version | awk '{print $2}')
        cd /tmp/pulseaudio-$pulsever
        # ./configure --without-caps
        ./configure
        git clone https://github.com/neutrinolabs/pulseaudio-module-xrdp.git
        cd pulseaudio-module-xrdp
        ./bootstrap
        ./configure PULSE_DIR="/tmp/pulseaudio-$pulsever"
        make
        cd /tmp/pulseaudio-$pulsever/pulseaudio-module-xrdp/src/.libs
        install -t "/var/lib/xrdp-pulseaudio-installer" -D -m 644 *.so
        # systemctl restart dbus
        # systemctl restart pulseaudio
        systemctl restart xrdp
        # 解决PA无声音问题,这似乎只在Ubuntu20出现,令人绝望...
        # Issue: https://github.com/neutrinolabs/pulseaudio-module-xrdp/issues/44
        fix_pa_systemd_issue
}

# 解决PA无声音问题,这似乎只在Ubuntu20出现,令人绝望...
# Issue: https://github.com/neutrinolabs/pulseaudio-module-xrdp/issues/44
function fix_pa_systemd_issue() {
mkdir -p /home/rdpuser/.config/systemd/user/
ln -s /dev/null /home/rdpuser/.config/systemd/user/pulseaudio.service
mkdir -p /home/rdpuser/.config/autostart/
cat <<EOF | \
  sudo tee /home/rdpuser/.config/autostart/pulseaudio.desktop
[Desktop Entry]
Type=Application
Exec=pulseaudio
Hidden=false
NoDisplay=false
X-GNOME-Autostart-enabled=true
Name[en_US]=pulseaudio
Name=pulseaudio
Comment[en_US]=pulseaudio
Comment=pulseaudio
EOF
chown -R rdpuser /home/rdpuser/.config/
chmod -R 755 /home/rdpuser/.config/
}

# 创建桌面用户
function create_desktop_user() {
useradd -s /bin/bash -m rdpuser
usermod -a -G sudo rdpuser
echo "rdpuser ALL=(ALL) ALL" >> /etc/sudoers
echo "rdpuser_password
rdpuser_password
" | passwd rdpuser
}

# Xrdp环境配置
function xrdp_conf() {
touch /home/rdpuser/.Xclients
echo "lxsession" > /home/rdpuser/.Xclients
chmod a+x /home/rdpuser/.Xclients
# sudo sed -e 's/^new_cursors=true/new_cursors=false/g' -i /etc/xrdp/xrdp.ini
cp /etc/xrdp/xrdp.ini /etc/xrdp/xrdp.ini.backup.u2ad
echo "$xrdp_config_base64" | base64 -d > /etc/xrdp/xrdp.ini
cat <<EOF | \
  sudo tee /etc/polkit-1/localauthority/50-local.d/xrdp-color-manager.pkla
[Netowrkmanager]
Identity=unix-user:*
Action=org.freedesktop.color-manager.create-device
ResultAny=no
ResultInactive=no
ResultActive=yes
EOF
systemctl restart xrdp
systemctl restart polkit
}

# 桌面环境配置
function desktop_env_conf() {
        # 移除掉网络图标
        apt-get remove -y network-manager-gnome
        # chrome疑似没有arm64,安装chromium
        apt-get install -y chromium-browser
}

# 设置简体中文
function set_chinese_lang() {
apt-get install -y locales
echo '# This file lists locales that you wish to have built. You can find a list
# of valid supported locales at /usr/share/i18n/SUPPORTED, and you can add
# user defined locales to /usr/local/share/i18n/SUPPORTED. If you change
# this file, you need to rerun locale-gen.
# aa_DJ ISO-8859-1
# aa_DJ.UTF-8 UTF-8
# aa_ER UTF-8
# aa_ER@saaho UTF-8
# aa_ET UTF-8
# af_ZA ISO-8859-1
# af_ZA.UTF-8 UTF-8
# ak_GH UTF-8
# am_ET UTF-8
# an_ES ISO-8859-15
# an_ES.UTF-8 UTF-8
# anp_IN UTF-8
# ar_AE ISO-8859-6
# ar_AE.UTF-8 UTF-8
# ar_BH ISO-8859-6
# ar_BH.UTF-8 UTF-8
# ar_DZ ISO-8859-6
# ar_DZ.UTF-8 UTF-8
# ar_EG ISO-8859-6
# ar_EG.UTF-8 UTF-8
# ar_IN UTF-8
# ar_IQ ISO-8859-6
# ar_IQ.UTF-8 UTF-8
# ar_JO ISO-8859-6
# ar_JO.UTF-8 UTF-8
# ar_KW ISO-8859-6
# ar_KW.UTF-8 UTF-8
# ar_LB ISO-8859-6
# ar_LB.UTF-8 UTF-8
# ar_LY ISO-8859-6
# ar_LY.UTF-8 UTF-8
# ar_MA ISO-8859-6
# ar_MA.UTF-8 UTF-8
# ar_OM ISO-8859-6
# ar_OM.UTF-8 UTF-8
# ar_QA ISO-8859-6
# ar_QA.UTF-8 UTF-8
# ar_SA ISO-8859-6
# ar_SA.UTF-8 UTF-8
# ar_SD ISO-8859-6
# ar_SD.UTF-8 UTF-8
# ar_SS UTF-8
# ar_SY ISO-8859-6
# ar_SY.UTF-8 UTF-8
# ar_TN ISO-8859-6
# ar_TN.UTF-8 UTF-8
# ar_YE ISO-8859-6
# ar_YE.UTF-8 UTF-8
# as_IN UTF-8
# ast_ES ISO-8859-15
# ast_ES.UTF-8 UTF-8
# ayc_PE UTF-8
# az_AZ UTF-8
# be_BY CP1251
# be_BY.UTF-8 UTF-8
# be_BY@latin UTF-8
# bem_ZM UTF-8
# ber_DZ UTF-8
# ber_MA UTF-8
# bg_BG CP1251
# bg_BG.UTF-8 UTF-8
# bhb_IN.UTF-8 UTF-8
# bho_IN UTF-8
# bn_BD UTF-8
# bn_IN UTF-8
# bo_CN UTF-8
# bo_IN UTF-8
# br_FR ISO-8859-1
# br_FR.UTF-8 UTF-8
# br_FR@euro ISO-8859-15
# brx_IN UTF-8
# bs_BA ISO-8859-2
# bs_BA.UTF-8 UTF-8
# byn_ER UTF-8
# ca_AD ISO-8859-15
# ca_AD.UTF-8 UTF-8
# ca_ES ISO-8859-1
# ca_ES.UTF-8 UTF-8
# ca_ES.UTF-8@valencia UTF-8
# ca_ES@euro ISO-8859-15
# ca_ES@valencia ISO-8859-15
# ca_FR ISO-8859-15
# ca_FR.UTF-8 UTF-8
# ca_IT ISO-8859-15
# ca_IT.UTF-8 UTF-8
# ce_RU UTF-8
# chr_US UTF-8
# cmn_TW UTF-8
# crh_UA UTF-8
# cs_CZ ISO-8859-2
# cs_CZ.UTF-8 UTF-8
# csb_PL UTF-8
# cv_RU UTF-8
# cy_GB ISO-8859-14
# cy_GB.UTF-8 UTF-8
# da_DK ISO-8859-1
# da_DK.UTF-8 UTF-8
# de_AT ISO-8859-1
# de_AT.UTF-8 UTF-8
# de_AT@euro ISO-8859-15
# de_BE ISO-8859-1
# de_BE.UTF-8 UTF-8
# de_BE@euro ISO-8859-15
# de_CH ISO-8859-1
# de_CH.UTF-8 UTF-8
# de_DE ISO-8859-1
# de_DE.UTF-8 UTF-8
# de_DE@euro ISO-8859-15
# de_IT ISO-8859-1
# de_IT.UTF-8 UTF-8
# de_LI.UTF-8 UTF-8
# de_LU ISO-8859-1
# de_LU.UTF-8 UTF-8
# de_LU@euro ISO-8859-15
# doi_IN UTF-8
# dv_MV UTF-8
# dz_BT UTF-8
# el_CY ISO-8859-7
# el_CY.UTF-8 UTF-8
# el_GR ISO-8859-7
# el_GR.UTF-8 UTF-8
# en_AG UTF-8
# en_AU ISO-8859-1
# en_AU.UTF-8 UTF-8
# en_BW ISO-8859-1
# en_BW.UTF-8 UTF-8
# en_CA ISO-8859-1
# en_CA.UTF-8 UTF-8
# en_DK ISO-8859-1
# en_DK.ISO-8859-15 ISO-8859-15
# en_DK.UTF-8 UTF-8
# en_GB ISO-8859-1
# en_GB.ISO-8859-15 ISO-8859-15
# en_GB.UTF-8 UTF-8
# en_HK ISO-8859-1
# en_HK.UTF-8 UTF-8
# en_IE ISO-8859-1
# en_IE.UTF-8 UTF-8
# en_IE@euro ISO-8859-15
# en_IL UTF-8
# en_IN UTF-8
# en_NG UTF-8
# en_NZ ISO-8859-1
# en_NZ.UTF-8 UTF-8
# en_PH ISO-8859-1
# en_PH.UTF-8 UTF-8
# en_SG ISO-8859-1
# en_SG.UTF-8 UTF-8
# en_US ISO-8859-1
# en_US.ISO-8859-15 ISO-8859-15
en_US.UTF-8 UTF-8
# en_ZA ISO-8859-1
# en_ZA.UTF-8 UTF-8
# en_ZM UTF-8
# en_ZW ISO-8859-1
# en_ZW.UTF-8 UTF-8
# eo UTF-8
# es_AR ISO-8859-1
# es_AR.UTF-8 UTF-8
# es_BO ISO-8859-1
# es_BO.UTF-8 UTF-8
# es_CL ISO-8859-1
# es_CL.UTF-8 UTF-8
# es_CO ISO-8859-1
# es_CO.UTF-8 UTF-8
# es_CR ISO-8859-1
# es_CR.UTF-8 UTF-8
# es_CU UTF-8
# es_DO ISO-8859-1
# es_DO.UTF-8 UTF-8
# es_EC ISO-8859-1
# es_EC.UTF-8 UTF-8
# es_ES ISO-8859-1
# es_ES.UTF-8 UTF-8
# es_ES@euro ISO-8859-15
# es_GT ISO-8859-1
# es_GT.UTF-8 UTF-8
# es_HN ISO-8859-1
# es_HN.UTF-8 UTF-8
# es_MX ISO-8859-1
# es_MX.UTF-8 UTF-8
# es_NI ISO-8859-1
# es_NI.UTF-8 UTF-8
# es_PA ISO-8859-1
# es_PA.UTF-8 UTF-8
# es_PE ISO-8859-1
# es_PE.UTF-8 UTF-8
# es_PR ISO-8859-1
# es_PR.UTF-8 UTF-8
# es_PY ISO-8859-1
# es_PY.UTF-8 UTF-8
# es_SV ISO-8859-1
# es_SV.UTF-8 UTF-8
# es_US ISO-8859-1
# es_US.UTF-8 UTF-8
# es_UY ISO-8859-1
# es_UY.UTF-8 UTF-8
# es_VE ISO-8859-1
# es_VE.UTF-8 UTF-8
# et_EE ISO-8859-1
# et_EE.ISO-8859-15 ISO-8859-15
# et_EE.UTF-8 UTF-8
# eu_ES ISO-8859-1
# eu_ES.UTF-8 UTF-8
# eu_ES@euro ISO-8859-15
# eu_FR ISO-8859-1
# eu_FR.UTF-8 UTF-8
# eu_FR@euro ISO-8859-15
# fa_IR UTF-8
# ff_SN UTF-8
# fi_FI ISO-8859-1
# fi_FI.UTF-8 UTF-8
# fi_FI@euro ISO-8859-15
# fil_PH UTF-8
# fo_FO ISO-8859-1
# fo_FO.UTF-8 UTF-8
# fr_BE ISO-8859-1
# fr_BE.UTF-8 UTF-8
# fr_BE@euro ISO-8859-15
# fr_CA ISO-8859-1
# fr_CA.UTF-8 UTF-8
# fr_CH ISO-8859-1
# fr_CH.UTF-8 UTF-8
# fr_FR ISO-8859-1
# fr_FR.UTF-8 UTF-8
# fr_FR@euro ISO-8859-15
# fr_LU ISO-8859-1
# fr_LU.UTF-8 UTF-8
# fr_LU@euro ISO-8859-15
# fur_IT UTF-8
# fy_DE UTF-8
# fy_NL UTF-8
# ga_IE ISO-8859-1
# ga_IE.UTF-8 UTF-8
# ga_IE@euro ISO-8859-15
# gd_GB ISO-8859-15
# gd_GB.UTF-8 UTF-8
# gez_ER UTF-8
# gez_ER@abegede UTF-8
# gez_ET UTF-8
# gez_ET@abegede UTF-8
# gl_ES ISO-8859-1
# gl_ES.UTF-8 UTF-8
# gl_ES@euro ISO-8859-15
# gu_IN UTF-8
# gv_GB ISO-8859-1
# gv_GB.UTF-8 UTF-8
# ha_NG UTF-8
# hak_TW UTF-8
# he_IL ISO-8859-8
# he_IL.UTF-8 UTF-8
# hi_IN UTF-8
# hne_IN UTF-8
# hr_HR ISO-8859-2
# hr_HR.UTF-8 UTF-8
# hsb_DE ISO-8859-2
# hsb_DE.UTF-8 UTF-8
# ht_HT UTF-8
# hu_HU ISO-8859-2
# hu_HU.UTF-8 UTF-8
# hy_AM UTF-8
# hy_AM.ARMSCII-8 ARMSCII-8
# ia_FR UTF-8
# id_ID ISO-8859-1
# id_ID.UTF-8 UTF-8
# ig_NG UTF-8
# ik_CA UTF-8
# is_IS ISO-8859-1
# is_IS.UTF-8 UTF-8
# it_CH ISO-8859-1
# it_CH.UTF-8 UTF-8
# it_IT ISO-8859-1
# it_IT.UTF-8 UTF-8
# it_IT@euro ISO-8859-15
# iu_CA UTF-8
# ja_JP.EUC-JP EUC-JP
# ja_JP.UTF-8 UTF-8
# ka_GE GEORGIAN-PS
# ka_GE.UTF-8 UTF-8
# kk_KZ PT154
# kk_KZ.RK1048 RK1048
# kk_KZ.UTF-8 UTF-8
# kl_GL ISO-8859-1
# kl_GL.UTF-8 UTF-8
# km_KH UTF-8
# kn_IN UTF-8
# ko_KR.EUC-KR EUC-KR
# ko_KR.UTF-8 UTF-8
# kok_IN UTF-8
# ks_IN UTF-8
# ks_IN@devanagari UTF-8
# ku_TR ISO-8859-9
# ku_TR.UTF-8 UTF-8
# kw_GB ISO-8859-1
# kw_GB.UTF-8 UTF-8
# ky_KG UTF-8
# lb_LU UTF-8
# lg_UG ISO-8859-10
# lg_UG.UTF-8 UTF-8
# li_BE UTF-8
# li_NL UTF-8
# lij_IT UTF-8
# ln_CD UTF-8
# lo_LA UTF-8
# lt_LT ISO-8859-13
# lt_LT.UTF-8 UTF-8
# lv_LV ISO-8859-13
# lv_LV.UTF-8 UTF-8
# lzh_TW UTF-8
# mag_IN UTF-8
# mai_IN UTF-8
# mg_MG ISO-8859-15
# mg_MG.UTF-8 UTF-8
# mhr_RU UTF-8
# mi_NZ ISO-8859-13
# mi_NZ.UTF-8 UTF-8
# mk_MK ISO-8859-5
# mk_MK.UTF-8 UTF-8
# ml_IN UTF-8
# mn_MN UTF-8
# mni_IN UTF-8
# mr_IN UTF-8
# ms_MY ISO-8859-1
# ms_MY.UTF-8 UTF-8
# mt_MT ISO-8859-3
# mt_MT.UTF-8 UTF-8
# my_MM UTF-8
# nan_TW UTF-8
# nan_TW@latin UTF-8
# nb_NO ISO-8859-1
# nb_NO.UTF-8 UTF-8
# nds_DE UTF-8
# nds_NL UTF-8
# ne_NP UTF-8
# nhn_MX UTF-8
# niu_NU UTF-8
# niu_NZ UTF-8
# nl_AW UTF-8
# nl_BE ISO-8859-1
# nl_BE.UTF-8 UTF-8
# nl_BE@euro ISO-8859-15
# nl_NL ISO-8859-1
# nl_NL.UTF-8 UTF-8
# nl_NL@euro ISO-8859-15
# nn_NO ISO-8859-1
# nn_NO.UTF-8 UTF-8
# nr_ZA UTF-8
# nso_ZA UTF-8
# oc_FR ISO-8859-1
# oc_FR.UTF-8 UTF-8
# om_ET UTF-8
# om_KE ISO-8859-1
# om_KE.UTF-8 UTF-8
# or_IN UTF-8
# os_RU UTF-8
# pa_IN UTF-8
# pa_PK UTF-8
# pap_AW UTF-8
# pap_CW UTF-8
# pl_PL ISO-8859-2
# pl_PL.UTF-8 UTF-8
# ps_AF UTF-8
# pt_BR ISO-8859-1
# pt_BR.UTF-8 UTF-8
# pt_PT ISO-8859-1
# pt_PT.UTF-8 UTF-8
# pt_PT@euro ISO-8859-15
# quz_PE UTF-8
# raj_IN UTF-8
# ro_RO ISO-8859-2
# ro_RO.UTF-8 UTF-8
# ru_RU ISO-8859-5
# ru_RU.CP1251 CP1251
# ru_RU.KOI8-R KOI8-R
# ru_RU.UTF-8 UTF-8
# ru_UA KOI8-U
# ru_UA.UTF-8 UTF-8
# rw_RW UTF-8
# sa_IN UTF-8
# sat_IN UTF-8
# sc_IT UTF-8
# sd_IN UTF-8
# sd_IN@devanagari UTF-8
# se_NO UTF-8
# sgs_LT UTF-8
# shs_CA UTF-8
# si_LK UTF-8
# sid_ET UTF-8
# sk_SK ISO-8859-2
# sk_SK.UTF-8 UTF-8
# sl_SI ISO-8859-2
# sl_SI.UTF-8 UTF-8
# so_DJ ISO-8859-1
# so_DJ.UTF-8 UTF-8
# so_ET UTF-8
# so_KE ISO-8859-1
# so_KE.UTF-8 UTF-8
# so_SO ISO-8859-1
# so_SO.UTF-8 UTF-8
# sq_AL ISO-8859-1
# sq_AL.UTF-8 UTF-8
# sq_MK UTF-8
# sr_ME UTF-8
# sr_RS UTF-8
# sr_RS@latin UTF-8
# ss_ZA UTF-8
# st_ZA ISO-8859-1
# st_ZA.UTF-8 UTF-8
# sv_FI ISO-8859-1
# sv_FI.UTF-8 UTF-8
# sv_FI@euro ISO-8859-15
# sv_SE ISO-8859-1
# sv_SE.ISO-8859-15 ISO-8859-15
# sv_SE.UTF-8 UTF-8
# sw_KE UTF-8
# sw_TZ UTF-8
# szl_PL UTF-8
# ta_IN UTF-8
# ta_LK UTF-8
# tcy_IN.UTF-8 UTF-8
# te_IN UTF-8
# tg_TJ KOI8-T
# tg_TJ.UTF-8 UTF-8
# th_TH TIS-620
# th_TH.UTF-8 UTF-8
# the_NP UTF-8
# ti_ER UTF-8
# ti_ET UTF-8
# tig_ER UTF-8
# tk_TM UTF-8
# tl_PH ISO-8859-1
# tl_PH.UTF-8 UTF-8
# tn_ZA UTF-8
# tr_CY ISO-8859-9
# tr_CY.UTF-8 UTF-8
# tr_TR ISO-8859-9
# tr_TR.UTF-8 UTF-8
# ts_ZA UTF-8
# tt_RU UTF-8
# tt_RU@iqtelif UTF-8
# ug_CN UTF-8
# uk_UA KOI8-U
# uk_UA.UTF-8 UTF-8
# unm_US UTF-8
# ur_IN UTF-8
# ur_PK UTF-8
# uz_UZ ISO-8859-1
# uz_UZ.UTF-8 UTF-8
# uz_UZ@cyrillic UTF-8
# ve_ZA UTF-8
# vi_VN UTF-8
# wa_BE ISO-8859-1
# wa_BE.UTF-8 UTF-8
# wa_BE@euro ISO-8859-15
# wae_CH UTF-8
# wal_ET UTF-8
# wo_SN UTF-8
# xh_ZA ISO-8859-1
# xh_ZA.UTF-8 UTF-8
# yi_US CP1255
# yi_US.UTF-8 UTF-8
# yo_NG UTF-8
# yue_HK UTF-8
zh_CN GB2312
zh_CN.GB18030 GB18030
zh_CN.GBK GBK
zh_CN.UTF-8 UTF-8
# zh_HK BIG5-HKSCS
# zh_HK.UTF-8 UTF-8
# zh_SG GB2312
# zh_SG.GBK GBK
# zh_SG.UTF-8 UTF-8
# zh_TW BIG5
# zh_TW.EUC-TW EUC-TW
# zh_TW.UTF-8 UTF-8
# zu_ZA ISO-8859-1
# zu_ZA.UTF-8 UTF-8
# en_US.UTF-8 UTF-8'>/etc/locale.gen
locale-gen
update-locale "LANG=zh_CN.UTF-8"
locale-gen --purge "zh_CN.UTF-8"
dpkg-reconfigure --frontend noninteractive locales
localectl set-locale LANG=zh_CN.UTF-8
apt-get install -y xfonts-intl-chinese xfonts-wqy fontforge ttf-wqy-microhei ttf-wqy-zenhei xfonts-wqy fonts-wqy-microhei
apt-get install -y ibus-libpinyin
}

apt-get update -y
apt-get install -y sudo screen

# 创建用户
create_desktop_user

# 安装桌面环境
install_desktop_env

# 安装XRDP
install_xrdp

# 安装XRDP PA
install_xrdp_pa

# XRDP环境配置
xrdp_config_base64="W0dsb2JhbHNdDQo7IHhyZHAuaW5pIGZpbGUgdmVyc2lvbiBudW1iZXINCmluaV92ZXJzaW9uPTENCg0KOyBmb3JrIGEgbmV3IHByb2Nlc3MgZm9yIGVhY2ggaW5jb21pbmcgY29ubmVjdGlvbg0KZm9yaz10cnVlDQoNCjsgcG9ydHMgdG8gbGlzdGVuIG9uLCBudW1iZXIgYWxvbmUgbWVhbnMgbGlzdGVuIG9uIGFsbCBpbnRlcmZhY2VzDQo7IDAuMC4wLjAgb3IgOjogaWYgaXB2NiBpcyBjb25maWd1cmVkDQo7IHNwYWNlIGJldHdlZW4gbXVsdGlwbGUgb2NjdXJyZW5jZXMNCjsNCjsgRXhhbXBsZXM6DQo7ICAgcG9ydD0zMzg5DQo7ICAgcG9ydD11bml4Oi8vLi90bXAveHJkcC5zb2NrZXQNCjsgICBwb3J0PXRjcDovLy46MzM4OSAgICAgICAgICAgICAgICAgICAgICAgICAgIDEyNy4wLjAuMTozMzg5DQo7ICAgcG9ydD10Y3A6Ly86MzM4OSAgICAgICAgICAgICAgICAgICAgICAgICAgICAqOjMzODkNCjsgICBwb3J0PXRjcDovLzxhbnkgaXB2NCBmb3JtYXQgYWRkcj46MzM4OSAgICAgIDE5Mi4xNjguMS4xOjMzODkNCjsgICBwb3J0PXRjcDY6Ly8uOjMzODkgICAgICAgICAgICAgICAgICAgICAgICAgIDo6MTozMzg5DQo7ICAgcG9ydD10Y3A2Oi8vOjMzODkgICAgICAgICAgICAgICAgICAgICAgICAgICAqOjMzODkNCjsgICBwb3J0PXRjcDY6Ly97PGFueSBpcHY2IGZvcm1hdCBhZGRyPn06MzM4OSAgIHtGQzAwOjA6MDowOjA6MDowOjF9OjMzODkNCjsgICBwb3J0PXZzb2NrOi8vPGNpZD46PHBvcnQ+DQpwb3J0PTMzODkNCg0KOyAncG9ydCcgYWJvdmUgc2hvdWxkIGJlIGNvbm5lY3RlZCB0byB3aXRoIHZzb2NrIGluc3RlYWQgb2YgdGNwDQo7IHVzZSB0aGlzIG9ubHkgd2l0aCBudW1iZXIgYWxvbmUgaW4gcG9ydCBhYm92ZQ0KOyBwcmVmZXIgdXNlIHZzb2NrOi8vPGNpZD46PHBvcnQ+IGFib3ZlDQp1c2VfdnNvY2s9ZmFsc2UNCg0KOyByZWd1bGF0ZSBpZiB0aGUgbGlzdGVuaW5nIHNvY2tldCB1c2Ugc29ja2V0IG9wdGlvbiB0Y3Bfbm9kZWxheQ0KOyBubyBidWZmZXJpbmcgd2lsbCBiZSBwZXJmb3JtZWQgaW4gdGhlIFRDUCBzdGFjaw0KdGNwX25vZGVsYXk9dHJ1ZQ0KDQo7IHJlZ3VsYXRlIGlmIHRoZSBsaXN0ZW5pbmcgc29ja2V0IHVzZSBzb2NrZXQgb3B0aW9uIGtlZXBhbGl2ZQ0KOyBpZiB0aGUgbmV0d29yayBjb25uZWN0aW9uIGRpc2FwcGVhciB3aXRob3V0IGNsb3NlIG1lc3NhZ2VzIHRoZSBjb25uZWN0aW9uIHdpbGwgYmUgY2xvc2VkDQp0Y3Bfa2VlcGFsaXZlPXRydWUNCg0KOyBzZXQgdGNwIHNlbmQvcmVjdiBidWZmZXIgKGZvciBleHBlcnRzKQ0KI3RjcF9zZW5kX2J1ZmZlcl9ieXRlcz0zMjc2OA0KI3RjcF9yZWN2X2J1ZmZlcl9ieXRlcz0zMjc2OA0KDQo7IHNlY3VyaXR5IGxheWVyIGNhbiBiZSAndGxzJywgJ3JkcCcgb3IgJ25lZ290aWF0ZScNCjsgZm9yIGNsaWVudCBjb21wYXRpYmxlIGxheWVyDQpzZWN1cml0eV9sYXllcj1uZWdvdGlhdGUNCg0KOyBtaW5pbXVtIHNlY3VyaXR5IGxldmVsIGFsbG93ZWQgZm9yIGNsaWVudCBmb3IgY2xhc3NpYyBSRFAgZW5jcnlwdGlvbg0KOyB1c2UgdGxzX2NpcGhlcnMgdG8gY29uZmlndXJlIFRMUyBlbmNyeXB0aW9uDQo7IGNhbiBiZSAnbm9uZScsICdsb3cnLCAnbWVkaXVtJywgJ2hpZ2gnLCAnZmlwcycNCmNyeXB0X2xldmVsPWhpZ2gNCg0KOyBYLjUwOSBjZXJ0aWZpY2F0ZSBhbmQgcHJpdmF0ZSBrZXkNCjsgb3BlbnNzbCByZXEgLXg1MDkgLW5ld2tleSByc2E6MjA0OCAtbm9kZXMgLWtleW91dCBrZXkucGVtIC1vdXQgY2VydC5wZW0gLWRheXMgMzY1DQo7IG5vdGUgdGhpcyBuZWVkcyB0aGUgdXNlciB4cmRwIHRvIGJlIGEgbWVtYmVyIG9mIHRoZSBzc2wtY2VydCBncm91cCwgZG8gd2l0aCBlLmcuDQo7JCBzdWRvIGFkZHVzZXIgeHJkcCBzc2wtY2VydA0KY2VydGlmaWNhdGU9DQprZXlfZmlsZT0NCg0KOyBzZXQgU1NMIHByb3RvY29scw0KOyBjYW4gYmUgY29tbWEgc2VwYXJhdGVkIGxpc3Qgb2YgJ1NTTHYzJywgJ1RMU3YxJywgJ1RMU3YxLjEnLCAnVExTdjEuMicsICdUTFN2MS4zJw0Kc3NsX3Byb3RvY29scz1UTFN2MS4yLCBUTFN2MS4zDQo7IHNldCBUTFMgY2lwaGVyIHN1aXRlcw0KI3Rsc19jaXBoZXJzPUhJR0gNCg0KOyBTZWN0aW9uIG5hbWUgdG8gdXNlIGZvciBhdXRvbWF0aWMgbG9naW4gaWYgdGhlIGNsaWVudCBzZW5kcyB1c2VybmFtZQ0KOyBhbmQgcGFzc3dvcmQuIElmIGVtcHR5LCB0aGUgZG9tYWluIG5hbWUgc2VudCBieSB0aGUgY2xpZW50IGlzIHVzZWQuDQo7IElmIGVtcHR5IGFuZCBubyBkb21haW4gbmFtZSBpcyBnaXZlbiwgdGhlIGZpcnN0IHN1aXRhYmxlIHNlY3Rpb24gaW4NCjsgdGhpcyBmaWxlIHdpbGwgYmUgdXNlZC4NCmF1dG9ydW49DQoNCmFsbG93X2NoYW5uZWxzPXRydWUNCmFsbG93X211bHRpbW9uPXRydWUNCmJpdG1hcF9jYWNoZT10cnVlDQpiaXRtYXBfY29tcHJlc3Npb249dHJ1ZQ0KYnVsa19jb21wcmVzc2lvbj10cnVlDQojaGlkZWxvZ3dpbmRvdz10cnVlDQptYXhfYnBwPTMyDQpuZXdfY3Vyc29ycz1mYWxzZQ0KOyBmYXN0cGF0aCAtIGNhbiBiZSAnaW5wdXQnLCAnb3V0cHV0JywgJ2JvdGgnLCAnbm9uZScNCnVzZV9mYXN0cGF0aD1ib3RoDQo7IHdoZW4gdHJ1ZSwgdXNlcmlkL3Bhc3N3b3JkICptdXN0KiBiZSBwYXNzZWQgb24gY21kIGxpbmUNCiNyZXF1aXJlX2NyZWRlbnRpYWxzPXRydWUNCjsgWW91IGNhbiBzZXQgdGhlIFBBTSBlcnJvciB0ZXh0IGluIGEgZ2F0ZXdheSBzZXR1cCAoTUFYIDI1NiBjaGFycykNCiNwYW1lcnJvcnR4dD1jaGFuZ2UgeW91ciBwYXNzd29yZCBhY2NvcmRpbmcgdG8gcG9saWN5IGF0IGh0dHA6Ly91cmwNCg0KOw0KOyBjb2xvcnMgdXNlZCBieSB3aW5kb3dzIGluIFJHQiBmb3JtYXQNCjsNCmJsdWU9MDA5Y2I1DQpncmV5PWRlZGVkZQ0KI2JsYWNrPTAwMDAwMA0KI2RhcmtfZ3JleT04MDgwODANCiNibHVlPTA4MjQ2Yg0KI2RhcmtfYmx1ZT0wODI0NmINCiN3aGl0ZT1mZmZmZmYNCiNyZWQ9ZmYwMDAwDQojZ3JlZW49MDBmZjAwDQojYmFja2dyb3VuZD02MjZjNzINCg0KOw0KOyBjb25maWd1cmUgbG9naW4gc2NyZWVuDQo7DQoNCjsgTG9naW4gU2NyZWVuIFdpbmRvdyBUaXRsZQ0KI2xzX3RpdGxlPU15IExvZ2luIFRpdGxlDQoNCjsgdG9wIGxldmVsIHdpbmRvdyBiYWNrZ3JvdW5kIGNvbG9yIGluIFJHQiBmb3JtYXQNCmxzX3RvcF93aW5kb3dfYmdfY29sb3I9MDA5Y2I1DQoNCjsgd2lkdGggYW5kIGhlaWdodCBvZiBsb2dpbiBzY3JlZW4NCmxzX3dpZHRoPTM1MA0KbHNfaGVpZ2h0PTQzMA0KDQo7IGxvZ2luIHNjcmVlbiBiYWNrZ3JvdW5kIGNvbG9yIGluIFJHQiBmb3JtYXQNCmxzX2JnX2NvbG9yPWRlZGVkZQ0KDQo7IG9wdGlvbmFsIGJhY2tncm91bmQgaW1hZ2UgZmlsZW5hbWUgKGJtcCBmb3JtYXQpLg0KI2xzX2JhY2tncm91bmRfaW1hZ2U9DQoNCjsgbG9nbw0KOyBmdWxsIHBhdGggdG8gYm1wLWZpbGUgb3IgZmlsZSBpbiBzaGFyZWQgZm9sZGVyDQpsc19sb2dvX2ZpbGVuYW1lPQ0KbHNfbG9nb194X3Bvcz01NQ0KbHNfbG9nb195X3Bvcz01MA0KDQo7IGZvciBwb3NpdGlvbmluZyBsYWJlbHMgc3VjaCBhcyB1c2VybmFtZSwgcGFzc3dvcmQgZXRjDQpsc19sYWJlbF94X3Bvcz0zMA0KbHNfbGFiZWxfd2lkdGg9NjUNCg0KOyBmb3IgcG9zaXRpb25pbmcgdGV4dCBhbmQgY29tYm8gYm94ZXMgbmV4dCB0byBhYm92ZSBsYWJlbHMNCmxzX2lucHV0X3hfcG9zPTExMA0KbHNfaW5wdXRfd2lkdGg9MjEwDQoNCjsgeSBwb3MgZm9yIGZpcnN0IGxhYmVsIGFuZCBjb21ibyBib3gNCmxzX2lucHV0X3lfcG9zPTIyMA0KDQo7IE9LIGJ1dHRvbg0KbHNfYnRuX29rX3hfcG9zPTE0Mg0KbHNfYnRuX29rX3lfcG9zPTM3MA0KbHNfYnRuX29rX3dpZHRoPTg1DQpsc19idG5fb2tfaGVpZ2h0PTMwDQoNCjsgQ2FuY2VsIGJ1dHRvbg0KbHNfYnRuX2NhbmNlbF94X3Bvcz0yMzcNCmxzX2J0bl9jYW5jZWxfeV9wb3M9MzcwDQpsc19idG5fY2FuY2VsX3dpZHRoPTg1DQpsc19idG5fY2FuY2VsX2hlaWdodD0zMA0KDQpbTG9nZ2luZ10NCkxvZ0ZpbGU9eHJkcC5sb2cNCkxvZ0xldmVsPURFQlVHDQpFbmFibGVTeXNsb2c9dHJ1ZQ0KU3lzbG9nTGV2ZWw9REVCVUcNCjsgTG9nTGV2ZWwgYW5kIFN5c0xvZ0xldmVsIGNvdWxkIGJ5IGFueSBvZjogY29yZSwgZXJyb3IsIHdhcm5pbmcsIGluZm8gb3IgZGVidWcNCg0KW0NoYW5uZWxzXQ0KOyBDaGFubmVsIG5hbWVzIG5vdCBsaXN0ZWQgaGVyZSB3aWxsIGJlIGJsb2NrZWQgYnkgWFJEUC4NCjsgWW91IGNhbiBibG9jayBhbnkgY2hhbm5lbCBieSBzZXR0aW5nIGl0cyB2YWx1ZSB0byBmYWxzZS4NCjsgSU1QT1JUQU5UISBBbGwgY2hhbm5lbHMgYXJlIG5vdCBzdXBwb3J0ZWQgaW4gYWxsIHVzZQ0KOyBjYXNlcyBldmVuIGlmIHlvdSBzZXQgYWxsIHZhbHVlcyB0byB0cnVlLg0KOyBZb3UgY2FuIG92ZXJyaWRlIHRoZXNlIHNldHRpbmdzIG9uIGVhY2ggc2Vzc2lvbiB0eXBlDQo7IFRoZXNlIHNldHRpbmdzIGFyZSBvbmx5IHVzZWQgaWYgYWxsb3dfY2hhbm5lbHM9dHJ1ZQ0KcmRwZHI9dHJ1ZQ0KcmRwc25kPXRydWUNCmRyZHludmM9dHJ1ZQ0KY2xpcHJkcj10cnVlDQpyYWlsPXRydWUNCnhyZHB2cj10cnVlDQp0Y3V0aWxzPXRydWUNCg0KOyBmb3IgZGVidWdnaW5nIHhyZHAsIGluIHNlY3Rpb24geHJkcDEsIGNoYW5nZSBwb3J0PS0xIHRvIHRoaXM6DQojcG9ydD0vdG1wLy54cmRwL3hyZHBfZGlzcGxheV8xMA0KDQo7IGZvciBkZWJ1Z2dpbmcgeHJkcCwgYWRkIGZvbGxvd2luZyBsaW5lIHRvIHNlY3Rpb24geHJkcDENCiNjaGFuc3J2cG9ydD0vdG1wLy54cmRwL3hyZHBfY2hhbnNydl9zb2NrZXRfNzIxMA0KDQoNCjsNCjsgU2Vzc2lvbiB0eXBlcw0KOw0KDQo7IFNvbWUgc2Vzc2lvbiB0eXBlcyBzdWNoIGFzIFhvcmcsIFgxMXJkcCBhbmQgWHZuYyBzdGFydCBhIGRpc3BsYXkgc2VydmVyLg0KOyBTdGFydHVwIGNvbW1hbmQtbGluZSBwYXJhbWV0ZXJzIGZvciB0aGUgZGlzcGxheSBzZXJ2ZXIgYXJlIGNvbmZpZ3VyZWQNCjsgaW4gc2VzbWFuLmluaS4gU2VlIGFuZCBjb25maWd1cmUgYWxzbyBzZXNtYW4uaW5pLg0KW1hvcmddDQpuYW1lPVhvcmcNCmxpYj1saWJ4dXAuc28NCnVzZXJuYW1lPWFzaw0KcGFzc3dvcmQ9YXNrDQppcD0xMjcuMC4wLjENCnBvcnQ9LTENCmNvZGU9MjANCg0KIyBbWHZuY10NCiMgbmFtZT1Ydm5jDQojIGxpYj1saWJ2bmMuc28NCiMgdXNlcm5hbWU9YXNrDQojIHBhc3N3b3JkPWFzaw0KIyBpcD0xMjcuMC4wLjENCiMgcG9ydD0tMQ0KI3hzZXJ2ZXJicHA9MjQNCiNkZWxheV9tcz0yMDAwDQoNCiMgW3ZuYy1hbnldDQojIG5hbWU9dm5jLWFueQ0KIyBsaWI9bGlidm5jLnNvDQojIGlwPWFzaw0KIyBwb3J0PWFzazU5MDANCiMgdXNlcm5hbWU9bmENCiMgcGFzc3dvcmQ9YXNrDQojcGFtdXNlcm5hbWU9YXNrc2FtZQ0KI3BhbXBhc3N3b3JkPWFza3NhbWUNCiNwYW1zZXNzaW9ubW5nPTEyNy4wLjAuMQ0KI2RlbGF5X21zPTIwMDANCg0KIyBbbmV1dHJpbm9yZHAtYW55XQ0KIyBuYW1lPW5ldXRyaW5vcmRwLWFueQ0KIyBsaWI9bGlieHJkcG5ldXRyaW5vcmRwLnNvDQojIGlwPWFzaw0KIyBwb3J0PWFzazMzODkNCiMgdXNlcm5hbWU9YXNrDQojIHBhc3N3b3JkPWFzaw0KDQo7IFlvdSBjYW4gb3ZlcnJpZGUgdGhlIGNvbW1vbiBjaGFubmVsIHNldHRpbmdzIGZvciBlYWNoIHNlc3Npb24gdHlwZQ0KI2NoYW5uZWwucmRwZHI9dHJ1ZQ0KI2NoYW5uZWwucmRwc25kPXRydWUNCiNjaGFubmVsLmRyZHludmM9dHJ1ZQ0KI2NoYW5uZWwuY2xpcHJkcj10cnVlDQojY2hhbm5lbC5yYWlsPXRydWUNCiNjaGFubmVsLnhyZHB2cj10cnVlDQo="
xrdp_conf

# 桌面环境配置
desktop_env_conf

# 中文配置
set_chinese_lang

apt-get autoremove -y

echo "Install Done!"
echo "Now you can reboot and connect port 3389 with rdp client"
echo "Note: chromium-browser is not displayed on the desktop, please start it manually if necessary"
echo "Default Username: rdpuser"
echo "Default Password: rdpuser_password"


Fix xRDP port 3389 not on tcp v4 interface issue

Unfortunately, after ran that script, I found it is still not able to connect to 3389 port.

The problem is 3389 port only binding to ipv6 interface, not on ipv4. But that can be changed using following method by modifying the xrdp configuration file:

nano /etc/xrdp/xrdp.ini

Change xrdp.ini file 's port configuration from "port=3389" to "port=tcp://:3389". 

[Globals]
; xrdp.ini file version number
ini_version=1

; fork a new process for each incoming connection
fork=true

; ports to listen on, number alone means listen on all interfaces
; 0.0.0.0 or :: if ipv6 is configured
; space between multiple occurrences
;
; Examples:
;   port=3389
;   port=unix://./tmp/xrdp.socket
;   port=tcp://.:3389                           127.0.0.1:3389
;   port=tcp://:3389                            *:3389
;   port=tcp://<any ipv4 format addr>:3389      192.168.1.1:3389
;   port=tcp6://.:3389                          ::1:3389
;   port=tcp6://:3389                           *:3389
;   port=tcp6://{<any ipv6 format addr>}:3389   {FC00:0:0:0:0:0:0:1}:3389
;   port=vsock://<cid>:<port>
port=tcp://:3389


After that, you will need to restart the xrdp service and you can use following commands to verify 3389 port:

  • apt install net-tools
  • netstat -na | grep 3389
  • systemctl xrdp status
  • service xrdp restart

References

  • 甲骨文ARM Gnome桌面配置
  • flyqie/ubuntu-20-arm-desktop.sh
  • 一键安装Pulseaudio在远程Linux桌面服务器上模拟声卡


via Blogger http://blog.51sec.org/2022/01/dd-original-ubuntu-image-to-oracle.html
January 09, 2022 at 08:46PM Cloud
0 Comments

Deploy Fortigate Firewall with Trial License to Azure Free Tier VM

1/8/2022

0 Comments

 
Deploy Fortigate Firewall with Trial License to Azure Free Tier VM

There are lots of limitation for you to deploy Azure marketplace's Fortigate VM , such as VM size requirement, license requirement, also only for Pay As You Go subscription. For my lab, not for test drive, I might need to deploy a Fortigate firewall into 1vCPU, 1GB Ram B1S size VM, and I will need to use my azure credit or student subscription to play with it. 

That won't be able to happen if you are using Marketplace's product.

This post is going to show you how to download a proper Fortigate VM file and how to load it into Azure to create your own customized VM with minimum VM size and cost.


Download Fortigate VM

After logged into FortiCloud, you can find out VM Images download link from Support menu.


From VM Images page, you can filter download link based on your corresponding product, platform and version :


Based on my testing, you can choose either Azure platform or Hyper-V platform to download. The difference will be, for Azure platform, it does not have trial license and you will be prompted to add your own license. 

For Hyper-V platform vm image, it already has a 15 days trial license in it. As long as you started vm, 15 days trial license will be activated.


Covert Dynamic Disk to Fixed Size Disk

Since the downloaded VM image only has dynamic disks inside it, we will need to convert it to fixed size disk. That can be done by Hyper-V manager.


You will get a 2GB VHD file which can be uploaded to Azure blob storage.


Upload 2GB VHD File to Blob Container


Create Image Based on 2GB VHD

Search Images service and create an image based on the VHD file uploaded to Blob.


Create VM using new image


Access Fortigate VM


Once VM deployed using the image, you will get a public ip to access your vm. 

If you are using Azure Fortigate VM, you will  have following wo ways to access it, either using browser to open url https://<public ip> or using SSH client to ssh to it.

The username and password is the one you put in during creating VM.

From browser, after you logged in, you will get a license invalid error and it will not allow you continue until you uploaded a valid license. 


I will suggest to use Hyper-VM VHD file to create image , then create VM. In that case, you will have default username and passowrd : admin/null

You will need to open HTTP port to access URL.

SSH will be same to access. 

But you will automatically load with a trial license for 15 days. 


Adding Second NIC on VM

Create a new subnet for your LAN network, which will be used for your new NIC card.


To add a new network card for Fortigate VM, you will need to stop the VM. 


Create a new routing table for LAN network


Add a new route:


This new route will route all traffic in associated subnet(s) to Fortigate's LAN NIC IP.


Associate the LAN subnet with this new route.


References


via Blogger http://blog.51sec.org/2022/01/deploy-fortigate-firewall-with-trial.html
January 08, 2022 at 11:29AM Fortigate
0 Comments
<<Previous

    Categories

    All
    Architecture
    Blog
    Checkpoint
    Cisco
    Cloud
    CyberArk
    F5
    Fortigate
    Guardium
    Juniper
    Linux
    Network
    Others
    Palo Alto
    Qualys
    Raspberry Pi
    Security
    SIEM
    Software
    Vmware
    VPN
    Wireless

    Archives

    March 2024
    February 2024
    January 2024
    December 2023
    November 2023
    October 2023
    September 2023
    August 2023
    July 2023
    June 2023
    May 2023
    April 2023
    March 2023
    February 2023
    January 2023
    December 2022
    November 2022
    October 2022
    September 2022
    August 2022
    July 2022
    June 2022
    May 2022
    April 2022
    March 2022
    February 2022
    January 2022
    December 2021
    November 2021
    October 2021
    September 2021
    August 2021
    July 2021
    June 2021
    May 2021
    April 2021
    March 2021
    February 2021
    January 2021
    December 2020
    November 2020
    October 2020
    September 2020
    August 2020
    July 2020
    October 2019
    September 2019
    June 2019
    July 2018
    May 2018
    December 2017
    August 2017
    April 2017
    March 2017
    January 2017
    December 2016
    November 2016
    October 2016
    September 2016
    August 2016
    July 2016
    June 2016
    May 2016
    April 2016
    March 2016
    February 2016
    January 2016
    December 2015
    November 2015
    October 2015
    September 2015
    August 2015
    July 2015
    June 2015
    May 2015
    April 2015
    March 2015

    Print Page:

    RSS Feed

    Email Subscribe
Powered by Create your own unique website with customizable templates.
  • Blog
  • Sitemap
    • Categories
  • Contact
  • About
  • Resources
  • Tools
  • 51sec.org