Info Security Memo
  • Blog
  • Sitemap
    • Categories
  • Contact
  • About
  • Resources
  • Tools
  • 51sec.org

Build Confidence

Focusing on Information Security 

Info Security Notes

Fortigate Firewall Console TFTP Image Recovery

2/27/2016

0 Comments

 
Recently I had a experience to install firmware from a local TFTP server under console control to reset a FortiGate unit to factory default settings.

It was caused by a failed firmware upgrade. System died after reboot. Power light was green, but not other interfaces.

I recorded the all steps in this post.

1. Physical Connections
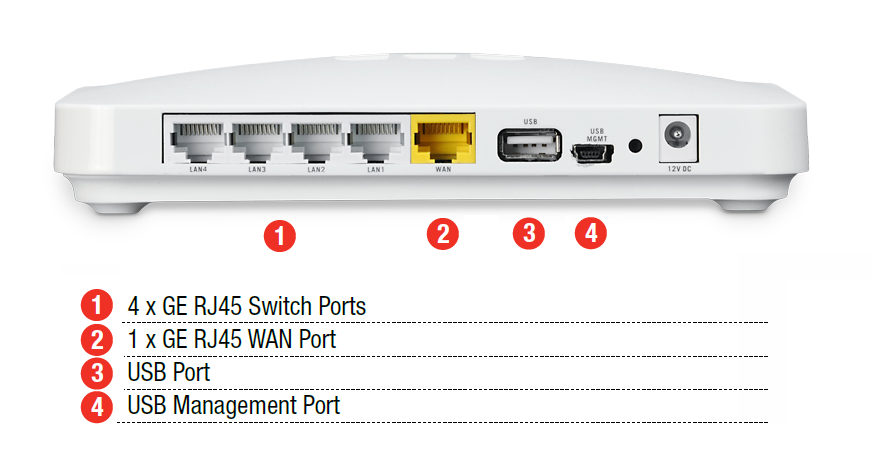
I were using Fortigate 30D to do this firmware TFTP installation. There are four different types of interfaces on the back of Fortigate 30D.
Here is the photo how Fortigate connected to my laptop with console connection and WAN interface Ethernet connection.
Fortigate 30D Connecting Console and WAN to Laptop
2. Software
2.1 TFTP Software
For TFTP software, I am using TFTPD32. 3CDaemon is also a good option.

TFTPD32 - Open Source tftp server for windows  
3CDaemon V2 - 3com's TFTP server for windows  

2.2 Terminal Client Software
Putty Terminal client communication parameters

  • 8 bits 
  • no parity 
  • 1 stop bit 
  • 9600 baud (the FortiGate-300 uses 115,000 baud) 
  • Flow Control = None  


3. Procedures

3.1 Power Cycle Fortigate 30D

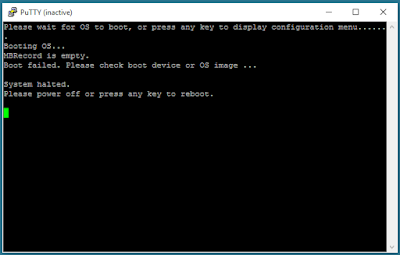
The system told me boot failed. Please check boot device or OS image.

Before that, there were about 6 seconds to wait to interrupt booting process.

3.2 Enter into Configuration mode
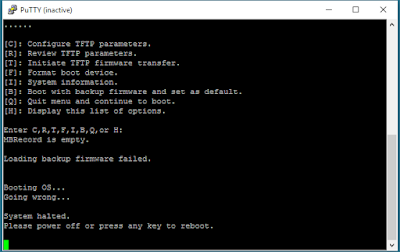
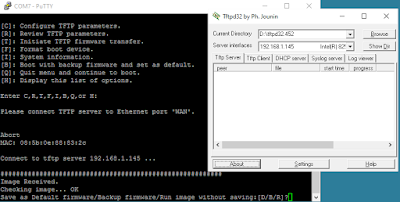
Press any key to interrupt booting process after you power cycle the device, following menu will show on the screen.

[C]: Configure TFTP parameters.
[R]: Review TFTP parameters.
[T]: Initiate TFTP firmware transfer.
[F]: Format boot device.
[I]: System information.
[B]: Boot with backup firmware and set as default.
[Q]: Quit menu and continue to boot.
[H]: Display this list of options.

3.3 Press C to Configure TFTP parameters


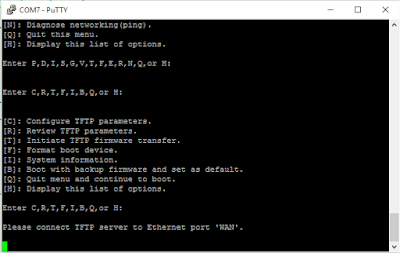
After you have configured all TFTP parameters, such as Fortigate local ip, network mask, gateway, image name, remote server ip etc, you can review those parameters. But for Fortigate local IP and network mask, it will show N/A. Actually you do not need to worry about it, just select T to initiate TFTP firmware transfer. Fortigate 30D will notify you to connect your TFTP server to WAN port, which is completely different from other Fortigate models, such as 60D. Please check following list to see which port your Fortigate should use to do firmware transfer.

 FortiGate Model                                Interface
=============================================================
50, 50A, 100, 200, 300, 500, 800, 800F          Internal
50B, all 60 models, 100A, 200A                  Internal port 1
100A, 200A (If Internal Port1 does not work)    Internal port 4
300A, 310A, 400, 400A, 500A, 1000 and higher    LAN port 1
1240B                                           port40
Fortigate with a dedicated management port      mgmt1


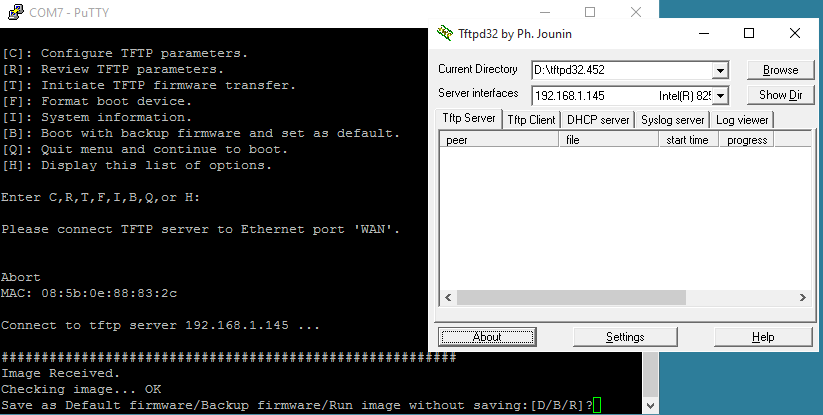
3.4 Initiate TFTP firmware transfer
After you initiate TFTP firmware transfer, the Fortigate WAN will be turned on.

You will see Firmware is transferring from TFTP server to Fortigate 30D. Once transferring done, you will be notified how you want to save this image for.


Reference:

Technical Note : Loading FortiGate firmware image using TFTP

0 Comments

Cisco ASA Remote Access VPN Configuration 2 - AnyConnect VPN

2/25/2016

0 Comments

 
Basic Cisco AnyConnect full-tunnel SSL VPN uses user authentication by username and password, provides IP address assignment to the client, and uses a basic access control policy. The client also authenticates the ASA with identity certificate-based authentication. Deployment tasks in this post are as follows:
  • Configure the basic ASA SSL VPN gateway features.
  • Configure local user authentication.
  • Configure IPv4/IPv6 address assignment.
  • Configure basic access control.
  • Install the Cisco AnyConnect Secure Mobility Client.
Initially, AnyConnect was an SSL-only VPN client. Starting with Version 3.0, AnyConnect became a modular client with additional features (including IPsec IKEv2 VPN terminations on Cisco ASA), but it requires a minimum of ASA 8.4(1) and ASDM 6.4(1).

Related posts in this blog:
  • Cisco ASA 5500-X Series Software 9.x Configuration Notes (Tips and Tricks)
  • Cisco ASA Remote Access VPN Configuration 2 - Anyconnect VPN Configuration
  • Cisco ASA Remote Access VPN Configuration 1 - Clientless SSL VPN Configuration
  • Cisco ASAv HA Configurations
1. Topology

In this post, Cisco Adaptive Security Appliance Software Version 9.1(2) and Device Manager Version 7.1(3) have been used as an example.


DMZ (Security Level 50) interface will be used to simulate external connection to Internet.
INTERNAL (Security Level 100) interface is connecting to local network.

User will come from 172.17.3.62 to access 10.94.200.62 though Anyconnect VPN connection.


2. Basic Configuration

2.1 Interface Configuration

interface GigabitEthernet0/0
 nameif INTERNAL
 security-level 100
 ip address 10.94.200.12 255.255.255.0 
!             
interface GigabitEthernet0/1
 nameif DMZ
 security-level 50
 ip address 172.17.3.12 255.255.255.0 

interface Management0/0
 management-only
 nameif MGMT
 security-level 0
 ip address 192.168.2.12 255.255.255.0 
 no shutdown

2.2 SSH and ASDM Configuration

aaa authentication ssh console LOCAL 
http server enable
http 192.168.2.0 255.255.255.0 MGMT
ssh 192.168.2.0 255.255.255.0 MGMT
username admin password admin

2.3 NAT and Access-list Configuration

INTERNAL network can access all DMZ networks with NAT-ed DMZ interface ip 172.17.3.12. But there is no access from DMZ to INTERNAL.

NAT

Firewall Rule
ICMP Echo reply packets have to be allowed on DMZ interface to make ping working from INTERNAL to DMZ work.

object service icmp-reply

 service icmp echo-reply 0

access-list global_access extended permit object icmp-reply any any 
access-list INTERNAL_access_in extended permit ip any any 

access-group INTERNAL_access_in in interface INTERNAL

access-group global_access global

The following NAT rule is to make INTERNAL network to access DMZ network using DMZ interface ip address.
nat (INTERNAL,DMZ) source dynamic any interface


3. Steps to Enable AnyConnect VPN

3.1 Start VPN Wizards -> AnyConnect VPN Wizard...

3.2 Enter Connection Profile Name
3.3 Create and Use a New Self-Signed Certificate

3.4 Add a new Client Image.
It is not .msi file. It has to be a package file.


3.5 Use Local Accounts in ASA as Authentication Method
3.6 Create and Use SSL Connection IPv4 Address Pool

3.7 NAT Exempt
Usually in ASA configuration, there are NAT configured. You will have to exempt your SSL VPN Traffic from NAT configuration
Note: In this wizard, you will only can exempt one local network from NAT configuration. If you have multiple Internal local networks, you will have to work on configuration manually from CLI to exempt all of them from NAT. Else, you will get a deny for your non-NAT-exempt traffic.

3.8 Allow Web Launch


3.9 Configuration Summary
After this screen, your configuration will be pushed from ASDM to ASA device. You will get a notification if there is any configuration wrong.

4. Split Tunneling
Split tunnelling is a feature that you can use in order to define the traffic for the subnets or hosts that must be encrypted. This involves the configuration of an Access Control List (ACL) that will be associated with this feature. The traffic for the subnets or hosts that is defined on this ACL will be encrypted over the tunnel from the client-end, and the routes for these subnets are installed on the PC routing table.

If Split Tunneling enabled on AnyConnect VPN Configuration, VPN user 's traffic to Internal Network (10.94.200.0/24) will be split from other traffic such as Internet Traffic. In this way, AnyConnect VPN user can keep their Internet connection at the same time having local Internal network access.


5. User Policy Control

By default, the user will use DfltGrpPolicy. You can customize your local user to use different VPN Group Policy and different VPN Connection Profile.

In this way, you can control which network user can access, since you can control Split-Tunneling networks in the VPN Connection Profile.


Reference:
Configure AnyConnect Secure Mobility Client with Split Tunneling on an ASA

0 Comments

Cisco ASA Remote Access VPN Configuration 1 - Clientless SSL VPN

2/24/2016

3 Comments

 
Remote access VPNs let single users connect to a central site through a secure connection over a TCP/IP network such as the Internet. Unlike other common VPN client solutions, the Clientless SSL VPN does not require that a client download and install a VPN client, all communications to the central location (where the ASA is located) are done via Secure Socket Layer (SSL) or its successor, Transport Layer Security (TLS).


This post describes how to build a remote access VPN connection using Clientless SSL VPN feature.
Related posts in this blog:
  • Cisco ASA 5500-X Series Software 9.x Configuration Notes (Tips and Tricks)
  • Cisco ASA Remote Access VPN Configuration 2 - Anyconnect VPN Configuration
  • Cisco ASA Remote Access VPN Configuration 1 - Clientless SSL VPN Configuration
  • Cisco ASAv HA Configurations

1. Topology


2. Configuration Steps

2.1 Start VPN Wizards -> Clientless SSL VPN Wizard...


2.2 Set Up SSL VPN Interface
2.3 User Authentication
2.4 Group Policy
2.5 Bookmark List

2.6 Import RDP/SSH/VNC Plug-in

2.6.1 Download RDP/SSH/VNC Java Plug-in

2.6.2 Import Plug-in

2.7 Test


3. Configuration

ciscoasa# show run
: Saved

: 
: Serial Number: 9ALU3EW6LDF
: Hardware:   ASAv, 1024 MB RAM, CPU Xeon 5500 series 2294 MHz
:
ASA Version 9.5(1)200 
!
hostname ciscoasa
enable password 8Ry2YjIyt7RRXU24 encrypted
xlate per-session deny tcp any4 any4
xlate per-session deny tcp any4 any6
xlate per-session deny tcp any6 any4
xlate per-session deny tcp any6 any6
xlate per-session deny udp any4 any4 eq domain
xlate per-session deny udp any4 any6 eq domain
xlate per-session deny udp any6 any4 eq domain
xlate per-session deny udp any6 any6 eq domain
names
!
interface GigabitEthernet0/0
 nameif INTERNAL
 security-level 100
 ip address 10.94.200.12 255.255.255.0 
!             
interface GigabitEthernet0/1
 nameif DMZ
 security-level 100
 ip address 172.17.3.12 255.255.255.0 
!
interface GigabitEthernet0/2
 shutdown
 no nameif
 no security-level
 no ip address
...
!
interface Management0/0
 management-only
 nameif MGMT
 security-level 0
 ip address 192.168.2.12 255.255.255.0 
!
ftp mode passive
dns domain-lookup INTERNAL
dns domain-lookup DMZ
dns domain-lookup MGMT
same-security-traffic permit inter-interface
same-security-traffic permit intra-interface
pager lines 23
logging enable
logging asdm informational
mtu INTERNAL 1500
mtu DMZ 1500
mtu MGMT 1500
no failover
no monitor-interface service-module 
icmp unreachable rate-limit 1 burst-size 1
no asdm history enable
arp timeout 14400
no arp permit-nonconnected
timeout xlate 3:00:00
timeout pat-xlate 0:00:30
timeout conn 1:00:00 half-closed 0:10:00 udp 0:02:00 icmp 0:00:02
timeout sunrpc 0:10:00 h323 0:05:00 h225 1:00:00 mgcp 0:05:00 mgcp-pat 0:05:00
timeout sip 0:30:00 sip_media 0:02:00 sip-invite 0:03:00 sip-disconnect 0:02:00
timeout sip-provisional-media 0:02:00 uauth 0:05:00 absolute
timeout tcp-proxy-reassembly 0:01:00
timeout floating-conn 0:00:00
user-identity default-domain LOCAL
aaa authentication ssh console LOCAL 
http server enable
http 192.168.2.0 255.255.255.0 MGMT
no snmp-server location
no snmp-server contact
crypto ipsec security-association pmtu-aging infinite
crypto ca trustpoint _SmartCallHome_ServerCA
 no validation-usage
 crl configure
crypto ca trustpool policy
crypto ca certificate chain _SmartCallHome_ServerCA
 certificate ca 6ecc7aa5a7032009b8cebcf4e952d491
    308205ec 308204d4 a0030201 0202106e cc7aa5a7 032009b8 cebcf4e9 52d49130 
    0d06092a 864886f7 0d010105 05003081 ca310b30 09060355 04061302 55533117 
   ...
    6119b5dd cdb50b26 058ec36e c4c875b8 46cfe218 065ea9ae a8819a47 16de0c28 
    6c2527b9 deb78458 c61f381e a4c4cb66
  quit
telnet timeout 5
ssh stricthostkeycheck
ssh 192.168.2.0 255.255.255.0 MGMT
ssh timeout 5
ssh key-exchange group dh-group1-sha1
console timeout 0
threat-detection basic-threat
threat-detection statistics access-list
no threat-detection statistics tcp-intercept
webvpn
 enable DMZ
 error-recovery disable
group-policy sslvpn_policy1 internal
group-policy sslvpn_policy1 attributes
 vpn-tunnel-protocol ssl-clientless
 webvpn
  url-list value test21
dynamic-access-policy-record DfltAccessPolicy
username test password P4ttSyrm33SV8TYp encrypted privilege 0
username test attributes
 vpn-group-policy sslvpn_policy1
 webvpn
  url-list value test21
username admin password eY/fQXw7Ure8Qrz7 encrypted
username admin attributes
 webvpn
  url-list value test21
tunnel-group SSLVPN1 type remote-access
tunnel-group SSLVPN1 general-attributes
 default-group-policy sslvpn_policy1
!
class-map inspection_default
 match default-inspection-traffic
!
!
policy-map type inspect dns preset_dns_map
 parameters
  message-length maximum client auto
  message-length maximum 512
policy-map global_policy
 class inspection_default
  inspect ip-options 
  inspect netbios 
  inspect rtsp 
  inspect sunrpc 
  inspect tftp 
  inspect xdmcp 
  inspect dns preset_dns_map 
  inspect ftp 
  inspect h323 h225 
  inspect h323 ras 
  inspect rsh 
  inspect esmtp 
  inspect sqlnet 
  inspect sip  
  inspect skinny  
policy-map type inspect dns migrated_dns_map_1
 parameters
  message-length maximum client auto
  message-length maximum 512
!
service-policy global_policy global
prompt hostname context 
no call-home reporting anonymous
call-home
 profile CiscoTAC-1
  no active
  destination address http https://tools.cisco.com/its/service/oddce/services/DDCEService
  destination address email [email protected]
  destination transport-method http
  subscribe-to-alert-group diagnostic
  subscribe-to-alert-group environment
  subscribe-to-alert-group inventory periodic monthly
  subscribe-to-alert-group configuration periodic monthly
  subscribe-to-alert-group telemetry periodic daily
 profile License
  destination address http https://tools.cisco.com/its/service/oddce/services/DDCEService
  destination transport-method http
hpm topN enable
Cryptochecksum:933e07d913ddf455a108be19e0e61f9b
: end
ciscoasa# 


Reference


  • ASA 8.x Import RDP Plug-in for use with WebVPN Configuration Example
  • ASA Clientless SSLVPN: RDP Plug-in Issues
  • Configuring Cisco ASA Clientless SSL VPN


3 Comments

Gartner Magic Quadrant for Data Center Infrastructure Management (DCIM) (2015,2014)

2/23/2016

0 Comments

 
Data center infrastructure management (DCIM) tools monitor, measure, manage and/or control data center resources and energy consumption of both IT-related equipment (such as servers, storage and network switches) and facilities infrastructure components (such as power distribution units [PDUs] and computer room air conditioners).

2015
Magic Quadrant for Data Center Infrastructure Management Tools, Source: Gartner (October 2015)

2014


0 Comments

Gartner Magic Quadrant for Application Delivery Controllers (2015,2014,2013,2012,2010)

2/19/2016

0 Comments

 
Application delivery controllers (ADCs) are generally deployed in the data center and provide functions that optimize delivery of enterprise applications across the network. ADCs provide functionality for both user-to-application and application-to-application traffic. The ADC effectively bridges the gap between the application and underlying protocols and the traditional packet-based networks. The market evolved from load-balancing systems that were developed in the latter half of the 1990s to ensure the availability and scalability of websites. Enterprises use ADCs today to improve the following aspects of their applications:

  • Availability
  • Scalability
  • End-user performance
  • Data center resource utilization
  • Security

The following ADC deployment models are commonly found in the market:

  • Single-instance hardware appliance
  • Multi-instance hardware appliance
  • Software-based ADC running on a bare-metal server or as a virtual appliance or within a Linux container
  • Software-based ADC available in cloud service providers 


2015
Magic Quadrant for Application Delivery Controllers 2015


2014

Magic Quadrant for Application Delivery Controllers 2014


2013


2012


2010


0 Comments

Palo Alto Study Notes: Firewall Configuration Essentials I (101) PAN-OS v.6.1

2/13/2016

1 Comment


To view Firewall Configuration Essentials 101 Course, please login to the Palo Alto Networks Learning Center.


[Updating]

1. Palo Alto Networks Platforms

The PA-500, PA-200, and VM-Series firewalls do not support virtual systems. High Availability and Aggregated interfaces are also only supported on higher models of the product.

The even-numbered platforms are older platforms. The PA-4000 is End-of-Sale. The PA-3000 and PA-5000 models use superior hardware, such as Cavium chips and SSD for logging. The PA-7050 is a chassis architecture.


The Control Plane has its own dual core processor, RAM, and hard drive. This processor is responsible for tasks such as management Ul, logging, and route updates.

The Data Plane contains three types of processors that are connected by high speed 1Gbps busses:

  • Signature Match Processor: Performs vulnerability and virus detection
  • Security Processors: Multi-core processors, which handle security tasks such as SSL decryption
  • Network Processor: Responsible for routing, NAT, and network layer communication


2. Initial Access to the System

2.1 Initial Access to the System
  • Connect a serial cable from your computer to the Console port and connect to the firewall using terminal emulation software (9600-8-N-1). Wait a few minutes for the boot-up sequence to complete; when the device is ready, the prompt changes to the name of the firewall, for example PA-500 login .
  • Connect an RJ-45 Ethernet cable from your computer to the MGT port on the firewall. From a browser, go to https://192.168.1.1 . Note that you may need to change the IP address on your computer to an address in the 192.168.1.0 network, such as 192.168.1.2, in order to access this URL.


2.2 Configuration Management


  • Candidate Config: When you change a configuration setting and click OK, the current or "candidate" configuration is updated; not the active or "running" configuration.
  • Running Config: Clicking Commit at the top of the page applies the candidate configuration to the running configuration, which activates all configuration changes since the last commit.


2.3 Licensing and Software Updates
2.4 Account Administration
2.5 Administrative Controls
CLI Mode:
  • Operational Mode
  • Configuration Mode

CLI Tools:
  • ?
  • Find command keyword fpga
  • show
  • ping

3. Basic Interface Configuration

3.1 Security Zones


3.2 Interface Types
  •  Tap Mode
  •  Decryption Mirror
  •  Virtual Wire Interface
  •  Layer 2
  •  Layer 3 (Virtual Router, IP Addressing, DHCP, Interface Management Profile)
3.3 IPv4 and IPv6

3.4 DHCP

3.5 Interface Management
  • Loopback
  • Aggregrate
4. Security and NAT Policies

4.1 Security Policy Overview

4.2 Security Policy Administration
Security Zone Rules - Three types

  • Intrazone
  • Interzone
  • Universal

4.3 Network Address Translation (NAT)
Source NAT 

  • Static IP
  • Dynamic IP
  • Dynamic IP/Port (DIPP)

Destination NAT


5. Basic App-ID
Application Identification (App-ID)
App-ID Overview
Application Groups and Filters


6. Basic Content-ID

Content-ID Overview
Security Profiles
Security Profile Administration
Zone Protection Profile

7. Decryption

Certificate management
Outbound SSL Decryption
Inbound SSL decryption
Other Decryption Topics

8. Basic User-ID

Configuring User-ID
Mapping Users to Group
Working with the Windoes User-ID Agent
Mapping Users to IP Addresses: Syslog Integration

9. Site-to-Site VPNs

Site-to Site and Client VPNs
Site-to-Site VPN
Configuring Site-to-Site Tunnels
IPSec Troubleshooting

10. Management and Reporting

Dashboard
Basic Logging
Viewing and Filtering Logs
Basic Reports

11. Active/Passive High Availability

Active/Passive High Availability Overview
Active/Passive Configuration
Managing Split Brain
Monitoring
Active/Active Overview

12. Panorama
Panorama Overview
Centralized Configuration and Deployment
Centralized Logging and Reporting
Role-Based Access Control

  •  Types of roles


1 Comment

Gartner Magic Quadrant for Intrusion Prevention Systems (2015, 2013, 2012, 2010 ...)

2/12/2016

0 Comments


According to Gartner, “The network intrusion prevention system market has undergone dynamic
evolution, increasingly being absorbed by next-generation firewall placements. Nextgeneration
IPSs are available for the best protection, but the IPS market is being pressured by the uptake of
advanced threat defense solutions.”


2015

For the ninth consecutive year, Intel Security’s industry leading Network Security Platform (NSP) has been recognised as a leader in the Gartner Magic Quadrant for IPS (Intrusion Prevention System).

IBM Security is back in the Leaders quadrant in the latest Gartner Magic Quadrant for Intrusion Prevention Systems (IPS), published on Nov. 16, 2015.


2013
Cisco acquired Sourcefire Inc. for about $2.7 billion on July 2013.
McAfee, the Intel-owned security specialist, bought Stonesoft,a Finland-based specialist in firewall protection products, for $389 million in cash on May 2013.


2012


2010


2009


2008


0 Comments

Cisco ASAv 9.5.1 200 and ASDM 7.5.1 in Workstation / ESXi

2/2/2016

0 Comments

 
I were keeping testing Cisco ASA in Vmware environment for my own studying purpose. Recently I got ASAv 9.5.1 and installed into Vmware workstation 10 and ESXi 5.5.

Here are all related posts in this blog:
  • ASA 8.02 in Vmware Workstation
  • ASA 8.42 in VMware Workstation
  • ASA 9.21 in Vmware Workstation 10
  • Cisco ASAv 9.4.1 and ASDM 7.4.1 in Workstation / ESXi (1)
  • Cisco ASAv 9.4.1 and ASDM 7.4.1 in Workstation / ESXi (2)
  • Cisco ASAv 9.5.1 200 and ASDM 7.5.1 in Workstation / ESXi 


1. Download Software from Cisco Software Website:

The latest is 9.5.2 200. I am using 9.5.1 200 as an example for this post.


After downloaded the package, unzipped it and you will get 7 files.

asav-esxi.ovf will be used for esxi and workstation environment.

2. Import into Vmware ESXi or Workstation

2.1 in ESXi 5.5

Choose Menu File -> Deploy OVF Template...
 Follow screen instruction to click next:
 Network Mapping will be very straightforward since all interface are listing with mapping name in the ASAv.


2.2 in Vmware Workstation 10
Choose Open from File menu:
 Following screen , click import:
After import done, you will get a new Virtual Machine:

Booting Screen:


3. Verify


ASAv-Pri#   show version

Cisco Adaptive Security Appliance Software Version 9.5(1)200
Device Manager Version 7.5(1)

Compiled on Fri 28-Aug-15 15:56 PDT by builders
System image file is "boot:/asa951-200-smp-k8.bin"
Config file at boot was "startup-config"

ASAv-Pri up 1 hour 5 mins
failover cluster up 15 hours 54 mins

Hardware:   ASAv, 1024 MB RAM, CPU Xeon 5500 series 2294 MHz,
Model Id:   ASAv5
Internal ATA Compact Flash, 256MB
Slot 1: ATA Compact Flash, 8192MB
BIOS Flash Firmware Hub @ 0x0, 0KB


 0: Ext: Management0/0       : address is 000c.291a.f3fd, irq 10
 1: Ext: GigabitEthernet0/0  : address is 000c.291a.f307, irq 5
 2: Ext: GigabitEthernet0/1  : address is 000c.291a.f311, irq 9
 3: Ext: GigabitEthernet0/2  : address is 000c.291a.f31b, irq 11
 4: Ext: GigabitEthernet0/3  : address is 000c.291a.f325, irq 10
 5: Ext: GigabitEthernet0/4  : address is 000c.291a.f32f, irq 5
 6: Ext: GigabitEthernet0/5  : address is 000c.291a.f339, irq 9
 7: Ext: GigabitEthernet0/6  : address is 000c.291a.f343, irq 11
 8: Ext: GigabitEthernet0/7  : address is 000c.291a.f34d, irq 10
 9: Ext: GigabitEthernet0/8  : address is 000c.291a.f357, irq 5

License mode: Smart Licensing
ASAv Platform License State: Unlicensed
No active entitlement: no feature tier and no throughput level configured
*Memory resource allocation is more than the permitted limit.

Licensed features for this platform:
Maximum Physical Interfaces       : 10
Maximum VLANs                     : 25
Inside Hosts                      : Unlimited
Failover                          : Active/Standby
Encryption-DES                    : Enabled
Encryption-3DES-AES               : Enabled
Security Contexts                 : 0
GTP/GPRS                          : Disabled
AnyConnect Premium Peers          : 2
AnyConnect Essentials             : Disabled
Other VPN Peers                   : 50
Total VPN Peers                   : 50
Shared License                    : Disabled
AnyConnect for Mobile             : Disabled
AnyConnect for Cisco VPN Phone    : Disabled
Advanced Endpoint Assessment      : Disabled
Total UC Proxy Sessions           : 2
Botnet Traffic Filter             : Enabled
Cluster                           : Disabled


License mode: Smart Licensing

Failover cluster licensed features for this platform:
Maximum Physical Interfaces       : 10
Maximum VLANs                     : 25
Inside Hosts                      : Unlimited
Failover                          : Active/Standby
Encryption-DES                    : Enabled
Encryption-3DES-AES               : Enabled
Security Contexts                 : 0
GTP/GPRS                          : Disabled
AnyConnect Premium Peers          : 2
AnyConnect Essentials             : Disabled
Other VPN Peers                   : 50
Total VPN Peers                   : 50
Shared License                    : Disabled
AnyConnect for Mobile             : Disabled
AnyConnect for Cisco VPN Phone    : Disabled
Advanced Endpoint Assessment      : Disabled
Total UC Proxy Sessions           : 2
Botnet Traffic Filter             : Enabled
Cluster                           : Disabled

Licensing mode is Smart Licensing

Serial Number: 9ALU3EW6LDF

Image type          : Release
Key version         : A

Configuration last modified by enable_1 at 17:02:38.079 UTC Wed Jan 27 2016
ASAv-Pri#

ASAv-Pri# sh run
: Saved

:
: Serial Number: 9ALU3EW6LDF
: Hardware:   ASAv, 1024 MB RAM, CPU Xeon 5500 series 2294 MHz
:
ASA Version 9.5(1)200
!
hostname ASAv-Pri
enable password 8Ry2YjIyt7RRXU24 encrypted
xlate per-session deny tcp any4 any4
xlate per-session deny tcp any4 any6
xlate per-session deny tcp any6 any4
xlate per-session deny tcp any6 any6
xlate per-session deny udp any4 any4 eq domain
xlate per-session deny udp any4 any6 eq domain
xlate per-session deny udp any6 any4 eq domain
xlate per-session deny udp any6 any6 eq domain
names
!
interface GigabitEthernet0/0
 nameif EXT
 security-level 0
 ip address 172.17.3.11 255.255.255.0 standby 172.17.3.12
!
interface GigabitEthernet0/1
 description test
 no nameif
 no security-level
 no ip address
!
interface GigabitEthernet0/2
 nameif INT
 security-level 100
 ip address 10.94.2.11 255.255.255.0 standby 10.94.2.12
!
interface GigabitEthernet0/3
 shutdown
 no nameif
 no security-level
 no ip address
!
interface GigabitEthernet0/4
 shutdown
 no nameif
 no security-level
 no ip address
!
interface GigabitEthernet0/5
 shutdown
 no nameif
 no security-level
 no ip address
!
interface GigabitEthernet0/6
 shutdown
 no nameif
 no security-level
 no ip address
!
interface GigabitEthernet0/7
 shutdown
 no nameif
 no security-level
 no ip address
!
interface GigabitEthernet0/8
 description LAN/STATE Failover Interface
!
interface Management0/0
 management-only
 nameif mgmt
 security-level 0
 ip address 192.168.2.11 255.255.255.0 standby 192.168.2.12
!
ftp mode passive
pager lines 23
logging enable
logging asdm informational
mtu EXT 1500
mtu INT 1500
mtu mgmt 1500
failover
failover lan unit secondary
failover lan interface LANFAIL GigabitEthernet0/8
failover key *****
failover link LANFAIL GigabitEthernet0/8
failover interface ip LANFAIL 10.10.1.1 255.255.255.0 standby 10.10.1.2
no monitor-interface mgmt
icmp unreachable rate-limit 1 burst-size 1
no asdm history enable
arp timeout 14400
no arp permit-nonconnected
timeout xlate 3:00:00
timeout pat-xlate 0:00:30
timeout conn 1:00:00 half-closed 0:10:00 udp 0:02:00 icmp 0:00:02
timeout sunrpc 0:10:00 h323 0:05:00 h225 1:00:00 mgcp 0:05:00 mgcp-pat 0:05:00
timeout sip 0:30:00 sip_media 0:02:00 sip-invite 0:03:00 sip-disconnect 0:02:00
timeout sip-provisional-media 0:02:00 uauth 0:05:00 absolute
timeout tcp-proxy-reassembly 0:01:00
timeout floating-conn 0:00:00
user-identity default-domain LOCAL
aaa authentication ssh console LOCAL
http server enable
http 192.168.2.0 255.255.255.0 mgmt
no snmp-server location
no snmp-server contact
crypto ipsec security-association pmtu-aging infinite
crypto ca trustpoint _SmartCallHome_ServerCA
 no validation-usage
 crl configure
crypto ca trustpool policy
crypto ca certificate chain _SmartCallHome_ServerCA
 certificate ca 6ecc7aa5a7032009b8cebcf4e952d491
    308205ec 308204d4 a0030201 0202106e cc7aa5a7 032009b8 cebcf4e9 52d49130
    0d06092a 864886f7 0d010105 05003081 ca310b30 09060355 04061302 55533117
    30150603 55040a13 0e566572 69536967 6e2c2049 6e632e31 1f301d06 0355040b
    13165665 72695369 676e2054 72757374 204e6574 776f726b 313a3038 06035504
    0b133128 63292032 30303620 56657269 5369676e 2c20496e 632e202d 20466f72
    20617574 686f7269 7a656420 75736520 6f6e6c79 31453043 06035504 03133c56
    65726953 69676e20 436c6173 73203320 5075626c 69632050 72696d61 72792043
    65727469 66696361 74696f6e 20417574 686f7269 7479202d 20473530 1e170d31
    30303230 38303030 3030305a 170d3230 30323037 32333539 35395a30 81b5310b
    30090603 55040613 02555331 17301506 0355040a 130e5665 72695369 676e2c20
    496e632e 311f301d 06035504 0b131656 65726953 69676e20 54727573 74204e65
    74776f72 6b313b30 39060355 040b1332 5465726d 73206f66 20757365 20617420
    68747470 733a2f2f 7777772e 76657269 7369676e 2e636f6d 2f727061 20286329
    3130312f 302d0603 55040313 26566572 69536967 6e20436c 61737320 33205365
    63757265 20536572 76657220 4341202d 20473330 82012230 0d06092a 864886f7
    0d010101 05000382 010f0030 82010a02 82010100 b187841f c20c45f5 bcab2597
    a7ada23e 9cbaf6c1 39b88bca c2ac56c6 e5bb658e 444f4dce 6fed094a d4af4e10
    9c688b2e 957b899b 13cae234 34c1f35b f3497b62 83488174 d188786c 0253f9bc
    7f432657 5833833b 330a17b0 d04e9124 ad867d64 12dc744a 34a11d0a ea961d0b
    15fca34b 3bce6388 d0f82d0c 948610ca b69a3dca eb379c00 48358629 5078e845
    63cd1941 4ff595ec 7b98d4c4 71b350be 28b38fa0 b9539cf5 ca2c23a9 fd1406e8
    18b49ae8 3c6e81fd e4cd3536 b351d369 ec12ba56 6e6f9b57 c58b14e7 0ec79ced
    4a546ac9 4dc5bf11 b1ae1c67 81cb4455 33997f24 9b3f5345 7f861af3 3cfa6d7f
    81f5b84a d3f58537 1cb5a6d0 09e4187b 384efa0f 02030100 01a38201 df308201
    db303406 082b0601 05050701 01042830 26302406 082b0601 05050730 01861868
    7474703a 2f2f6f63 73702e76 65726973 69676e2e 636f6d30 12060355 1d130101
    ff040830 060101ff 02010030 70060355 1d200469 30673065 060b6086 480186f8
    45010717 03305630 2806082b 06010505 07020116 1c687474 70733a2f 2f777777
    2e766572 69736967 6e2e636f 6d2f6370 73302a06 082b0601 05050702 02301e1a
    1c687474 70733a2f 2f777777 2e766572 69736967 6e2e636f 6d2f7270 61303406
    03551d1f 042d302b 3029a027 a0258623 68747470 3a2f2f63 726c2e76 65726973
    69676e2e 636f6d2f 70636133 2d67352e 63726c30 0e060355 1d0f0101 ff040403
    02010630 6d06082b 06010505 07010c04 61305fa1 5da05b30 59305730 55160969
    6d616765 2f676966 3021301f 30070605 2b0e0302 1a04148f e5d31a86 ac8d8e6b
    c3cf806a d448182c 7b192e30 25162368 7474703a 2f2f6c6f 676f2e76 65726973
    69676e2e 636f6d2f 76736c6f 676f2e67 69663028 0603551d 11042130 1fa41d30
    1b311930 17060355 04031310 56657269 5369676e 4d504b49 2d322d36 301d0603
    551d0e04 1604140d 445c1653 44c1827e 1d20ab25 f40163d8 be79a530 1f060355
    1d230418 30168014 7fd365a7 c2ddecbb f03009f3 4339fa02 af333133 300d0609
    2a864886 f70d0101 05050003 82010100 0c8324ef ddc30cd9 589cfe36 b6eb8a80
    4bd1a3f7 9df3cc53 ef829ea3 a1e697c1 589d756c e01d1b4c fad1c12d 05c0ea6e
    b2227055 d9203340 3307c265 83fa8f43 379bea0e 9a6c70ee f69c803b d937f47a
    6decd018 7d494aca 99c71928 a2bed877 24f78526 866d8705 404167d1 273aeddc
    481d22cd 0b0b8bbc f4b17bfd b499a8e9 762ae11a 2d876e74 d388dd1e 22c6df16
    b62b8214 0a945cf2 50ecafce ff62370d ad65d306 4153ed02 14c8b558 28a1ace0
    5becb37f 954afb03 c8ad26db e6667812 4ad99f42 fbe198e6 42839b8f 8f6724e8
    6119b5dd cdb50b26 058ec36e c4c875b8 46cfe218 065ea9ae a8819a47 16de0c28
    6c2527b9 deb78458 c61f381e a4c4cb66
  quit
telnet timeout 5
ssh stricthostkeycheck
ssh 192.168.2.0 255.255.255.0 mgmt
ssh timeout 5
ssh key-exchange group dh-group1-sha1
console timeout 0
threat-detection basic-threat
threat-detection statistics access-list
no threat-detection statistics tcp-intercept
dynamic-access-policy-record DfltAccessPolicy
username test password P4ttSyrm33SV8TYp encrypted
!
class-map inspection_default
 match default-inspection-traffic
!
!
policy-map type inspect dns preset_dns_map
 parameters
  message-length maximum client auto
  message-length maximum 512
policy-map global_policy
 class inspection_default
  inspect ip-options
  inspect netbios
  inspect rtsp
  inspect sunrpc
  inspect tftp
  inspect xdmcp
  inspect dns preset_dns_map
  inspect ftp
  inspect h323 h225
  inspect h323 ras
  inspect rsh
  inspect esmtp
  inspect sqlnet
  inspect sip
  inspect skinny
policy-map type inspect dns migrated_dns_map_1
 parameters
  message-length maximum client auto
  message-length maximum 512
!
service-policy global_policy global
prompt hostname context
call-home reporting anonymous prompt 2
call-home
 profile License
  destination address http https://tools.cisco.com/its/service/oddce/services/DDCEService
  destination transport-method http
 profile CiscoTAC-1
  no active
  destination address http https://tools.cisco.com/its/service/oddce/services/DDCEService
  destination address email [email protected]
  destination transport-method http
  subscribe-to-alert-group diagnostic
  subscribe-to-alert-group environment
  subscribe-to-alert-group inventory periodic monthly
  subscribe-to-alert-group configuration periodic monthly
  subscribe-to-alert-group telemetry periodic daily
Cryptochecksum:deb136269827f21fc1c142fac079704b
: end

ASAv-Pri#


0 Comments

Upgrading Check Point Gateway Cluster (R77.30)

2/1/2016

0 Comments

 
Install / Upgrade Checkpoint Full HA (Gateway and Management) is the old post for installing or upgrading to R77.10. This post is recorded for R77.30 upgrading purpose with more details , although all steps are almost same as previous version. 
1. Standalone Check Point Gateway Upgrade
Check Point Product Upgrade is not that complicated and Check Point has provided a couple of ways to do it :
1.1 CPUSE (WebUI)
You will need vaild license and your gateway will need Internet access to connect to Check Point User Center for updating available hotfix/packages list. You also can import the package downloaded manually from Check Point Support site then do installation from CPUSE / WebUI interface.


1.2 CLI
Command line is also popular way to install Check Point Hotfix / Upgrading Package. Here are commands used to do R77.30 upgrades.

[Expert@HostName]# tar -zxvf Check_Point_R77.30_T204.Gaia.tgz
[Expert@HostName]# ./UnixInstallScript


2. Check Point Gateway Cluster Upgrade
Those methods are great for Standalone Check Point implementation. If your implementation is Cluster (ClusterXL), the procedures are different. You will have to think about down time during upgrading.

Check Point has SK107042 to list all ways for Cluster Upgrade:

  • Minimal Effort (Maximum Downtime will be needed)
  • Zero Downtime (Short Downtime for old Connections to be dropped)
  • Optimal Service Upgrade (Very Short Downtime for old Connections to be dropped)
  • Connectivity Upgrade (No Downtime , no Connection dropped)
  • Full Connectivity Upgrade (Not Supported after R75GA )
Upgrade Method
Description
Network Impact
Duration of Upgrade
Minimal Effort
(Simple Upgrade)
Cluster members can be upgraded to any version.
Each cluster member is upgraded as an independent Security Gateway.
Existing connections are disrupted.
No connectivity as all cluster members are out of for maintenance.
Requires a substantial maintenance window.
As long as it takes to upgrade all cluster members.
Zero
Downtime
Cluster members can be upgraded to any version.
During this type of upgrade, there is always at least one Active cluster member that handles the traffic.
Connections are not synchronized between cluster members running different Check Point software versions.
Upgraded cluster members are in "Ready" state until the cluster members running the previous version are stopped (with cphastop, or cpstop command).
Connections that were initiated on a cluster members running the previous version are dropped when the cluster member is upgraded to a new version.
Requires a relatively short maintenance window for old connections to be dropped.
Relatively short.
Optimal Service
Upgrade (OSU)
Cluster members can be upgraded according to the "Upgrade paths" table below.
Newly established connections are forwarded to the upgraded cluster members while the cluster members running the previous version continue to inspect the old existing connections.
The more time the upgrade procedure takes, the less old connections exist, and upon stopping the cluster members running the previous version, the connection drop is minimal.
Despite long duration of this upgrade procedure, security and connectivity are fully maintained.
A minimal number of connections that were initiated before the upgrade and were not closed during the upgrade procedure are dropped after the upgrade.
Requires a very short maintenance window for old connections to be dropped.
Long.
The nature of this upgrade procedure requires time for old connections to be closed while newly established connections are transferred to the upgrade clcuster members for inspection.
Connectivity
Upgrade (CU)

also refer to

Connectivity
Upgrades (CU)
Best Practices
Guide
Cluster members can be upgraded to R77.20 and above according to the "Upgrade paths" table below.
Connection failover is guaranteed.
The procedure is very similar to "Zero Downtime" with the addition of synchronizing the connections to the upgraded cluster members.
No connections are dropped.
Requires no maintenance window.
Short.
Full Connectivity
Upgrade (FCU)
This upgrade method is considered obsolete and not supported since R75 GA.


Upgrade methodsActually even you read all those documentations, you may still confuse which way I should go. Which one is best for this upgrade?

Check Point explained some situations for those methods:

Effort and time efficient upgrades with some loss of connectivity
  • Simple Upgrade (with downtime) - Select this option if you have a period of time during which network downtime is allowed. This method is the simplest, because each cluster member is upgraded as an independent Gateway.
  • Zero Downtime - Select this option if you cannot have any network downtime and need to complete the upgrade quickly, with a minimal number of dropped connections. During this type of upgrade, there is always at least one active member that handles traffic. Connections are not synchronized between cluster members running different Check Point software versions.
    Note - Connections that were initiated on a cluster member running the old version get dropped when the cluster member is upgraded to a new version. Network connectivity, however, remains available during the upgrade, and connections initiated on an upgraded cluster member are not dropped.


Upgrades that guarantee minimal connectivity loss
  • Optimal Service Upgrade (OSU) - Select this option if security is of utmost concern. During this type of upgrade two cluster members process network traffic. Connections that are initiated during the upgrade stay up through the upgrade. A minimal number of connections that were initiated before the upgrade get dropped after the upgrade.
  • Connectivity Upgrade (CU) - Select this option, if you need to upgrade a Security Gateway or a VSX cluster to any version, and guarantee connection failover. Connections that were initiated before the upgrade are synchronized with the upgraded Security Gateways and cluster members so that no connections are dropped.


From my experience, Zero Downtime usually is good for most situations. If there is a requirement for no downtime, Connectivity Upgrades will be the only choice.

No matter which way, backup is always first thing you must do. Either Snapshot or Backup will help you when there is unexpected failure happens during upgrading.
Snapshot

Backup
Here is the steps I were doing Cluster upgrade from R77.10 to R77.30.
2.1 Find and Download Check Point Upgrade Package from Upgrade Wizard
You will download a upgrade package Check_Point_R77.30_T204.Gaia.tgz which size is about 1.5G.

2.2 Upload Image to Check Point Gateways

You may need to use command to change user cli shell from Clish to Bash, so you could use sftp to upload this 1.5G size file into installation folder.

HostName> set user admin shell /bin/bash
HostName> save config

To Change it back , you can use following command from Expert mode:

[Expert@Pub-cp2:0]# chsh -s /etc/cli.sh admin
Changing shell for admin.

Shell changed.
Pub-cp2> set user admin shell 
shell: specifies the user's command interpreter, which is invoked on login.

        Range: No range. See file /etc/shells for valid login shells.
        Default: /etc/cli.sh.

Pub-cp2> set user admin shell /etc/cli.sh

Pub-cp2> save config

After you changed user CLI shell to bash, you will be able to use sftp software such as WinSCP to upload it.

2.3 Install Uploaded Package


[Expert@FW-CP1:0]# tar -zxvf Check_Point_R77.30_T204.Gaia.tgz

[Expert@FW-CP1:0]# ./UnixInstallScript 


***********************************************************
Welcome to Check Point R77.30 installation 
***********************************************************
Verifying installation environment for R77.30...Done!
The following components will be installed:
* R77.30
Installation program is about to stop all Check Point Processes.
Do you want to continue (y/n) ? y
Stopping Check Point Processes...Done!
Installing Security Gateway / Security Management R77.30...Done!

Installing Mobile Access R77.30...Done!

Installing Performance Pack R77.30...Done!

UserAuthority Server  is not installed. Skipping installation.

INIT: version 2.86 reloading

Installing GAIA R77.30...Done!


************************************************************************

Package Name                                                    Status
------------                                                    ------
Security Gateway / Security Management R77.30                   Succeeded

Mobile Access R77.30                                            Succeeded


Performance Pack R77.30                                         Succeeded


UserAuthority Server R77.30                                     Skipped


GAIA R77.30                                                     Succeeded


************************************************************************


Installation program completed successfully.
Do you wish to reboot your machine (y/n) ? y

Broadcast message from admin (pts/2) (Thu Jan 28 15:22:02 2016):

The system is going down for reboot NOW!

Broadcast message from admin (pts/2) (Thu Jan 28 15:22:02 2016):

The system is going down for reboot NOW!

INIT: Sending processes the TERM signalhu Jan 28
[Expert@FW-CP2:0]# Stopping sshd: [  OK  ]
Stopping arp: <not configured> 
Stopping xinetd: [  OK  ]
Stopping acpi daemon: [  OK  ]
Stopping crond: [  OK  ]
CPshell shutdown:  [  OK  ]
Stopping auditd: [  OK  ]
Shutting down kernel logger: [  OK  ]
Shutting down system logger: [  OK  ]
Starting killall:  [  OK  ]
Starting bypass_on:  [  OK  ]
Sending all processes the TERM signal... xpand[6routed[4874]: task_terminate: manager quitting
routed[4874]: Exit routed[4874] version routed-06.21.2015-13:44:30

Sending all processes the KILL signal... 
Saving random seed:  
Syncing hardware clock to system time 
Turning off swap:  
Unmounting file systems:  
mount: /proc is busy
Please stand by while rebooting the system...
Restarting system.

€


Output from console for rebooting:

                                                                                  
PCI: BIOS Bug: MCFG area at e0000000 is not E820-reserved                       
PCI: Not using MMCONFIG.                                                        
ACPI: Getting cpuindex for acpiid 0x31.80GHz                                    
ACPI: Getting cpuindex for acpiid 0x4                                           
ÿ  Reading all physical volumes.  This may take a while...                      
  Found volume group "vg_splat" using metadata type lvm2                        
  8 logical volume(s) in volume group "vg_splat" now active                     
Setting clock  (utc): Thu Jan 28 15:22:41 EST 2016 [  OK  ]                     
Starting udev: [  OK  ]CA                                                       
Setting hostname FW-CP1:  [  OK  ]                                         
Setting up Logical Volume Management:   8 logical volume(s) in volume group "vg_splat" now active
[  OK  ]                                                                        
Checking filesystems                                                            
Checking all file systems.                                                      
[/sbin/fsck.ext3 (1) -- /] fsck.ext3 -a /dev/mapper/vg_splat-lv_current         
/dev/mapper/vg_splat-lv_current: clean, 41374/4194304 files, 2589690/8388608 blocks
[/sbin/fsck.ext3 (1) -- /boot] fsck.ext3 -a /dev/sda1                           
/boot: clean, 230/38152 files, 96780/152584 blocks                              
[/sbin/fsck.ext3 (1) -- /var/log] fsck.ext3 -a /dev/mapper/vg_splat-lv_log      
/dev/mapper/vg_splat-lv_log: clean, 2503/15728640 files, 3081118/15728640 blocks
[  OK  ]hardware clock to system time 
Remounting root filesystem in read-write mode:  [  OK  ]
Mounting local filesystems:  [  OK  ]
vm.balance_pgdat_limit = 20
vm.balance_pgdat_zone = 2ooting the system...
grep: /etc/udev/rules.d//00-OS-XX.rules: No such file or directory
vm.max_map_count = 524288
Enabling /etc/fstab swaps:  [  OK  ]
INIT: Entering runlevel: 3
Applying Intel CPU microcode update: [  OK  ]
Starting sysstat:  Calling the system activity data collector (sadc): 
[  OK  ]
Running UP accel driver check.
IP series driver not present
Starting background readahead: [  OK  ]
Checking for hardware changes [  OK  ]
Configuring ipv6 kernel support:  ipv6_xlate[4451]: ipv6_xlate: FW ipv6 state OFF
[  OK  ]
Starting kdump:[  OK  ]
Inserting ipsctlmod.2.6.18.cp.i686: [  OK  ]
CKP: Loading SecureXL:  [  OK  ]
no ixgbe interfaces on the machine
no igb interfaces on the machine
CKP: Loading FW-1 IPv4 Instance 0:  [  OK  ]
CKP: Loading VPN-1     Instance 0:  [  OK  ]
CKP: Loading FW-1 IPv4 Instance 1:  [  OK  ]
CKP: Loading VPN-1     Instance 1:  [  OK  ]
FW1: Starting cpWatchDog
fwha_read_boot_conf: WARNING: cluster_id is not set in ha_boot.conf.
Starting wrp:  
[  OK  ]
Starting auditd: [  OK  ]
Starting system logger: [  OK  ]
Starting kernel logger: [  OK  ]
Fulcrum switch not installed
Starting upgrade_db:  [  OK  ]
Update Interfaces in Database:  0 bindings were imported
[  OK  ]
Generating vrfs:  [  OK  ]
Configuring NetAccess:  [  OK  ]
Generating NTP configuration:  [  OK  ]
Generating Time Zone configuration:  [  OK  ]
Generating domain name configuration:  [  OK  ]
Generating keyboard mapping configuration:  [  OK  ]
Generating hostname configuration:  [  OK  ]
Configuring Interfaces:  [  OK  ]
Generating /etc/monitor_mode:  [  OK  ]
Generating /etc/fonic_pairs:  [  OK  ]
Configuring NDP:  [  OK  ]
Generating hosts.conf:  [  OK  ]
Generating resolv.conf:  [  OK  ]
Generating dhclient.conf:  [  OK  ]
Generating pwcontrol.conf [  OK  ]
Generating passwd + shadow [  OK  ]
Generating group + gshadow [  OK  ]
Generating routed.conf [  OK  ]
Generating routed0.conf [  OK  ]
Generating extended commands:  [  OK  ]
Generating MOTD:  [  OK  ]
Generating banner message:  [  OK  ]
Generating /etc/raddb/server:  [  OK  ]
Generating TACACS+ configuration:  [  OK  ]
Generating /etc/msmtp.conf:  [  OK  ]
Generating /etc/pam.d/system-auth:  [  OK  ]
Generating /etc/sysconfig/external.if:  [  OK  ]
Generating /etc/lldpd.conf:  [  OK  ]
Generating DHCP server configuration:  Write DSTATE called 
ServerConfigured = 1 
DdnsConfigured = 0 
[  OK  ]
Generating /etc/adjust_radius:  [  OK  ]
Running /bin/arp_xlate:  [  OK  ]
Generating SNMP configuration:  [  OK  ]
Generating SNMP Monitor configuration:  [  OK  ]
Generating Job Scheduler configuration:  [  OK  ]
Updating general configuraion file:  [  OK  ]
Updating syslogd configuration:  Reloading syslogd...[  OK  ]
Reloading klogd...[  OK  ]
[  OK  ]
Updating httpd2 configuration:  [  OK  ]
 Updating httpd-ssl configuration:  [  OK  ]
Applying NetFlow configuration [  OK  ]
Configuring PPPoE:  [  OK  ]
Configuring hostaccess:  [  OK  ]
CPshell initialization:  [  OK  ]
Initializing CP Process Manager..
Starting cp_pm_rl2:  [  OK  ]
Starting cp_pm_rl3:  [  OK  ]
Starting cp_pm_rl4:  [  OK  ]
Starting acpi daemon: [  OK  ]
Starting sshd: [  OK  ]
Starting arp: <not configured> 
Starting xinetd: [  OK  ]
Starting bp_init:  [  OK  ]
Starting bypass_off:  [  OK  ]
Starting crond: [  OK  ]
Starting cpri_d:  cpridstart: Starting cprid
[1] 7362
[  OK  ]
Starting cpboot:  cpstart: Power-Up self tests passed successfully

cpstart: Starting product - SVN Foundation

SVN Foundation: cpWatchDog already running
Starting cpviewd
starting the history daemon
cpwd_admin: 
Process HISTORYD started successfully (pid=7428) 
SVN Foundation: Starting cpd
SVN Foundation: Starting PostgreSQL Database
Multiportal daemon: starting mpdaemon
SVN Foundation started

cpstart: Starting product - VPN-1

FireWall-1: starting external VPN module -- OK
fwha_read_boot_conf: WARNING: cluster_id is not set in ha_boot.conf.
cpwd_admin: 
Process CPHAMCSET started successfully (pid=7728) 
FireWall-1: Starting fwd

SecureXL disabled, cannot use affinity commands
SecureXL will be started after a policy is loaded. 
FireWall-1: Fetching policy

Installing Security Policy FW_1 on all.all@FW-CP1
Fetching Security Policy from localhost succeeded
SIM: using arbitrary CPU 0

Fetching FW1 Security Policy From: 10.4.2.5

 Local Policy is Up-To-Date.
 The Policy was not installed because it is the same as the Policy already on the Security Gateway.
Installing Threat Prevention policy from -n

Fetching Threat Prevention Security Policy From: 10.4.20.50 

Threat Prevention Security Policy wasn't loaded
Fetching Threat Prevention policy failed
AntiMalware was not started
FireWall-1: enabling bridge forwarding
FireWall-1 started
SIM: using arbitrary CPU 0

cpstart: Starting product - FloodGate-1

FloodGate-1 is disabled. If you wish to start the service, please run 'etmstart enable'.

cpstart: Starting product - SmartView Monitor

SmartView Monitor: Not active

cpstart: Starting product - SmartLog


cpstart: Starting product - Mobile Access

Mobile Access service is disabled.
If you wish to start Mobile Access, please enable the Mobile Access blade in the SmartDashboard and configure the Mobile Access policy.

cpstart: Starting product - Deployment Agent

cpwd_admin: 
Process DASERVICE started successfully (pid=9527) 
[  OK  ]
Starting cpboot_refetch:  [  OK  ]
Inserting vrrp_lkm.2.6.18.cp.i686: [  OK  ]


This system is for authorized use only.
login: 


Log in to gateway to verify installed package.

[Expert@FW-CP1:0]# fw ver
This is Check Point's software version R77.30 - Build 503
[Expert@FW-CP1:0]#


2.4 Check Point Mgmt Server Changes

2.4.1 Change Gateway version to R77.30
2.4.2 Install Policy with clear the check for option "For Gateway Clusters install on all the members, if it fails do not install at all"

Installation to the upgraded gateway (R77.30) will be successful with some warning notification since the installation will fail on active but non-upgraded gateway (R77.10). You can safely ignore it.

2.5 Upgrade another Cluster member from R77.10 to R77.30
On left R77.10 gateway, you can do cpstop to failover active role to new R77.30 gateway, then you will following same steps on 2.4 to upgrade R77.10 to r77.30.

After second gateway upgraded to R77.30, you can push policy again but this time you will not get warning notification for policy push status.

2.6 Verify Status

[Expert@FW-CP1:0]# cphaprob stat

Cluster Mode:   High Availability (Active Up) with IGMP Membership

Number     Unique Address  Assigned Load   State       

1 (local)  10.9.9.15     0%              Ready            

(*) 'Ready' state might be caused due to configuration inconsistency between members:
    32bit/64bit/usermode, number of CoreXL instances or different SW version.

[Expert@FW-CP1:0]# cphaprob stat

Cluster Mode:   High Availability (Active Up) with IGMP Membership

Number     Unique Address  Assigned Load   State       

1 (local)  10.9.9.15     100%            Active          


[Expert@FW-CP1:0]# fw stat
HOST      POLICY     DATE            
localhost FW_Policy_1  28Jan2016 15:42:36 :  [>eth1] [<eth1] [>eth2] [<eth2] [>eth3] [>Mgmt] [<Mgmt] 
[Expert@FW-CP1:0]#  


Reference:

  • sk107042 - ClusterXL upgrade methods and paths
  • CP_R77_Gaia_Installation_and_Upgrade_Guide
  • Install / Upgrade Checkpoint Full HA (Gateway and Management) 


0 Comments

    Categories

    All
    Architecture
    Blog
    Checkpoint
    Cisco
    Cloud
    CyberArk
    F5
    Fortigate
    Guardium
    Juniper
    Linux
    Network
    Others
    Palo Alto
    Qualys
    Raspberry Pi
    Security
    SIEM
    Software
    Vmware
    VPN
    Wireless

    Archives

    March 2024
    February 2024
    January 2024
    December 2023
    November 2023
    October 2023
    September 2023
    August 2023
    July 2023
    June 2023
    May 2023
    April 2023
    March 2023
    February 2023
    January 2023
    December 2022
    November 2022
    October 2022
    September 2022
    August 2022
    July 2022
    June 2022
    May 2022
    April 2022
    March 2022
    February 2022
    January 2022
    December 2021
    November 2021
    October 2021
    September 2021
    August 2021
    July 2021
    June 2021
    May 2021
    April 2021
    March 2021
    February 2021
    January 2021
    December 2020
    November 2020
    October 2020
    September 2020
    August 2020
    July 2020
    October 2019
    September 2019
    June 2019
    July 2018
    May 2018
    December 2017
    August 2017
    April 2017
    March 2017
    January 2017
    December 2016
    November 2016
    October 2016
    September 2016
    August 2016
    July 2016
    June 2016
    May 2016
    April 2016
    March 2016
    February 2016
    January 2016
    December 2015
    November 2015
    October 2015
    September 2015
    August 2015
    July 2015
    June 2015
    May 2015
    April 2015
    March 2015

    Print Page:

    RSS Feed

    Email Subscribe
Powered by Create your own unique website with customizable templates.
  • Blog
  • Sitemap
    • Categories
  • Contact
  • About
  • Resources
  • Tools
  • 51sec.org