Info Security Memo
  • Blog
  • Sitemap
    • Categories
  • Contact
  • About
  • Resources
  • Tools
  • 51sec.org

Build Confidence

Focusing on Information Security 

Info Security Notes

Troubleshooting Java HTTPS Security Warning Message

3/27/2015

1 Comment

 
One of our Internal Website is always having a Security Warning message when using Internet Explorer https to it, but this message is not showing when using Google Chrome.

Symptoms:

As following screenshot shows, a pop-up window will ask you "Do you want to Continue? The connection to this website is untrusted".
 Click More Information link:
 The Warning message will warm you a Risk;
"This application will run with unrestricted access which may put your computer and personal information at risk. The information provided is unreliable or unknown so it is recommended not to run this application unless you are familiar with its source. 
Unable to ensure the certificate unsed to identify this application has not been revoked. 
The digital signature for this application was generated with a certificate from a trusted certificate authority, but we are unable to ensure that it was not revoked by that authority."
Lets drill down again to view Certificate Details:
 From the certificate chain, we can see the local certificate was issued by Verisign G4, Verisign G4 certificate was issued by Verisign G5 (expiring date is Jul 16 2036).

I were able to find out this G5 certificate from Certificate button at IE's Content tab:


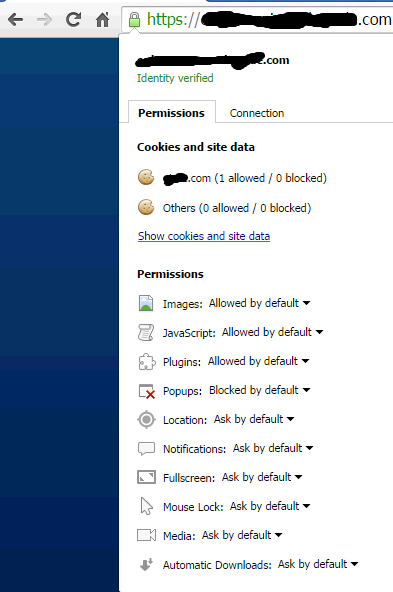
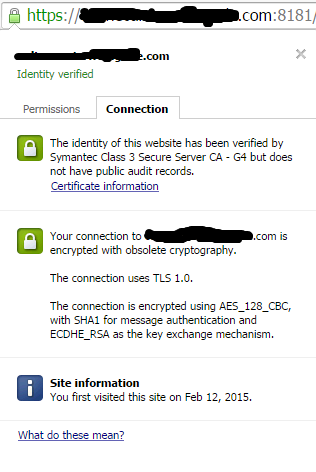
Interesting thing is when I use Google Chrome, there is no warning at all. But If I do find an Interesting thing on this Google Chrome connection:
The connection to this website is using TLS1.0 , which is obsolete cryptography.

Solutions:

From previous More Information of warning message screenshot, we could find out it is coming from Java, since at the bottom, it lets us to visit Java.com for more details. Also it mentioned the certificate could not be verified if revoked before. This warning message must relate to Java's TLS Revocation Settings.


I went back to Java Control Panel and found out there is one setting for "TLS Certificate Revocation". After changed it to Do not check. This warning message is gone.

Another solution for this is to change server side to use ssl only.  I will keep post once get more information regarding this Java security warming message issue.  If you have any better idea why Google Chrome is always fine before any change, please let me know. Appreciated it. 
1 Comment

Vulnerability Mitigation - Plaintext Management Interfaces Accessible On Cisco Device

3/23/2015

1 Comment

 
Recently, during an Qualys external Scanning, there is a couple of Vulnerability found which is relate to Plaintext Management Interface. That is because of Telnet port 2002, 9002 is opened on Internet. 

It was mentioned before in my previous post. This post just adds more information regarding vulnerability details and how those external scanning tools are responding this vulnerability.

Issues:

In Qualys PCI Scanning report, it lists this vulnerability detail as following:
Plaintext Management Interfaces Accessible On Cisco Device port 2002/tcp
PCI COMPLIANCE STATUS
PCI Severity: MED
FAIL
VULNERABILITY DETAILS
CVSS Base Score: 4 AV:N/AC:L/Au:S/C:P/I:N/A:N
CVSS Temporal Score: 3.6 E:F/RL:W/RC:C
Severity: 3
QID: 38250
Category: General remote services
CVE ID: -
Vendor Reference: -
Bugtraq ID: -
Last Update: 10/31/2012
THREAT:
The target is determined to be a Cisco device, which uses protocols such as HTTP, TELNET, rlogin, FTP, and SNMP for configuration management.
These services can be accessed and are an invitation for malicious users to break in.
The port string mentioned with this vulnerability should identify the service in question.
IMPACT:
Malicious users can exploit this vulnerability to deploy a range of known attacks against accessible services. Brute force attacks such as password
guessing and Denial Of Service are also possible.
SOLUTION:
Consider taking the following precautionary measures:
Disable services that are not needed.
Consider putting access controls on these services. Access controls can be put together using the features in the device (if available) or using an
external firewall.
Do not use default passwords and replace them with hard to guess passwords. Change passwords frequently.
RESULT:
Service name: TELNET(Cisco) on TCP port 2002.

Plaintext Management Interfaces Accessible On Cisco Device port 9002/tcp
PCI COMPLIANCE STATUS
PCI Severity: MED
FAIL
VULNERABILITY DETAILS
CVSS Base Score: 4 AV:N/AC:L/Au:S/C:P/I:N/A:N
CVSS Temporal Score: 3.6 E:F/RL:W/RC:C
Severity: 3
QID: 38250
Category: General remote services
CVE ID: -
Vendor Reference: -
Bugtraq ID: -
Last Update: 10/31/2012
THREAT:
The target is determined to be a Cisco device, which uses protocols such as HTTP, TELNET, rlogin, FTP, and SNMP for configuration management.
These services can be accessed and are an invitation for malicious users to break in.
The port string mentioned with this vulnerability should identify the service in question.
IMPACT:
Malicious users can exploit this vulnerability to deploy a range of known attacks against accessible services. Brute force attacks such as password
guessing and Denial Of Service are also possible.
SOLUTION:
Consider taking the following precautionary measures:
Disable services that are not needed.
Consider putting access controls on these services. Access controls can be put together using the features in the device (if available) or using an
external firewall.
Do not use default passwords and replace them with hard to guess passwords. Change passwords frequently.
RESULT:
Service name: TELNET(Cisco) on TCP port 9002.

Screenshots:


R1#show control-plane host open-ports
Active internet connections (servers and established)
Prot               Local Address             Foreign Address                  Service    State
 tcp                        *:22                         *:0               SSH-Server   LISTEN
 tcp                        *:23                         *:0                   Telnet   LISTEN
 tcp                      *:2002          88.198.46.51:58719            TCP Protocols ESTABLIS
 udp                       *:123                         *:0                      NTP   LISTEN
 udp                      *:4500                         *:0                   ISAKMP   LISTEN
 udp                       *:161                         *:0                  IP SNMP   LISTEN
 udp                       *:162                         *:0                  IP SNMP   LISTEN
 udp                      *:1975                         *:0                      IPC   LISTEN
 udp                     *:57430                         *:0                  IP SNMP   LISTEN
 udp                       *:500                         *:0                   ISAKMP   LISTEN

Root Cause: 

Based on my search, it looks like the Line 2 is used to communicate between the routers and Embedded Service Engine on the Cisco ISR G2 routers. 
The article from itcertnotes provides some solutions. 
  1. Complete disable line 2 access
  2. put an access list on the Line 2 for IPv4 and IPv6. 


Solution: 

Since Embedded Service Engine is not used that much, there is no need to configure an IP address and put a access-list to restrict access. The simplest solution is to complete disable the access to line 2. 
line 2 
transport input none

Reference:


  • Close Cisco IOS TCP Ports 23, 2002, 4002, 6002, and 9002 from Network Ports Scanning  

1 Comment

Free Forticloud Service for FortiGate and FortiWiFi

3/20/2015

0 Comments

 
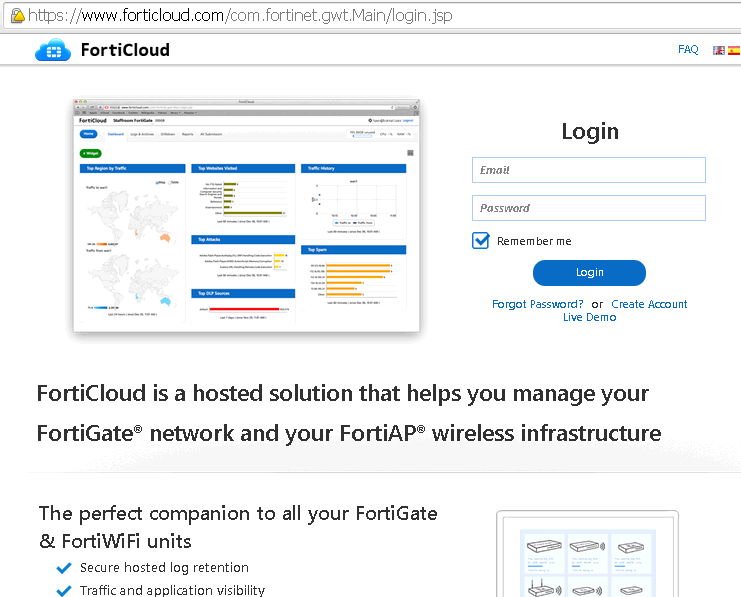
FortiCloud is a Cloud-based services for FortiGate and FortiWiFi products from Fortinet company. It is free for charge for at most 1GB data storage. It is quite interesting especially the remote access feature when I tried to use it. As long as your products managed by FortiCloud have Internet access, you are able to remote access into it.

Here are some FortiCloud Highlights based on its webpage:
  1. -Low touch device provisioning - Get your security and wireless infrastructure up and running quickly by centrally bootstrapping devices
  2. -Centralized configuration management - Change device settings across multiple devices instantly with profile-based templates
  3. -Traffic and application visibility - Oversee network utilization by leveraging built-in dashboards and FortiView's drill-down capabilities
  4. -Secure, hosted log retention - Minimize IT costs by storing log data in the cloud
  5. -Cloud-based APT sandboxing - Leverage threat research from FortiGuard to prevent the latest zero-day attacks from affecting your network
  6. -Rogue AP detection - Prevent attackers from circumventing your wireless network with the introduction of rogue APs
  7. -Custom and preconfigured reporting - Proactively optimize and secure your network by leveraging reporting insights to maintain an optimized security posture

This is FortiCloud main page:
It is completely free to use, you can register your account even without owning Fortinet product. To register your products into FortiCloud, you can activate FortiCloud service from your device's management page.

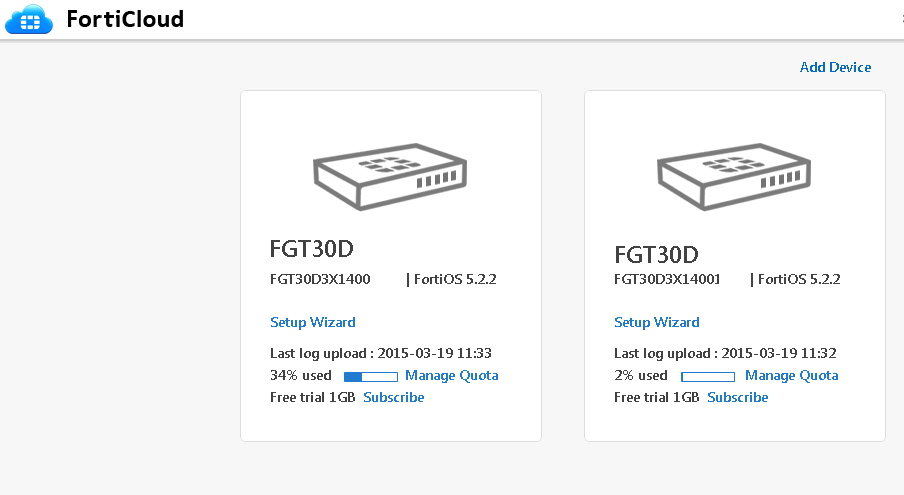
After activation, you can see the products from FortiCloud page, such as below screenshot. There are two Fortigate 30D products managed by this FortiCloud account. Both of them are having FortiOS 5.2.2 installed. there are Free 1GB storage space. If your business needs more for your devices, you could subscribe it from the home page.

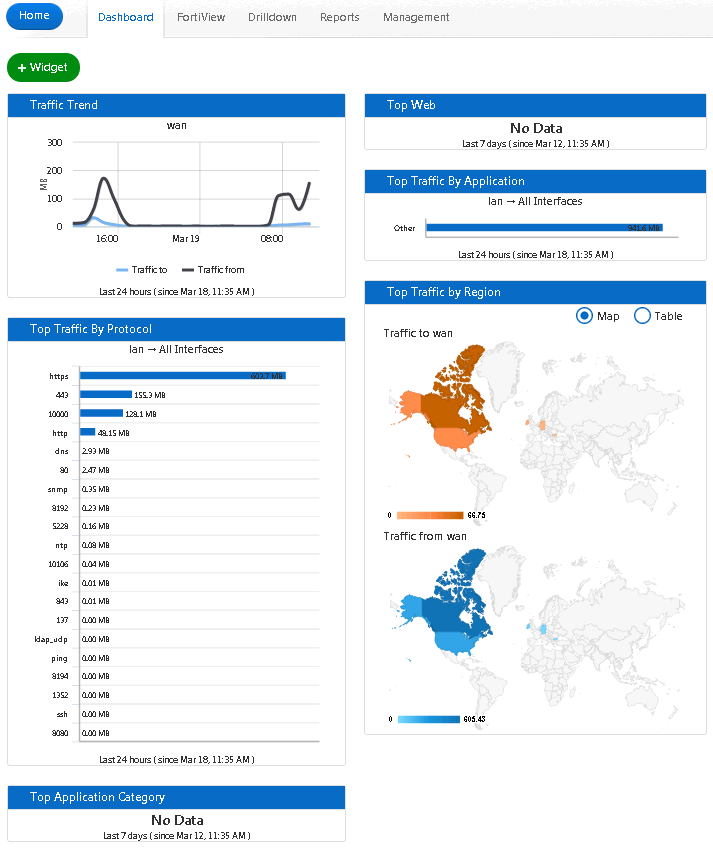
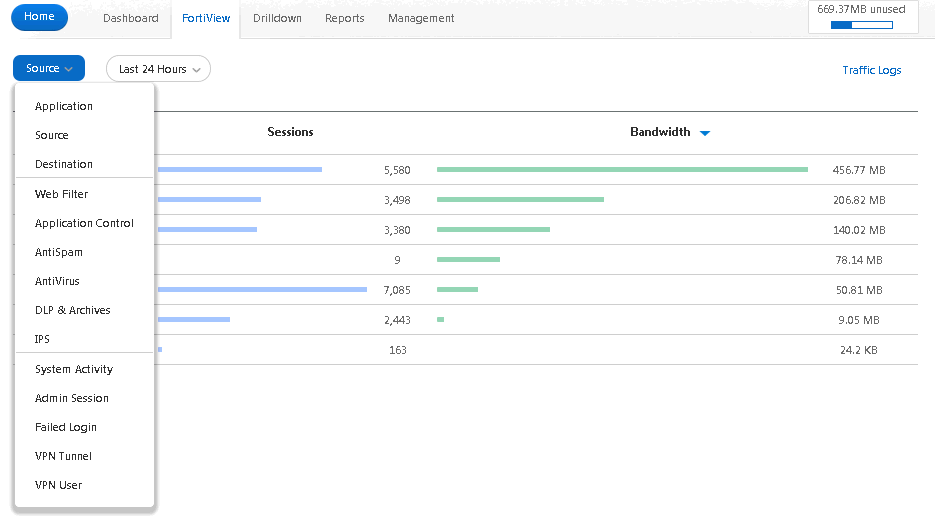
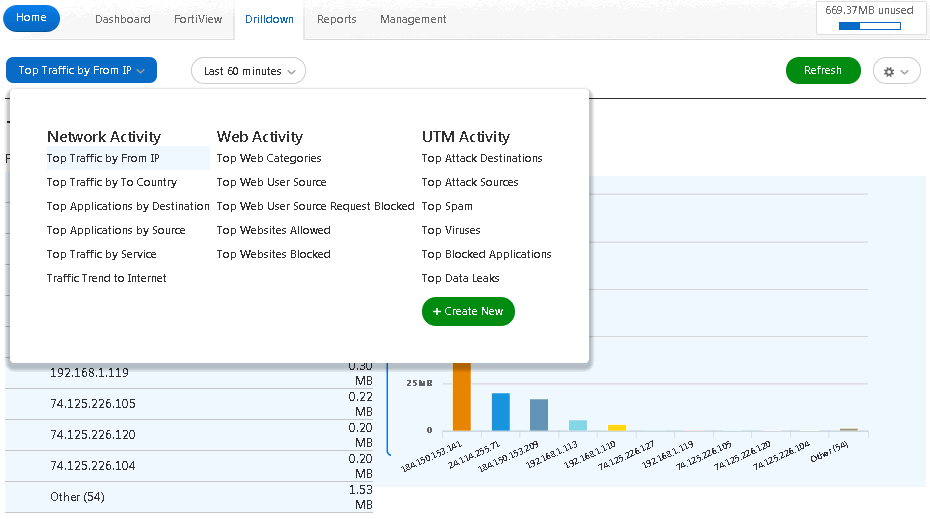
There are Dashboard, FortiView, Drilldown, Reports and Management tabs in the FortiCloud.
  • Dashboard tab page:


  • FortiView tab page:


  • Drilldown tab page:


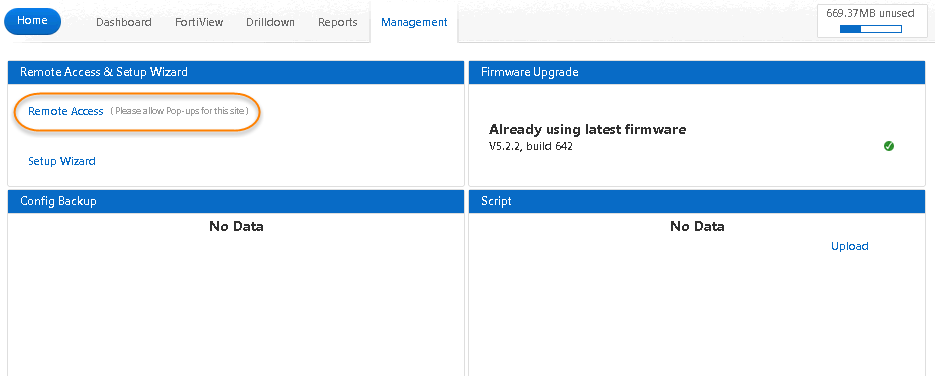
The most useful one is the Remote Access feature under the Management tab page. You can remote log into your devices https web management page through FortiCloud. It does not require any special configuration on your upstream router /firewall, as long as your device has Internet access, it can be remote accessed through FortiCloud.
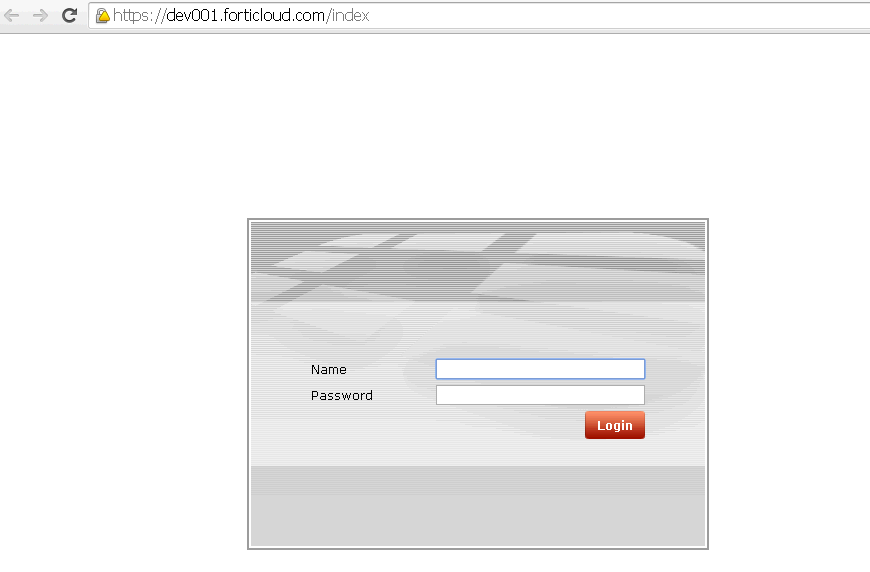
Below screenshot is Fortigate 30D https management page. It will be pop up after you clicked Remote Access link under Management tab page.
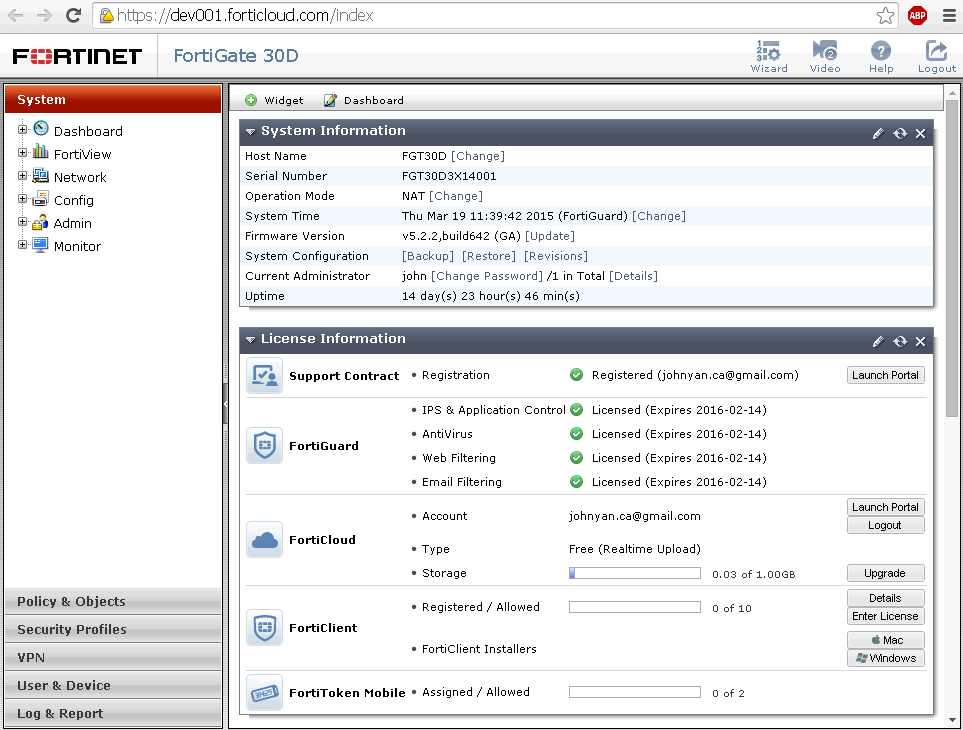
You will see FortiGate 30D management page after loged in , just like you saw from Internal network. It wont need your upstream router / firewall to open https/http/ssh access to your device's WAN public ip address.


There is a small trick here. After you upgraded your FortiOS to 5.2.2 version, this function is broken. The device's management log in page won't show up. Only a blank page will show in a pop up window. To make it working, following special configuration has to be configured on your device first. Basically, it is because FortiCloud is not supporting https ssl version well. But by default FortiOS 5.2.2 has lock down for Poodle / Heartbeat vulnerability already. The solution is simple, just add support tsl v1.0, 1.1, and 1.2 back into FortiGate devcie. All should be working as expected.

config system global
set admin-https-ssl-versions tlsv1-0 tlsv1-1 tlsv1-2
end

FGT30D (global) # show
config system global
    set admin-https-ssl-versions tlsv1-0 tlsv1-1 tlsv1-2
    set fgd-alert-subscription advisory latest-threat
    set gui-dlp enable
    set gui-ips enable
    set gui-spamfilter enable
    set hostname "FGT30D"
    set timezone 12
end

References:

  • FortiCloud v2.0 Frequently Asked Questions


0 Comments

Linux Service Configuration - NTP

3/16/2015

0 Comments

 
As a network guy, you will work with NTP (Network Time Protocol) lots for your network devices.

From Wikipedia, the explanation regarding NTP is:
"The protocol is usually described in terms of a client-server model, but can as easily be used in peer-to-peer relationships where both peers consider the other to be a potential time source.Implementations send and receive timestamps using the User Datagram Protocol (UDP) on port number 123. They can also use broadcasting or multicasting, where clients passively listen to time updates after an initial round-trip calibrating exchange. NTP supplies a warning of any impending leap second adjustment, but no information about local time zones or daylight saving time is transmitted."
A local linux NTP server on the network can be synchronized with a trusted timing source to keep all of your internal NTP clients in sync with an accurate time. For windows ntp server, please check my previous post: Build NTP Windows Server for Network Devices (not Win32Time)

1. Install NTP Server

a. Check your linux release

[root@syslov1p ~]# cat /etc/redhat-release
CentOS release 6.6 (Final)

b. [root@syslov1p ~]# yum install ntp

Loaded plugins: fastestmirror
Setting up Install Process
Loading mirror speeds from cached hostfile
Package ntp-4.2.6p5-2.el6.centos.x86_64 already installed and latest version
Nothing to do

2. Modify /etc/ntp.conf

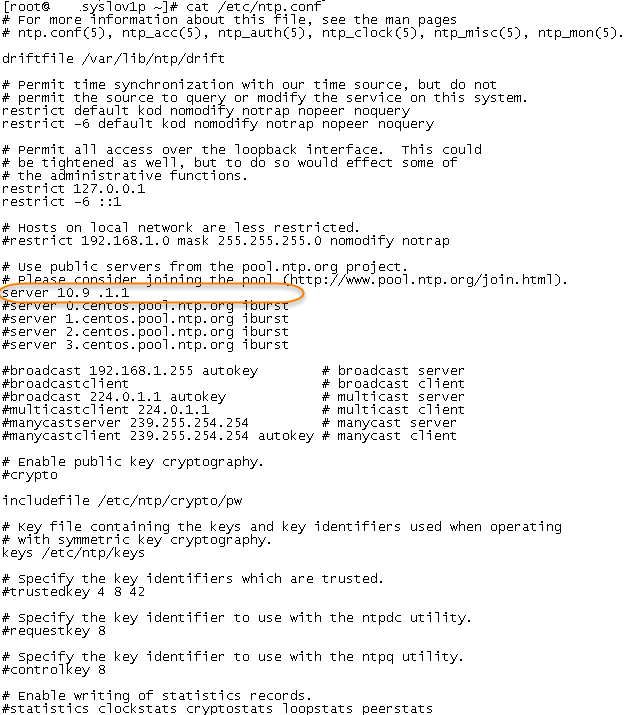
a. add trusted time server, in my case it is 10.9.1.1. Other configuration could be default. 


b. Restart ntpd service

[root@syslov1p ~]# service ntpd restartShutting down ntpd: [  OK  ]Starting ntpd: [  OK  ][root@syslov1p ~]# service ntpd stopShutting down ntpd: [  OK  ][root@syslov1p ~]# service ntpd startStarting ntpd: [  OK  ]

c. Also you could restrict only specific clients

restrict 192.168.1.0 mask 255.255.255.0 nomodify notrap

d. add local clock as backup

server 127.127.1.0 # local clockfudge 127.127.1.0 stratum 10

3. Verify NTP Status

a. using command ntpq -p
[root@syslov1p ~]# ntpq -p     remote           refid      st t when poll reach   delay   offset  jitter==============================================================================*10.9.1.1     193.108.184.92   3 u   25   64  377    2.173    4.430   3.906

b. Manually synchronize time

[root@syslov1p ~]# ntpdate -u 10.9.1.116 Mar 20:38:58 ntpdate[2671]: adjust time server 10.9.1.1 offset -0.005387 sec

c. on your linux NTP client, you could start your ntp client Daemon and check the ntp client status

[root@syslov1p ~]# /etc/init.d/ntpd start
Starting ntpd:  
[root@syslov1p ~]# ntpdc -c sysinfo
system peer:          r-1-hsrp.mgmt.intern
system peer mode:     client
leap indicator:       00
stratum:              4
precision:            -19
root distance:        0.18851 s
root dispersion:      1.09599 s
reference ID:         [10.9.1.1]
reference time:       d8b1b105.8e2ff185  Mon, Mar 16 2015 20:44:05.555
system flags:         auth monitor ntp kernel stats
jitter:               0.000000 s
stability:            0.000 ppm
broadcastdelay:       0.000000 s
authdelay:            0.000000 s


0 Comments

March 15th, 2015

3/15/2015

0 Comments

 
There are always bad days during your life. The only thing we could do is to face it and find the solution. Just like today, it supposed to be a good weekend after a quick patch. But things quickly turned to bad way. There was a Checkpoint firewall not coming back after a hotfix installed. System crashed and kept rebooting during loading the policy from local host. (Root cause for this issue is another story.)

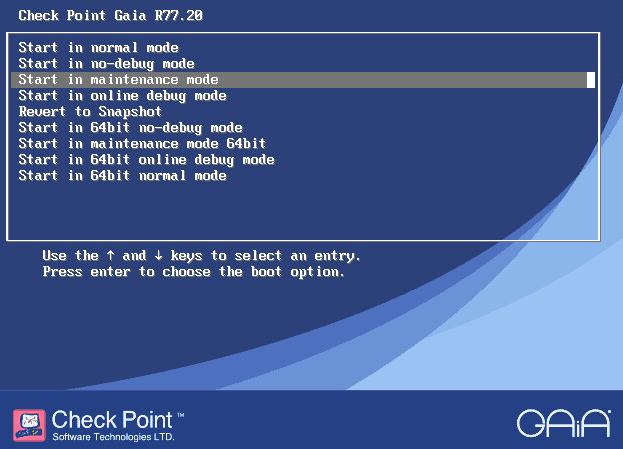
Since system crashed and no way for administrator to log in, what we could do is to log in to maintenance mode , either restore from previous backup / image (hopefully you have one), or uninstall the hotfix.

Usually uninstallation script will save your huge amounts of time from this awkward situation, the worst case is to get into maintenance mode to restore image you took before. Let me list all steps I experienced today:

1. System crushed during rebooting after applied a hotfix from Check Point

INIT: Entering runlevel: 3
Applying Intel CPU microcode update: [  OK  ]
Starting sysstat:  Calling the system activity data collector (sadc):
[  OK  ]
Running UP accel driver check.
IP series driver not present
Starting background readahead: [  OK  ]
Checking for hardware changes [  OK  ]
Configuring ipv6 kernel support:  [  OK  ]
Starting kdump:[  OK  ]
Inserting ipsctlmod.2.6.18.cp.i686: [  OK  ]
CKP: Loading SecureXL:  [  OK  ]
CKP: Loading FW-1 IPv4 Instance 0:  [  OK  ]
CKP: Loading VPN-1     Instance 0:  [  OK  ]
CKP: Loading FW-1 IPv4 Instance 1:  [  OK  ]
CKP: Loading VPN-1     Instance 1:  [  OK  ]
FW1: Starting cpWatchDog
Starting wrp: 
[  OK  ]
Starting auditd: [  OK  ]
Starting system logger: [  OK  ]
Starting kernel logger: [  OK  ]
Fulcrum switch not installed
Update Interfaces in Database:  0 bindings were imported
[  OK  ]
Generating vrfs:  [  OK  ]
Configuring NetAccess:  [  OK  ]
Generating NTP configuration:  [  OK  ]
Generating Time Zone configuration:  [  OK  ]
Generating domain name configuration:  [  OK  ]
Generating keyboard mapping configuration:  [  OK  ]
Generating hostname configuration:  [  OK  ]
Configuring Interfaces:  [  OK  ]
Generating /etc/monitor_mode:  [  OK  ]
Generating /etc/fonic_pairs:  [  OK  ]
Configuring NDP:  [  OK  ]
Generating hosts.conf:  [  OK  ]
Generating resolv.conf:  [  OK  ]
Generating dhclient.conf:  [  OK  ]
Generating pwcontrol.conf [  OK  ]
Generating passwd + shadow [  OK  ]
Generating group + gshadow [  OK  ]
Generating routed.conf [  OK  ]
Generating routed0.conf [  OK  ]
Generating extended commands:  [  OK  ]
Generating MOTD:  [  OK  ]
Generating banner message:  [  OK  ]
Generating /etc/raddb/server:  [  OK  ]
Generating TACACS+ configuration:  [  OK  ]
Generating /etc/msmtp.conf:  [  OK  ]
Generating /etc/pam.d/system-auth:  [  OK  ]
Generating /etc/sysconfig/external.if:  [  OK  ]
Generating /etc/lldpd.conf:  [  OK  ]
Generating DHCP server configuration:  Write DSTATE called
ServerConfigured = 1
DdnsConfigured = 0
[  OK  ]
Generating /etc/adjust_radius:  [  OK  ]
Running /bin/arp_xlate:  [  OK  ]
Generating SNMP configuration:  [  OK  ]
Generating Job Scheduler configuration:  [  OK  ]
Updating general configuraion file:  [  OK  ]
Updating syslogd configuration:  Reloading syslogd...[  OK  ]
Reloading klogd...[  OK  ]
[  OK  ]
Updating httpd2 configuration:  [  OK  ]
 Updating httpd-ssl configuration:  [  OK  ]
Applying NetFlow configuration [  OK  ]
Configuring PPPoE:  [  OK  ]
CPshell initialization:  [  OK  ]
Initializing CP Process Manager..
Starting cp_pm_rl2:  [  OK  ]
Starting cp_pm_rl3:  [  OK  ]
Starting cp_pm_rl4:  [  OK  ]
Starting acpi daemon: [  OK  ]
Starting sshd: [  OK  ]
Starting arp: <not configured>
Starting xinetd: [  OK  ]
Starting bp_init:  [  OK  ]
Starting bypass_off:  [  OK  ]
Starting crond: [  OK  ]
Starting cpri_d:  cpridstart: Starting cprid
[1] 7382
[  OK  ]
Starting cpboot:  cpstart: Power-Up self tests passed successfully

cpstart: Starting product - SVN Foundation

SVN Foundation: cpWatchDog already running
SVN Foundation: Starting cpd
Multiportal daemon: starting mpdaemon
SVN Foundation started

cpstart: Starting product - VPN-1

FireWall-1: starting external VPN module -- OK
cpwd_admin:
Process CPHAMCSET started successfully (pid=8208)
FireWall-1: Starting fwd

SecureXL disabled, cannot use affinity commands
SecureXL will be started after a policy is loaded.
FireWall-1: Fetching policy

Installing Security Policy Internet-CP-Cluster on all.all@Pub-cp2
wdt stop function not defined

Oops: 0000 [#1]
SMP
last sysfs file: /devices/pci0000:00/0000:00:00.0/class
Modules linked in: w83627ehf(U) hwmon_vid(U) hwmon(U) button(U) xfrm_nalgo(U) crypto_api(U) 8021q(U) wrpmodmod(PU) vpn_1(PU) fw_1(PU) vpn_0(PU) fw_0(PU) simmod(PU) bridge(U) llc(U) ipsctlmod(PU) parport_pc(U) lp(U) parport(U) sg(U) pcspkr(U) bypass_sb_gpio(U) i2c_i801(U) bypass_class(U) igb(U) i2c_core(U) e1000e(U) serio_raw(U) ip_srs_apic(U) dm_snapshot(U) dm_zero(U) dm_mirror(U) dm_mod(U) ata_piix(U) libata(U) sd_mod(U) scsi_mod(U) ext3(U) jbd(U) ehci_hcd(U) ohci_hcd(U) uhci_hcd(U)
CPU:    1
EIP:    0060:[<f13bf15b>]    Tainted: P      VLI
EFLAGS: 00010202   (2.6.18-92cp #1)
EIP is at cphwd_api_init+0x82b/0xe90 [simmod]
eax: 5505b527   ebx: 00000005   ecx: 00000000   edx: 00000080
esi: 00000001   edi: f1685580   ebp: f1683120   esp: e2e5b984
ds: 007b   es: 007b   ss: 0068
Process fw_full (pid: 8553, ti=e2e58000 task=ef452c70 task.ti=e2e58000)
Stack: f1441ac0 00000002 00000000 80405d5a f40e3c74 00000000 f40e3e80 00000000
       f13be930 e2e5b9cc f40e3c74 00000000 f2d2eb97 e2e5b9cc f338ae30 00000060
       00000202 f40e3e80 00000000 00000000 00000000 00000001 00000002 00000000
Call Trace:
[<e2e5b990>] <0> [<80405d5a>] common_interrupt+0x1a/0x20
[<e2e5b9a4>] <0> [<f13be930>] cphwd_api_init+0x0/0xe90 [simmod]
[<e2e5b9b4>] <0> [<f2d2eb97>] cphwd_api_init_+0x97/0x100 [fw_0]
[<e2e5b9bc>] <0> [<f338ae30>] fwhamultik_validate_not_locked+0x0/0x90 [fw_0]
[<e2e5b9e8>] <0> [<f2d1b0c4>] cphwd_start+0x2174/0x2cc0 [fw_0]
[<e2e5ba64>] <0> [<804388a9>] update_process_times+0x59/0x90
[<e2e5ba74>] <0> [<f2eaa135>] hmem_global_receive_returned_blocks+0x65/0xd0 [fw_0]
[<e2e5ba78>] <0> [<8041e50a>] smp_apic_timer_interrupt+0x7a/0x80
[<e2e5ba84>] <0> [<80405deb>] apic_timer_interrupt+0x1f/0x24

2. Enter into Maintenance Mode

Following Steps will bring your CheckPoint appliance into maintenance mode:
  • Connect to the machine over console (serial).
  • Reboot the machine (power cycle). 
  • During the boot, press a key on the "Press any key to see the boot menu" screen. This should open the Check Point Boot Menu. By default, user has only 5 seconds to press any key. 
  • Choose the "Start in maintenance mode" and press Enter.
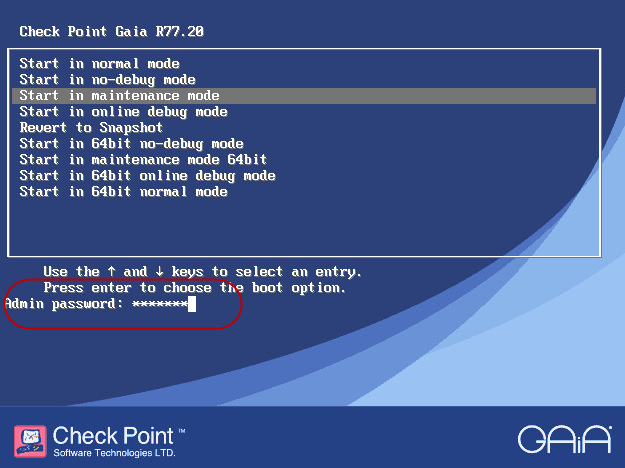
  • Enter the Admin credentials and press Enter.


3. Uninstall the hotfix from /opt/CPsuite-R77 folder

sh-3.1# fw ver
This is Check Point's software version R77.10 - Build 243
 List all installed hotfix. You will see that problem one marked with red color:
sh-3.1# cpinfo -y
Error: 'Couldn't connect to /tmp/xgets:  Connection refused
'.
------------------------
Hotfix versions
------------------------
[FW1]
  HOTFIX_R77_10
  HOTFIX_R77_HF_HA10_005
  HOTFIX_GYPSY_LTE_HF_001 
[PPACK]
  HOTFIX_R77_10
[SecurePlatform]
  HOTFIX_R77_10_GAIA_GHOST_833
[CVPN]
  HOTFIX_R77_10
[CPinfo]
  No hotfixes..
[SmartLog]
  HOTFIX_R77_10 


Go to /opt/CPsuite-R77 folder:
Note: Usually it is the parent folder $FWDIR. Based on the version you are having on your Checkpoint Device, the real folder directory is different. In this case, it is Gaia R77.10, and folder is /opt/CPsuite-R77.


sh-3.1# cd CPsuite-R77
sh-3.1# ls
CPinstall    fw1_wrapper_HOTFIX_GYPSY_LTE_HF_001_bcp.tgz
LICENSE.TXT  fw1_wrapper_HOTFIX_GYPSY_LTE_HF_001_bcp.tgz.new.txt
conf         fw1_wrapper_HOTFIX_R77_HF_HA10_005_bcp.tgz
fg1          fw1_wrapper_HOTFIX_R77_HF_HA10_005_bcp.tgz.new.txt
fw1          uninstall_fw1_wrapper_HOTFIX_GYPSY_LTE_HF_001
fw1_wrapper  uninstall_fw1_wrapper_HOTFIX_R77_HF_HA10_005


sh-3.1# ls -ali
total 122712
328062 drwxrwx--x  7 admin bin      4096 Mar 15 10:26 .
 65537 drwxr-xr-x 19 admin root     4096 Aug  6  2014 ..
328064 drwxrwx---  2 admin bin      4096 Aug  6  2014 CPinstall
328066 -rwxrwx---  1 admin bin     38604 Jan 16  2014 LICENSE.TXT
328067 drwxrwx---  2 admin bin      4096 Aug  6  2014 conf
328069 drwxrwx---  9 admin bin      4096 Nov  9 01:37 fg1
328095 drwxrwx--x 30 admin bin      4096 Mar 15 12:35 fw1
852062 drwxr-x---  3 admin bin      4096 Apr  7  2014 fw1_wrapper
327694 -rw-rw----  1 admin root 72317473 Mar 15 10:25 fw1_wrapper_HOTFIX_GYPSY_LTE_HF_001_bcp.tgz
327692 -rw-rw----  1 admin root      763 Mar 15 10:24 fw1_wrapper_HOTFIX_GYPSY_LTE_HF_001_bcp.tgz.new.txt
329068 -rw-rw----  1 admin root 53080782 Aug  6  2014 fw1_wrapper_HOTFIX_R77_HF_HA10_005_bcp.tgz
329067 -rw-rw----  1 admin root      187 Aug  6  2014 fw1_wrapper_HOTFIX_R77_HF_HA10_005_bcp.tgz.new.txt
327700 -rwxr-x---  1 admin bin     18224 Nov  9 01:37 uninstall_fw1_wrapper_HOTFIX_GYPSY_LTE_HF_001
329069 -rwxr-x---  1 admin bin     18218 Apr  7  2014 uninstall_fw1_wrapper_HOTFIX_R77_HF_HA10_005

sh-3.1# ./uninstall_fw1_wrapper_HOTFIX_GYPSY_LTE_HF_001 
Validating uninstall archive...
Do you want to proceed with uninstallation of
Security Gateway Power/UTM R77.10 GYPSY_LTE_HF_001 on this computer?
If you choose to proceed, uninstall will perform CPSTOP.
To proceed type y to cancel type n :
y
 cpwd_admin: Failed to submit request to cpWatchDog
cvpnd: no process killed
dbwriter: no process killed
cvpnproc: no process killed
MoveFileServer: no process killed
CvpnUMD: no process killed
Mobile Access: Stopping MoveFileDemuxer service (if needed)
 cpwd_admin: Failed to submit request to cpWatchDog
Mobile Access: MoveFileDemuxer is not running
Exception: connect() failed - Network is unreachable
Multiportal daemon is not running
Pinger: no process killed
Mobile Access: Successfully stopped Mobile Access services
 cpwd_admin: Failed to submit request to cpWatchDog
SmartView Monitor: Unable to find CpWatchDog - run cpstart
FloodGate-1 is already stopped.
 Unable to open '/dev/fw0': No such file or directory
 fw_syncn_set: failed to set off synchronization
 cpwd_admin: Failed to submit request to cpWatchDog
 Unable to open '/dev/fw0': No such file or directory
 Failed to notify kernel: No such file or directory
 HA not stopped.
VPN-1/FW-1 stopped
Multi portal stopped
fw: Unable to open '/dev/fw0': Unknown error 4294967295
fw: Set operation failed: failed to get parameter
fw: set: Operation failed: Unknown error 4294967295
SVN Foundation: cpd is not running
Multiportal daemon: mpdaemon is not running
 cpwd_admin: Failed to submit request to cpWatchDog
SVN Foundation: cpWatchDog is not running
SVN Foundation stopped
Launching pre-uninstall utility
Removing gx.lf file from registry...
****************
Security Gateway Power/UTM R77.10
Security Gateway Power/UTM R77.10 GYPSY_LTE_HF_001
Uninstall completed successfully.
****************

***********************************************************

Don't forget to reboot the machine!!

***********************************************************

sh-3.1# reboot
Preforming soft reboot
INIT: Sending processes the TERM signal
INIT: Starting killall:  [  OK  ]
Starting bypass_on:  [  OK  ]
Sending all processes the TERM signal...
Sending all processes the KILL signal...
Saving random seed:
Syncing hardware clock to system time
Turning off swap:
Unmounting file systems:
mount: /proc is busy
Please stand by while rebooting the system...
Restarting system.

4. Verify Hotfix uninstalled

You will find HOTFIX_GYPSY_LTE_HF_001 has gone from the list.
[Expert@Pub-CP1:0]# cpinfo -y
------------------------
Hotfix versions
------------------------
[FW1]
  HOTFIX_R77_10
  HOTFIX_R77_HF_HA10_005
[SecurePlatform]
  HOTFIX_R77_10_GAIA_GHOST_833
[PPACK]
  HOTFIX_R77_10
[CVPN]
  HOTFIX_R77_10
[CPinfo]
  No hotfixes..
[SmartLog]
  HOTFIX_R77_10
[rtm]
  No hotfixes..

0 Comments

Troubleshooting Verisign SSL Certificates Issue on PKI VPN Tunnel between Juniper SRX Firewalls (Cont.)

3/13/2015

0 Comments

 
PKI based IPSec Site to Site VPN becomes more and more populous. I had a previous post "Set up PKI IPSec VPN with Verisign SSL Certificates between Juniper SRX Firewalls" which records all steps how to set this kind of IPsec VPN up.

This post is regarding some troubleshooting procedures for strange certificates issue during configuration PKI based IPSec vpn between Juniper SRX Firewalls. 

Symptoms: 

The VPN Tunnel could not be built although all procedures have been followed, generated RSA key pair, generated CSR on both SRX firewalls, submitted CSR to SSL certification provider, received certificates for both devices, received CA certificates, and imported all certificates into devices.

Debugging IKE did not give too much information. But during verify certificates, I found these strange information:

@SRX1:
root@fw-SRX1-2> show security pki ca-certificate detail node1:--------------------------------------------------------------------------
Certificate identifier: G5  Certificate version: 3  Serial number: 250ce8e030612e9f2b89f7054d7cf8fd  Issuer:    Organization: "VeriSign, Organizational unit: Class 3 Public Primary Certification Authority, Country: US  Subject:    Organization: "VeriSign, Organizational unit: VeriSign Trust Network, Organizational unit: "(c) 2006 VeriSign, Country: US, Common name: VeriSign Class 3 Public Primary Certification Authority - G5  Subject string:     C=US, O="VeriSign, Inc.", OU=VeriSign Trust Network, OU="(c) 2006 VeriSign, Inc. - For authorized use only", CN=VeriSign Class 3 Public Primary Certification Authority - G5  Validity:    Not before: 11- 8-2006 00:00 UTC    Not after: 11- 7-2021 23:59 UTC  Public key algorithm: rsaEncryption(2048 bits)    30:82:01:0a:02:82:01:01:00:af:24:08:08:29:7a:35:9e:60:0c:aa    e7:4b:3b:4e:dc:7c:bc:3c:45:1c:bb:2b:e0:fe:29:02:f9:57:08:a3    64:85:15:27:f5:f1:ad:c8:31:89:5d:22:e8:2a:aa:a6:42:b3:8f:f8    b9:55:b7:b1:b7:4b:b3:fe:8f:7e:07:57:ec:ef:43:db:66:62:15:61    cf:60:0d:a4:d8:de:f8:e0:c3:62:08:3d:54:13:eb:49:ca:59:54:85    26:e5:2b:8f:1b:9f:eb:f5:a1:91:c2:33:49:d8:43:63:6a:52:4b:d2    8f:e8:70:51:4d:d1:89:69:7b:c7:70:f6:b3:dc:12:74:db:7b:5d:4b    56:d3:96:bf:15:77:a1:b0:f4:a2:25:f2:af:1c:92:67:18:e5:f4:06    04:ef:90:b9:e4:00:e4:dd:3a:b5:19:ff:02:ba:f4:3c:ee:e0:8b:eb    37:8b:ec:f4:d7:ac:f2:f6:f0:3d:af:dd:75:91:33:19:1d:1c:40:cb    74:24:19:21:93:d9:14:fe:ac:2a:52:c7:8f:d5:04:49:e4:8d:63:47    88:3c:69:83:cb:fe:47:bd:2b:7e:4f:c5:95:ae:0e:9d:d4:d1:43:c0    67:73:e3:14:08:7e:e5:3f:9f:73:b8:33:0a:cf:5d:3f:34:87:96:8a    ee:53:e8:25:15:02:03:01:00:01  Signature algorithm: sha1WithRSAEncryption  Distribution CRL:     http://crl.verisign.com/pca3.crl  Authority Information Access OCSP:     http://ocsp.verisign.com  Use for key: CRL signing, Certificate signing, TLS Web Server Authentication, 1.3.6.1.5.5.7.3.1, TLS Web Client Authentication, 1.3.6.1.5.5.7.3.2, Code Signing, 1.3.6.1.5.5.7.3.3, Netscape Server Gated Crypto,  2.16.840.1.113730.4.1, 2.16.840.1.113733.1.8.1, 2.16.840.1.113733.1.8.1  Fingerprint:    32:f3:08:82:62:2b:87:cf:88:56:c6:3d:b8:73:df:08:53:b4:dd:27 (sha1)    f9:1f:fe:e6:a3:6b:99:88:41:d4:67:dd:e5:f8:97:7a (md5)
Certificate identifier: G4  Certificate version: 3  Serial number: 513fb9743870b73440418d30930699ff  Issuer:    Organization: "VeriSign, Organizational unit: VeriSign Trust Network, Organizational unit: "(c) 2006 VeriSign, Country: US, Common name: VeriSign Class 3 Public Primary Certification Authority - G5  Subject:    Organization: Symantec Corporation, Organizational unit: Symantec Trust Network, Country: US, Common name: Symantec Class 3 Secure Server CA - G4  Subject string:     C=US, O=Symantec Corporation, OU=Symantec Trust Network, CN=Symantec Class 3 Secure Server CA - G4  Validity:    Not before: 10-31-2013 00:00 UTC    Not after: 10-30-2023 23:59 UTC  Public key algorithm: rsaEncryption(2048 bits)    30:82:01:0a:02:82:01:01:00:b2:d8:05:ca:1c:74:2d:b5:17:56:39    c5:4a:52:09:96:e8:4b:d8:0c:f1:68:9f:9a:42:28:62:c3:a5:30:53    7e:55:11:82:5b:03:7a:0d:2f:e1:79:04:c9:b4:96:77:19:81:01:94    59:f9:bc:f7:7a:99:27:82:2d:b7:83:dd:5a:27:7f:b2:03:7a:9c:53    25:e9:48:1f:46:4f:c8:9d:29:f8:be:79:56:f6:f7:fd:d9:3a:68:da    8b:4b:82:33:41:12:c3:c8:3c:cc:d6:96:7a:84:21:1a:22:04:03:27    17:8b:1c:68:61:93:0f:0e:51:80:33:1d:b4:b5:ce:eb:7e:d0:62:ac    ee:b3:7b:01:74:ef:69:35:eb:ca:d5:3d:a9:ee:97:98:ca:8d:aa:44    0e:25:99:4a:15:96:a4:ce:6d:02:54:1f:2a:6a:26:e2:06:3a:63:48    ac:b4:4c:d1:75:93:50:ff:13:2f:d6:da:e1:c6:18:f5:9f:c9:25:5d    f3:00:3a:de:26:4d:b4:29:09:cd:0f:3d:23:6f:16:4a:81:16:fb:f2    83:10:c3:b8:d6:d8:55:32:3d:f1:bd:0f:bd:8c:52:95:4a:16:97:7a    52:21:63:75:2f:16:f9:c4:66:be:f5:b5:09:d8:ff:27:00:cd:44:7c    6f:4b:3f:b0:f7:02:03:01:00:01  Signature algorithm: sha256WithRSAEncryption  Distribution CRL:     http://s1.symcb.com/pca3-g5.crl  Authority Information Access OCSP:     http://s2.symcb.com  Use for key: CRL signing, Certificate signing  Fingerprint:    ff:67:36:7c:5c:d4:de:4a:e1:8b:cc:e1:d7:0f:da:bd:7c:86:61:35 (sha1)    23:d5:85:8e:bc:89:86:10:7c:b7:ac:1e:17:f7:26:c5 (md5)
From output of show command, both certificates G4 and G5 at firewall fw-SRX1-1 look ok. But they wont pass verification.
root@fw-srx1-2> request security pki ca-certificate verify ca-profile G4
node1:
--------------------------------------------------------------------------
Error: Certificate Authority not found for certificate </C=US/O=VeriSign, Inc./OU=VeriSign Trust Network/OU=(c) 2006 VeriSign, Inc. - For authorized use only/CN=VeriSign Class 3 Public Primary Certification Authority - G5>
{primary:node1}
root@fw-srx1-2> request security pki ca-certificate verify ca-profile G5  
node1:
--------------------------------------------------------------------------
Error: Certificate Authority not found for certificate </C=US/O=VeriSign, Inc./OU=VeriSign Trust Network/OU=(c) 2006 VeriSign, Inc. - For authorized use only/CN=VeriSign Class 3 Public Primary Certification Authority - G5>

@SRX2, same thing happened:

root@fw-SRX2-1> show security pki ca-certificate detail 
node0:
--------------------------------------------------------------------------
Certificate identifier: G5
  Certificate version: 3
  Serial number: 250ce8e030612e9f2b89f7054d7cf8fd
  Issuer:
    Organization: "VeriSign, Organizational unit: Class 3 Public Primary Certification Authority, Country: US
  Subject:
    Organization: "VeriSign, Organizational unit: VeriSign Trust Network, Organizational unit: "(c) 2006 VeriSign, Country: US, Common name: VeriSign Class 3 Public Primary Certification Authority - G5
  Subject string:
    C=US, O="VeriSign, Inc.", OU=VeriSign Trust Network, OU="(c) 2006 VeriSign, Inc. - For authorized use only", CN=VeriSign Class 3 Public Primary Certification Authority - G5
  Validity:
    Not before: 11- 8-2006 00:00 UTC
    Not after: 11- 7-2021 23:59 UTC
  Public key algorithm: rsaEncryption(2048 bits)
    30:82:01:0a:02:82:01:01:00:af:24:08:08:29:7a:35:9e:60:0c:aa
    e7:4b:3b:4e:dc:7c:bc:3c:45:1c:bb:2b:e0:fe:29:02:f9:57:08:a3
    64:85:15:27:f5:f1:ad:c8:31:89:5d:22:e8:2a:aa:a6:42:b3:8f:f8
    b9:55:b7:b1:b7:4b:b3:fe:8f:7e:07:57:ec:ef:43:db:66:62:15:61
    cf:60:0d:a4:d8:de:f8:e0:c3:62:08:3d:54:13:eb:49:ca:59:54:85
    26:e5:2b:8f:1b:9f:eb:f5:a1:91:c2:33:49:d8:43:63:6a:52:4b:d2
    8f:e8:70:51:4d:d1:89:69:7b:c7:70:f6:b3:dc:12:74:db:7b:5d:4b
    56:d3:96:bf:15:77:a1:b0:f4:a2:25:f2:af:1c:92:67:18:e5:f4:06
    04:ef:90:b9:e4:00:e4:dd:3a:b5:19:ff:02:ba:f4:3c:ee:e0:8b:eb
    37:8b:ec:f4:d7:ac:f2:f6:f0:3d:af:dd:75:91:33:19:1d:1c:40:cb
    74:24:19:21:93:d9:14:fe:ac:2a:52:c7:8f:d5:04:49:e4:8d:63:47
    88:3c:69:83:cb:fe:47:bd:2b:7e:4f:c5:95:ae:0e:9d:d4:d1:43:c0
    67:73:e3:14:08:7e:e5:3f:9f:73:b8:33:0a:cf:5d:3f:34:87:96:8a
    ee:53:e8:25:15:02:03:01:00:01
  Signature algorithm: sha1WithRSAEncryption
  Distribution CRL:
    http://crl.verisign.com/pca3.crl
  Use for key: CRL signing, Certificate signing, TLS Web Server Authentication, 1.3.6.1.5.5.7.3.1, TLS Web Client Authentication, 1.3.6.1.5.5.7.3.2, Code Signing, 1.3.6.1.5.5.7.3.3, Netscape Server Gated Crypto,
  2.16.840.1.113730.4.1, 2.16.840.1.113733.1.8.1, 2.16.840.1.113733.1.8.1
  Fingerprint:
    32:f3:08:82:62:2b:87:cf:88:56:c6:3d:b8:73:df:08:53:b4:dd:27 (sha1)
    f9:1f:fe:e6:a3:6b:99:88:41:d4:67:dd:e5:f8:97:7a (md5)
  Auto-re-enrollment:
    Status: Disabled
    Next trigger time: Timer not started
Certificate identifier: G4
  Certificate version: 3
  Serial number: 513fb9743870b73440418d30930699ff
  Issuer:
    Organization: "VeriSign, Organizational unit: VeriSign Trust Network, Organizational unit: "(c) 2006 VeriSign, Country: US, Common name: VeriSign Class 3 Public Primary Certification Authority - G5
  Subject:
    Organization: Symantec Corporation, Organizational unit: Symantec Trust Network, Country: US, Common name: Symantec Class 3 Secure Server CA - G4
  Subject string:
    C=US, O=Symantec Corporation, OU=Symantec Trust Network, CN=Symantec Class 3 Secure Server CA - G4
  Validity:
    Not before: 10-31-2013 00:00 UTC
    Not after: 10-30-2023 23:59 UTC
  Public key algorithm: rsaEncryption(2048 bits)
    30:82:01:0a:02:82:01:01:00:b2:d8:05:ca:1c:74:2d:b5:17:56:39
    c5:4a:52:09:96:e8:4b:d8:0c:f1:68:9f:9a:42:28:62:c3:a5:30:53
    7e:55:11:82:5b:03:7a:0d:2f:e1:79:04:c9:b4:96:77:19:81:01:94
    59:f9:bc:f7:7a:99:27:82:2d:b7:83:dd:5a:27:7f:b2:03:7a:9c:53
    25:e9:48:1f:46:4f:c8:9d:29:f8:be:79:56:f6:f7:fd:d9:3a:68:da
    8b:4b:82:33:41:12:c3:c8:3c:cc:d6:96:7a:84:21:1a:22:04:03:27
    17:8b:1c:68:61:93:0f:0e:51:80:33:1d:b4:b5:ce:eb:7e:d0:62:ac
    ee:b3:7b:01:74:ef:69:35:eb:ca:d5:3d:a9:ee:97:98:ca:8d:aa:44
    0e:25:99:4a:15:96:a4:ce:6d:02:54:1f:2a:6a:26:e2:06:3a:63:48
    ac:b4:4c:d1:75:93:50:ff:13:2f:d6:da:e1:c6:18:f5:9f:c9:25:5d
    f3:00:3a:de:26:4d:b4:29:09:cd:0f:3d:23:6f:16:4a:81:16:fb:f2
    83:10:c3:b8:d6:d8:55:32:3d:f1:bd:0f:bd:8c:52:95:4a:16:97:7a
    52:21:63:75:2f:16:f9:c4:66:be:f5:b5:09:d8:ff:27:00:cd:44:7c
    6f:4b:3f:b0:f7:02:03:01:00:01
  Signature algorithm: sha256WithRSAEncryption
  Distribution CRL:
    http://s1.symcb.com/pca3-g5.crl
  Use for key: CRL signing, Certificate signing
  Fingerprint:                        
    ff:67:36:7c:5c:d4:de:4a:e1:8b:cc:e1:d7:0f:da:bd:7c:86:61:35 (sha1)
    23:d5:85:8e:bc:89:86:10:7c:b7:ac:1e:17:f7:26:c5 (md5)
  Auto-re-enrollment:
    Status: Disabled
    Next trigger time: Timer not started
Also the certificate chain did not pass verify procedure. The error is same as SRX1 device. It seems G5 CA certificate is having issue.
root@fw-SRX2-1> request security pki ca-certificate verify ca-profile G4  
node0:
--------------------------------------------------------------------------
CA certificate G4 verified successfully
{primary:node0}
root@fw-SRX2-1> request security pki ca-certificate verify ca-profile G5  
node0:
--------------------------------------------------------------------------
Error: Certificate Authority not found for certificate </C=US/O=VeriSign, Inc./OU=VeriSign Trust Network/OU=(c) 2006 VeriSign, Inc. - For authorized use only/CN=VeriSign Class 3 Public Primary Certification Authority - G5>
Both Devices CA certificate chain did not pass the verify. On SRX1, G4 and G5 CA certificate did not pass verify, and on SRX2, only G5 failed, although I imported same certificates on both devices.

Troubleshooting:

Let have a look at the files we got from Symantec Verisign:
1. ssl_certificate.crt is firewall's  certificate which is signed by Verisign CA certificate.
2. IntermediateCA.crt is CA certificate chain file which includes two certificates.
-----BEGIN CERTIFICATE-----MIIFODCCBCCgAwIBAgIQUT+5dDhwtzRAQY0wkwaZ/zANBgkqhkiG9w0BAQsFADCByjELMAkGA1UEBhMCVVMxFzAVBgNVBAoTDlZlcmlTaWduLCBJbmMuMR8wHQYDVQQLExZWZXJpU2lnbiBUcnVzdCBOZXR3b3JrMTowOAYDVQQLEzEoYykgMjAwNiBWZXJpU2lnbiwgSW5jLiAtIEZvciBhdXRob3JpemVkIHVzZSBvbmx5MUUwQwYDVQQDEzxWZXJpU2lnbiBDbGFzcyAzIFB1YmxpYyBQcmltYXJ5IENlcnRpZmljYXRpb24gQXV0aG9yaXR5IC0gRzUwHhcNMTMxMDMxMDAwMDAwWhcNMjMxMDMwMjM1OTU5WjB+MQswCQYDVQQGEwJVUzEdMBsGA1UEChMUU3ltYW50ZWMgQ29ycG9yYXRpb24xHzAdBgNVBAsTFlN5bWFudGVjIFRydXN0IE5ldHdvcmsxLzAtBgNVBAMTJlN5bWFudGVjIENsYXNzIDMgU2VjdXJlIFNlcnZlciBDQSAtIEc0MIIBIjANBgkqhkiG9w0BAQEFAAOCAQ8AMIIBCgKCAQEAstgFyhx0LbUXVjnFSlIJluhL2AzxaJ+aQihiw6UwU35VEYJbA3oNL+F5BMm0lncZgQGUWfm893qZJ4Itt4PdWid/sgN6nFMl6UgfRk/InSn4vnlW9vf92Tpo2otLgjNBEsPIPMzWlnqEIRoiBAMnF4scaGGTDw5RgDMdtLXO637QYqzus3sBdO9pNevK1T2p7peYyo2qRA4lmUoVlqTObQJUHypqJuIGOmNIrLRM0XWTUP8TL9ba4cYY9Z/JJV3zADreJk20KQnNDz0jbxZKgRb78oMQw7jW2FUyPfG9D72MUpVKFpd6UiFjdS8W+cRmvvW1Cdj/JwDNRHxvSz+w9wIDAQABo4IBYzCCAV8wEgYDVR0TAQH/BAgwBgEB/wIBADAwBgNVHR8EKTAnMCWgI6Ahhh9odHRwOi8vczEuc3ltY2IuY29tL3BjYTMtZzUuY3JsMA4GA1UdDwEB/wQEAwIBBjAvBggrBgEFBQcBAQQjMCEwHwYIKwYBBQUHMAGGE2h0dHA6Ly9zMi5zeW1jYi5jb20wawYDVR0gBGQwYjBgBgpghkgBhvhFAQc2MFIwJgYIKwYBBQUHAgEWGmh0dHA6Ly93d3cuc3ltYXV0aC5jb20vY3BzMCgGCCsGAQUFBwICMBwaGmh0dHA6Ly93d3cuc3ltYXV0aC5jb20vcnBhMCkGA1UdEQQiMCCkHjAcMRowGAYDVQQDExFTeW1hbnRlY1BLSS0xLTUzNDAdBgNVHQ4EFgQUX2DPYZBV34RDFIpgKrL1evRDGO8wHwYDVR0jBBgwFoAUf9Nlp8Ld7LvwMAnzQzn6Aq8zMTMwDQYJKoZIhvcNAQELBQADggEBAF6UVkndji1l9cE2UbYD49qecxnyH1mrWH5sJgUs+oHXXCMXIiw3k/eG7IXmsKP9H+IyqEVv4dn7ua/ScKAyQmW/hP4WKo8/xabWo5N9Q+l0IZE1KPRj6S7t9/Vcf0uatSDpCr3gRRAMFJSaXaXjS5HoJJtGQGX0InLNmfiIEfXzf+YzguaoxX7+0AjiJVgIcWjmzaLmFN5OUiQt/eV5E1PnXi8tTRttQBVSK/eHiXgSgW7ZTaoteNTCLD0IX4eRnh8OsN4wUmSGiaqdZpwOdgyA8nTYKvi4Os7X1g8RvmurFPW9QaAiY4nxug9vKWNmLT+sjHLF+8fk1A/yO0+MKcc=-----END CERTIFICATE----------BEGIN CERTIFICATE-----MIIE0DCCBDmgAwIBAgIQJQzo4DBhLp8rifcFTXz4/TANBgkqhkiG9w0BAQUFADBfMQswCQYDVQQGEwJVUzEXMBUGA1UEChMOVmVyaVNpZ24sIEluYy4xNzA1BgNVBAsTLkNsYXNzIDMgUHVibGljIFByaW1hcnkgQ2VydGlmaWNhdGlvbiBBdXRob3JpdHkwHhcNMDYxMTA4MDAwMDAwWhcNMjExMTA3MjM1OTU5WjCByjELMAkGA1UEBhMCVVMxFzAVBgNVBAoTDlZlcmlTaWduLCBJbmMuMR8wHQYDVQQLExZWZXJpU2lnbiBUcnVzdCBOZXR3b3JrMTowOAYDVQQLEzEoYykgMjAwNiBWZXJpU2lnbiwgSW5jLiAtIEZvciBhdXRob3JpemVkIHVzZSBvbmx5MUUwQwYDVQQDEzxWZXJpU2lnbiBDbGFzcyAzIFB1YmxpYyBQcmltYXJ5IENlcnRpZmljYXRpb24gQXV0aG9yaXR5IC0gRzUwggEiMA0GCSqGSIb3DQEBAQUAA4IBDwAwggEKAoIBAQCvJAgIKXo1nmAMqudLO07cfLw8RRy7K+D+KQL5VwijZIUVJ/XxrcgxiV0i6CqqpkKzj/i5Vbext0uz/o9+B1fs70PbZmIVYc9gDaTY3vjgw2IIPVQT60nKWVSFJuUrjxuf6/WhkcIzSdhDY2pSS9KP6HBRTdGJaXvHcPaz3BJ023tdS1bTlr8Vd6Gw9KIl8q8ckmcY5fQGBO+QueQA5N06tRn/Arr0PO7gi+s3i+z016zy9vA9r911kTMZHRxAy3QkGSGT2RT+rCpSx4/VBEnkjWNHiDxpg8v+R70rfk/Fla4OndTRQ8Bnc+MUCH7lP59zuDMKz10/NIeWiu5T6CUVAgMBAAGjggGbMIIBlzAPBgNVHRMBAf8EBTADAQH/MDEGA1UdHwQqMCgwJqAkoCKGIGh0dHA6Ly9jcmwudmVyaXNpZ24uY29tL3BjYTMuY3JsMA4GA1UdDwEB/wQEAwIBBjA9BgNVHSAENjA0MDIGBFUdIAAwKjAoBggrBgEFBQcCARYcaHR0cHM6Ly93d3cudmVyaXNpZ24uY29tL2NwczAdBgNVHQ4EFgQUf9Nlp8Ld7LvwMAnzQzn6Aq8zMTMwbQYIKwYBBQUHAQwEYTBfoV2gWzBZMFcwVRYJaW1hZ2UvZ2lmMCEwHzAHBgUrDgMCGgQUj+XTGoasjY5rw8+AatRIGCx7GS4wJRYjaHR0cDovL2xvZ28udmVyaXNpZ24uY29tL3ZzbG9nby5naWYwNAYIKwYBBQUHAQEEKDAmMCQGCCsGAQUFBzABhhhodHRwOi8vb2NzcC52ZXJpc2lnbi5jb20wPgYDVR0lBDcwNQYIKwYBBQUHAwEGCCsGAQUFBwMCBggrBgEFBQcDAwYJYIZIAYb4QgQBBgpghkgBhvhFAQgBMA0GCSqGSIb3DQEBBQUAA4GBABMC3fjohgDyWvj4IAxZiGIHzs73Tvm7WaGY5eE43U68ZhjTresY8g3JbT5KlCDDPLq9ZVTGr0SzEK0saz6r1we2uIFjxfleLuUqZ87NMwwq14lWAyMfs77oOghZtOxFNfeKW/9mz1Cvxm1XjRl4t7mi0VfqH5pLr7rJjhJ+xr3/-----END CERTIFICATE-----
After saved each part of certificate chain into a file, I checked the certificate property for each certificate.

From the certificate properties, we can tell "Symantec Class 3 Secure Server CA - G4" is signed by "VeriSign Class 3 Public Primary Certification Authority - G5" and "VeriSign Class 3 Public Primary Certification Authority - G5" is signed by "Class 3 Public Primary Certification Authority"

From below output, local certificate SRX1 is signed by "Symantec Class 3 Secure Server CA - G4"

root@fw-SRX1-1> show security pki local-certificate detail
node0:
--------------------------------------------------------------------------
Certificate identifier: SRX1
  Certificate version: 3
  Serial number: 2d6f03041e93e1e97acd758ae940e6db
  Issuer:
    Organization: Symantec Corporation, Organizational unit: Symantec Trust Network, Country: US, Common name: Symantec Class 3 Secure Server CA - G4
  Subject:
    Organization: GG, Organizational unit: IT, Country: CA, State: Ontario, Locality: srx1, Common name: srx1.gg.com
  Subject string:
    C=CA, ST=Ontario, L=srx1, O=gg, OU=IT, CN=srx1.gg.com
  Alternate subject: email empty, srx1.gg.com, ip empty
  Validity:
    Not before: 01- 9-2015 00:00 UTC
    Not after: 04- 5-2018 23:59 UTC
  Public key algorithm: rsaEncryption(2048 bits)
    30:82:01:0a:02:82:01:01:00:9d:96:c7:76:c3:66:25:c3:ec:58:61
    ee:c9:9d:82:ae:d6:de:26:ff:50:e8:b1:a0:ce:cd:0f:1a:f2:59:56
    9f:7f:49:aa:de:88:a8:5d:4c:69:0a:5b:f0:91:a7:49:e4:9b:3b:df
    e4:0e:24:7d:23:fe:32:4b:c0:9e:a6:37:ff:0c:7b:ae:02:6b:1c:b7
    7c:79:29:e3:73:4d:4f:3d:5a:38:4a:f6:43:03:8b:b9:8e:19:ea:bb
    cd:52:00:5d:a8:b5:a8:3a:92:3c:38:06:13:32:50:56:31:3f:be:68
    a2:b7:e4:f0:2d:0c:a2:f1:0b:22:b3:ea:2a:9e:47:7b:5b:aa:cc:43
    9d:f2:4e:e5:86:9f:c8:37:fc:02:d4:66:34:93:e0:d6:6b:35:c9:5d
    25:29:90:6d:ab:8c:1e:00:a1:cb:79:27:b4:f9:26:2e:e4:22:20:28
    70:e1:51:b6:7d:4a:34:07:c9:a3:69:49:26:34:6a:0b:66:ee:0c:29
    a5:c6:14:04:fb:64:49:31:72:cb:10:15:c4:c4:2b:66:b3:8c:3d:21
    76:34:3d:6a:83:0b:50:92:fe:32:a4:0c:7b:d2:82:d2:3f:61:63:59
    8c:57:4b:c7:99:09:a0:57:45:6c:e9:fb:64:34:80:46:dc:43:ce:4d
    1b:d0:d9:0a:e3:02:03:01:00:01
  Signature algorithm: sha256WithRSAEncryption
  Distribution CRL:
    http://ss.symcb.com/ss.crl
  Use for key: Key encipherment, Digital signature, TLS Web Server Authentication, 1.3.6.1.5.5.7.3.1, TLS Web Client Authentication, 1.3.6.1.5.5.7.3.2
  Fingerprint:
    8a:ea:0d:e2:a9:28:65:d1:d4:e0:6d:77:7e:aa:75:7d:69:7d:1f:ab (sha1)
    c7:b2:a1:ad:36:aa:8e:40:3d:5e:c9:cb:ad:9b:3f:10 (md5)
  Auto-re-enrollment:
    Status: Disabled
    Next trigger time: Timer not started

I checked the Symantec page "Licensing and Use of Root Certificates", and found there is another G5 certificate.

Downloaded it and checked the property from Windows:
This new G5 certificate will expire on 2036 and has same Issued to and Issued by, which means it is Root CA certificate. The old G5 will expire on 2021 and have different Issued to and Issued by , which means it is signed by another root CA certificate. Now I am kind of understand Symantec Certificate Chain by drawing following diagram:

Solutions:

Now it is quite clear, with those originate certificates sent from Symantec, I only have G5(2021) and G4 for CA certificate chain. I am missing one root certificate "Verisign Class 3 Public Primary CA".

I can either import another new ca certificate to complete this chain, or replace G5(2021) with the new G5(2036). I choose replace option.

All steps are listed in the following:

root@fw-SRX1-2> request security pki ca-certificate load ca-profile G5 filename /var/tmp/G5.pem  
node1:
--------------------------------------------------------------------------
error: Command aborted as CA certificate already exists. Retry after clearing the existing CA certificate

root@fw-SRX1-2> clear security pki ca-certificate ca-profile G5                                  

root@fw-SRX1-2> request security pki ca-certificate load ca-profile G5 filename /var/tmp/G5.pem  
node1:
--------------------------------------------------------------------------
Fingerprint:
  4e:b6:d5:78:49:9b:1c:cf:5f:58:1e:ad:56:be:3d:9b:67:44:a5:e5 (sha1)
  cb:17:e4:31:67:3e:e2:09:fe:45:57:93:f3:0a:fa:1c (md5)
CA certificate for profile G5 loaded successfully
root@fw-SRX1-2> request security pki ca-certificate verify ca-profile G4
node1:
--------------------------------------------------------------------------
CA certificate G4 verified successfully

root@fw-SRX1-2> request security pki ca-certificate verify ca-profile G5  
node1:
--------------------------------------------------------------------------
CA certificate G5 verified successfully
root@fw-SRX1-2> show security pki ca-certificate node0:--------------------------------------------------------------------------
Certificate identifier: G5  Issued to: VeriSign Class 3 Public Primary Certification Authority - G5, Issued by: C = US, O = "VeriSign, Inc.", OU = VeriSign Trust Network, OU = "(c) 2006 VeriSign, Inc. - For authorized use only", CN = VeriSign Class 3 Public Primary Certification Authority - G5  Validity:    Not before: 11- 8-2006 00:00 UTC    Not after: 07-16-2036 23:59 UTC  Public key algorithm: rsaEncryption(2048 bits)
Certificate identifier: G4  Issued to: Symantec Class 3 Secure Server CA - G4, Issued by: C = US, O = "VeriSign, Inc.", OU = VeriSign Trust Network, OU = "(c) 2006 VeriSign, Inc. - For authorized use only", CN = VeriSign Class 3 Public Primary Certification Authority - G5  Validity:    Not before: 10-31-2013 00:00 UTC    Not after: 10-30-2023 23:59 UTC  Public key algorithm: rsaEncryption(2048 bits)


0 Comments

Bridge Your Home Routers to Extend Your Wireless Network

3/1/2015

0 Comments

 
Not sure how many home users are experiencing wireless router coverage issue. Your wireless home router is set at living room, but at the certain location of your home, the wireless signal is quite weak. It will be painful especially when you found this fact on the bed with your tablet devices. Upgrade a more powerful wireless routers, or buy another router repeater?Actually the router vendors have implemented a "bridge" technology which can enable wireless connection between multi-vendor's routers. Here is Wikepedia's explanation about Bridging (networking):
"Network bridging is the action taken by network equipment to create an aggregate network from either two or more communication networks, or two or more network segments. If one or more segments of the bridged network are wireless, it is known as wireless bridging. Bridging is distinct from routing, which allows multiple different networks to communicate independently while remaining separate."
This post is my weekend task to get my living room's wireless signal to cover the corner of my bed room better. In the bedroom's far end from wireless router's location, the signal is always not enough to keep my ipad/cell phone persistently connected. To stop my family's complain, I decided to set up secondary router as a bridge Access Point at second floor, which will provide strong signal to upper floors.

Topology:


1. Main Router's Configuration

Main router is from isp, and this Adsl device model is HG-A800. This router's configuration is not any special. You just need to enable wireless security, LAN network and DHCP. 

Wireless basic configuration:

 Wireless Security:

 LAN and DHCP Setup (LAN IP is 192.168.2.1):


2. Secondary Router's Configuration:

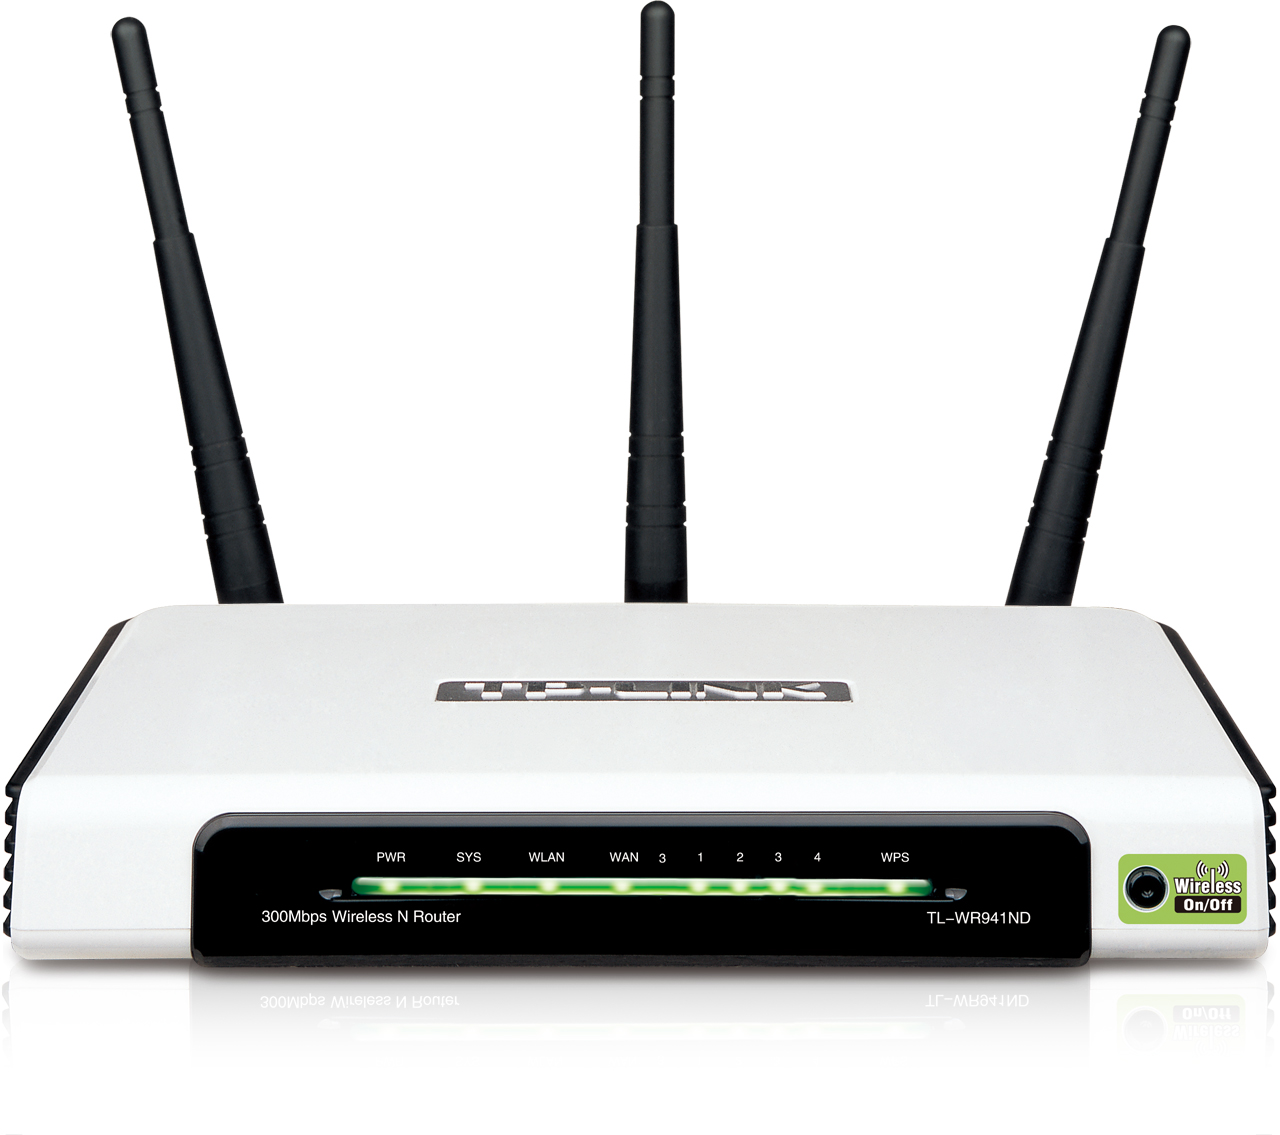
TP-LINK WR941ND is used as secondary router for bridge Access Point purpose. 

There is no connection on WAN port since it is secondary router which is not directly connecting to Internet. LAN port can be used to connect local network devices such as media player, game console or desktop.WAN configuration type for this secondary router will be Dynamic IP. LAN IP will be 192.168.2.2. DHCP Scope is from 192.168.2.151 to 192.168.2.199. As you tell, The DHCP Scope of Primary router and Secondary router is not overlapping, which is easier for us to identify which device your system is logged in by wireless later. 

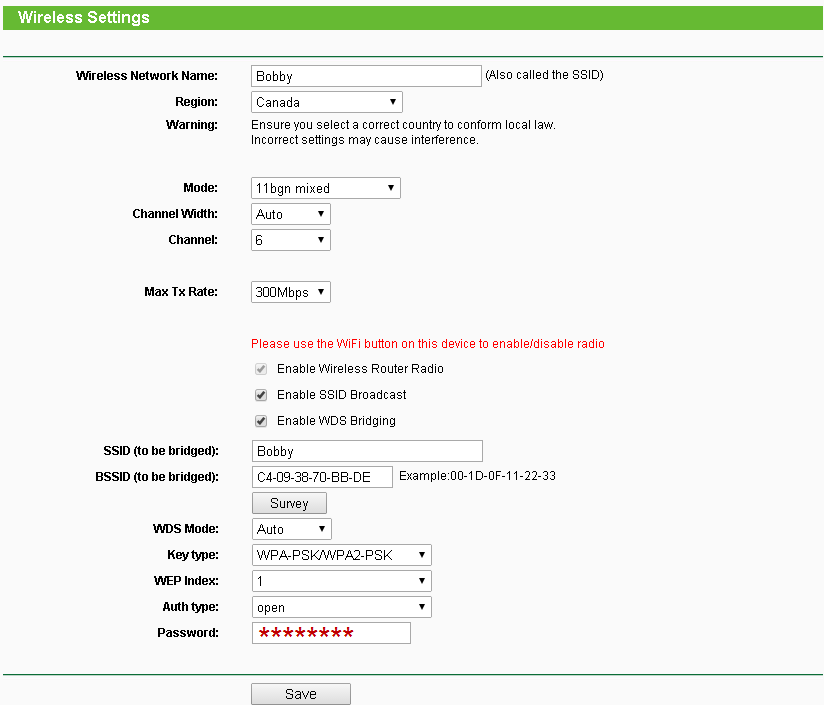
The most important part is Wireless Settings in secondary router. You had better set up same wireless SSID and password  as Primary router, especially at SSID (to be bridged) section. 


3. Test Result

My ISP is providing 15 mbps downloading speed and 1 mbps uploading speed. From the speedtest.net's result, it shows pretty good result from Secondary router, almost no loss from this set up.


0 Comments

Using SNMPv3 Monitoring Juniper SRX 240H Alarm andTemperature

3/1/2015

0 Comments

 
One of our SRX240H is having temperature problem. Whenever the temperature reached 50 Celsius degree, system alarm will be on. Alarm email should be sent out when temperature reached threshold 50. SRX itself seems not able to send alarm email out based on this discussion. NSM or other SNMP tools may help in this situation.

PRTG is using to monitor our network devices and it works great with SNMPv3. My previous post has described how to monitor SRX's CPU, Memory, Flow Sessions etc. Alarm status and Temperature is another sensor I am looking for to monitor. There are couple of ways to do it. You can use NSM to send alarm email, firewall itself to send snmp traps to your SNMP server, or Network Monitoring Tools to pull SNMP OID values then send email. In my case, PRTG is preferred way to monitor system status and send alarming email based on the requirement.

Step 1: SNMPv3 on SRX


set snmp v3 usm local-engine user SRXAES authentication-md5 authentication-password Test1234
set snmp v3 usm local-engine user SRXAES privacy-aes128 privacy-password Test12345
set snmp engine-id local 4716
set snmp view view_all oid 1 include
set snmp filter-duplicates
set snmp health-monitor

set snmp location "<location>"
set snmp contact "<contact name>"
set snmp community <community-name> authorization read-only
set snmp community <community-name> clients <snmp-host>
set snmp community <community-name> clients 0.0.0.0/0 restrict

Note: A generic local engine-id must be configured. Otherwise (e.g. when the MAC is used) SNMPv3 will not work in cluster configurations. After configuring the engine-id, committing the configuration might be required because the engine-id is involved in the key generation below.

To make NSM work with SRX, location and contact should not be set. Else, after the configuration imported into NSM, when you push policy from NSM to SRX, snmpv3 anthentication password and privacy password will be changed.

In my working configuration for NSM and SRX 240H / 1400 Cluster, the configuration looks like below:
root@fw-srx-1> show configuration snmp
v3 {
    usm {
        local-engine {
            user SRXAES {
                authentication-md5 {
                    authentication-key "$9$cOJSKMWLxNbs8LUjq.zF9ApuIEM8Xx-VvM4aJGq.Tz390BhSrlM836evW8dVP5TCuO1EhrOB-VYgJZ69CApBlKM-bsKv4aZUHkBIRcevdbsY4aSr8boa/CAtu1SyKW87vMX-bs4oJGDk5Q9ApREyk.hSreXxk5Qn/9pOBE3nA0O1hcYg4oDi"; ## SECRET-DATA
                }
                privacy-aes128 {
                    privacy-key "$9$4yaZjq.53/CmPF/CtIRNdVsoJDik.mTZGp01IcSM8XNds4oGDHqvWUjqmTQevM8dbYgojk.4oz369OBX7N-s2JZjPfz.muOBIrlLxNdVYgoDkY2QF6/tpM8Lx7VY2aGjHaJUH.PQzEcSl8XVwYaGDsYoGiH5T369pIErev7dbuONdbYoan/9AtO"; ## SECRET-DATA
                }
            }
        }
    }
    vacm {
        security-to-group {
            security-model usm {
                security-name SRXAES {
                    group readonly;
                }
            }
        }
        access {
            group readonly {
                default-context-prefix {
                    security-model usm {
                        security-level privacy {
                            read-view view_all;
                        }
                    }
                }
            }
        }
    }
}
engine-id {
    local 109849;
}
view view_all {
    oid 1 include;
}
client-list snmpclient {
    10.1.1.11/31;
    0.0.0.0/0 {
        restrict;
    }
}

Step 2: PRTG Configuration


PRTG can be easily integrated into your network monitoring system and execute comprehensive monitoring tasks. Also , alerting feature is quite flexible to meet your organization needs. Even one normal windows server can monitoring thousands of sensors without problem.

For SNMPv3 configuration in the PRTG, right click edit pop up menu at  root properties of Device tab, enter the snmpv3 information:

Then you can add your network devices with inherited configuration. All new device will get same snmpv3 configuration.

Step 3: Add SNMP Custom Sensor

Following instruction on the screen to add sensor for your network devices, you will need to pick SNMP category's SNMP Custom type sensor.

In the basic sensor settings, the most important thing is OID values. You will need to know exact OID number to make your own monitoring sensor in the PRTG.

Lets go back to our SRX firewall to find out what the temperature SNMP mib oid is:

Show snmp mib walk 1.3.6.1.4.1 | match temp

we are able to find out a couple of values for temperature:
jnxOperatingTemp.9.1.0.0 = 50
jnxOperatingTemp.9.2.0.0 = 49
jnxFruTemp.9.1.0.0 = 50
jnxFruTemp.9.1.1.0 = 50
jnxFruTemp.9.2.0.0 = 48
jnxFruTemp.9.2.1.0 = 48
From Show Chassis Routing-Engine, there are different type of temperature for cpu and chassis , also for different node if it is cluster configuration.
root@fw-srx-1> show chassis routing-engine
node0:
--------------------------------------------------------------------------
Routing Engine status:
    Temperature                 50 degrees C / 122 degrees F
    CPU temperature             49 degrees C / 120 degrees F

    Total memory              1024 MB Max   850 MB used ( 83 percent)
      Control plane memory     560 MB Max   493 MB used ( 88 percent)
      Data plane memory        464 MB Max   362 MB used ( 78 percent)
    CPU utilization:
      User                       7 percent
      Background                 0 percent
      Kernel                     5 percent
      Interrupt                  0 percent
      Idle                      87 percent
    Model                          RE-SRX240H
    Serial ID                      AAEP4868
    Start time                     2015-01-18 13:24:42 UTC
    Uptime                         38 days, 8 hours, 29 minutes, 47 seconds
    Last reboot reason             0x200:normal shutdown
    Load averages:                 1 minute   5 minute  15 minute
                                       0.16       0.44       0.46
node1:
--------------------------------------------------------------------------
Routing Engine status:
    Temperature                 48 degrees C / 118 degrees F
    CPU temperature             50 degrees C / 122 degrees F

    Total memory              1024 MB Max   696 MB used ( 68 percent)
      Control plane memory     560 MB Max   336 MB used ( 60 percent)
      Data plane memory        464 MB Max   357 MB used ( 77 percent)
    CPU utilization:
      User                       5 percent
      Background                 0 percent
      Kernel                     3 percent
      Interrupt                  0 percent
      Idle                      92 percent
    Model                          RE-SRX240H
    Serial ID                      AAEK3334
    Start time                     2015-02-15 16:05:14 UTC
    Uptime                         10 days, 5 hours, 49 minutes, 24 seconds
    Last reboot reason             0x200:normal shutdown
    Load averages:                 1 minute   5 minute  15 minute
                                       0.06       0.08       0.08
Next step is to find out OID from online website OID database , such as http://oid-info.com/ or Solarwinds SNMP Center:
From the database search result, it shows jnxOperatingTemp = 1.3.6.1.4.1.2636.3.1.13.1.7
In this case, jnxOperatingTemp.9.2.0.0 is 1.3.6.1.4.1.2636.3.1.13.1.7.9.2.0.0. That is exactly OID we need for this monitoring. 

Step 4. Create email alarm

After checked the thresholds for temperature as shown in below, we will build an alarm email.
root@fw-srx-1> show chassis temperature-thresholds
node0:
--------------------------------------------------------------------------
                           Fan speed      Yellow alarm      Red alarm      Fire Shutdown
                          (degrees C)      (degrees C)     (degrees C)      (degrees C)
Item                     Normal  High   Normal  Bad fan   Normal  Bad fan     Normal
Chassis default              35    45       50       40       75       65      100
Routing Engine               35    45       50       40       75       65      100
node1:
--------------------------------------------------------------------------
                           Fan speed      Yellow alarm      Red alarm      Fire Shutdown
                          (degrees C)      (degrees C)     (degrees C)      (degrees C)
Item                     Normal  High   Normal  Bad fan   Normal  Bad fan     Normal
Chassis default              35    45       50       40       75       65      100
Routing Engine               35    45       50       40       75       65      100
Based on this Object Triggers set up, once the JnxOperatingTemp sensor's value is above 51 for 60 seconds, an email will be sent out to admin.

Reference:

  • Junos temperature thresholds in SRX devices and the actions taken when it exceeds the threshold
  • Monitoring Juniper SRX Firewall CPU, Memory and Flow Session Information from PRTG


0 Comments

Basic Fortigate CLI Commands (Fortinet Firewalls Tips and Tricks)

3/1/2015

0 Comments


1. FGT30D # config system interface 

FGT30D (interface) # show
config system interface
    edit "wan"
        set ip 10.99.142.1 255.255.255.0
        set allowaccess ping https ssh snmp http fgfm
        set type physical
        set snmp-index 2
    next
.....
    edit "lan"
        set ip 192.168.100.1 255.255.255.0
        set allowaccess ping https ssh http fgfm capwap
        set type physical
        set snmp-index 1
    next
end

2. Change System Hostname

FGT30D # config system global 
FGT30D (global) # set hostname FGT30D
FGT30D (global) # end


3. Configure System DHCP Server on Interface "lan"

FGT30D # config system dhcp server 
config system dhcp server
    edit 1
        set default-gateway 192.168.100.1
        set dns-service default
        set interface "lan"
            config ip-range
                edit 1
                    set end-ip 192.168.100.200
                    set start-ip 192.168.100.80
                next
            end
        set netmask 255.255.255.0
    next
end

4. FGT30D # config firewall policy 

config firewall policy 
    edit 1
        set srcintf "lan"
        set dstintf "wan"
        set srcaddr "all"
        set dstaddr "all"
        set action accept
        set schedule "always"
        set service "ALL"
        set nat enable
    next
end

5. FGT30D # config router static 

config router static
    edit 1
        set device "wan"
        set gateway 10.99.142.6
    next
end

6. Configure system DNS host

FGT30D # config system dns 
config system dns
    set primary 208.91.112.53
    set secondary 208.91.112.52
end

7. Set System Users

FGT30D # config system admin
config system admin
edit admin
set password <psswrd>
config system admin
    edit "admin"
        set accprofile "super_admin"
 ....
        set password ENC AK1TDEt3tvzlnXWgK7ZjkFDgEisgltyWyK2/lnOYtvcl28=
    next
    edit "superadmin1"
        set accprofile "super_admin"
....
        set password ENC AK1eDVLPbT+qARqmQ5r0ituEhnmu9xVwdAbo2puf9TZofo=
    next
    edit "testadmin"
        set accprofile "prof_admin"
        set password ENC AK1JB0gM4GKvhld20nMmfFbhnictGo/+oUIqAaGTGlb+vg=
    next
end

8. Configure Syslog Settings

config log syslogd(2|3) setting
set status enable
set server 10.99.1.1
set port 514
set facility user
end
diagnose log test // Test logging

9. Execure Command - Ping

FGT30D # execute ping www.google.ca
PING www.google.ca (173.194.46.111): 56 data bytes
64 bytes from 173.194.46.111: icmp_seq=0 ttl=57 time=20.7 ms
64 bytes from 173.194.46.111: icmp_seq=1 ttl=57 time=22.7 ms
64 bytes from 173.194.46.111: icmp_seq=2 ttl=57 time=20.6 ms
--- www.google.ca ping statistics ---
3 packets transmitted, 3 packets received, 0% packet loss
round-trip min/avg/max = 20.6/21.3/22.7 ms

10. Set Ping Source

FGT30D # execute ping-options source 192.168.1.1
FGT30D # execute ping-options viewPing Options:
        Repeat Count: 5
        Data Size: 56
        Timeout: 2
        Interval: 1
        TTL: 64
        TOS: 0
        DF bit: unset
        Source Address: 192.168.1.1
        Pattern:
        Pattern Size in Bytes: 0
        Validate Reply: no
Note: ping-options will reset when session closed

11. Debugging 

diag debug enable
diag debug console timestamp enable
diag sniffer packet wan 'host 8.8.8.8' 1
diag debug disable
diag debug reset

12. Backup Configuration to Flash

FGT30D # execute backup config flash 
Please wait...
Config backed up to flash disk done.
Setting timestamp
FGT30D # execute revision list config Last Firmware Version: V0.0.0-build000-REL0
ID TIME                   ADMIN                 FIRMWARE VERSION        COMMENT
 1 2015-02-10 13:39:29    jn                  V5.0.0-build292-REL0
 2 2015-02-10 13:42:15    jn                  V5.0.0-build292-REL0    20140210

13. Restore Configuration from Flash

FGT30D # execute restore config flash 2
This operation will overwrite the current settings!
Do you want to continue? (y/n)y
Please wait...
Get config from local disk OK.
File check OK.

14. Get system configuraiton

get system arp          // ARP Table
get system dns // DNS Configuration
get system dhcp server // DHCP server configuration

FGT30D # get system setting
opmode              : nat
firewall-session-dirty: check-all
bfd                 : disable
utf8-spam-tagging   : enable
wccp-cache-engine   : disable
vpn-stats-log       :
vpn-stats-period    : 0
v4-ecmp-mode        : source-ip-based
gui-default-policy-columns:
asymroute           : disable
ses-denied-traffic  : disable
strict-src-check    : disable
asymroute6          : disable
per-ip-bandwidth    : disable
sip-helper          : enable
sip-nat-trace       : enable
status              : enable
sip-tcp-port        : 5060
sip-udp-port        : 5060
sccp-port           : 2000
multicast-forward   : enable
multicast-ttl-notchange: disable
allow-subnet-overlap: disable
deny-tcp-with-icmp  : disable
ecmp-max-paths      : 10
discovered-device-timeout: 28
email-portal-check-dns: enable 
show system interface wan1 | grep -A2 ip // Show WAN and interface information.
get system info admin status // Show logged in users
get system status // Show system hardware/software update versions
get hardware status // Detailed hardware model information
get system performance status
get system performance top
show system interface 
diagnose hardware deviceinfo nic // Interface Statistics/Settings
diagnose hardware sysinfo memory
diag debug crashlog read
diag hardware sysinfo shm // Device should be in 0, if (>0) then conservemode
get system global | grep -i timer // Show tcp and udp timers for halfopen and idle
get system session-ttl // System default tcp-idle session timeout
get hardware nic
get system interface physical
diagnose ip address list
diagnose ip arp list
diagnose sys session list
diagnose sys session clear
diagnose sys kill 9 <id>

15. Online Demo Read Access for Fortinet Products

  • Fortigate:
user:demo
password: demo
fortigate.com
  • ForiAnalyzer:
user:demo
password: demo
fortianalyzer.com
  • FortiManager:
user:demo
password: demo
fortimanager.com

  • FortiMail

user:demo
password: demo
https://209.87.230.132/admin
  • FortiWeb
user:demo
password: demo
http://fortiweb.fortinet.com/

  • FortiDB

user:demo
password: demo
http://www.fortidb.com/

Reference:

  • CLI Reference for FortiOS 5.0


0 Comments

A Quick Test to Check Point Capsule Cloud Service

3/1/2015

0 Comments

 
Not sure how many Checkpoint customers are using this service, but it is quite attractive when I heard about it. It will help your remote users connect with your global offices and Internet seamlessly.  

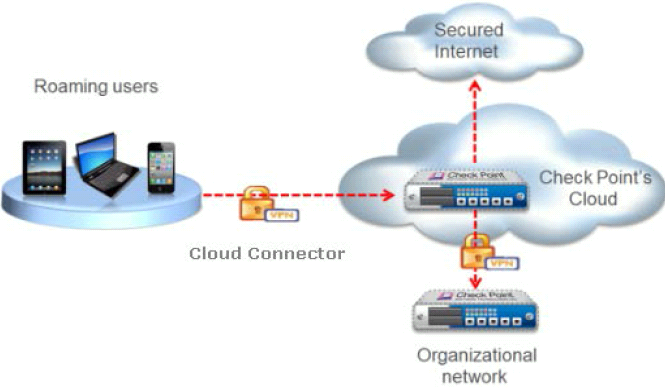
Roaming users will use a vpn tunnel to connect to Check Point's cloud network, from there they could access their company's Internal network with another pre-built vpn tunnel. Also from Check Point Cloud, roaming users will be able to browse Internet safely with Check Point's cloud service:
  • URL Filtering
  • Anti-Virus
  • Anti-Bot
  • Threat Emulation
  • IPS
  • HTTPS Inspection

Lets start to experience it:

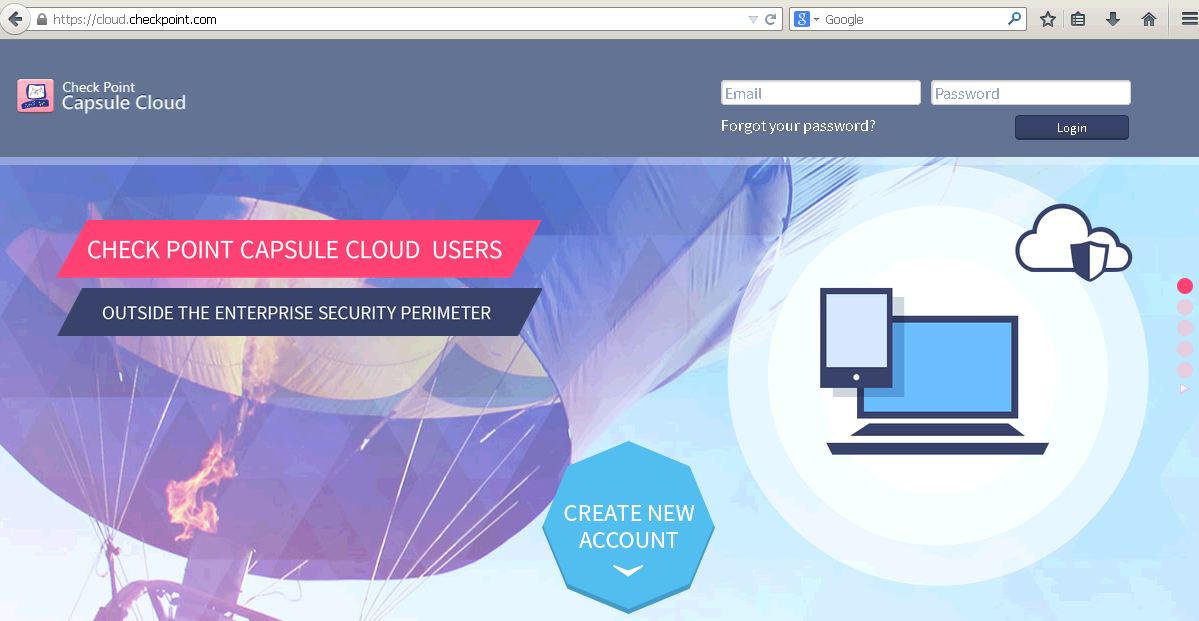
Step 1: Register an account at https://cloud.checkpoint.com/ with your email account

 After registration, you will receive a email with subject "Your Capsule Connect registration code". Inside the email, there are all links to download the client for Windows, Macintosh, Android and iOS versions.

Step 2: Download and Install the Client:

From "Your Capsule Connect registration code" email, download windows client on your pc. Double click and follow on screen instruction to complete software installation. You will find a cloud icon appears on your right bottom screen. Basically the client will install a new Local Area Connection network driver "Check Point Virtual Network Adapter For Cloud Connect" in your system.
Right click the cloud icon:
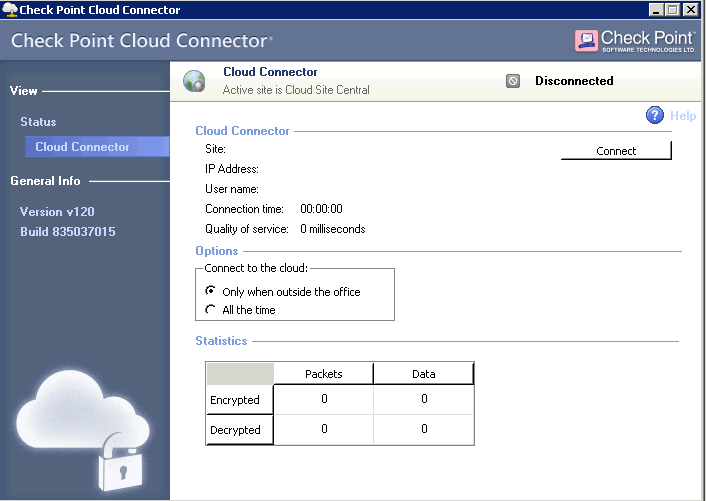
Select 'Show Client' menu to enable main window. Choose connect button to make a connection to Check Point's Cloud network.
After system connected to the cloud, you will find your system got a new ip address (172.16.9.28/22) from DHCP server 172.16.9.27 with DNS server 8.8.8.8.

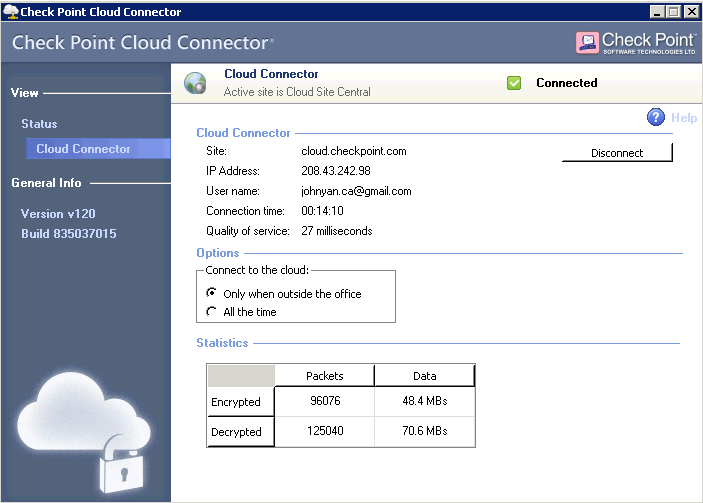
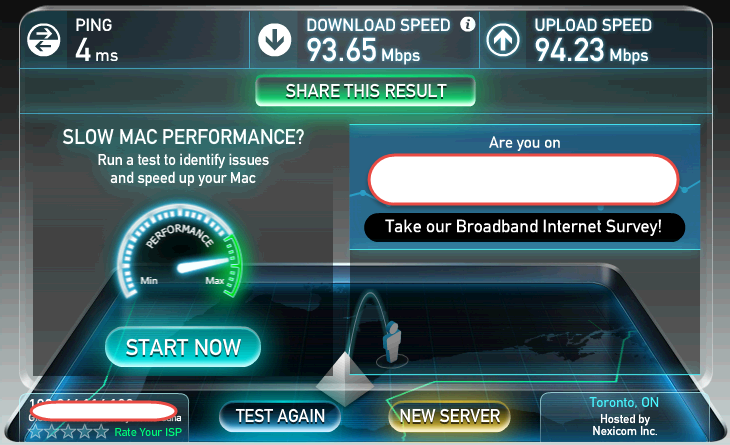
Also from Speedtest.net, we will see the system got an US ip address 208.43.242.98. The download and upload speed is not that bad. 

My pc is having almost 100Mbps download / upload speed without connecting to Checkpoint Cloud.

Step 3: Log into https://cloud.checkpoint.com/ to review the configuration and policies

Check Point Capsule Cloud Policy Tab.
Under Security Policy, there are three features enabled:

  • URL Filtering
  • Threat Prevention
  • HTTPS Inspection


Step 4: Troubleshooting for https website issue

By default, there is a problem to browse https website, such as Gmail site.It shows a This Connection is Untrusted and the connection is blocked. 
From the "Logs & Reports" tab, it shows Check Point Cloud Service Application Cloud blade blocked those 
Double click the log entry you will get the log details for that record.

After turned off HTTPS Inspection from Policy tab, those https website become available again. 

Reference:

  • Check Point Capsule Cloud sk102501
  • Check Point Capsule Cloud Administration Guide


0 Comments
<<Previous

    Categories

    All
    Architecture
    Blog
    Checkpoint
    Cisco
    Cloud
    CyberArk
    F5
    Fortigate
    Guardium
    Juniper
    Linux
    Network
    Others
    Palo Alto
    Qualys
    Raspberry Pi
    Security
    SIEM
    Software
    Vmware
    VPN
    Wireless

    Archives

    March 2024
    February 2024
    January 2024
    December 2023
    November 2023
    October 2023
    September 2023
    August 2023
    July 2023
    June 2023
    May 2023
    April 2023
    March 2023
    February 2023
    January 2023
    December 2022
    November 2022
    October 2022
    September 2022
    August 2022
    July 2022
    June 2022
    May 2022
    April 2022
    March 2022
    February 2022
    January 2022
    December 2021
    November 2021
    October 2021
    September 2021
    August 2021
    July 2021
    June 2021
    May 2021
    April 2021
    March 2021
    February 2021
    January 2021
    December 2020
    November 2020
    October 2020
    September 2020
    August 2020
    July 2020
    October 2019
    September 2019
    June 2019
    July 2018
    May 2018
    December 2017
    August 2017
    April 2017
    March 2017
    January 2017
    December 2016
    November 2016
    October 2016
    September 2016
    August 2016
    July 2016
    June 2016
    May 2016
    April 2016
    March 2016
    February 2016
    January 2016
    December 2015
    November 2015
    October 2015
    September 2015
    August 2015
    July 2015
    June 2015
    May 2015
    April 2015
    March 2015

    Print Page:

    RSS Feed

    Email Subscribe
Powered by Create your own unique website with customizable templates.
  • Blog
  • Sitemap
    • Categories
  • Contact
  • About
  • Resources
  • Tools
  • 51sec.org