Info Security Memo
  • Blog
  • Sitemap
    • Categories
  • Contact
  • About
  • Resources
  • Tools
  • 51sec.org

Build Confidence

Focusing on Information Security 

Info Security Notes

CyberArk PAS Core Design and Deployment Considerations

2/28/2021

1 Comment

 
CyberArk PAS Core Design and Deployment Considerations
This post is trying to summarize some PAS solution's design and deployment thoughts and notes.


Small/Medium Environment Design

Vault Design

  • Cluster HA / DR
  • Appliance / Virtual Machine
  • Cloud / On-Prem

PVWA Design

  • Multiple PVWA
  • HA / Load balance

CPM Design

  • Multiple CPM
  • Load balance on different types of Safe, such as one for Windows, one for *nux/Cloud.

PSM Design

  • Multiple PSM
  • Load balance
  • PSMP 

PTA Design

  • Licensing
  • Integration

Safe Design

  • Safe Name Convention
  • Safe Access Mapping from Roles to Access Rights
  • Safe Access Model : Share , Personal, Mix

Platform Design

  • Name Convention

Account Design

  • Account name length restriction
  • Account name convention
  • Personalized accounts, Shared accounts for different technologies (DB, Windows, *Nix, Networking, Cloud)

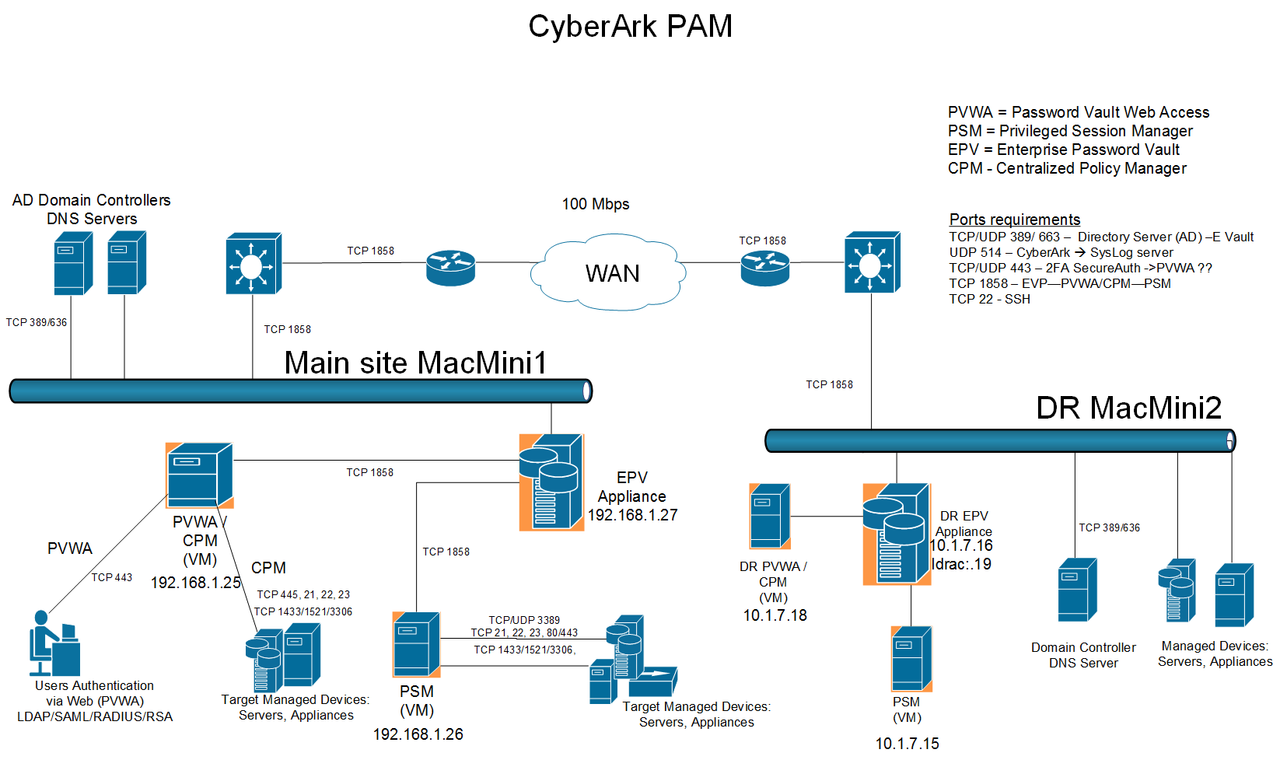
Traffic Flow Design

  • Firewall Ports
  • Traffic direction : one way or two way
  • All components including integration with NTP, AD, DC, Target Servers, DBs, Cloud , SIEM, Ticket system, etc

Authentication

  • MFA, 2FA
  • First Factor 
  • Second Factor 
  • Non Web Client Authentication - All kinds of Native Clients


A phased approach for implementing PAS

CyberArk Brief: A phased approach for implementing a Privileged Access Security Program


1. Phase 0 - Identify


1.1 Crown of jewels - Most critical assets
PII
Credit Cards
etc

1.2 Accounts who can access those assets
OS accounts
DB accounts
applications accounts

1.3 Accounts
shared / role based privilege accounts - built-in administrator account and root account
personal privilege accounts : accounts with -adm, or $ at the end

Focus on shared / role based     privilege accounts  first will get you least push back from admins.

2. Phase 1


2.1 Load --> Rotate
Load credentials into actual vaults
Set up automatic verification process to confirm those credentials are accurate
End user should be able to use connect to reach their targets to do their administration work
Choose selective subset accounts to change password. Start with change button to confirm the CPM process is working.
Automated changes to rotate credentials' passwords.

2.2 Isolate --> Monitor --> Analyze
Remove show/copy buttons to require end users to connect to target.
PSM will provide connectivity and  monitor/record the session without exposing credentials.
PTA component will detect / alert threat detected from multiple sources


3. Phase 2


Repeat - going wider and deeper

Going wider: - expand the process to other end points we identified (Networking devices, databases, web applications, iol devices)
Going deeper: - non human id ( application accounts, iis app pool, registry keys )


Timeline for basic installation of PAS

This is basic sample implementation schedule to roll out a non-ha basic design PAS solution

Pre-implementation to collect following information;
1. network design diagram including firewall, domain controller, VM ip, dns, smtp, snmp , ntp, etc.
2. hardware / virtual machine information based on size evaluation
3. traffic flow diagram
4. firewall rule sets based on traffic flow diagram
5. Details of SMTP, DC, SNMP, NTP,
6. CA certificate
7. Download software copy and licenses.
8. Make sure hard copy of Master CD, Operator CD in safe hand.


• Onsite Implementation Day 1:  Install and perform initial configuration of the Production including advanced Vault integration such as SNMP, SMTP, SYSLOG and any others the were agreed upon.
• Onsite Implementation Day 2:  Install and perform initial configuration of the Central Policy Manager, Password Vault Web Access 1 and 2, Privileged Session Manager, Secure Replication Utility and the PrivateArk Client.
•Onsite Implementation Day 3 Perform advanced configuration for the CPM, PVWAs and PSM. Test CPM management on 3 5 types of the out of the box plug ins. Test PSM workflows on 3 5 types of the out of the box connectors.
• Onsite Implementation Day 4 Troubleshoot any issues discovered during the CPM testing and PSM workflows. Perform overview session with administrators. Go over and assist in documenting the Master Policy, Access Control Model data and permission structures. Set up and go over support access and procedures.


References

  • Docs  > Administration > Components > Privileged Session Manager > Architecture


via Blogger https://ift.tt/3uOwpxl
February 28, 2021 at 06:10PM CyberArk
1 Comment

CyberArk PAS Configuration Notes (Architecture)

2/28/2021

0 Comments

 
CyberArk PAS Configuration Notes (Architecture)
The CyberArk Privileged Account Security solution comprises features that secure, monitor and manages confidential accounts. The major components used widely are following:
  • Enterprise Password Vault
  • Central Policy Manager (CPM)
  • Password Vault Web Access (PVWA)
  • Privileged Session Manager (PSM)
PAS = (Privileged Access Security)

Architecture

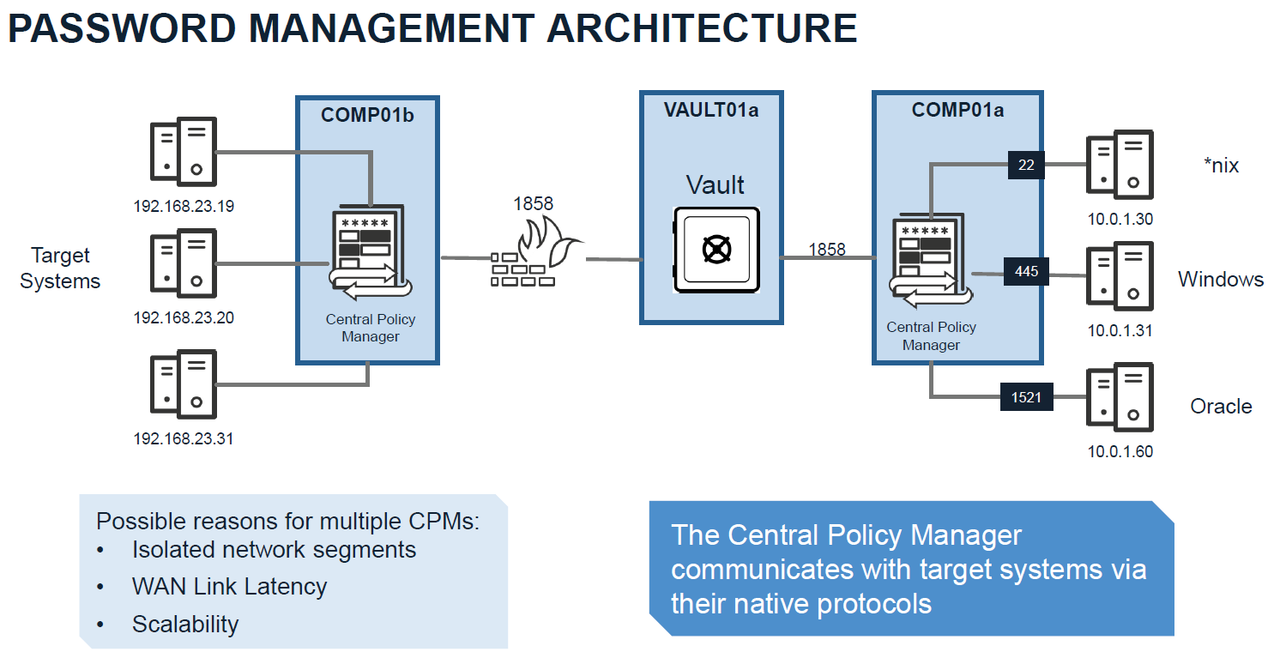
Password Management Architecture

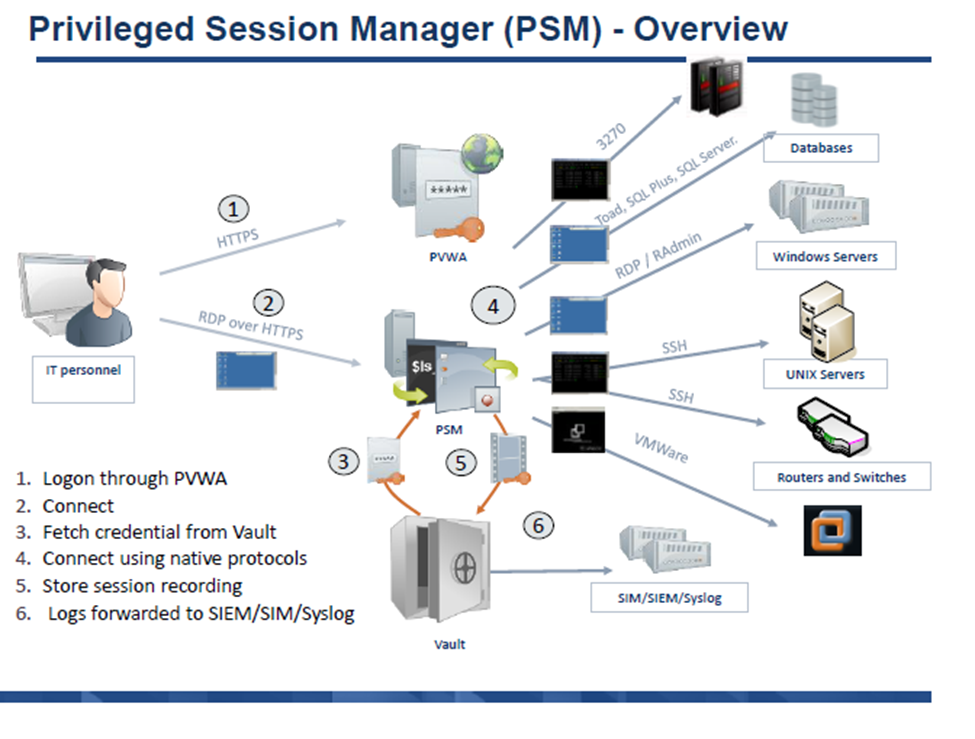
Session Manager Architecture


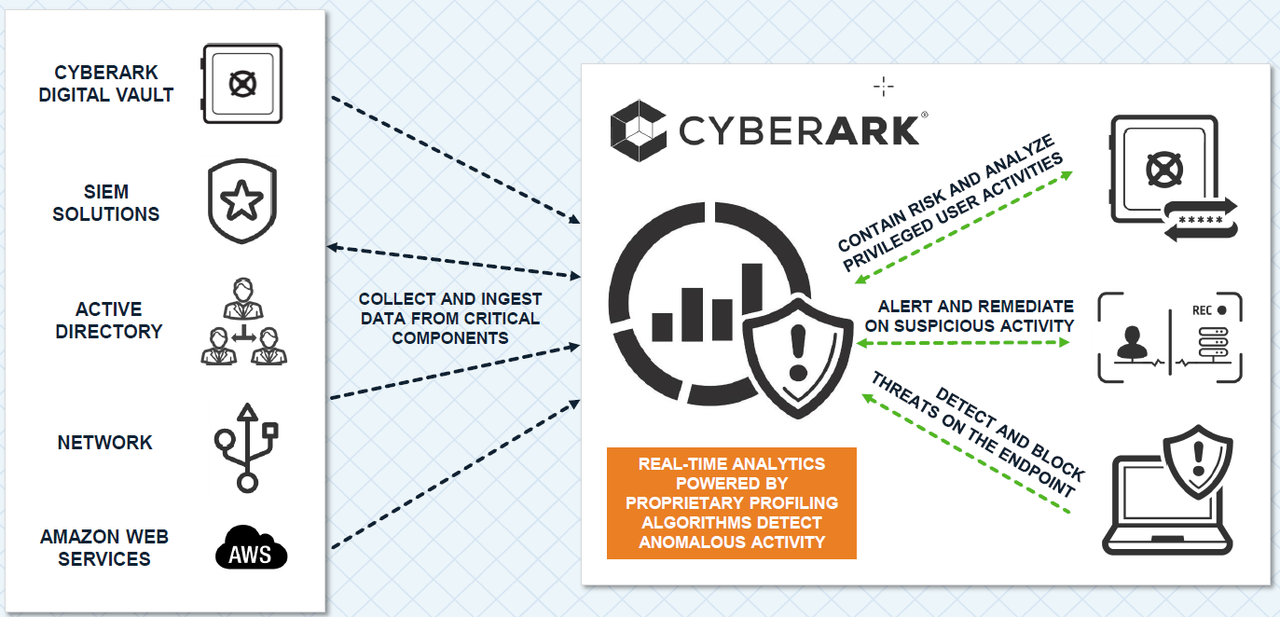
Privileged Threat Analytics Architecture

PAM Solution High Availability Design


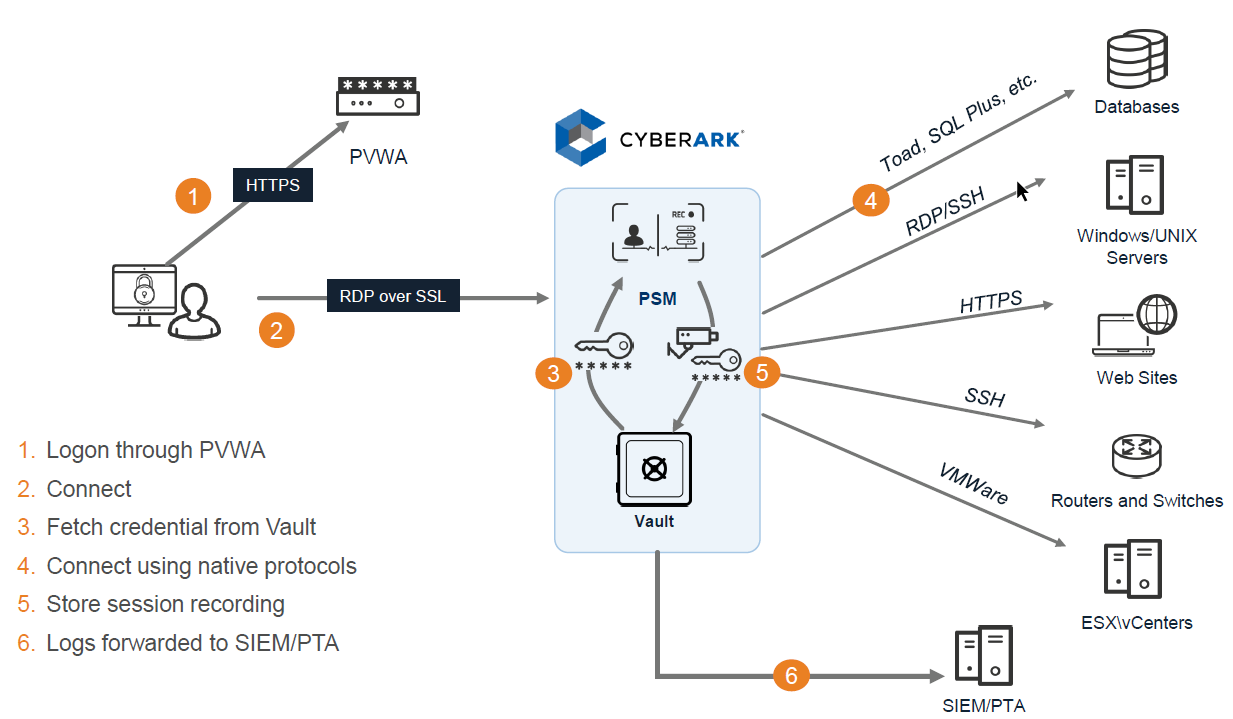
PAS architecture design with PSM. 

Connect through the web portal (PVWA):


Connect through PSM for Windows:


PAS Configuration Steps

On the Domain Controller:
1. create a CyberArk Bind User -  ex. [email protected]. Usually it is domain admin account
2. Define follow LDAP CyberArk groups - Cyberark mapping roles:
CyberArk Vault Admins - Vault Admins
CyberArk Safe Managers - Safe Managers
CyberArk Auditors - Auditors
CyberArk Users - Users


From PVWA Web GUI:
1. Activate PSM
2. Deactivate 'Require users to specify reason for access'
3. Integrate LDAP


On the Vault
1. Manual restart the vault service, will not start Event Notification Engine service.


PSM "connect" explaination


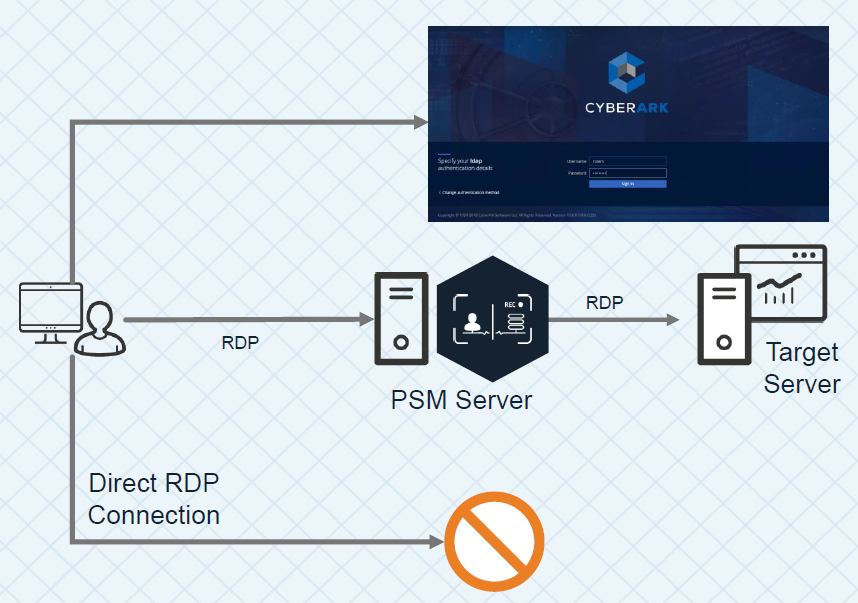
A user clicks "connect" in PVWA, an initial RDP session is established between the user and the PSM server. Since the user shouldn't be able to connect to the PSM server directly, the PSMConnect account is used. Once the session connects, PSM checks the session variables of the connecting user, including CyberArk username. Then the PSMConnect session creates a temporary profile for the user on the PSM server, called a Shadow user (if one doesn't exist), and switches the user's RDP session to that "isolated" shadow session/profile. Now that the user is in their own shadow session, PSM tries to execute the Connection Component specified. For example if it's SSH, it needs to pull the target address, managed account and password from the Vault. It will check if the user is authorized to use that account, pull the information, and launch an ssh session using command line switches for putty. Finally it will start recording, and give control to the RDS session back to the user.


CPM "verify" explaination

For most platforms, to "verify" the password, CyberArk tries to log into the target with the stored account. If it's able to log in, it calls the password verify. In Unix machines that concept is fairly straightforward - it does an SSH connection, and if it's able to get to the regular prompt, it calls it a success. In Windows, for the regular (non-WMI platform), it tries to issue a "net use \servername\IPC$ /user:<manageduser>" command. If successful, the password is verified. For databases it might try to establish an ODBC connection, etc.


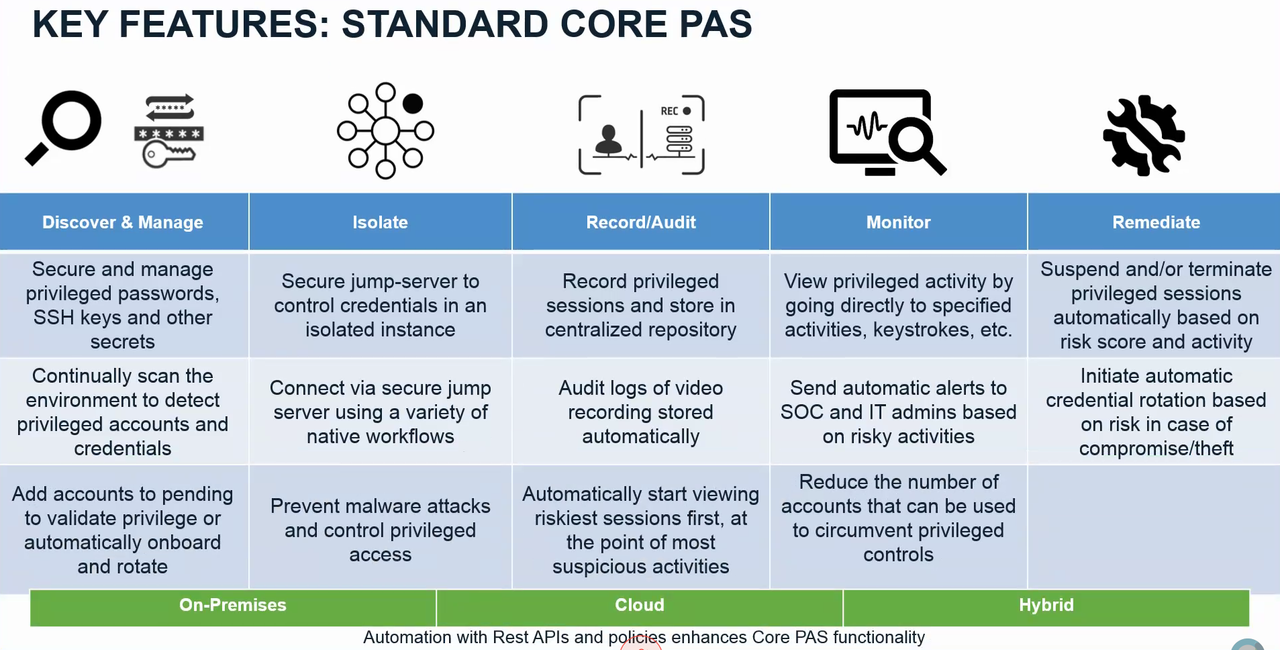
Key Features of Core PAS


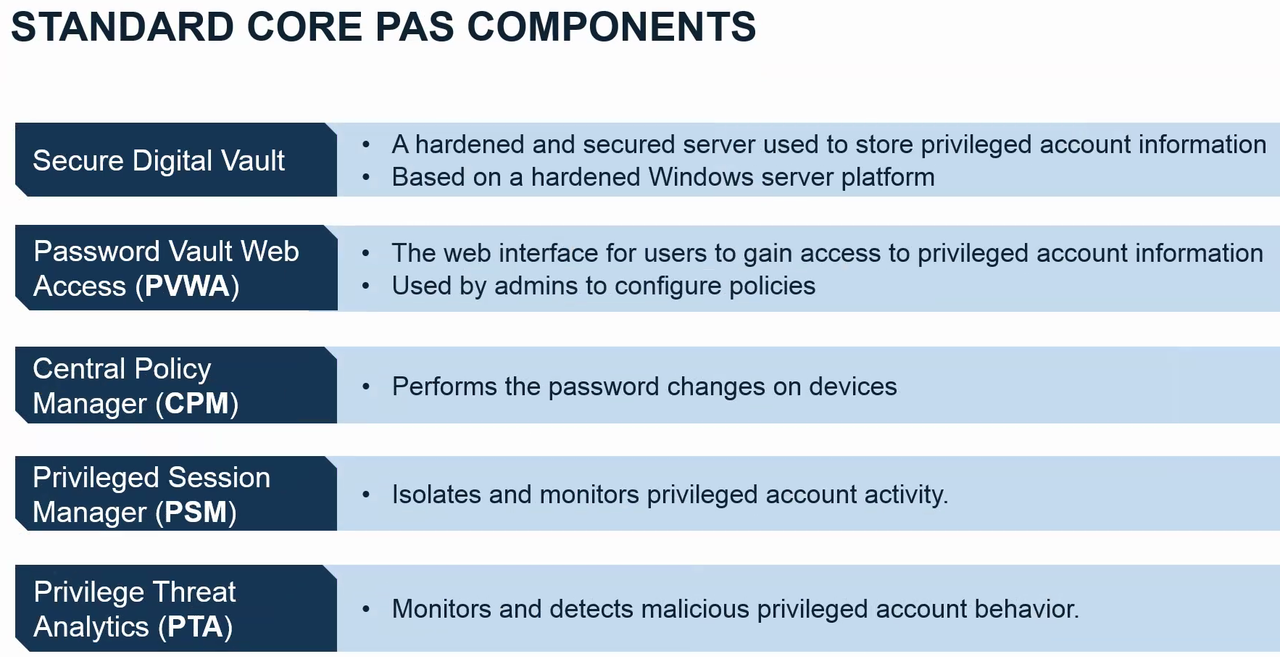
Standard Core PAS Componets


RDP Traffic Flow


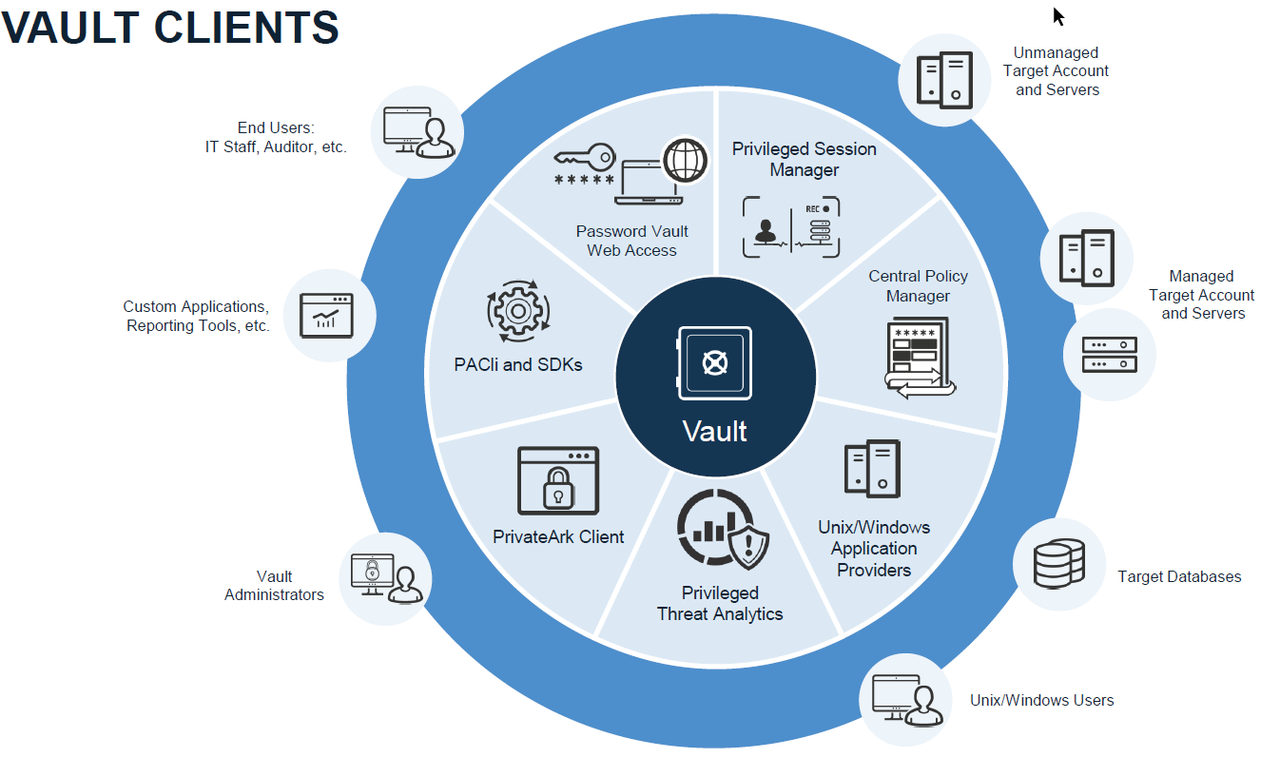
Vault, Components and Clients


References

  • Install the Vault Backup Utility
  • https://cyberark-customers.force.com/login
  • CyberArk Secure File Exchange to download your software


via Blogger https://ift.tt/3kvpmVr
February 28, 2021 at 05:44PM CyberArk
0 Comments

CyberArk Quick Operation Handbook

2/27/2021

1 Comment

 
CyberArk Quick Operation Handbook
This post is to show some quick steps for regular operation on my CyberArk environment.
  • On board CyberArk End User
  • Create a safe
  • Platform Management
  • Create an account
  • Grant User to Add New Account to their Own Safe
  • Change account password
  • Reset CyberArk Built-in administrator Password
  • Reset/Log in CyberArk Built-in Master Password
  • CyberArk PAS Quick Operation Handbook
  • Reconcile Account


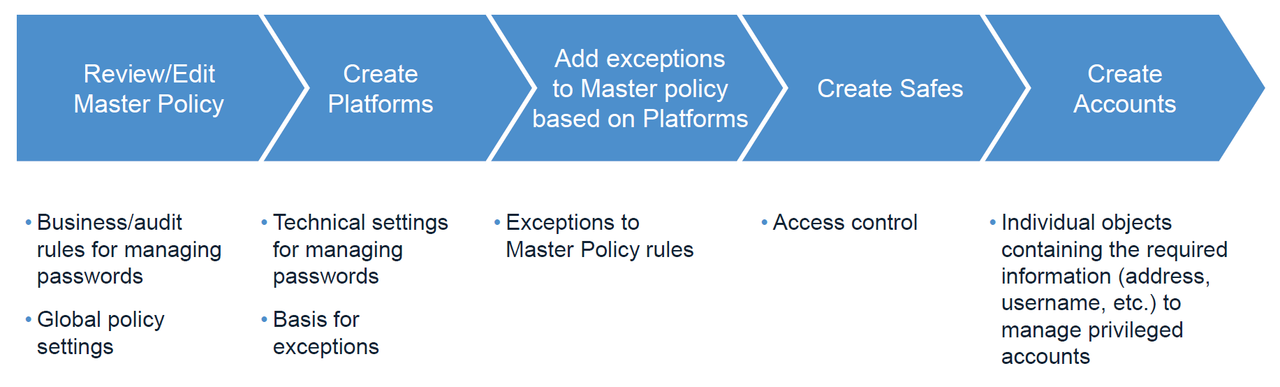
Workflow for creating policies and accounts in CyberArk PAS:


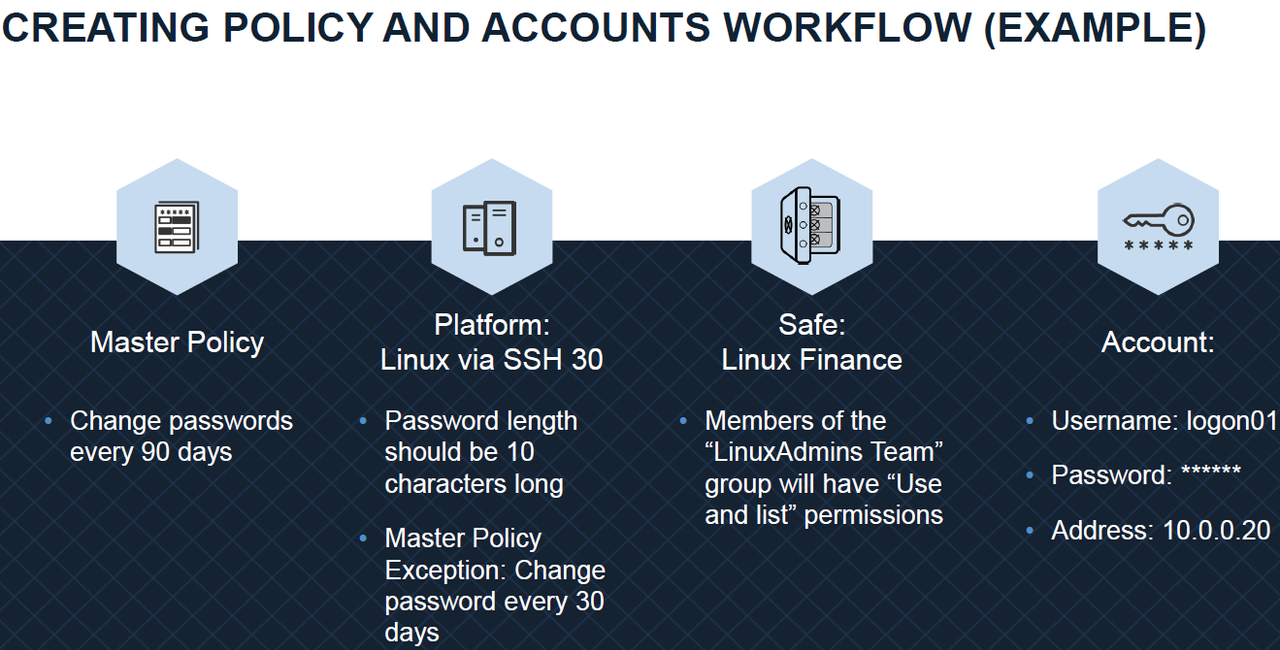
An Example for Creating Policy and Accounts:

On board CyberArk End User

If you CyberArk has AD integrated, you will need to add this user into proper CybreArk AD group. Usually, you will have three types of CyberArk AD user groups:
  • CyberArk Users
  • CyberArk Auditors
  • CyberArk Admins
Depends on what type of user you will need to add in, you might need to add them into your specific AD group first.
You can check my previous post about CyberArk AD Integration configuration.

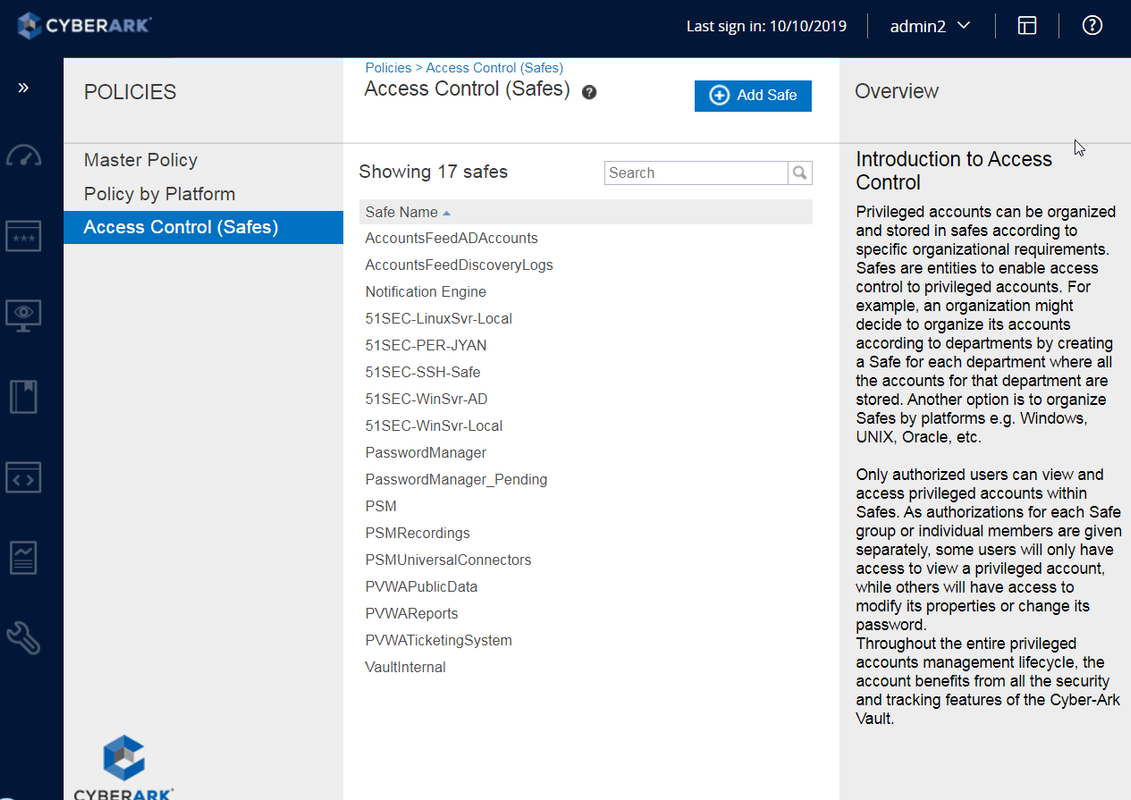
Create a safe

The safe is (usually) the nexus linking the various people whom have some involvement with the account - specifically via the roles assigned to these users: the ability to connect using the account : retrieve the password for use outside of CyberArk : approve other peoples requests : maintain the account details in CyberArk.....

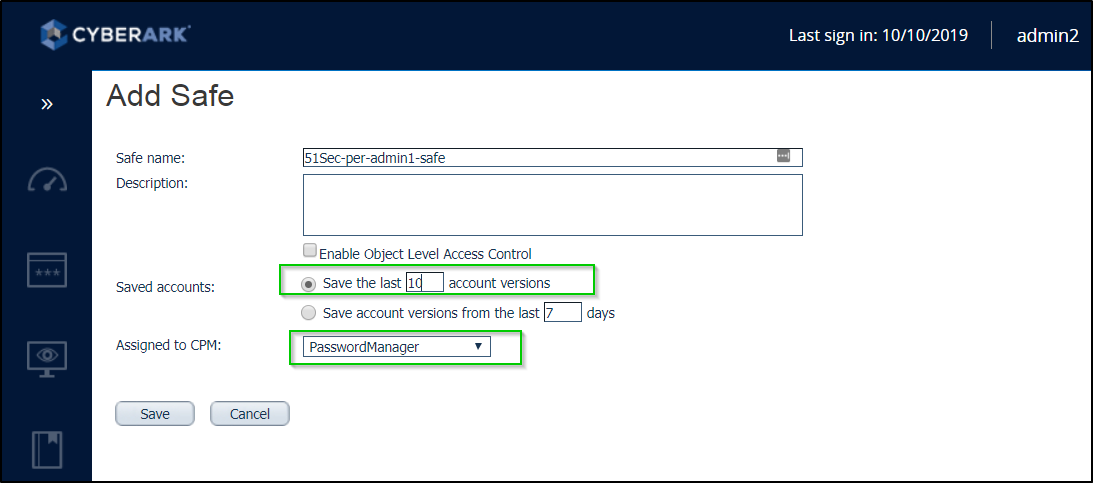
Once starting on board the users, you will need to create their personal safes, which will hold all his/her personal privileged accounts. 

It is typical in enterprise to create shared safes for functional teams to use as well. If you are on boarding a  shared Privileged account, you will need to create/modify your shared safe.


Notes:
  • By default, Safe creator will have quota ownership which will not be deleted. For how to delete it, check post https://blog.51sec.org/2019/11/cyberark-pta-solution-issues-and.html
  • Suggested permission: It should only two users in the safe member list: PSM Manager and Safe Domain User
  • Hide predefined users and groups. You can change this settings through one ini file in the vault server.
  • A safe name cannot be more than 28 characters. Description of the new Safe. Up to 100 characters.
  • Due to performance considerations, a maximum number of objects stored in a safe is 20000. This includes versions of objects, therefore the recommended number of actual accounts or files stored in a safe is 3000-5000
  • Due to security considerations, it is recommended to separate objects stored in safes in groups, following the “least privilege” concept, to avoid situations where providing access for a user to a group of accounts also gives said user access to unrelated accounts. For example: “Windows Accounts” vs “Window Local Administrators for HR App” (28 character limit was not enforced in this example)
  • Safe name convention
    • Define business designations that are important for your environment. For example: Line of Business, Geographical Location, Data Center, Platform, Account Type, Application Association, Environment, etc
    • List them in order of importance
    • Discuss and agree on the resulting layered structure. This will be your Safe Naming Convention Base. Eliminate any layers that are redundant or not needed.
    • List out as many examples of each designation as possible and define 2-4 letter translations for each. For example ORA for Oracle Database or LADM for Local Administrative Account. Alternatively, define a 1-2 digit number and its place in the Safe name instead of a 2-4 letter translation. For example 06 in the 8th and 9th spot for Oracle Database or 1 in the 1st spot for Production
    • Create 7-10 examples of safe names to ensure the structure is sufficiently robust to account for any future need
    • Document the Safe Naming Convention. Examples
      • 1. P-TOR-SRV-WIN-LADM – Local Administrative Accounts (LADM) for Production (P) Windows (WIN) Servers (SRV) in Toronto (TOR)
      • 2. P-MAR-SRV-WIN-DSVC-HR – Domain Service Accounts (DSVC) for the HR Application (HR) living on Production (P) Windows (WIN) Servers (SRV) in the Markham (MAR)
      • 3. D-AWS-DB-ORA-LSVC-HR – Local Service Accounts (LSVC) for the HR Application (HR) living on Development (D) Oracle (ORA) Database (DB) in the Amazon Cloud (AWS)

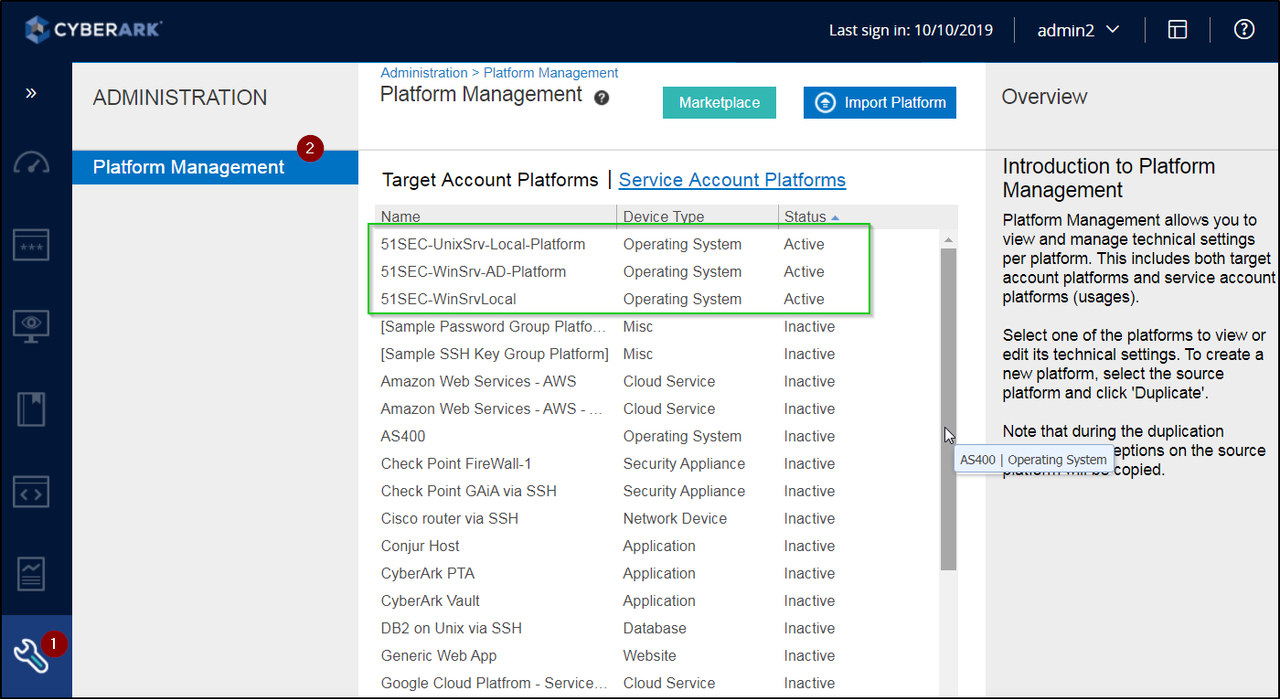
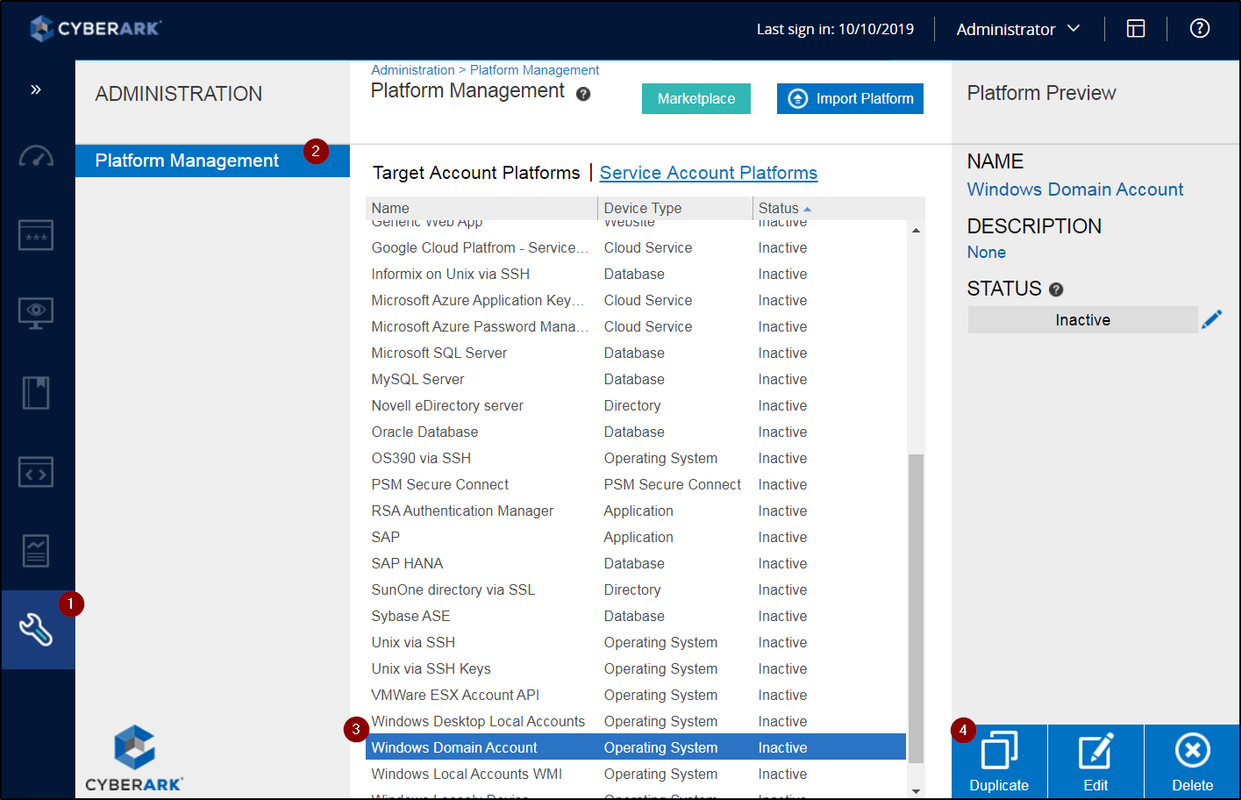
Platform Management

There are two ways to add new platform: 
1. Duplicate existing platforms
2. Import new platforms


Notes:
  • New platform can be downloaded and imported from market place.
  • Platform name convention need to defined well
  • You can delete platform even there is account assigned to it. (Delete need to be very careful here). But since platform has gone, you wont be able to do connect, change, reconcile, this kind of actions anymore. You will not be able to edit it without select a new platform. 
  • PAS supports up to 800 platforms.
  • Platform name length: ??


Create an account


Notes:
  • Default account names (Application-<Safe>-<Address>-<Username>
  • The CPM Login methods possess the 38 character limit on the password field, same as the Vault.
  • The account name pattern can be changed (Administration > Options > Account Name Pattern) - just delete/add properties of the account that should form the account name.
  • The maximum length of the full path of a filename (that includes all folders in the path) is 170 characters. I generally remove "Device Type" from the default pattern to reduce chances of auto-generated names reaching the limit.
  • Domain admin accounts can set restriction to pre-defined server which will have a drop-down menu to select
  • Local admin accounts will need to define target address and name well. 
  • Account Name Limitation
    • Windows - 32
    • *NIX 
      • Legacy Unix - 8 characters
      • Modern *NIX - 32

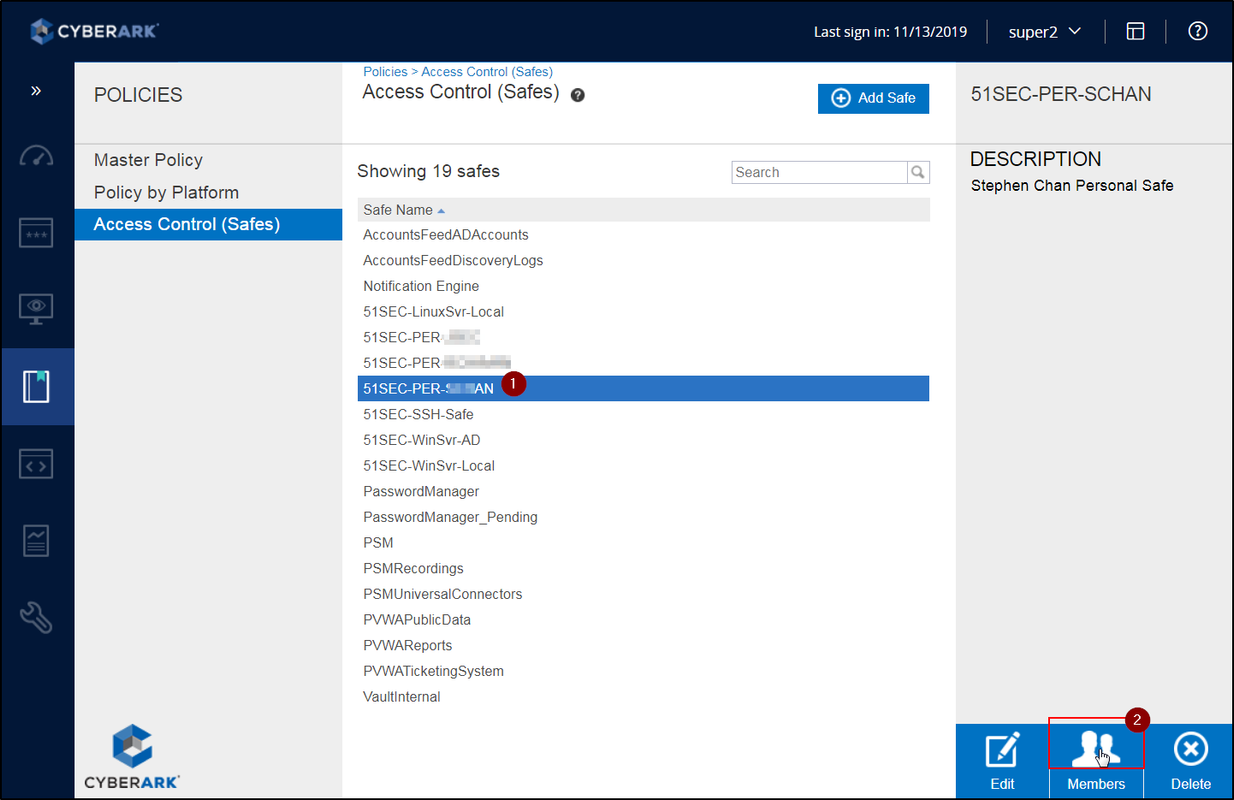
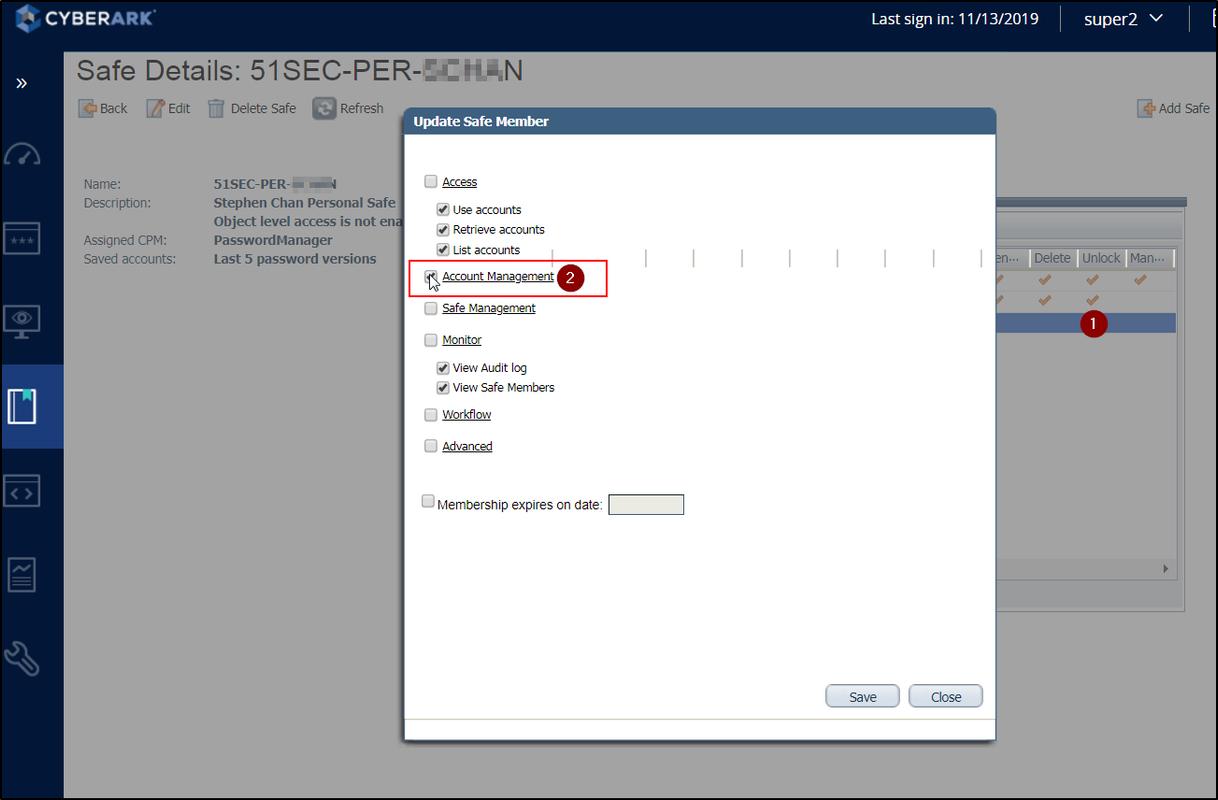
Grant User to Add New Account to their Own Safe


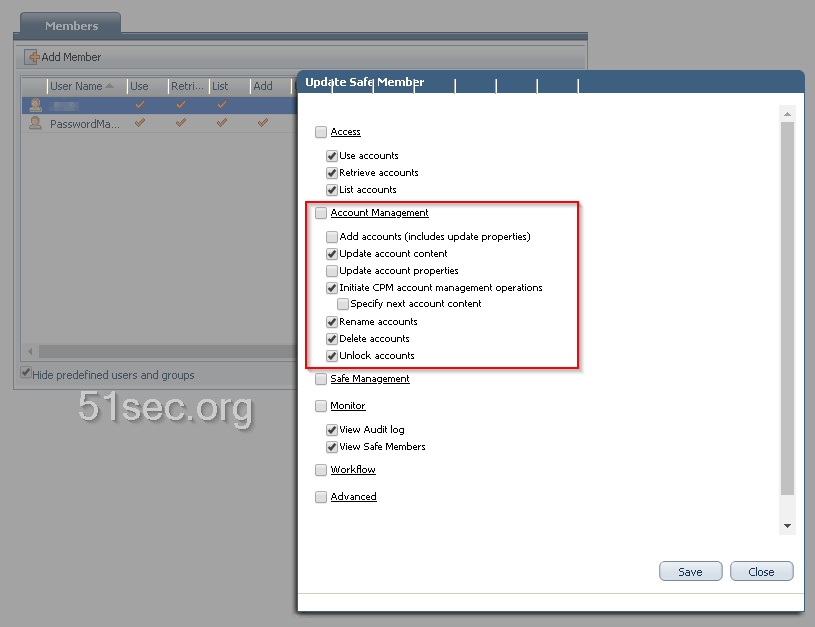
Grant user to account management ability.

Or more specifically, you can remove some permissions from user to have better control. Even update account content can be removed.

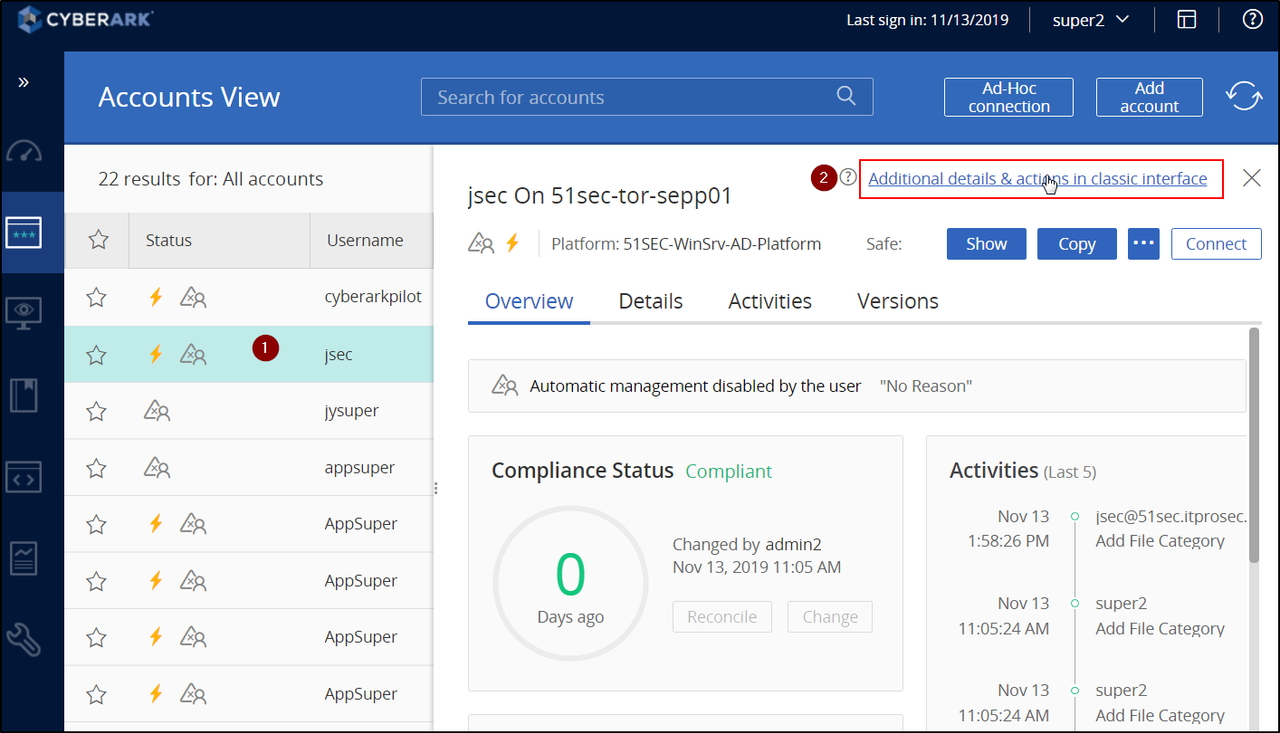
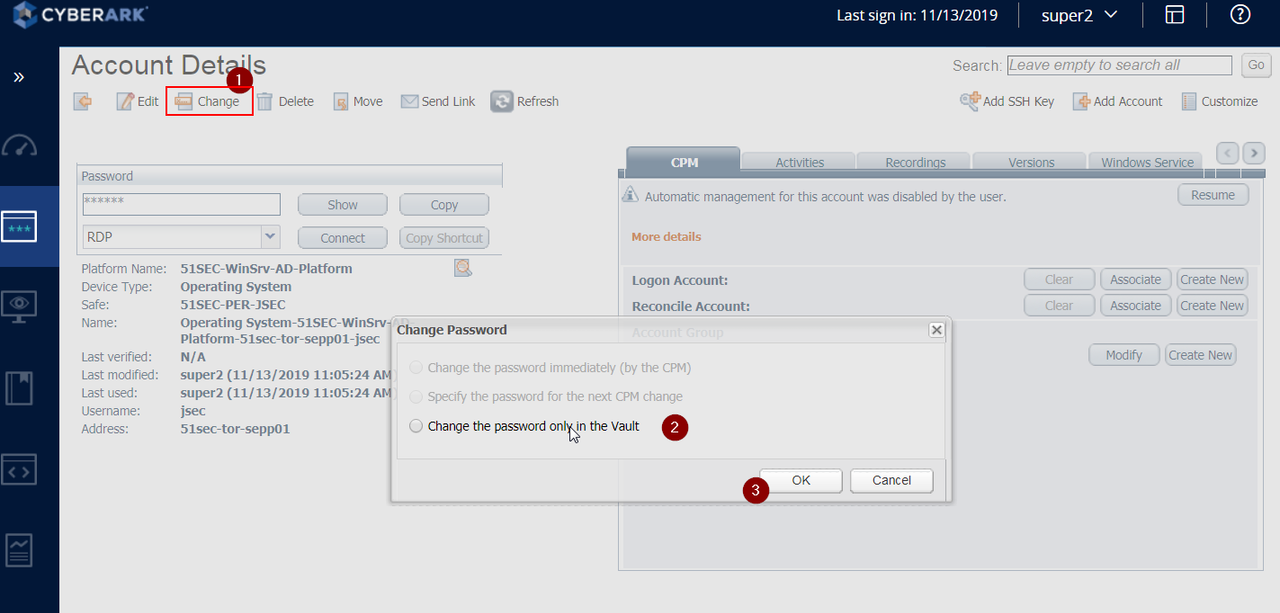
Change account password

To change added account's password, you will need to switch Web Gui to classic interface mode.


YouTube Video:


Reset CyberArk Built-in administrator Password

  • Master user is automatically added to all new safes with full rights - even safes it did not create. It requires a special configuration in order to login into it.
  • Administrator is a built-in administrative user, but unlike Master it does not get automatically assigned to all new safes created (by other users).
You will also need the Master user if you're doing a full database restore from a PAReplicate backup, or if you need to re-key the vault.

If for somehow, your CyberArk administrator account has been locked up or you want to update the password, you can follow following steps to work on:

First, you will have RDP into your PVWA which has PrivateArk installed.

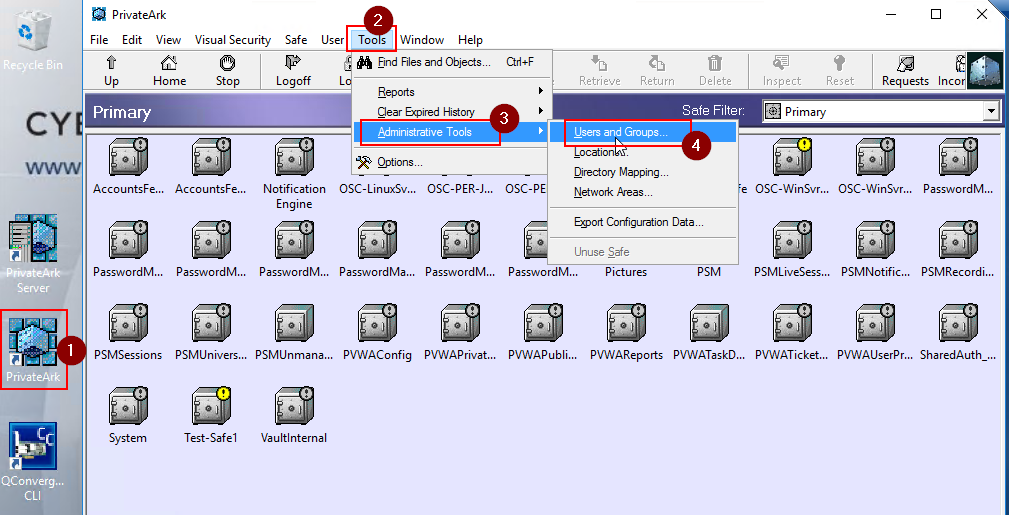
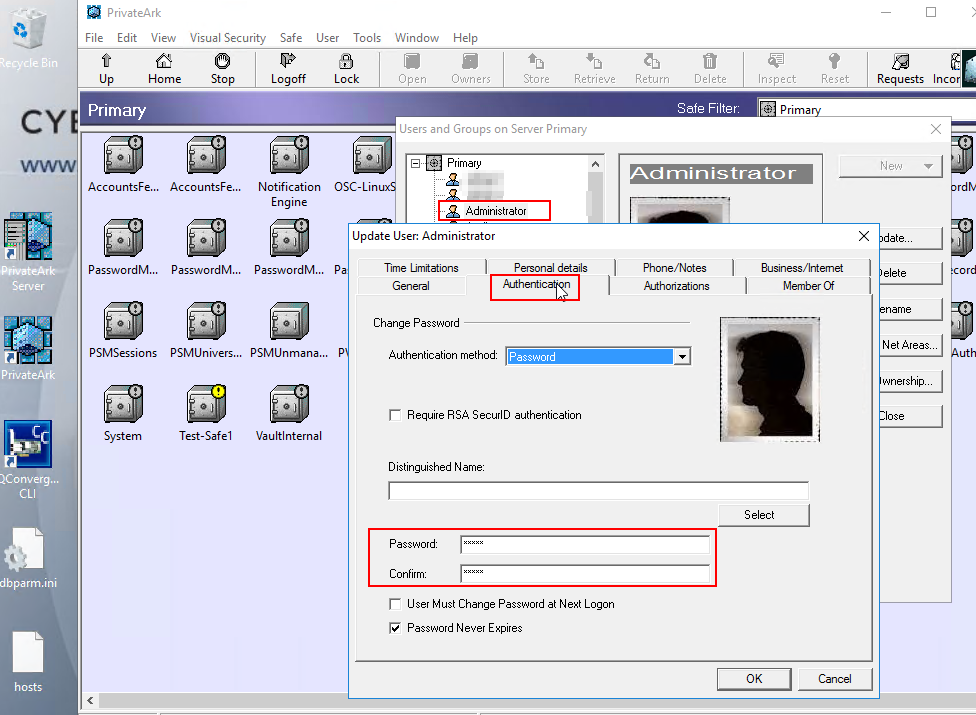
Then, Log into PrivateArk client with another account with Vault-level permissions such as Administrator2 . Click Tools > Administrative Tools > users and groups. Click on the "Administrator" account, and then "Trusted Networks Areas..." and click Activate.


If you don't have another local account such as adminsitrator2, you'll have to log in with the "Master" user. To log in with the "Master" user you'll have to take a few extra steps. 

Reset/Log in CyberArk Built-in Master Password

As per best practices you should always have a Backup administration account for operational stuff and shouldn't use Administrator account. In case you got into such situation, here are some thing you can follow to help you out:

Steps to Log In with Master Account:
  1. Place Master CD into server.
  2. Double click Private Ark icon
  3. Enter 'Master' as the user and enter password.

More details from CyberArk KB:
To log in as the Master user please do the following on the Vault Machine:
1. Insert the Master CD in the CD Drive
2. Verify if the dbparm.ini lists the location of the Master key in the Master CD
•  dbparm.ini is located in the following location :  Drive:\Program Files (x86)\PrivateArk\Server\dbparm.ini
•  In v10+, the dbparm.ini is located here:   Drive:\Program Files (x86)\PrivateArk\Server\conf\dbparm.ini
•  The Master key parameter and value can be found as the following in the dbparm.ini file : RecoveryPrvKey="Drive:\RecPrv.key" 
•  If the location needs to be changed, a restart of the PrivateArk Server service is required for changes to take effect
3. Start the PrivateArk Client Application on the Vault Machine
4. Right Click on the "<VaultName> Server" icon within the Private Ark Client and choose "Properties" > "Advanced" > "Authentication" tab > "Authentication methods" section > Choose "PrivateArk authentication" > Click OK in the advanced window > Click OK in the Properties window
5. Log into the Vault with the username as "Master"
•  If you need to reset the Master password, this can be accomplished by going to User > Set password after logging in


Delete Safe / Change Safe Members


Delete a safe using a administrator user which was added to the operators group. it prompts as below:

"ITATS056E Folder Root\ cannot be deleted because it contains non-expired object.
Object have been marked as deleted.
Folder can be deleted in 7 days"


There is a KB for how to delete safe member: Delete Safe member

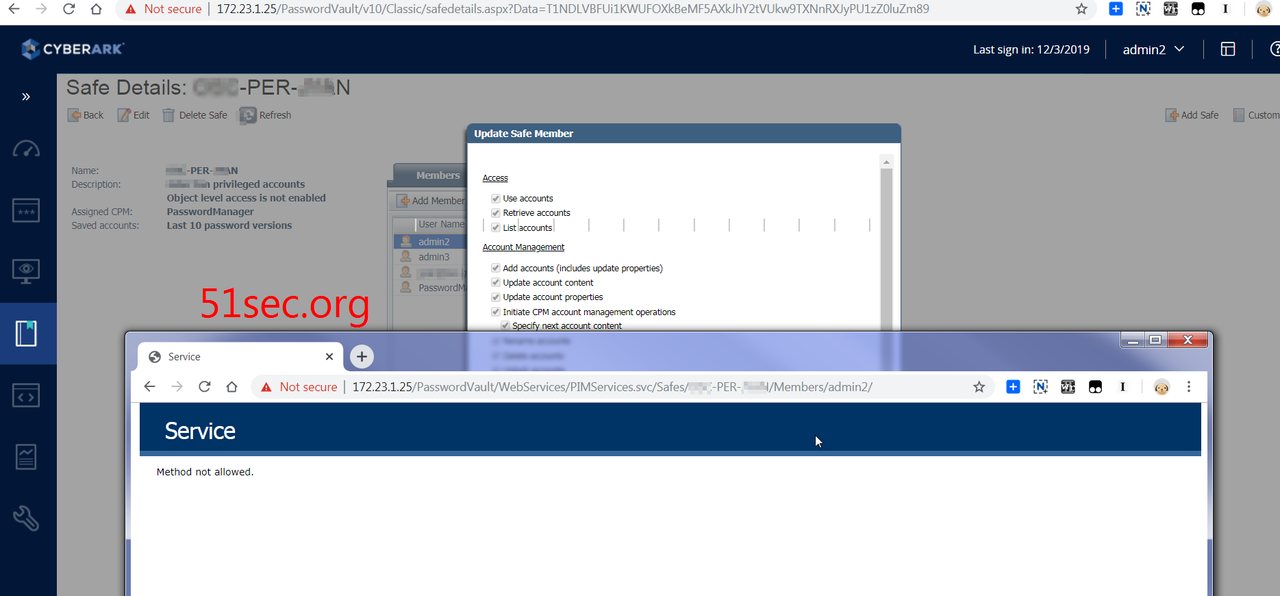
using following URL to delete a safe member.
https://<IIS_Server_Ip>/PasswordVault/WebServices/PIMServices.svc/Safes/{SafeName}/Members/{MemberName}

Unfortunately, I got following error;


At the end of account member record, there is a delete icon. You will need drag slide bar to the end to see it. That will delete member.


Reconcile Account

Passwords in the Vault must be synchronized with corresponding passwords on remote devices to ensure that they are constantly available. Therefore, the CPM runs a verification process to check that passwords are synchronized. If the verification process discovers passwords that are not synchronized with their corresponding password in the Vault, the CPM can reset both passwords and reconcile them. This ensures that the passwords are resynchronized automatically, without any manual intervention.

During password reconciliation, the unsynchronized password is replaced in the Vault and on the remote device with a new password that is generated according to the relevant platform. As soon as reconciliation is finished successfully, all standard verifications and changes can be carried out as usual. Users can see details of the last reconciliation process in the Operational Views in the Accounts List.
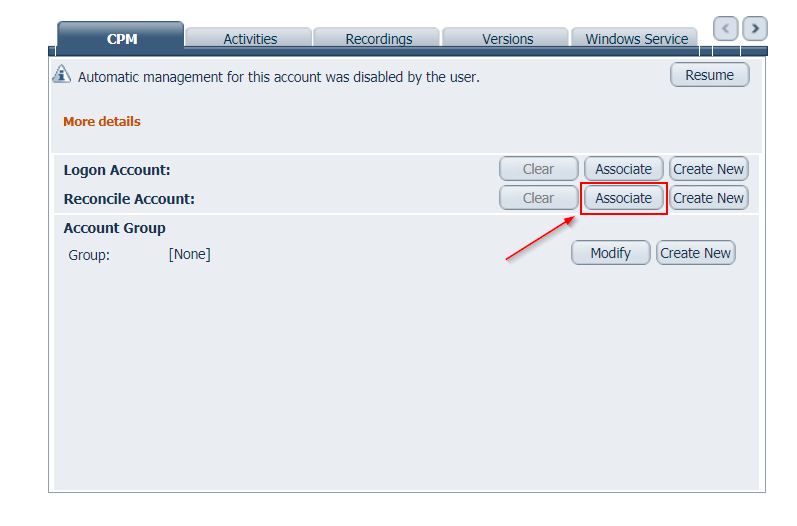
Assign reconcile account at Platform level:
Find account details and copy them into Platform Password Reconciliation settings. Then all accounts (new or existing) will have this setting automatically.


References

  • How to log in as the Master user (CyberArk KB)


via Blogger https://ift.tt/3sybsED
February 27, 2021 at 05:17PM CyberArk
1 Comment

CyberArk PAS 12 0 Installation -1. Vault
2/25/2021

0 Comments

 
CyberArk released PAS 12.0 version. I recorded this series video during working on my lab environment. It will mainly show how to install each component one by one based on CyberArk Installation Document. Basic configuration and integration will be included in the videos as well. CyberArk PAS 12.0 Installation and Configuration: - CyberArk PAS 12 0 Installation -1. Vault : https://youtu.be/iAunmeDWOI0 If you are new to CyberArk world, this will be a good point to start. If you would like to know more about previous version, please check my playlist: https://www.youtube.com/playlist?list=PLg7bL1bMpwPWNr2LzAnoK995sbWUbcotS ==================================================================== If you found this video has some useful information, please give me a thumb up and subscribe this channel to get more updates: https://www.youtube.com/c/Netsec?sub_confirmation=1 Learning and Sharing - 海内存知己,天涯若比邻 - http://51sec.org
Watch video on YouTube here: https://youtu.be/iAunmeDWOI0 by Jon Netsec
0 Comments

Install Docker and Portainer on Ubuntu 20.04 in Raspberry Pi

2/22/2021

0 Comments

 
In my old Raspberry Pi 2 module B, I have installed Ubuntu 20.04 LTS version. This video is to show you how to install Docker, Docker Compose, Portainer on Ubunut 20.04 in this old Raspberry Pi 2B. Since Raspberry Pi 2B only has 1GB memory available, after system Ubuntu 20.04 installed, only left 500MB available, I added 1GB swap size into system . That should help us to run some memory consumption dockers. Related Posts: *Install Ubuntu 20.04 on Raspberry Pi - https://ift.tt/2NwdHtf *Change SWAP Size to Improve Low Memory Cloud VM Reliability - https://ift.tt/3qC9UsN *Portainer Usage Tips and Tricks - https://ift.tt/3sfyYWP ==================================================================== If you found this video has some useful information, please give me a thumb up and subscribe this channel to get more updates: https://www.youtube.com/c/Netsec?sub_confirmation=1 Learning and Sharing - 海内存知己,天涯若比邻 - http://51sec.org

Watch video on YouTube here: https://youtu.be/MjbInsvvGvw by Jon Netsec
0 Comments

Intreresting WordPress Plug-in Introduction

2/20/2021

1 Comment

 
Intreresting WordPress Plug-in Introduction
This post is to summarize some of my favorite plug-ins used in my blogs and forums. All of them are free. They are used for certain purpose and it will be used based on requirements.

If you found some interesting ones, let me know. I will try it out. 

Encrypt WordPress with a plugin

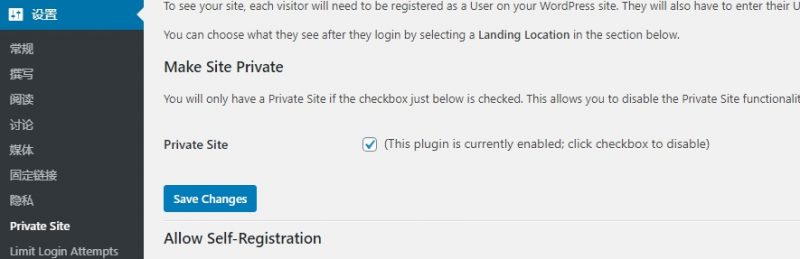
First of all, we recommend to you a WordPress plugin- My Private Site , which is a plugin specially used to encrypt WordPress, which can restrict access very easily.

After installing the plugin, select Settings – Private Siteheck the Private Site option to encrypt the entire WordPress site.
My Private Site

Only the logged-in user can access the website after encryption, and other people will automatically jump to the login page.

This method is highly recommended for newbies and users who use virtual hosting, it is simple and easy to use

Encrypt WP Site with Pagoda Panel


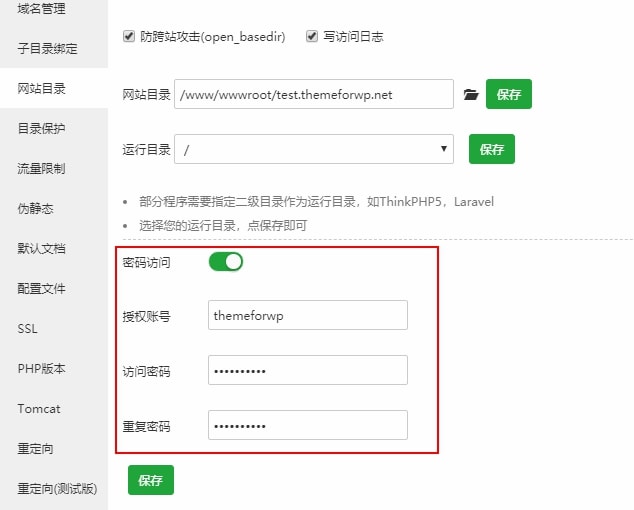
If you use WordPress built with Pagoda Panel, then the encryption will be very simple. Pagoda Panel has a built-in website encryption function.

Open the setting options of the corresponding website in the pagoda panel and select the website directory
Turn on password access and set a strong password that only you know

Pagoda Set Website Password Access

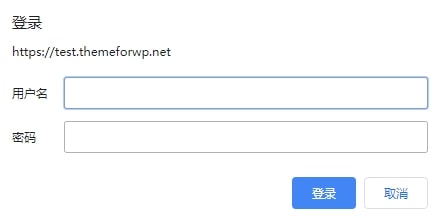
When you visit the website again, you will see the following password box. Only enter the correct account and password before you can continue to access
Website needs to enter account password to access

This method can cooperate with the Private Site plug-in above to achieve double encryption

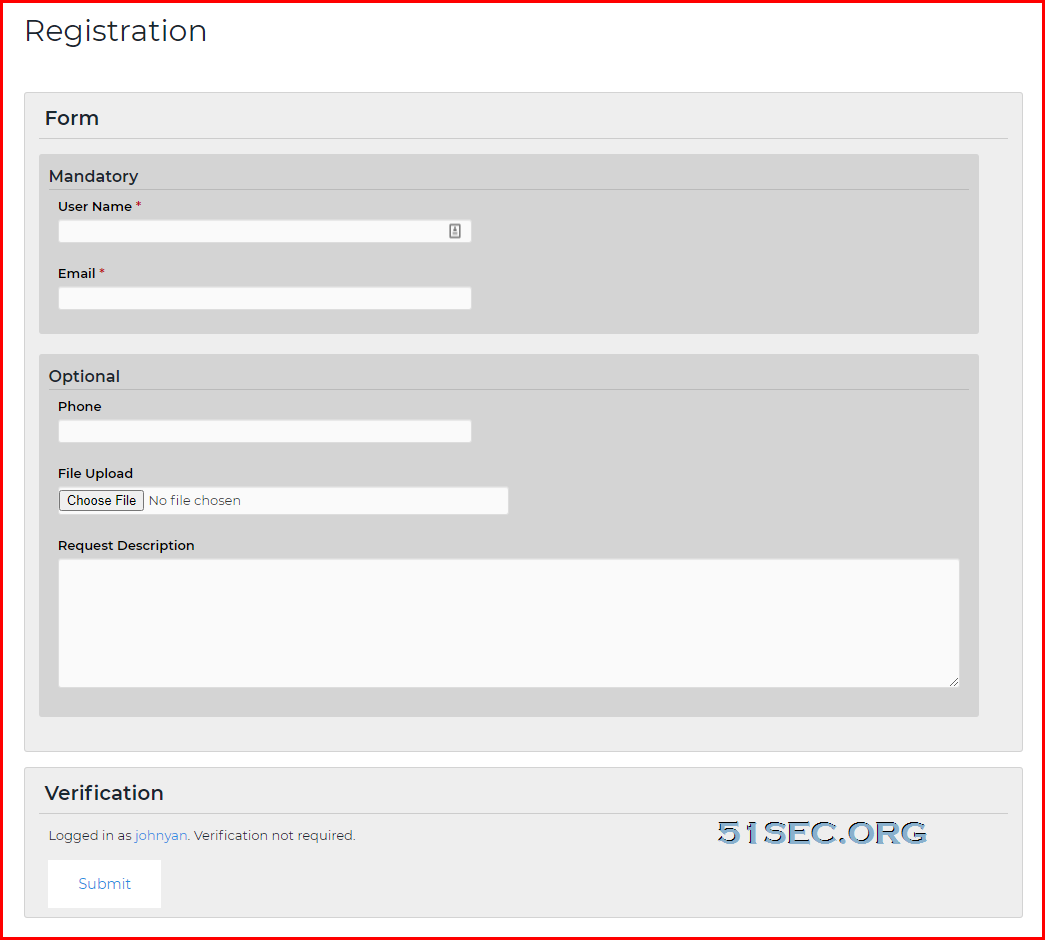
Form Plugin to upload a file - Visual Form Builder


Visual Form Builder is a plugin that allows you to build and manage all kinds of forms for your website in a single place. Building a fully functional contact form takes only a few minutes and you don’t have to write one bit of PHP, CSS, or HTML!

WPForms definitely will be better. But once it comes into attachment feature, it will charge you $39.50/year.


via Blogger https://ift.tt/3qEC9qH
February 19, 2021 at 09:44PM Blog
1 Comment

Windows PowerShell Script Collection

2/20/2021

1 Comment

 
Windows PowerShell Script Collection

Starting to collect some PowerShell scripts for references. There are lots of them can be found from the references section.

Export a Computer List from Active Directory


Step 1: Run Powershell ISE

Open the Powershell ISE → Run the following script, adjusting the path for the export:


Step 2: Source Code (One Line)

Get-ADComputer -Filter * -Property * | Select-Object Name,OperatingSystem,OperatingSystemVersion,ipv4Address | Export-CSV ADcomputerslist.csv -NoTypeInformation -Encoding UTF8


Reset Domain User's Password

1. Using Powershell

Set-ADAccountPassword -Identity admin2 -Reset -NewPassword (ConvertTo-SecureString -AsPlainText "Cyberark1" -Force)
Set-ADAccountPassword -Identity admin3 -Reset -NewPassword (ConvertTo-SecureString -AsPlainText "Cyberark1" -Force)
Set-ADAccountPassword -Identity auditor1 -Reset -NewPassword (ConvertTo-SecureString -AsPlainText "Cyberark1" -Force)
Set-ADAccountPassword -Identity auditor2 -Reset -NewPassword (ConvertTo-SecureString -AsPlainText "Cyberark1" -Force)
Set-ADAccountPassword -Identity test1 -Reset -NewPassword (ConvertTo-SecureString -AsPlainText "Cyberark1" -Force)
Set-ADAccountPassword -Identity test2 -Reset -NewPassword (ConvertTo-SecureString -AsPlainText "Cyberark1" -Force)
Set-ADAccountPassword -Identity test3 -Reset -NewPassword (ConvertTo-SecureString -AsPlainText "Cyberark1" -Force)
Set-ADAccountPassword -Identity vaultadmin1 -Reset -NewPassword (ConvertTo-SecureString -AsPlainText "Cyberark1" -Force)
Set-ADAccountPassword -Identity vaultadmin2 -Reset -NewPassword (ConvertTo-SecureString -AsPlainText "Cyberark1" -Force)


2. Use Command Prompt

net user /domain USERNAME NEWPASS.
Run command prompt as administrator:
C:\Windows\system32>net user /domain admin2 Cyberark1
The command completed successfully.

C:\Windows\system32>

Replace USERNAME and NEWPASS with the actual username and a new password for this user.If the actual username consists of more than two words, place it inside quotation marks.


References

  • /u/jacfearsome https://github.com/JacFearsome/powershell-scripts
  • /u/PowerMonkey500 https://github.com/AndrewEllis93/PowerShell-Scripts
  • /u/unibody https://github.com/jwmoss/powershell_scripts
  • /u/IDA_noob https://github.com/tylerapplebaum?tab=repositories
  • /u/mikedopp https://github.com/mikedopp
  • /u/JBear_Alpha https://github.com/Average-Bear
  • /u/BornToBeRoot https://github.com/BornToBeRoot/PowerShell
  • /u/ramblingcookiemonste https://github.com/RamblingCookieMonster/PowerShell
  • /u/jhulbe https://github.com/jhulbe/Powershell
  • jrussellfreelance/powershell-scripts


via Blogger https://ift.tt/3k4qj6V
February 19, 2021 at 09:42PM Windows
1 Comment

Install Win10 1809 Enterprise 2019 LTSC into HP ThinClient T620

2/19/2021

1 Comment

 
Regular Win10 home/Pro is a bit too heavy for HP Thinclient T620. I found Win10 Enterprise LTSC version is a good fit into T620. After installed Win10 LTSC 2019 version, the resource usage cuts half from memory and CPU, one third of hard drive usage comparing to a regular Win10 version. If you are planning to install Win10 to ThinClient T620, check this video first. It will show you how to get it installed, also show you a resource usage compares between a regular Win10 Pro and Enterprise Win10 LTSC in this video. . ==================================================================== If you found this video has some useful information, please give me a thumb up and subscribe this channel to get more updates: https://www.youtube.com/c/Netsec?sub_confirmation=1 Learning and Sharing - 海内存知己,天涯若比邻 - http://51sec.org

Watch video on YouTube here: https://youtu.be/InQSctNGcT0 by Jon Netsec
1 Comment

Run Docker Containers Free From GCP Cloud Shell

2/17/2021

1 Comment

 
This video is to show how to launch Docker containers from Google Cloud Platform Cloud Shell. Basically GCP cloud shell is a cloud instance with 16G ram and 4 vCPU. Although it is ephemeral (removed after 20 minutes session ends), it does provide you 5GB home storage for you to store files between sessions. The internet speed is 1Gbps for uploading and downloading. It is docker and docker compose ready environment which you can easily bring up some dockers. In this video, I showed you how to launch Ubuntu Desktop docker using docker run command and also showed you how to launch NextCloud docker using docker-compose.yml file. ==================================================================== If you found this video has some useful information, please give me a thumb up and subscribe this channel to get more updates: https://www.youtube.com/c/Netsec?sub_confirmation=1 Learning and Sharing - 海内存知己,天涯若比邻 - http://51sec.org

Watch video on YouTube here: https://youtu.be/IqE2EOywH_A by Jon Netsec
1 Comment

Free SubDomain from PP.UA and Integration with CloudFlare

2/16/2021

1 Comment

 
Free SubDomain from PP.UA and Integration with CloudFlare

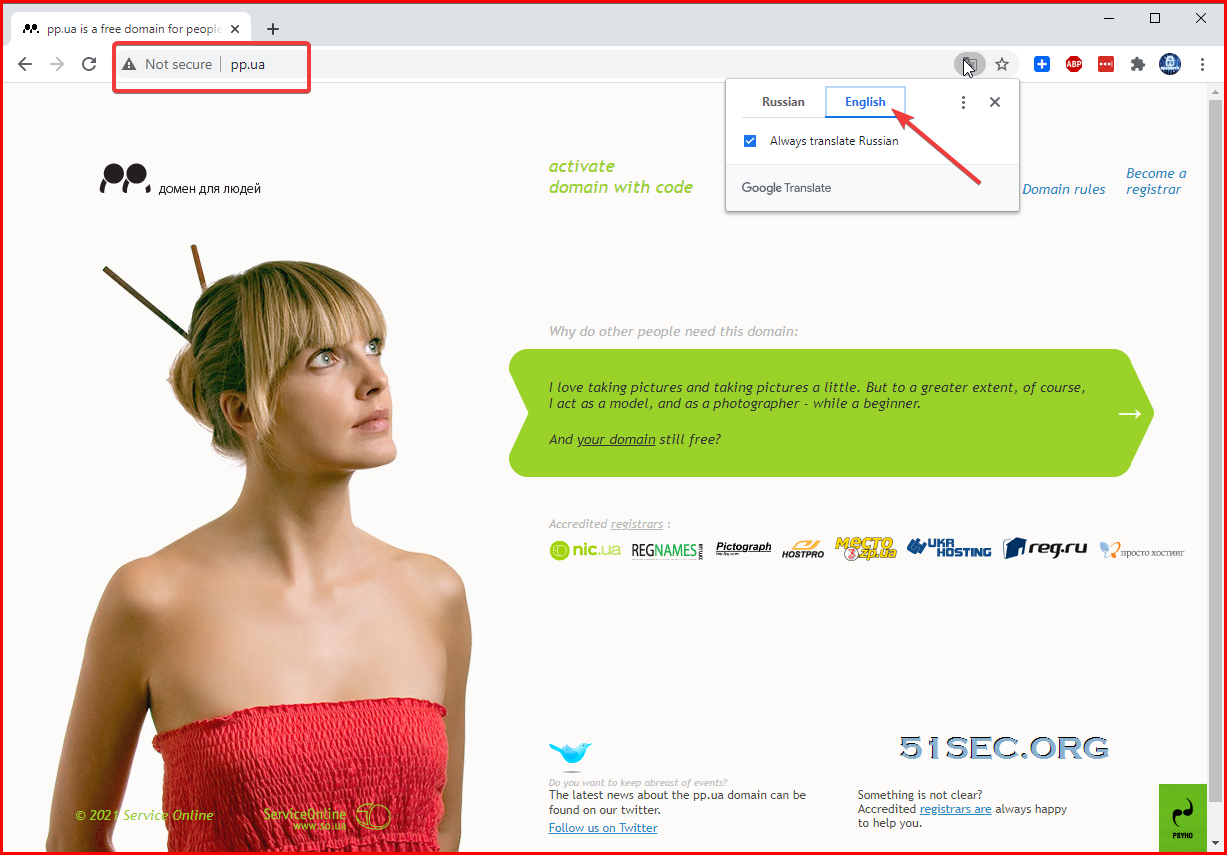
During building my lab for testing, I tried to find a free subdomain to use which also can be integrated with CloudFlare. I found this free pp.ua domain zone is perfect for personal pages and blogs - the abbreviation "PP" means "Private Person". It is Ukraine website in Russian language, but it can be applied globally with Google translation's help .  So far, the subdomain from pp.ua works just like any other domains. 


Restrictions

It does has some restrictions including following main ones:
  • It requires activation, which I found phone number outside of Ukraine might not work. Telegram activation method is still working. 
  • WHOIS information is public. 
  • You can register 3 free domains in one month from the same phone number under your account

Steps to apply a new domain

As shown from the homepage of https://pp.ua, there are quite a few domain registrars. In this post, I picked the first one nic.ua to register my own subdomain as an example. You will need to register an account from nic.ua website first. 

1  Find an accredited registrar
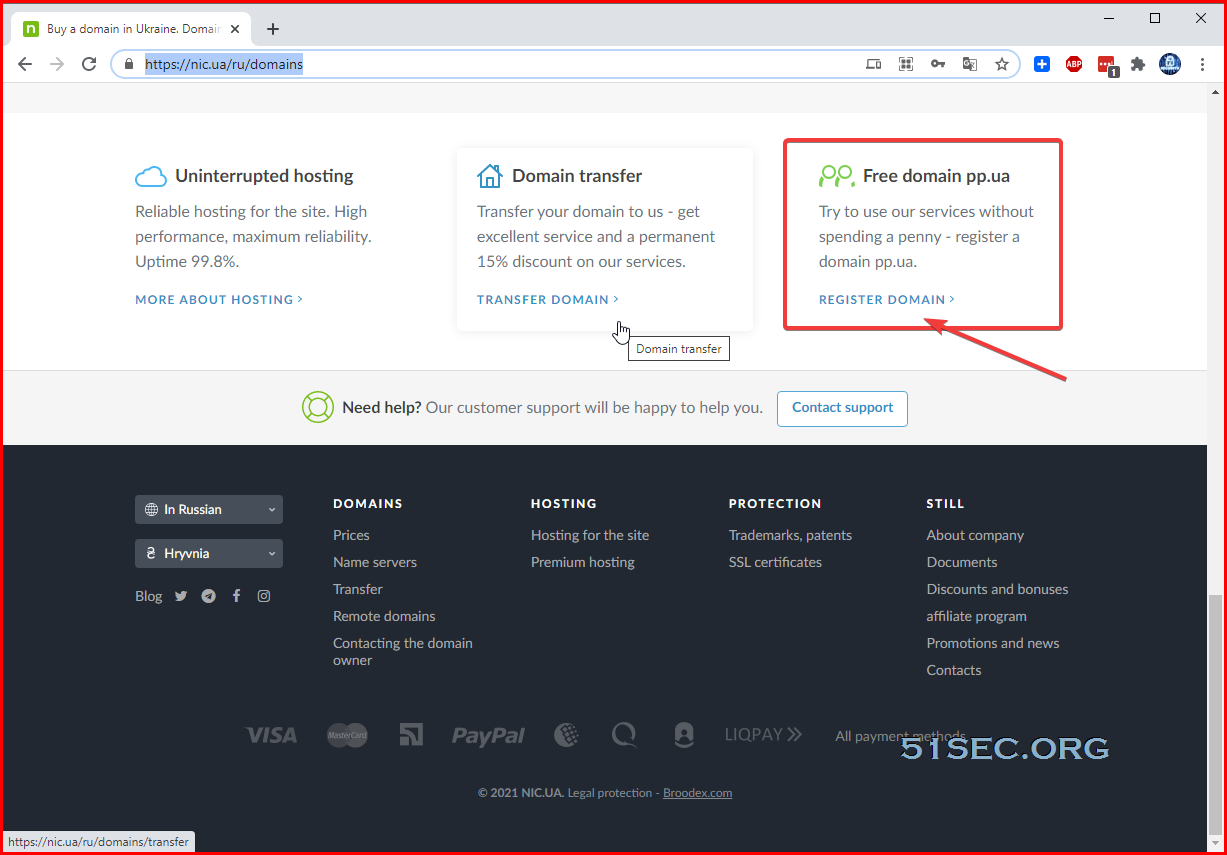
From nic.ua's domain page (https://nic.ua/ru/domains), scroll to the bottom, you will find the free domain pp.ua registration link: https://nic.ua/ru/domains/.pp.ua

Again it is in Russian, you might need Google Translation's help to understand it well.


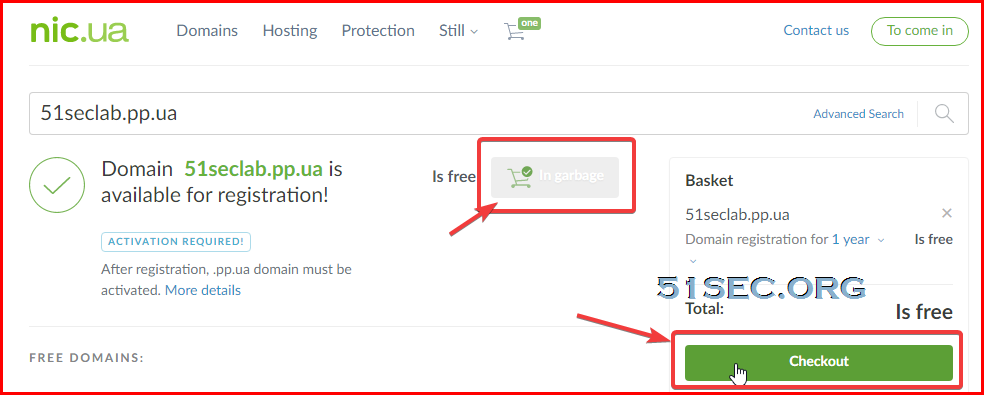
2  Find an available subdomain by searching

Once found an available one, you can easily add it into cart and check out from the same page. 


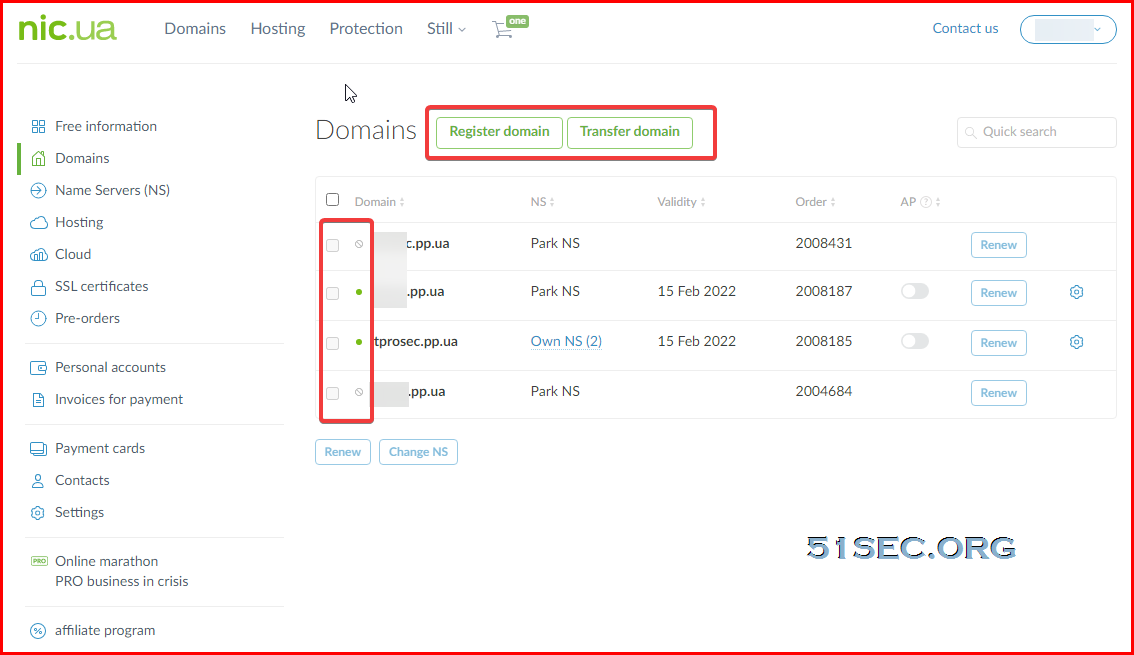
3  Check Domain from your account dashboard
Since it has not been activated, your new domain will not show a green dot in front of it. No more than three domain registered in one month. 


Activation

There are multiple ways to activate your domain. It will require activation code. Unfortunately, for somehow, I did not get sms message for the code. After waited a couple of days, I decided to try Telegram method. 

Follow steps below to activate the domain:

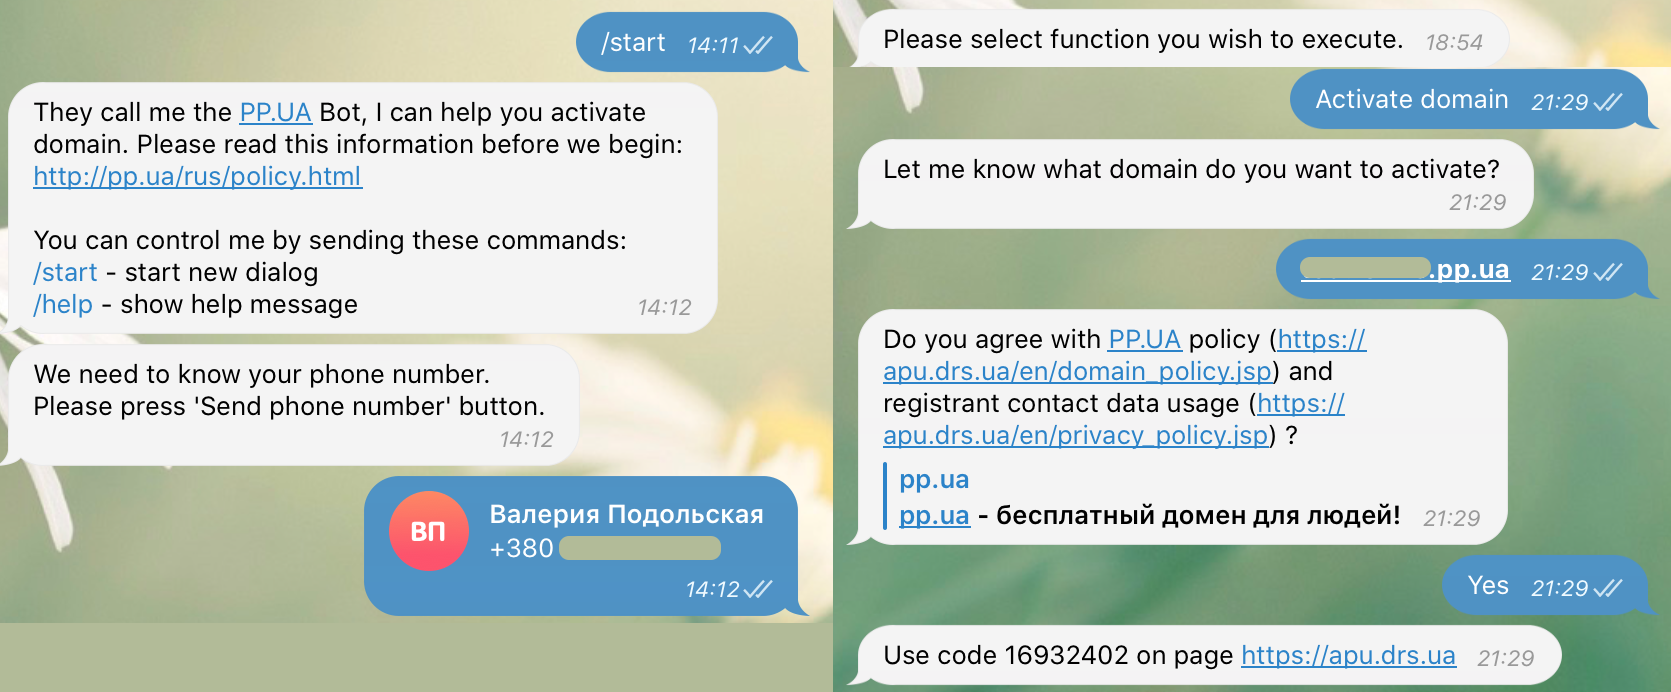
  • In Telegram searching bar find the @ppuabot, press START.
  • Then press "Send phone number”.
  • You will see "Please select function you wish to execute”.
  • Press “Activate domain” and enter your domain name without
    'www' and 'http://'
  • Then you should agree with PP.UA policy and registrant contact data usage
  • PP.UA Bot will generate an activation code.
  • Copy the activation code.
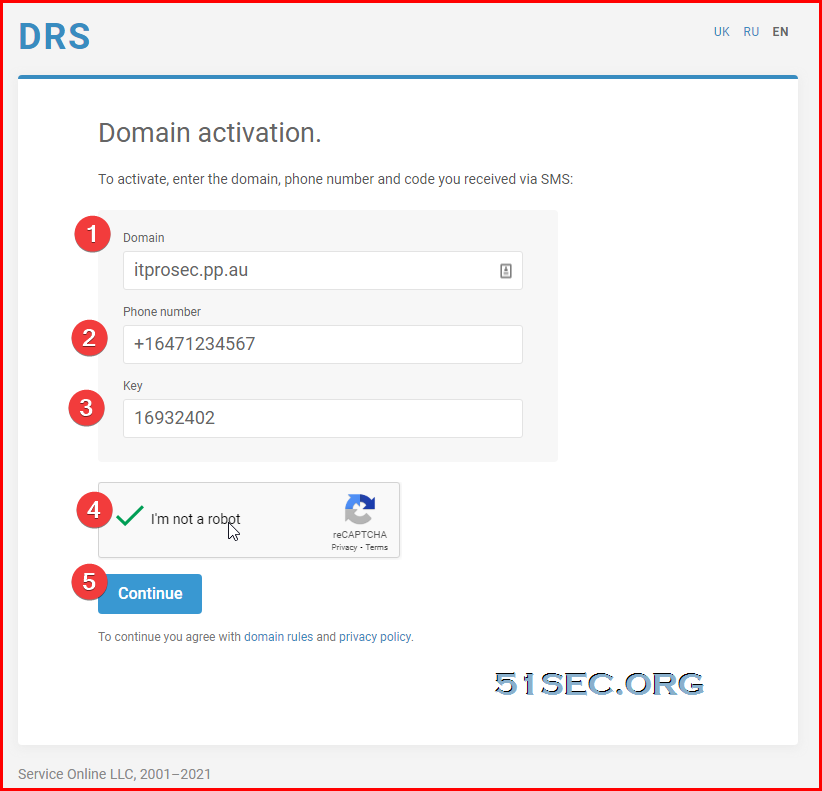
  • Go to activation page


  • Fill 'Domain', 'Phone number' (in international format) and 'Key' field
  • When you continue you agree again with domain rules and privacy policy
  • Click 'Continue' and wait for the result.

Please note, when you will renew the domain in a year, you have to activate it again the same way. Also, all requests to the registry are eligible for 5 days. If you didn't activate domain in 5 days then you will need to do registration request again and activate your domain.

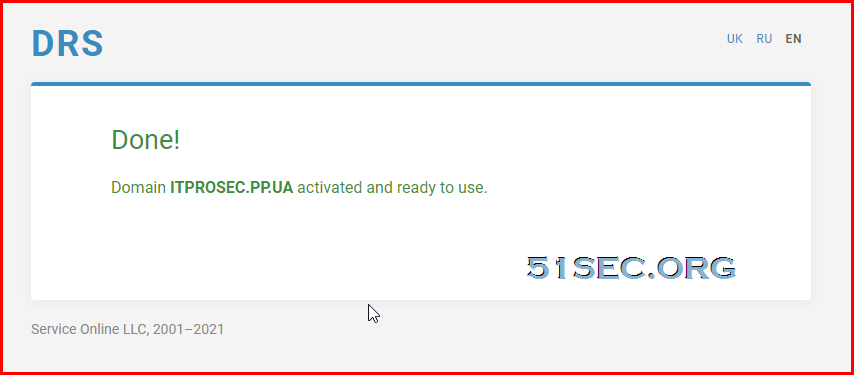
Once you got following Done! page, which confirmed your new domain activated and ready for next step, integration with CloudFlare. 


Integration with CloudFlare

After you activated from Telegram, you can start the process to integrate with CloudFlare. 
  • Log into your CloudFlare account, click button "+Add a Site"
  • Enter your new activated pp.ua domain
  • Choose Free plan
  • You will get a "Complete your nameserver setup" page.
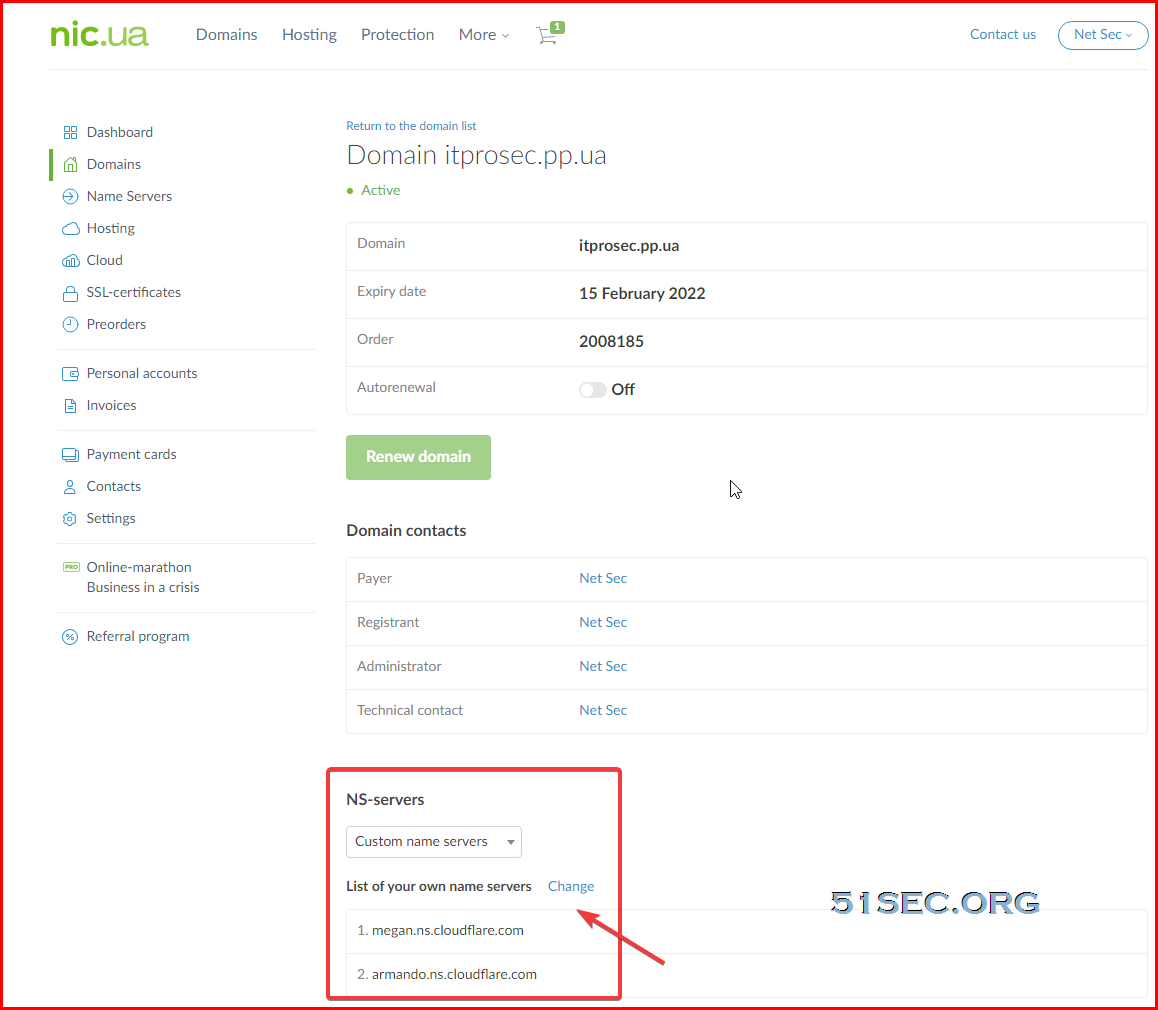
  • Change nameserver settings under your new activated domain from nic.ua 
Click 'Change' to modify your name servers. Change NS-Servers entries to those two displayed in CloudFlare page.

  • It will take a couple of hours to get this NS-Server change take into effect. You can request CloudFlare to check this nameserver updates from Overview page in your domain's CloudFlare Dashboard.
  • Eventually if all goes well, in next 2-3 hours, you CloudFlare's domain page will show you this message: "Great news! Cloudflare is now protecting your site"


References

  • PP.UA domains restrictions
  • How to activate PP.UA domain

via Blogger https://ift.tt/3u4wzQw
February 15, 2021 at 09:03PM Cloud
1 Comment
<<Previous

    Categories

    All
    Architecture
    Blog
    Checkpoint
    Cisco
    Cloud
    CyberArk
    F5
    Fortigate
    Guardium
    Juniper
    Linux
    Network
    Others
    Palo Alto
    Qualys
    Raspberry Pi
    Security
    SIEM
    Software
    Vmware
    VPN
    Wireless

    Archives

    March 2024
    February 2024
    January 2024
    December 2023
    November 2023
    October 2023
    September 2023
    August 2023
    July 2023
    June 2023
    May 2023
    April 2023
    March 2023
    February 2023
    January 2023
    December 2022
    November 2022
    October 2022
    September 2022
    August 2022
    July 2022
    June 2022
    May 2022
    April 2022
    March 2022
    February 2022
    January 2022
    December 2021
    November 2021
    October 2021
    September 2021
    August 2021
    July 2021
    June 2021
    May 2021
    April 2021
    March 2021
    February 2021
    January 2021
    December 2020
    November 2020
    October 2020
    September 2020
    August 2020
    July 2020
    October 2019
    September 2019
    June 2019
    July 2018
    May 2018
    December 2017
    August 2017
    April 2017
    March 2017
    January 2017
    December 2016
    November 2016
    October 2016
    September 2016
    August 2016
    July 2016
    June 2016
    May 2016
    April 2016
    March 2016
    February 2016
    January 2016
    December 2015
    November 2015
    October 2015
    September 2015
    August 2015
    July 2015
    June 2015
    May 2015
    April 2015
    March 2015

    Print Page:

    RSS Feed

    Email Subscribe
Powered by Create your own unique website with customizable templates.
  • Blog
  • Sitemap
    • Categories
  • Contact
  • About
  • Resources
  • Tools
  • 51sec.org