Info Security Memo
  • Blog
  • Sitemap
    • Categories
  • Contact
  • About
  • Resources
  • Tools
  • 51sec.org

Build Confidence

Focusing on Information Security 

Info Security Notes

Windows 10 LTSC English Version Install Other Language

7/27/2022

0 Comments

 
Windows 10 LTSC English Version Install Other Language

There are many reasons why some tech people like to use Windows LTSC version. It is light, small, stable and fast, comparing to regular Windows version. 

Some features might not installed by default and it might need a bit tuning to get it working properly. In this post, I am showing some steps to get your Windows 10 LTSC English version to display other language such as Chinese properly. 


Issue

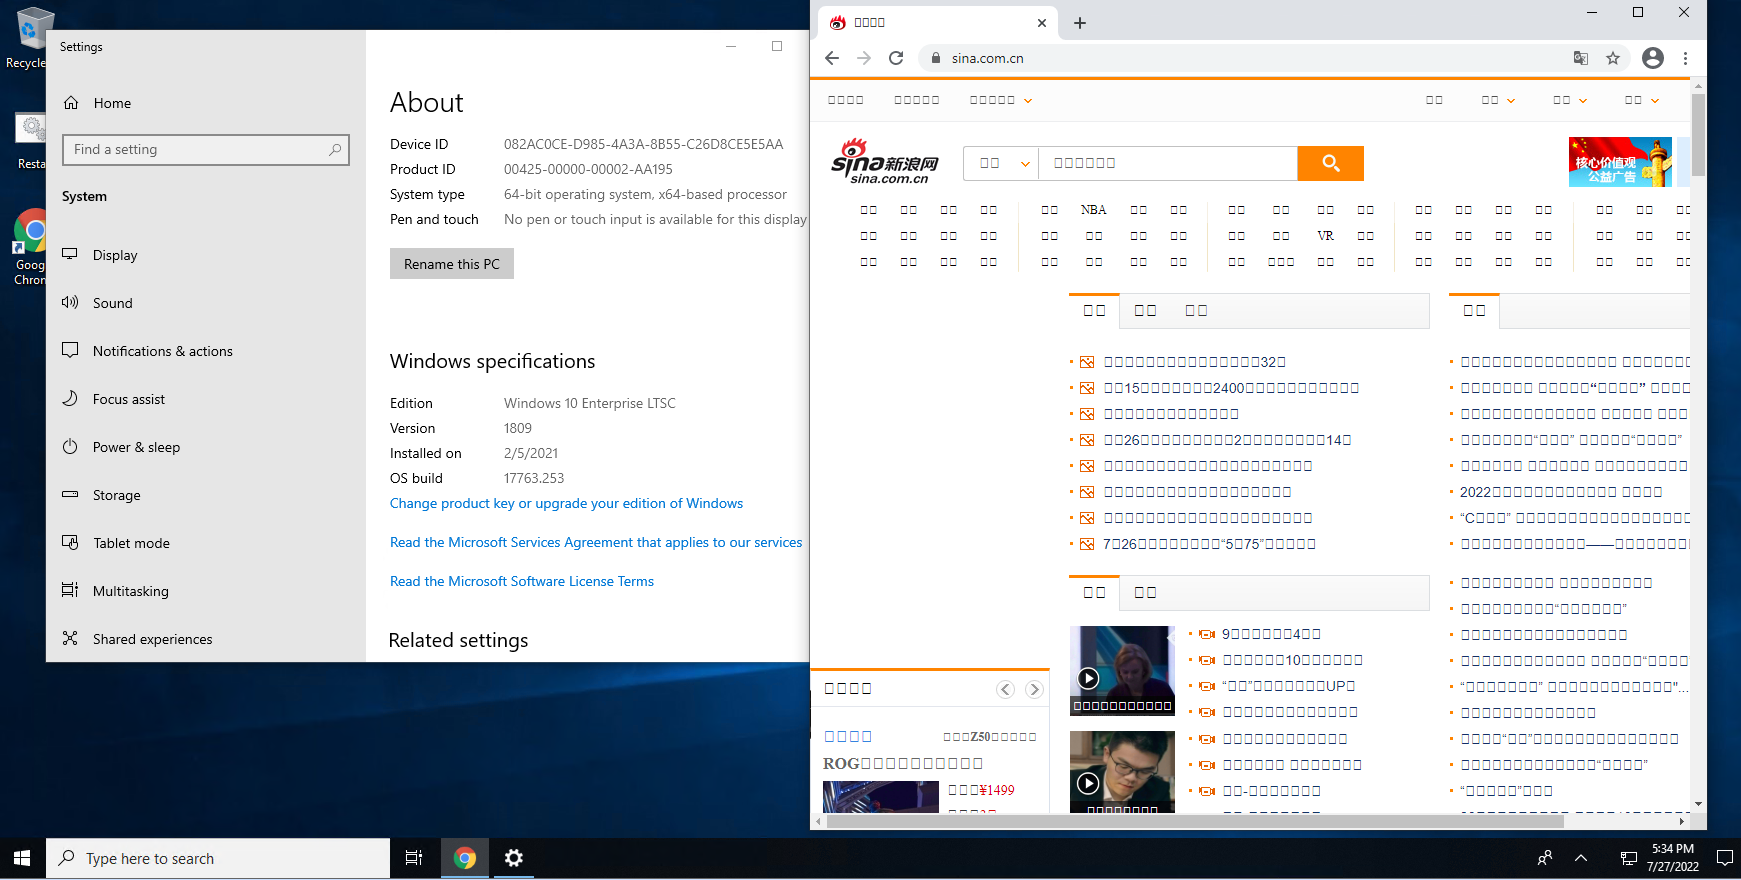
By default, it wont show Chinese Characters properly in browser, file explorer, or applications.

Here are some steps to fix this issue.

Steps


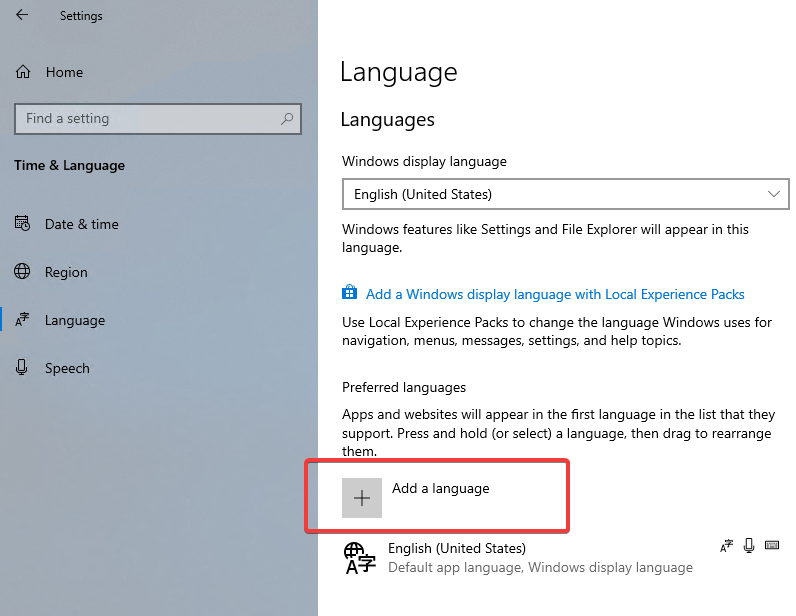
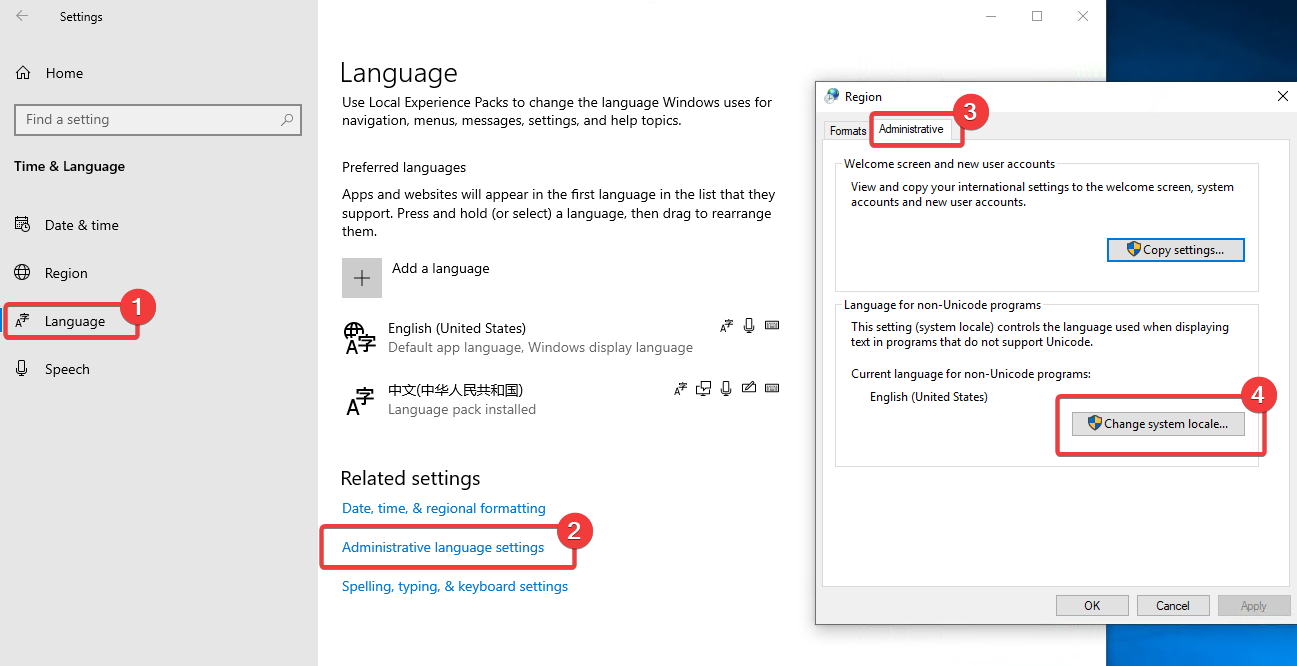
1 Add Chinese Language from Windows Settings - Time & Language - Language


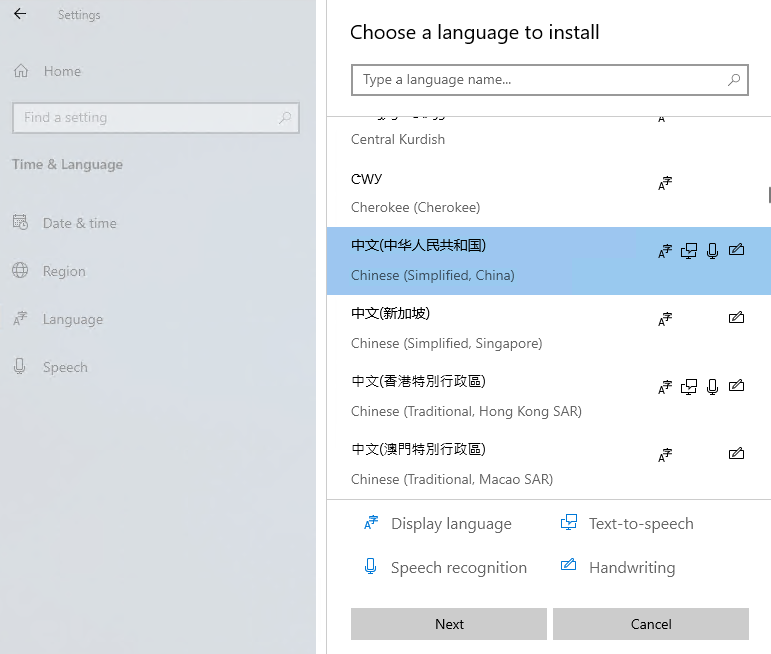
2 Click next , then select install button to start installation. It will take some minutes to get all installed.

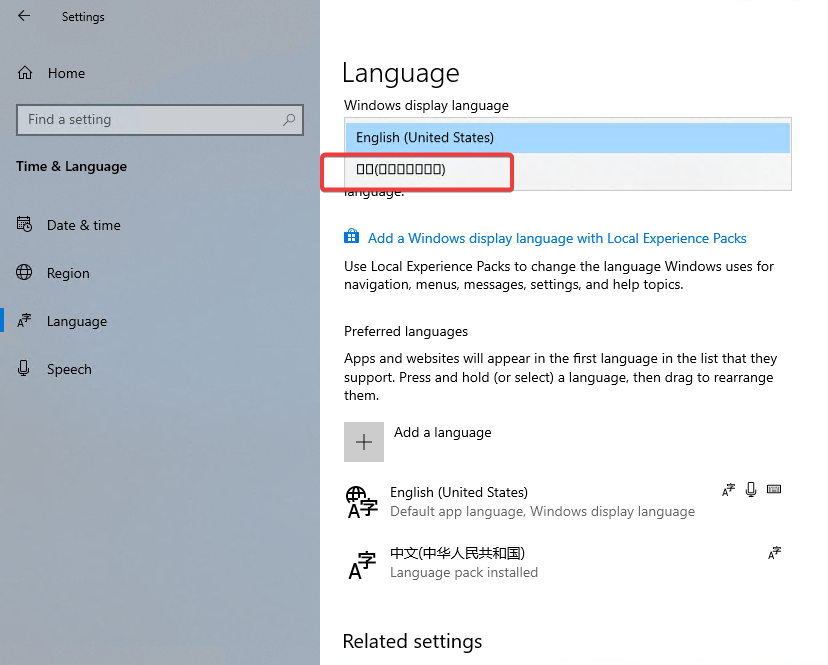
3 Once done, you will find Windows display language has a new option, but it shows square character only.


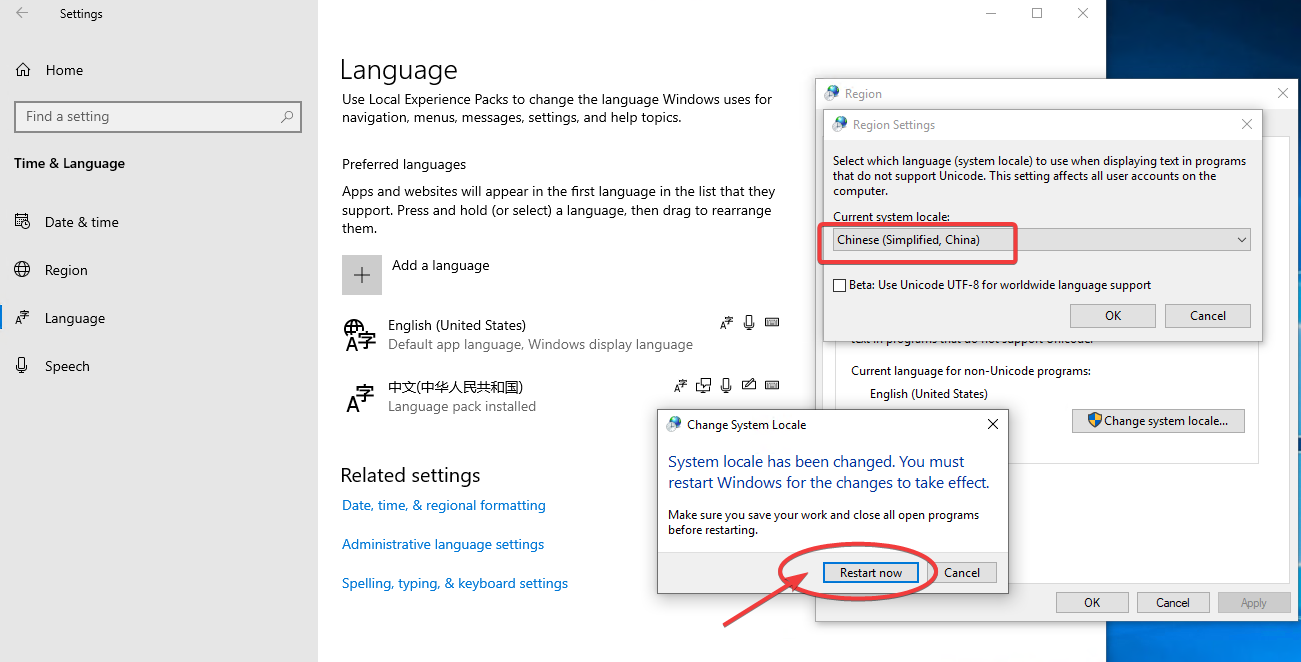
4 Change Language for non-Unicode program to Chinese


5 Reboot machine as prompted.


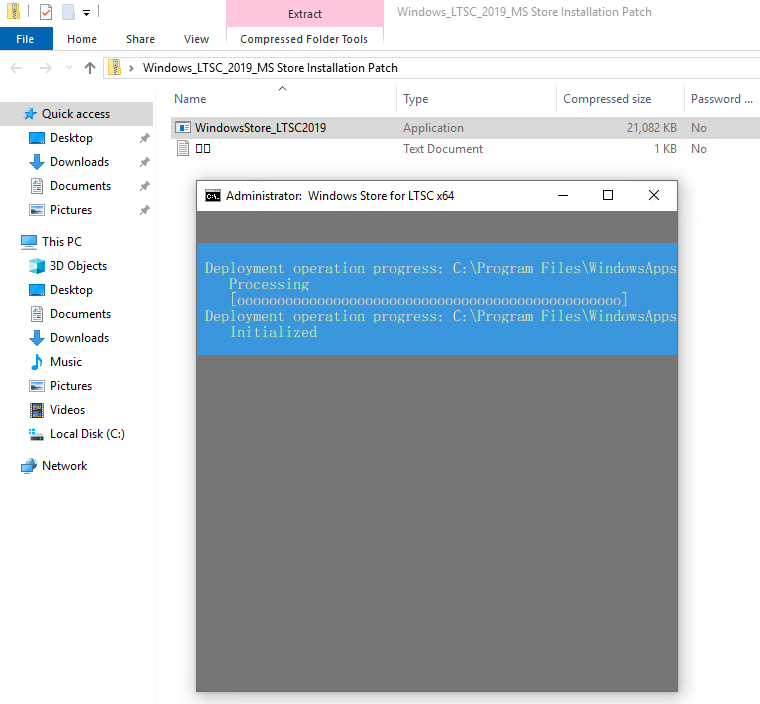
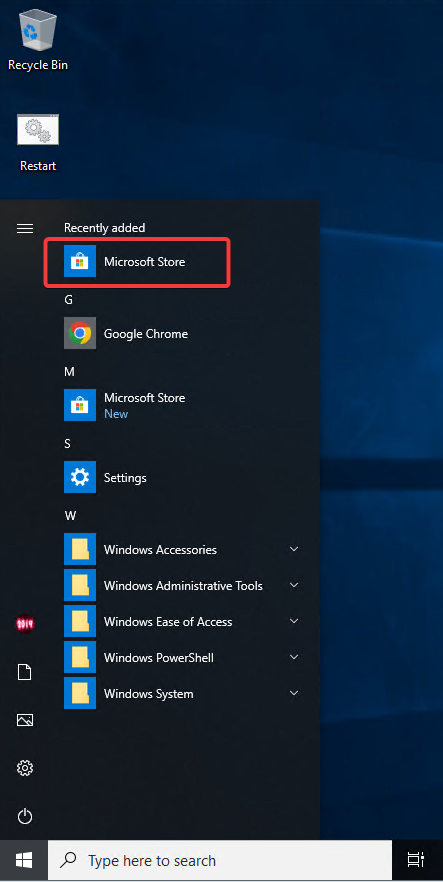
6 You will need a new app to open this ms-windows-store. LTSC version does not have Microsoft Store installed and it can't be added through built-in programs. Here is a special patch which will add MS store. You can download it from this link.

Double Click WindowsStore_LTSC2019.exe file. It will automatically launch Windows CMD Console to get it installed. 


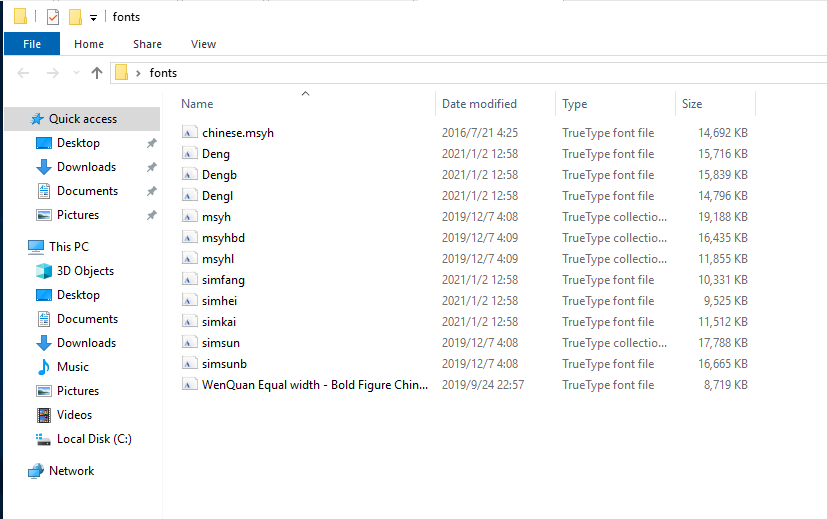
7 LTSC version is also missing Chinese fonts to show those Chinese Characters correctly. Lets copy those fonts in which I found from online and another non-LTSC windows 10 machine. 


8 Just drag those fonts into LTSC Windows - Fonts folder to install them. It will be automatically installed for those new fonts.


9 Restart system to get all changes taken into effects

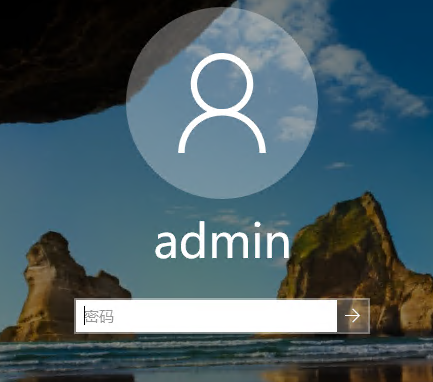
Welcome login windows already showing Chinese properly now. 


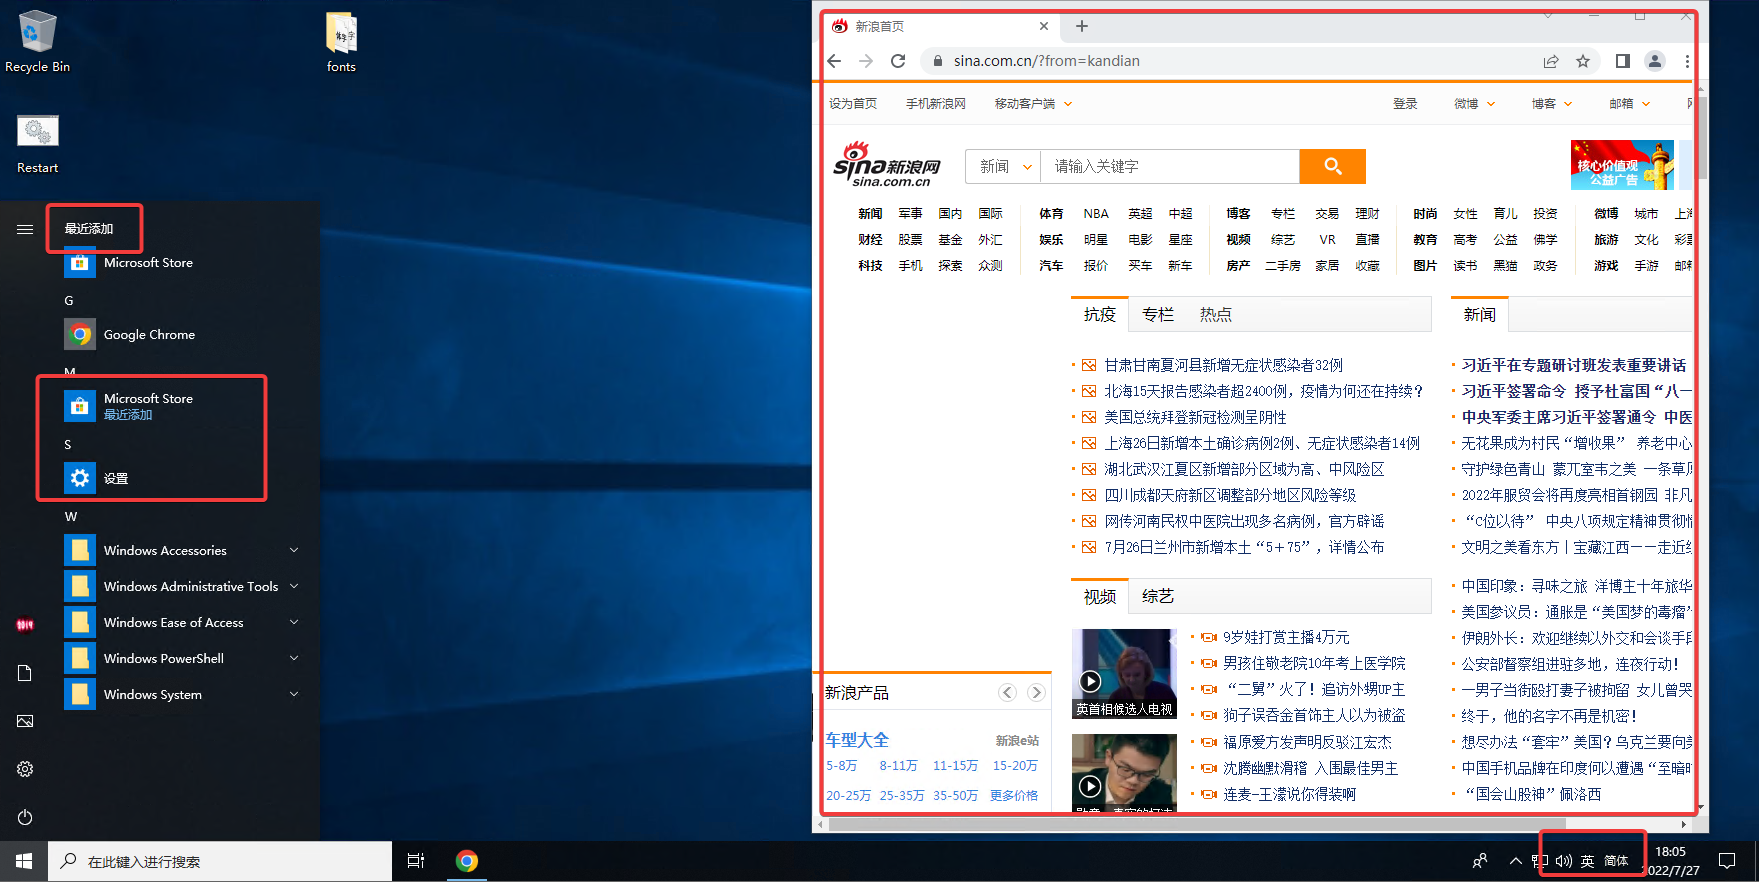
10 All of those square characters are gone now 


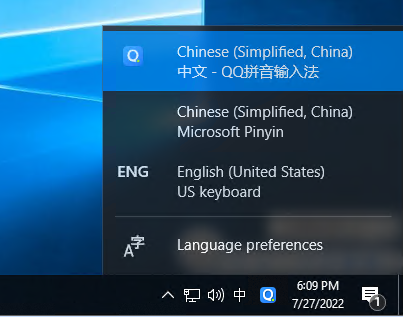
11 Default Chinese inputs does not work properly although it shows on your taskbar and seems waiting you to use it. But based on my test, it does not give you right inputs. 


The alternation is to install other Chinese inputs, such as QQ pingying  It works fine. 


Now this original English LTSC Windows 10 is supporting full Chinese function. 

Videos


References


via Blogger http://blog.51sec.org/2022/07/windows-10-ltsc-english-version-install.html
July 27, 2022 at 06:10PM Windows
0 Comments

CyberArk 12.1 Lab - 5. PSM Installation

7/27/2022

0 Comments

 
CyberArk 12.1 Lab - 5. PSM Installation

Privileged Session Manager (PSM) enables organizations to secure, control and monitor privileged access to network devices by using the Vault technology to manage privileged accounts and record all IT administrator privileged sessions on remote machines. This post summarizes some steps to install PSM (Privileged Session Manager).. 

Diagram


Architecture

Design Consideration:
  • size of session recordings
  • activity in your enterprise
  • recordings retention period

Deployment model:
  • Disaster Recovery deployment

  • Distributed (Multiple sites, fault tolerance)


  • Performance in a load balanced configuration


System Requirements

Refer to this doc for installation of PSM:

1 Recommended server specifications

2 Components version compatibility

3 Software requirements
  • OS: 2019. 2016 (Preferred by installation guide), 2012 (Special requirements)
  • .Net Framework 4.8
  • Microsoft RDS Session Host
  • minimum hardware requirements

4 Ports and Protocols (Network Firewall might need to open those ports)


Installation Overview

The PSM automatic installation enables a silent and automatic deployment of the product. This facilitates a fast deployment of the product eliminating human mistakes during installation and configuration.

The automatic installation is divided into several configurable stages: setup, installation, post-installation, hardening and registration. 

Each step in a stage can be configured to run automatically as part of the automatic installation, or, the step can be configured to be done manually for troubleshooting or user preferences. The recommended steps are enabled by default and you can disable them in the configuration file.

In addition, the installation and registration stages can be done manually using the installation wizard.


Method 1 - Automatic Installation all in one

PSMAutoInstallation.exe runs all the PSM installation stages: setup, installation, post-installation, hardening, and registration. Doc.

Notes:
  • This tool DOES NOT support upgrade.
  • SM installation runs the hardening steps, including PSMConfigureApplocker, with a default configuration.
  • The hardening stage blocks all administrators from navigating in the PSM server file system.
  • The Registration stage creates the relevant PSM objects in the Vault each time it runs. When you run the tool, this stage is only run if it has not yet run or if the connection to the Vault failed. If registration started and was cancelled, you must run the repair via the installation Wizard.


Run the installation tool

  1. From the installation CD, copy the PSM folder to the component server and unzip.

  2. Open CMD and run

     
    CD <PSM CD-Image Path>\PSMAutoInstallationTool
    PSMAutoInstallationTool /vaultip <Vault IP address> /vaultuser <Vault username for installation> /accepteula yes
    • Restart - The tool runs the PSM installation stages. When a restart is required, the user is prompted to press Enter, restarting the machine. When the user logs in to the machine again, the tool continues from the relevant step.

    • Vault user credentials - If you are using a Vault username and password, after the last restart you are prompted to enter a password. Enter the password and click Enter. You can use the cred file to avoid entering the password interactively.


Method 2 - Automatic Installation in Five Stages

Detailed explanation  on this doc:

Set Up Stage:


  1. From the installation CD, copy the PSM folder to the component server and unzip.

  2. Open InstallationAutomation\Prerequisites\PrerequisitesConfig.XML. Review the options and select the steps to enable by setting Enable = "Yes".

Run the set up stage

To run the script in standard mode, open a PowerShell window and run the following command:

CD “<CD-Image Path>\InstallationAutomation”
.\Execute-Stage.ps1 “<CD-Image Path>\InstallationAutomation\Prerequisites\PrerequisitesConfig.XML”


Installation Stage:


To run the script in standard mode, open a PowerShell window and run the following command:

CD “<CD-Image Path>\InstallationAutomation”
.\Execute-Stage.ps1 “<CD-Image Path>\
InstallationAutomation\Installation\InstallationConfig.XML”


Post-installation Stage:

The post installation stage configures the PSM server after it has been installed successfully.

Configure the post-installation stage

From the CD image, open InstallationAutomation\PostInstallation\PostInstallationConfig.XML. and select the steps you want to enable by setting Enable = "Yes"

Open a PowerShell window and run the following command:

CD “<CD-Image Path>\InstallationAutomation”
.\Execute-Stage.ps1 “<CD-Image Path>\Installation automation\PostInstallation\PostInstallationConfig.XML


Harden Stage:

The PSM hardening stage enhances PSM security by defining a highly secured Windows server. The hardening procedure, which disables multiple operating system services on the PSM server machine, is included as part of the PSM installation.

Open a PowerShell window and run the following command:

CD “<CD-Image Path>\InstallationAutomation”
.\Execute-Stage.ps1 “<CD-Image Path>\Installation automation\Hardening\HardeningConfig.XML


Registration Stage:

The Registration stage registers the Privileged Session Manager server to the Vault.

  1. Run the registration stage with a password. Open a PowerShell window and run one of the following commands:

    1. Interactively run the script with the -spwd parameter to securely pass the password to the script. After running the script, enter the Vault user password and press Enter.

        CD “<installation package Path>InstallationAutomation” .\Execute-Stage.ps1 “<installation package Path>\InstallationAutomation\Registration\RegistrationConfig.XML”-spwd
    2. Automatically run the script with the -spwdObj parameter to securely pass the password to the script. First create a secure string that holds the Vault user password. For example:


      $sp = Read-Host -AsSecureString

      Enter the Vault user password, press Enter, and run the script.

        CD “<installation package Path>InstallationAutomation” .\Execute-Stage.ps1 “<installation package Path>\InstallationAutomation\Registration\RegistrationConfig.XML”-spwdObj $sp
    3. Interactively run the script with the -pwd parameter:

        CD “<installation package Path>InstallationAutomation” .\Execute-Stage.ps1 “<installation package Path>\InstallationAutomation\Registration\RegistrationConfig.XML”-pwd <vaultpassword>


      This method is not recommended, as it runs with the password in clear text.

  2. If you use a credfile, open a PowerShell window and run the following command:

      CD “<installation package Path>InstallationAutomation” .\Execute-Stage.ps1 “<installation package Path>\InstallationAutomation\Registration\RegistrationConfig.XML”
  3. When you use the registration tool, the PSM server is assigned a unique identifier, PSM-<identifier>.

    To view the ID assigned to each of PSM servers in your environment, go to PVWA > ADMINISTRATION > Systems Configuration > Options > Privileged Session Management > Configured PSM Servers.

  4. When you use the registration tool on an existing vault environment, every platform's PSM in this vault environment is set to the unique identifier described in the previous step.

    To edit a PSM Server ID on an individual platform, go to Platform Management, select the platform and reset the PSM server ID.

    To edit multiple PSM Server IDs, you can do a bulk change. Go to Vault > PVWAConfiguration Safe > Policies.XML, and edit the PSM server IDs.


Method 3 - Wizard Installation all in one

This is detailed document link.

PSM installation all in one runs the hardening steps by default, including PSMConfigureApplocker. Ensure that the PSMConfigureApplocker.xml file is updated before you continue.

You can always re-run the PSMConfigureApplocker script at a later stage. For details, see Hardening.

  1. Log on as a domain user who is a member of the local administrators group.

  2. Create a new folder on the PSM server machine. From the installation CD, copy the contents of the Privileged Session Manager folder to your new folder .

    Display the contents of the Privileged Session Manager folder.

  3. Start the installation procedure:

    Double-click Setup.exe or,

    On systems that are UAC-enabled, right-click Setup.exethen select Run as Administrator.

    The PSM installation wizard appears and displays a list of prerequisites that are installed before the PSM installation continues.

  4. Click Install to begin the installation process; the installation process begins and the Setup window appears.


    You can exit installation at any time by clicking Cancel. You can return to the previous installation window by clicking Back, where applicable.

  5. Click Next to view the CyberArk license and accept the terms of the License Agreement.

    Read the license agreement, then click Yes to accept its terms.

  6. On the Customer Information window, enter your name and your Company name in the appropriate fields, then click Next.

  7. On the Destination Location window, click Next to accept the default location provided by the installation.

  8. On the Recordings Folder window, click Next to accept the default recordings folder provided by the installation.

     
    • The Recordings Folder may require a large amount of disk space, depending on the number of recordings that are stored there before being uploaded into the Vault.
    • Take into consideration that, by default, the recordings folder is on the System disk under Program Files and you may want to change it to a different location.


    If you install multiple PSMs in the same Vault environment, verify that each PSM has the same path to the Recordings folder.

  9. On the Password Vault Web Access Environment window, click Next to accept the default name of the PVWA Configuration Safe provided by the installation.

  10. Click Next; the installation automatically installs the Oracle Instant Client, then displays the Vault's Connection Details window. Next.


    Skip this step if you want to register the Vault later or if the PSM is already registered. For details, see Install the PSM server in stages.

  11.  
    • It is recommended to use the Vault administrator user for this installation as this user has the appropriate Vault authorizations and is created in the appropriate location in the Vault hierarchy.
    • If you install multiple PSMs in the same Vault environment, you must install all PSMs with the same Vault user

    If a previous PSM has been installed on this machine and a PSM was created, the following message will appear:

    This is an informative message. Click OK to continue installation.

  12. On the API Gateway Connection Details window, enter the protocol and hostname of the PVWA where the PSM connects to the API Gateway, then click Next. This information is used to generate an endpoint for API calls (<protocol>://<Host>/passwordvault/api).

     
    • This window is for use in a Distributed Vaults environment and to automatically unlock accounts.

    • The PSM machine must have trusted communication to the PVWA machine.

    • Port 443 between the PSM the PVWA machines must be open.

  13. On the PKI authentication configuration window, select the checkbox to enable smart card authentication, then click Next.

     
    • Do not enable this setting if PKI Authentication is not used in your organization.
    • If you do not enable this setting during installation and want to enable PKI authentication for PSM, follow the instructions in During PSM installation.
  14. On the Hardening window, click Advanced to customize the post installation and hardening processes, or click Next to perform the standard post installation and hardening processes and display the Setup Complete window.

    If you clicked Advanced, select the post installation and hardening processes that the installation will run, then click Next to display the Setup Complete window.

  15. Click Finish to complete the Privileged Session Manager installation.

    image003

  16. Restart the PSM server. 
  17. On the PVWA machine, run iisreset,

    or

    Wait for the PVWA refresh configuration interval to pass.


Method 4- Wizard Installation in Three Stages 

This is detailed document link.

  1. Follow the Method 3 (Wizard Installation all in one) procedure. Skip steps 10 - 12. These steps register the PSM server to the Vault.

  2. Use the Registration tool to register the PSM server to the Vault.
  3. Finally,  Activate the Privileged Session Manager server


Hardening PSM Server with a GPO in Domain Environment

From DC, open Group Policy Management Console, import PSM Hardening GPO and link it to PSM OU.

This step also applies to other PVWA/CPM servers.


Testing and Validation


Load Balancing


External Load Balancing


Advanced PSM Implementations


  • Install PSM HTML5 Gateway
  • Install PSM in a Load-Balancing Environment
  • Configure PSM to connect to Web applications
  • PSMConnect and PSMAdminConnect Domain Users
  • Internal PSM Users
  • Installing Multiple PSM Servers
  • Change the PSM Server ID
  • PSM in a Vault Disaster Recovery Site
  • Enable Users to Print PSM Sessions


PSM for SSH Servers


References

  • Install AD & CS (Certification Service) on Windows Server 2016 to Deploy Enterprise PKI
  • Logo Privileged Access Manager Version 12.2 - Installation

via Blogger http://blog.51sec.org/2022/07/cyberark-121-lab-5-psm-installation.html
July 27, 2022 at 09:15AM CyberArk
0 Comments

Get Root Access to Oketeto's Instance Using Githhub & Ngrok and Create New Image For This Purpose

7/25/2022

0 Comments

 
Get Root Access to Oketeto's Instance Using Githhub & Ngrok and Create New Image For This Purpose

This post shows an interesting way to use Okteto's container with the help from Ngrok and Github. By default, when you create a namespace and deploy a project to it, you will get a container running on four core CPU with 32GB memory machine. You wont be able to have console and root access to it, and it is even not opened to Internet. With the help of Ngrok and Github, all those become possible.


Note: This usage is violating Oketeo TOS and your Okteto account might be got suspended. 

Using Existing Github Project to Get Root Access to Okteto Instance


1 Got to github project majalaya/xssh:


2 Fork it into your own Repository


3 Go to https://ngrok.com/. Log in or sign up if you do not have an account

Click Your Authtoken link and copy your ngrok token.


4 Change your token value in config.sh file from your xssh repository


5 Log into Okteto.com with your Github account


6 Launch Dev Environment


7 Choose from Github, then select your xssh repository


8 Select main branch then launch


9 Your xssh project will be deployed in a minute.


10 You will be able to see a new agent shows in Ngrok's Tunnels menu page.


Create Your Own Image


docker run -d -it ubuntu bash

docker ps

docker exec -it xxxxxxxxxxxxxxxx  bash


apt install nano -y

apt install wget -y

apt install unzip -y

apt install ssh -y

nano /etc/ssh/sshd.config

PermitRootLogin Yes

PasswordAuthentication yes


service ssh restart


passwd root


wget https://bin.equinox.io/c/4VmDzA7iaHb/ngrok-stable-linux-amd64.zip

unzip ngrok-stable-linux-amd64.zip

ls

rm ngrok*.zip

mv ./ngrok /usr/bin/ngrok
ngrok


ngrok authtoken 2C8vUaTWbwplW7bMlWggllXwY7V_2vJaHYXyYZUbiuxRrXuzc

ngrok

nohup ngrok tcp 22


apt install htop

htop


References

  • https://github.com/51sec/xssh
  • https://github.com/majalaya/xssh
  • https://github.com/MetaVPS/xssh
  • 永久免费4核32G的LinuxVPS


via Blogger http://blog.51sec.org/2022/07/get-root-access-to-oketetos-instance.html
July 25, 2022 at 09:03AM Cloud
0 Comments

4. CPM Installation - - CyberArk PAM 12.1 Lab @Home

7/24/2022

0 Comments

 
This video is to show how to install your first CPM after your PVWA installation completed. Related Post: ✍,https://blog.51sec.org/2022/06/cyberark-121-lab-4-cpm-installation_21.html Related Videos: ⚡1. Home Lab Infrastructure Setup - https://youtu.be/qKiNev10GkM ⚡2. Primary Vault Installation - https://youtu.be/ZrO_FjVkCuE ⚡3. PVWA Installation - https://youtu.be/RAUvcRa_-KE ⚡3.1 Generate CA Signed Certificate for PVWA - https://youtu.be/vxq5mBL9flg Previous Videos: ✅ Install CA Signed SSL Certificate to Fix CyberArk PSM RDP Warning - https://youtu.be/XnXrKCmCt7o ✅ CyberArk PAS 11.4 - 2.1 Install MS CA Signed IIS Certificate for PVWA - https://youtu.be/dfBl9WWdfcc ✅ CyberArk PAS v11.1 Install and Config - 4. CPM Installation - https://www.youtube.com/watch?v=iknDUKdXncE Related videos Playlists: ⚡CyberArk:https://www.youtube.com/playlist?list=PLg7bL1bMpwPWNr2LzAnoK995sbWUbcotS ⚡CyberArk12:https://www.youtube.com/playlist?list=PLg7bL1bMpwPWNTJdY4-NOQItypI0tfwH3 ====================================================================== If you found this video has some useful information✍, please give me a thumb up ✅ and subscribe this channel ?to get more updates?: ⚡https://www.youtube.com/c/Netsec?sub_confirmation=1 ⚡Resource Collection and Bookmarks: https://sites.51sec.org/ Learning and Sharing - ?海内存知己,天涯若比邻 ⚡https://51sec.org ?https://itprosec.com

Watch video on YouTube here: https://youtu.be/Pcv8YSICq8E by NetSec
0 Comments

3.1 Generate CA Signed Certificate for PVWA - CyberArk PAM 12 1 Lab @Home

7/16/2022

0 Comments

 
This video is to show how you can create your PVWA server's CSR and submit to your CA server to sign. Related Post: ✍,https://blog.51sec.org/2020/08/generate-csr-from-windows-server-and.html Related Videos: ⚡1. Home Lab Infrastructure Setup - https://youtu.be/qKiNev10GkM ⚡2. Primary Vault Installation - https://youtu.be/ZrO_FjVkCuE ⚡3. PVWA Installation - https://youtu.be/RAUvcRa_-KE ⚡3.1 Generate CA Signed Certificate for PVWA - https://youtu.be/vxq5mBL9flg Previous Videos: ✅ Install CA Signed SSL Certificate to Fix CyberArk PSM RDP Warning - https://youtu.be/XnXrKCmCt7o ✅ CyberArk PAS 11.4 - 2.1 Install MS CA Signed IIS Certificate for PVWA - https://youtu.be/dfBl9WWdfcc Related videos Playlists: ⚡CyberArk:https://www.youtube.com/playlist?list=PLg7bL1bMpwPWNr2LzAnoK995sbWUbcotS ⚡CyberArk12:https://www.youtube.com/playlist?list=PLg7bL1bMpwPWNTJdY4-NOQItypI0tfwH3 ====================================================================== If you found this video has some useful information✍, please give me a thumb up ✅ and subscribe this channel ?to get more updates?: ⚡https://www.youtube.com/c/Netsec?sub_confirmation=1 ⚡Resource Collection and Bookmarks: https://sites.51sec.org/ Learning and Sharing - ?海内存知己,天涯若比邻 ⚡https://51sec.org ?https://itprosec.com

Watch video on YouTube here: https://youtu.be/vxq5mBL9flg by NetSec
0 Comments

Install Domain Controller VM in Azure For Existing Active Directory

7/15/2022

0 Comments

 
Install Domain Controller VM in Azure For Existing Active Directory

This post is to summarize the steps to install additional Domain controller in an Azure Virtual machine for your existing on-prem Active directory.


Diagram


Test Your On-Premises Domain Controller

Before deploying an extra domain controller it’s wise to test the health of the current situation. Below are some checks you can do (don’t forget about DNS!). Existing problems must be fixed before continuing.
  • Analyse your Active Directory and DNS Logs.
  • Test your domain controller health with dcdiag /s:dcName
  • Test DNS with dcdiag /s:dcName /test:dns

Deploy A Virtual Machine

  1. Navigate to https://portal.azure.com and sign-in with a user that has sufficient permissions.
  2. Create a new Windows Server resource. I Recommend using Windows Server 2022 if possible.
  3. Enter al basic information and don’t forget about the availability options. Don’t use a spot VM to save costs – a domain controller should be always online.

When deploying multiple domain controllers in Azure, each of them should be in a different availability zone or in the same availability set.


By default, allow selected ports is enabled to alow RDP (3389). For safety reasons, you should set this option to none. If required, a network security group can be attached to the subnet or vm afterwards to block certain ports. I Recommend attaching NSG’s to subnets.

  1. Click Next to configure vm disks.

A Single VM without premium SSD’s has an SLA of 99.95%. A Single VM with premium SSD’s (all disks) has an SLA of 99.99%. I Recommend using premium disks for your domain controller.

Add a second (premium ssd) disk with host caching set to none. This disk will contain the database, logs and sysvol folders. A Disk with a size of 8GB is sufficient.

  1. Click Next to configure networking. Attach the VM to your existing vNet that’s connected with your on-premises domain. Don’t assign a public IP address to your virtual machine as recommended by Microsoft – use a VPN or Azure Bastion to connect to the machine. Again, I’ll apply NSG’s to my subnet if required.
  1. Finish all steps to create the virtual machine. Don’t enable ‘Login with AAD credentials‘ or ‘Auto-shutdown’.

Configure IP Settings

The virtual machine must have a static IP address and the primary DNS server must point to the on-premises domain controller.

Static IP Address

  1. Click on the network interface of your new virtual machine.
  1. Select IP configurations and click on the IP config to change the IP settings.
  1. Select Static and configure the IP address. Don’t forget to click save – a reboot may be required. You should never configure the static IP address on the VM itself as you do on-premises.
  1. Test if you can ping the VM from your on-premises domain controller and the other way around. If this isn’t working you can try the Network Watcher for troubleshooting.


DNS Servers

DNS servers can be configured on the virtual network or on the virtual machine itself. If configured on the vNet, everything that’s connected to this network will inherit these settings (you probably want this).

  1. Click on your virtual network to edit it’s settings.
  2. Select DNS and confire a custom DNS server (your on-premises domain controller).
  3. Don’t forget to click save and reboot the virtual machine.

After adding AD DC roles to the new VM we’ll come back to this page to change the DNS settings once more.

Active Directory Sites & Services

It’s important to create a new site with a corresponding subnet that whill contain your new domain controller. Clients will try to contact the domain controller in their subnet first so a misconfiguration can cause slow logons or other problems. If your on-premises subnet isn’t visible here you should create this one too!

  1. Open Active Directory Sites & Services on your on-premises domain controller.
  2. Right click Sites and select New Site.
  1. Name your new site and link it to the DEFAULTIPSITELINK. Click OK to complete.
  1. Right click Subnets and select New Subnet.
  2. Enter to correct prefix (your azure subnet that contains your virtual machine) and link it to the new site.
  1. Click OK to complete. You should end up with two (or more) subnets and two (or more) sites.

Install Active Directory Domain Services

  1. Start Add Roles and Features on the Azure VM.
  2. Add the Active Directory Domain Services role and all necessary features.
  3. Promote this server to a domain controller.


  4. Select Add a domain controller to an existing domain.


  1. Enter your domain name and click Select. Provide credentials with sufficient permissions. If you get an error that the wizard can’t find your domain, your DNS settings are probably incorrect.
  2. Select the correct site name and enter a DSRM password.

You might get an warning message about a delegation for this DNS server cannot be created. 


  1. Replicate from any domain controller.


  2. Change all paths to the 8GB partition (without caching).
I put them into c drive as default. I am having D drive as temporary storage which is 8G. 


  1. Leave all other options default or configure as required.
  2. There are some warning messages, but you can feel free to do installation.

  3. Reboot the virtual machine.


Validate DNS Settings

DC on Azure

When the virtual machine is back online, it probably has static DNS servers configured – this happened because of the AD DC roles. Change this back to Obtain DNS server address automatically. Do this for both IPv4 and IPv6. you probably loose connection to the virtual machine.

DC on-premises

The preferred DNS server of your on-premises domain controller should be the domain controller on Azure. The alternate DNS server should point to itself. All other on-premises servers or clients should have the on-premises dc as preferred DNS server.

Virtual Network DNS Settings

The first DNS server should be the DC on Azure and the second DNS server should be the DC on-premises.

DNS Settings DC on Azure

The first DNS server should be the on-premises DC and the second DNS server should be the DC on Azure. Reboot your VM after changing this.

Validate this change on the VM itself by using ipconfig /all.


References

  • How to deploy a Domain Controller on Microsoft Azure
  • DEPLOY A NEW ACTIVE DIRECTORY DOMAIN CONTROLLER SERVER AT AZURE


via Blogger http://blog.51sec.org/2022/07/install-domain-controller-vm-in-azure.html
July 15, 2022 at 12:16PM Cloud
0 Comments

Deploy Docker Docker-Compose Portainer and NPM (Nginx Proxy Manager)

7/13/2022

0 Comments

 
Deploy Docker, Docker-Compose, Portainer and NPM (Nginx Proxy Manager)
In this tutorial, you will learn to install and configure Docker, Docker-compose, the Portainer container management solution on a Linux server and use it to create and manage Docker containers to run different apps. You will also learn to put these containers behind Nginx using the Nginx proxy manager.The Nginx proxy manager (NPM) is a reverse proxy management system running on Docker. NPM is based on an Nginx server and provides users with a clean, efficient, and beautiful web interface for easier management.


Install Docker & Docker-Compose

  • Docker Install documentation
  • Docker-Compose Install documentation

Ubuntu System:


apt install docker.io -y && apt install docker-compose


CentOS System:

Install Docker on CentOS 8:

curl -sSL https://get.docker.com/ | sh 
systemctl start docker 
systemctl enable docker

Install Docker Compose on CentOS 8:
Important: Check the latest version of docker-compose from https://docs.docker.com/compose/release-notes/ then modify following command with latest version number. (I got 1.29.2 for this installation)


curl -L "https://get.daocloud.io/docker/compose/releases/download/1.29.2/docker-compose-$(uname -s)-$(uname -m)" -o /usr/local/bin/docker-compose
chmod +x /usr/local/bin/docker-compose

ln -s /usr/local/bin/docker-compose /usr/bin/docker-compose


Notes: 
  • Install Docker, Docker-Compose, Portainer & Nginx on CentOS 8 & Ubuntu 20.04

Install Portainer


Commands to install Portainer:

[root@arm1 ~]# docker volume create portainer_data
portainer_data
[root@arm1 ~]# docker run -d -p 9000:9000 --name portainer --restart always -v /var/run/docker.sock:/var/run/docker.sock -v portainer_data:/data portainer/portainer-ce:latest

Access Portainer:
  • Make sure your VPS's 9000 port has been opened. 
Verify Portainer from Internet by visiting http://<VPS's Public IP>:9000

Install NPM


  1. Install Docker and Docker-Compose
  • Docker Install documentation
  • Docker-Compose Install documentation
  1. Create a docker-compose.yml file similar to this:
version: '3'
services:
  app:
    image: 'jc21/nginx-proxy-manager:latest'
    restart: unless-stopped
    ports:
      - '80:80'
      - '81:81'
      - '443:443'
    volumes:
      - ./data:/data
      - ./letsencrypt:/etc/letsencrypt

  1. Bring up your stack by running
docker-compose up -d

  1. Log in to the Admin UI

When your docker container is running, connect to it on port 81 for the admin interface. Sometimes this can take a little bit because of the entropy of keys.

http://127.0.0.1:81

Default Admin User:

Email:    [email protected]
Password: changeme

Immediately after logging in with this default user you will be asked to modify your details and change your password

Log in and change password.


Access NPM


1 Open the URL https://<yourserverIP>:81 in your browser, and you will get the following screen. Enter the following default credentials to sign in.

Email address: [email protected] Password: changeme

2 Next, you will be immediately asked to set a name and an email address. Click the Save button, and you will be asked to create a new password. Click the Save button again to get started.

Nginx Proxy Manager Dashboard

3 Visit the Hosts >> Proxy Hosts and click the Add Proxy Host button.

Add Portainer as Proxy Host

4 Enter the domain name as portainer.example.com. Choose the scheme as https. Enter the name of the container as the Forward Hostname and 9443 as the Forward port. Check the options Block Common Exploits and Websockets Support options.

Portainer NPM SSL options


Configure NPM for Portainer


Configure NPM for NPM


Videos


References

  • NPM Quick Setup
  • How to Install and Use Portainer for Docker management with Nginx Proxy Manager
  • How to setup the Nginx Proxy Manager Docker example
  • Install Docker, Docker-Compose, Portainer & Nginx on CentOS 8 & Ubuntu 20.04


via Blogger http://blog.51sec.org/2022/07/deploy-docker-docker-compose-portainer.html
July 13, 2022 at 02:53PM Docker
0 Comments

3 . PVWA Installation - CyberArk PAM 12 1 Lab @Home

7/10/2022

0 Comments

 
This is basic PVWA installation after you installed Vault. No hardening done since that would be in later. Self-signed certificate has been used. It will be replaced with a CA signed certificate in next video. Since this is only for lab at home, all steps are simplified for a purpose to get a working lab environment at home as soon as possible. ✍, Related Post: https://blog.51sec.org/2022/06/cyberark-121-lab-4-cpm-installation.html ? Related videos Playlists: CyberArk:https://www.youtube.com/playlist?list=PLg7bL1bMpwPWNr2LzAnoK995sbWUbcotS CyberArk12:https://www.youtube.com/playlist?list=PLg7bL1bMpwPWNTJdY4-NOQItypI0tfwH3 ====================================================================== If you found this video has some useful information✍, please give me a thumb up ✅ and subscribe this channel ?to get more updates?: ⚡https://www.youtube.com/c/Netsec?sub_confirmation=1 ⚡Resource Collection and Bookmarks: https://sites.51sec.org/ Learning and Sharing - ?海内存知己,天涯若比邻 ⚡https://51sec.org ?https://itprosec.com

Watch video on YouTube here: https://youtu.be/RAUvcRa_-KE by NetSec
0 Comments

Free OpenSource Sites Monitoring Solution Based on Github Actions Pages

7/4/2022

0 Comments

 
This video is to show you a Github project, upptime, which can be used to create your own website to monitor other websites and hosts. Features: 1. Free and Open Sources. No need to have your own server or program experience. 2. Github account. Fully powered by Github Actions, Issues, and Pages 3. 5 Minutes interval to monitor websites or hosts 4. Every 6 hours, response time commited to git to save for page view. 5. Github pages to show data using API to fetch repository data. Support PWA. Demo: https://up.51sec.org Related Post: ✍https://blog.51sec.org/2022/07/upptime-github-based-free-opensource.html Related Videos: ⚡Create Your Own Free Heroku Hosted UptimeRobot Monitoring Page - https://youtu.be/Fk5Y3WMqWB0 ⚡Five Minutes Build Your Own Free Website Monitoring Site with UptimeRobot - https://youtu.be/dJ4-tvb1pSc ⚡Configure Your Own Domain to Access Free Monitoring Status Page From Freshping - https://youtu.be/dtKEgwAVzKk ====================================================================== If you found this video has some useful information✍, please give me a thumb up ✅ and subscribe this channel ?to get more updates?: ⚡https://www.youtube.com/c/Netsec?sub_confirmation=1 ⚡Resource Collection and Bookmarks: https://sites.51sec.org/ Learning and Sharing - ?海内存知己,天涯若比邻 ⚡https://51sec.org ?https://itprosec.com

Watch video on YouTube here: https://youtu.be/57gzLUcop2M by NetSec
0 Comments

upptime: a GitHub-based free opensource website monitoring project

7/2/2022

0 Comments

 
upptime: a GitHub-based free opensource website monitoring project

This post introduces UPPTIME this Github project which is an open source site monitoring tool completely based on Github. 


Demo

Demo sites: 
  • https://up.51sec.org
  • https://demo.upptime.js.org/


Introduction

Github Project: upptime/upptime
Webiste: Upptime (https://upptime.js.org)

Upptime is the open-source uptime monitor and status page, powered entirely by GitHub Actions, Issues, and Pages, which has been used by 1,000+ people and teams to ensure they know when their endpoints go down.

Docs: https://upptime.js.org/docs/

Main features


1. Free and Open Sources. No need to have your own server or program experience. 
2. Github account. Fully powered by Github Actions, Issues, and Pages
3. 5 Minutes interval to monitor websites or hosts
4. Every 6 hours, response time commited to git to save for page view.
5. Github pages to show data using API to fetch repository history data. Support PWA.
6. Support api, tcp, ping monitoring as well.
7. Notify users of downtime with GitHub Issues

Installation


Getting Started guide: https://upptime.js.org/docs/

1 Create a repository from the template

  • Click "Create a new repository"
  • Enter repository name and check "include all branches"


2 Publishing Page

By default, it has been published automatically with right source and folder settings. 

Only thing you might want to add is a custom domain name,


Custom domain name will require a cname record added into your domain registrar. 


3 add repository secrets

  • Click on your profile picture on the top-right corner and select "Settings"
  • In the left sidebar, select "Developer settings"
  • In the left sidebar, click "Personal access tokens"
  • Click "Generate new token"
  • Select the "repo" and "workflow" scopes
  • Click "Generate token"


4 Add secret into your repository settings

  • After generating your token, copy it (you will not see it again). Then, add it as a repository secret:
  • In your Upptime repository, select "Settings"
  • In the left sidebar, click "Secrets"
  • Press the button "New repository secret"
  • Enter the name of the secret as GH_PAT
  • Paste your personal access token into the Value field
  • Be sure there are no spaces before or after the token and/or linebreaks after your token
  • Save your PAT by selecting "Add secret"


5 Update configuration


The content of .upptimerc.yml

# Change these first
owner: 51sec # Your GitHub organization or username, where this repository lives
repo: up # The name of this repository
sites:
  - name: Blog
    url: https://blog.51sec.org
    icon: https://blog.51sec.org/favicon.ico
  - name: WWW
    url: https://www.51sec.org
    icon: https://www.51sec.org/favicon.ico
  - name: ITPROSEC
    url: https://www.itprosec.com
    icon: https://itprosec.com/wp-content/uploads/2020/03/ITPROSEC-No-Transparent-Icon-Only-small.jpg
  - name: Sites
    url: https://sites.51sec.org
    icon: https://photos.51sec.org/file/test1-51sec/2021/10/sites%20-%20round%20-500.png
  - name: Navigation
    url: https://nav.51sec.org
    icon: https://photos.51sec.org/file/test1-51sec/2021/10/Black%2C%20White%20and%20Yellow%20Lightning%20-%20Round%20corner-350.png
  - name: OneDrive
    url: https://od.51sec.org
    icon: https://photos.51sec.org/file/test1-51sec/2021/10/OneDrive%20OD%2051sec-roundcorner%20-%20Copy.png
  - name: NetSec YouTube Channel
    url: https://www.youtube.com/c/NetSec
    icon: https://image.similarpng.com/very-thumbnail/2020/05/Logo-YouTube-realistic-icon-transparent-PNG.png
  - name: Google DNS 8.8.8.8
    check: "tcp-ping"
    url: 8.8.8.8
    port: 53
    icon: https://icons.veryicon.com/png/o/application/app-general-icon-01/dns-1.png

status-website:
  # Add your custom domain name, or remove the `cname` line if you don't have a domain
  # Uncomment the `baseUrl` line if you don't have a custom domain and add your repo name there
  cname: up.51sec.org
  # baseUrl: /your-repo-name
  logoUrl: https://raw.githubusercontent.com/51sec/up/master/assets/up-icon.png
  name: UP
  introTitle: "**UP** monitors 51Sec Websites and servers!"
  introMessage: The monitoring **real-time** data from our [GitHub repository](https://github.com/51sec/up).
  favicon: https://raw.githubusercontent.com/51sec/up/master/assets/up-icon.png
  theme: ocean
  # Available themes are light, dark, night or ocean.
  navbar:
    - title: Status Page
      href: /
    - title: GitHub
      href: https://github.com/$OWNER/$REPO
    - title: 51Sec
      href: https://blog.51sec.org
      
# Upptime also supports notifications, assigning issues, and more
# See https://upptime.js.org/docs/configuration
i18n:
  footer: This page is [created]($REPO) @2022-07-01 by [51Sec](www.51sec.org), powered by [Upptime](https://upptime.js.org)


Videos


  • Freshping - https://youtu.be/dtKEgwAVzKk
  • UptimeRobot - https://youtu.be/Fk5Y3WMqWB0


References

  • https://github.com/51sec/up
  • https://github.com/upptime/upptime


via Blogger http://blog.51sec.org/2022/07/upptime-github-based-free-opensource.html
July 02, 2022 at 10:11AM Network
0 Comments

    Categories

    All
    Architecture
    Blog
    Checkpoint
    Cisco
    Cloud
    CyberArk
    F5
    Fortigate
    Guardium
    Juniper
    Linux
    Network
    Others
    Palo Alto
    Qualys
    Raspberry Pi
    Security
    SIEM
    Software
    Vmware
    VPN
    Wireless

    Archives

    March 2024
    February 2024
    January 2024
    December 2023
    November 2023
    October 2023
    September 2023
    August 2023
    July 2023
    June 2023
    May 2023
    April 2023
    March 2023
    February 2023
    January 2023
    December 2022
    November 2022
    October 2022
    September 2022
    August 2022
    July 2022
    June 2022
    May 2022
    April 2022
    March 2022
    February 2022
    January 2022
    December 2021
    November 2021
    October 2021
    September 2021
    August 2021
    July 2021
    June 2021
    May 2021
    April 2021
    March 2021
    February 2021
    January 2021
    December 2020
    November 2020
    October 2020
    September 2020
    August 2020
    July 2020
    October 2019
    September 2019
    June 2019
    July 2018
    May 2018
    December 2017
    August 2017
    April 2017
    March 2017
    January 2017
    December 2016
    November 2016
    October 2016
    September 2016
    August 2016
    July 2016
    June 2016
    May 2016
    April 2016
    March 2016
    February 2016
    January 2016
    December 2015
    November 2015
    October 2015
    September 2015
    August 2015
    July 2015
    June 2015
    May 2015
    April 2015
    March 2015

    Print Page:

    RSS Feed

    Email Subscribe
Powered by Create your own unique website with customizable templates.
  • Blog
  • Sitemap
    • Categories
  • Contact
  • About
  • Resources
  • Tools
  • 51sec.org