Info Security Memo
  • Blog
  • Sitemap
    • Categories
  • Contact
  • About
  • Resources
  • Tools
  • 51sec.org

Build Confidence

Focusing on Information Security 

Info Security Notes

Divoom Timebox Pixel Bluetooth Speaker Generation 4 TimeBox EVO Openbox

5/31/2021

0 Comments

 
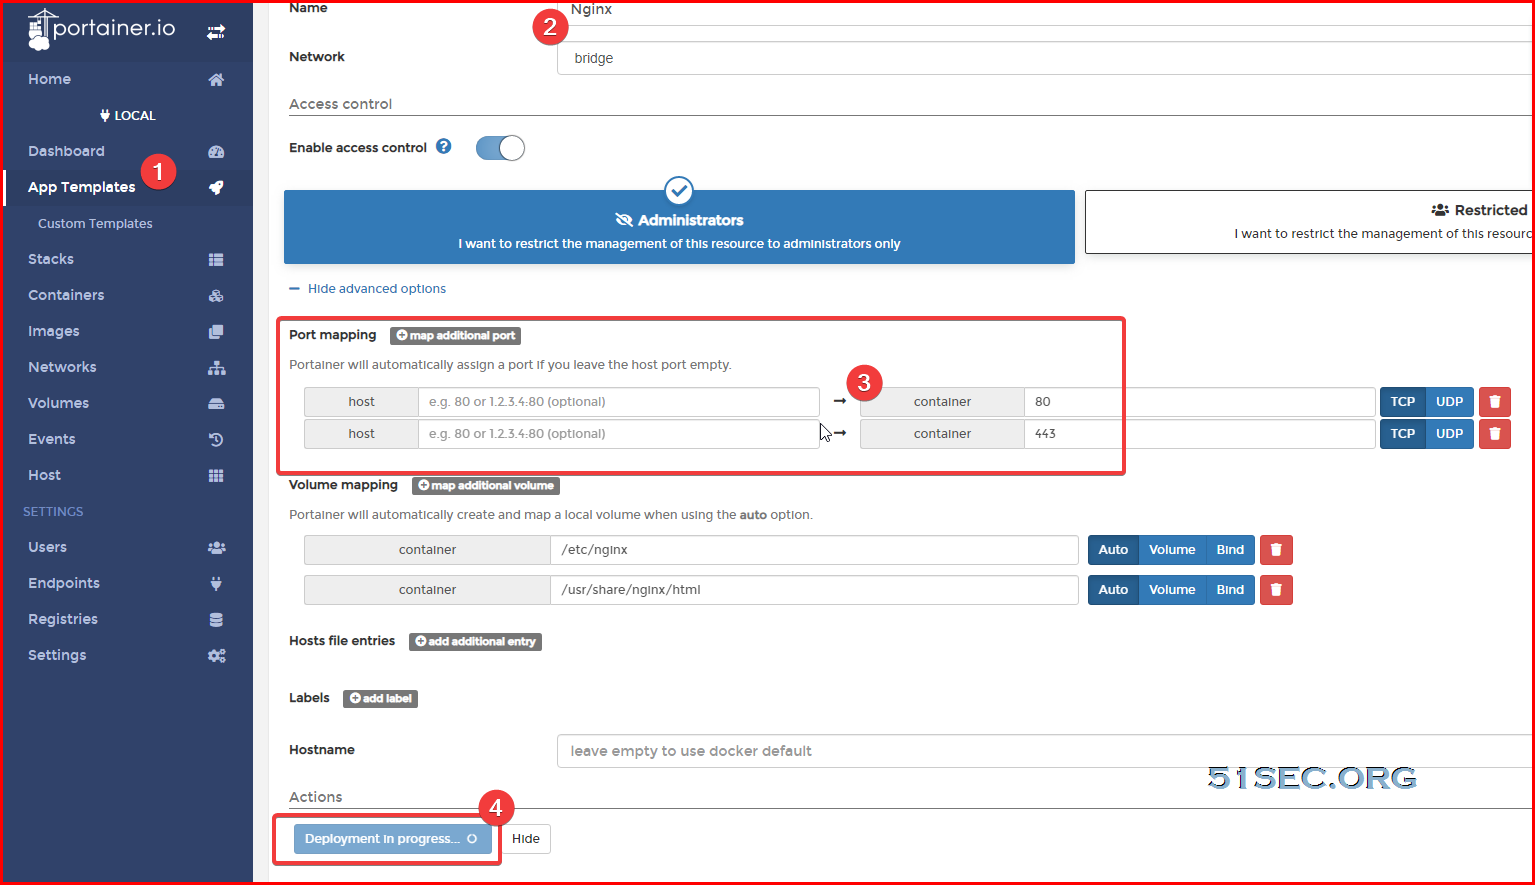
Divoom Timebox Speaker has been in the market for a few years now and the 4th generation hardware has been developed. This video shows my recent purchase of TimeBox EVO from Aliexpress and the openbox to have a quick test about this product. One of my main reason to buy this product is to show some text and add some coloring during recording my videos. You will see it on my desk more often in the future. All opinion is my person experience and not associated with any company or third partied. I am also not posting any link to suggest to buy. If you are interesting on this product, just search from Aliexpress.com, or google it. ==================================================================== If you found this video has some useful information, please give me a thumb up and subscribe this channel to get more updates: https://www.youtube.com/c/Netsec?sub_confirmation=1 Learning and Sharing - 海内存知己,天涯若比邻 - http://51sec.org

Watch video on YouTube here: https://youtu.be/xLib59l0aCs by Johnny Netsec
0 Comments

Free 1TB Cloud Storage with Online Bittorrent Client - TeraBox

5/30/2021

0 Comments

 
TeraBox is from Dubox, which was just renamed. It does provide 1TB large space for your cloud storage. Although lack of Desktop client, Android and iPhone client is available. It also can act as BT client to download BT file directly. Sharing feature is also friendly to use. Speed is acceptable to me. If you are looking for backup your mobile files, it might be a good solution. Unfortunately, free plan does not sync your videos. Related Post: https://ift.tt/2SDR3kY ==================================================================== If you found this video has some useful information, please give me a thumb up and subscribe this channel to get more updates: https://www.youtube.com/c/Netsec?sub_confirmation=1 Learning and Sharing - 海内存知己,天涯若比邻 - http://51sec.org

Watch video on YouTube here: https://youtu.be/SwUVtNb0_ss by Johnny Netsec
0 Comments

Build Cloud File Download & Manage Site using FileBrowserAria2AriaNgRcloneCaddyGoogle Drive

5/29/2021

0 Comments

 
Build Cloud File Download & Manage Site using FileBrowser+Aria2+AriaNg+Rclone+Caddy+Google Drive
This post is regarding how to use wahyd4/aria2-ui's docker image to achieve a downloading and file managing / sharing center. In just one docker image, you can do downloading (Aria2), Web GUI management for your downloading task (AriaNG) , File Managing (FileBrowser), supporting multi-type file view, and saving to Google Drive. 

Pre-requirement:

Install Docker and Portainer:
Post: Install Docker, Docker-Compose, Portainer & Nginx on CentOS8


Open Firewall port at cloud firewall and local firewall if enabled:
  • for tcp 8000

#CentOS 6
iptables -A INPUT -p tcp --dport 8000 -j ACCEPT
service iptables save
service iptables restart
#CentOS 7
firewall-cmd --zone=public --add-port=8000/tcp --permanent
firewall-cmd --reload


Github Project and Docker Image Information


Github project : 

  • wahyd4/aria2-ariang-docker
Docker images:
  • wahyd4/aria2-ui:latest

Other related GitHub Sites:
  • https://github.com/wahyd4/aria2-ariang-x-docker-compose
  • https://github.com/51sec/aria2-ariang-x-docker-compose


Features

  • Aria2 (SSL support)
  • AriaNg
  • Rclone
  • File Browser: Files mangement and videos playing
  • Auto HTTPS (Let's Encrypt)
  • Bind non root user into container, so non root user can also manage downloaded files.
  • Basic Auth
  • Support ARM CPUs as well, all supported CPU platforms can be found here
  • Cloud Storage platforms synchronization


Quick Run for Testing


docker run -d --name aria2-ui -p 80:80 wahyd4/aria2-ui
Here are default URL and user name / password. 
  • Aria2: http://yourip
  • FileManger: http://yourip/files
  • Rclone: http://yourip/rclone
  • Please use admin/admin as username and password to login Filebrowser for the first time. And if rclone enabled, please use user/password to login Rclone if you didn't update ARIA2_USER and ARIA2_PWD
  • ENABLE_RCLONE set to false to disable Rclone in the docker


Modified Docker Run Command Based Requirements

Quick run is not exactly what we want. For my configuration, I would like to put this docker into different port, 8000, also I will need to map my host folders into docker. No need rclone to run in the docker, I will get it running on my host to mount my Google Drive. Also I will need some kind of authentication to be enabled for AriaNG web gui. 


docker run -d --name aria2-ui \
  --restart=unless-stopped \
  -p 8000:80 \
  -e ENABLE_AUTH=true \
  -e ARIA2_SSL=false \
  -e ARIA2_USER=user \
  -e ARIA2_PWD=password \
  -e ARIA2_EXTERNAL_PORT=8000 \
  -e ENABLE_RCLONE=False \
  -v ~/data:/data \
  -v ~/gdrive:/gdrive \
  wahyd4/aria2-ui


Notes:
  • /data folder is aria2 downloading folder. After finished downloading, file will be transferred to /gdrive folder automatically with a script.
  • /gdrive folder is host's Rclone mounted Google Drive folder, which is mapped to ~/gdrive folder (/root/gdrive). 


Configure FileBrowser to Manage Gdrive folder

This is an option to do if you would like FileBrowser web gui to manage your mounted google drive. Default it is managing download folder /data. 

Change File Browser's folder. vi /app/Procfile
Change default /data folder to /gdrive. So File Browser will open /gdrive when you log in. You can mange your Google Drive from File Browser directly. It is not necessary to do this step if you does not want to manage your Google Drive folder from FileBrowser page. 


[root@centos-nextcloud-aria2 ~]docker exec -it aria2-ui /bin/bash
bash-5.0# cd /app
bash-5.0# ls
Procfile aria2c.sh caddy.sh conf filebrowser filebrowser.db forego init.sh start.sh
bash-5.0# vi Procfile
filebrowser: /app/filebrowser -p 8080 -d /app/filebrowser.db -r /gdrive
caddy: /app/caddy.sh
aria2c: /app/aria2c.sh [root@centos-nextcloud-aria2 ~]# docker restart aria2-ui


Configure Aria2 to Move Completed File to /Gdrive

[root@centos-nextcloud-aria2 ~]docker exec -it aria2-ui /bin/bash

Inside the docker, create a shell script , rcloneupload.sh,with following code:


bash-4.3#vi /app/conf/rcloneupload.sh
#!/bin/bash

GID="$1";
FileNum="$2";
File="$3";
MinSize="5"  #限制最低上传大小,默认5k
MaxSize="157286400"  #限制最高文件大小(单位k),默认15G
RemoteDIR="/gdrive/";  #rclone挂载的本地文件夹,最后面保留/
LocalDIR="/data/";  #Aria2下载目录,最后面保留/

if [[ -z $(echo "$FileNum" |grep -o '[0-9]*' |head -n1) ]]; then FileNum='0'; fi
if [[ "$FileNum" -le '0' ]]; then exit 0; fi
if [[ "$#" != '3' ]]; then exit 0; fi

function LoadFile(){
  IFS_BAK=$IFS
  IFS=$'\n'
  if [[ ! -d "$LocalDIR" ]]; then return; fi
  if [[ -e "$File" ]]; then
    FileLoad="${File/#$LocalDIR}"
    while true
      do
        if [[ "$FileLoad" == '/' ]]; then return; fi
        echo "$FileLoad" |grep -q '/';
        if [[ "$?" == "0" ]]; then
          FileLoad=$(dirname "$FileLoad");
        else
          break;
        fi;
      done;
    if [[ "$FileLoad" == "$LocalDIR" ]]; then return; fi
    EXEC="$(command -v mv)"
    if [[ -z "$EXEC" ]]; then return; fi
    Option=" -f";
    cd "$LocalDIR";
    if [[ -e "$FileLoad" ]]; then
      ItemSize=$(du -s "$FileLoad" |cut -f1 |grep -o '[0-9]*' |head -n1)
      if [[ -z "$ItemSize" ]]; then return; fi
      if [[ "$ItemSize" -le "$MinSize" ]]; then
        echo -ne "\033[33m$FileLoad \033[0mtoo small to spik.\n";
        return;
      fi
      if [[ "$ItemSize" -ge "$MaxSize" ]]; then
        echo -ne "\033[33m$FileLoad \033[0mtoo large to spik.\n";
        return;
      fi
      eval "${EXEC}${Option}" \'"${FileLoad}"\' "${RemoteDIR}";
    fi
  fi
  IFS=$IFS_BAK
}
LoadFile;

make file become executable: chmod +x rcloneupload.sh
Edit Aria2 configuration file (/app/conf/aria2.conf) to add one following line at the file end:
on-download-complete=/app/conf/rcloneupload.sh

Restart aria2-ui docker to take change into effect

[root@centos-nextcloud-aria2 ~]# docker restart aria2-ui
bash-4.3# cd /app/conf/
bash-4.3# ls
aria2.conf      aria2.session      aria2c.sh      key

bash-4.3# vi /app/conf/aria2.conf
# Bit Torrent: The amount of time and the upload-to-download ratio you wish to
# seed to. If either the time limit ( seconds ) or the seed ratio is reached,
# torrent seeding will stop. You can set seed-time to zero(0) to disable
# seeding completely.
seed-ratio=0.01
seed-time=1
on-download-complete=/app/conf/rcloneupload.sh


Configure Host Rclone to mount Google Drive

1   First to install epel source
yum -y install epel-release


2  Install some components
yum -y install wget unzip screen fuse fuse-devel


3  Install rclone
[root@centos7-test1 data]# curl https://ift.tt/3p61n1s | sudo bash


4  configure rclone
rclone config

create a new remote and name it as google-drive

Other steps can check post: https://blog.51sec.org/2020/05/use-rclone-to-mount-google-drive-and.html

5  mount Google Drive using rclone
  • create a new folder at /home/gdrive
mkdir -p /home/gdrive

  • mount system
rclone mount google-drive: /home/gdrive --allow-other --allow-non-empty --vfs-cache-mode writes

Note: google-drive is the Rclone configuration name.


6   create rclone.service

To make rclone mount the google drive even after rebooted the vps, create /usr/lib/systemd/system/rclone.service with following information:
vi /usr/lib/systemd/system/rclone.service

[Unit]
Description=rclone

[Service]
User=root
ExecStart=/usr/bin/rclone mount google-drive: /home/gdrive --allow-other --allow-non-empty --vfs-cache-mode writes
Restart=on-abort


7  systemctl enable rclone.service

8  Using browser to access system

FileBrowser: http://ip/files
aria2ng: http://ip

Default FileBrowser username/password will be admin/admin.

Aria will download files to docker's local /data folder . Once completed downloading, the file will be moved to /gdrive folder.

Gdrive folder has been mounted with Google Drive, which will be managed by FileBrowser.


Cloudflare Configuration


Remove Installed Docker

#Delete Docker ContainerID=`docker ps|grep wahyd4/aria2-ui|awk '{print $1}'` docker kill ${ContainerID} docker rm ${ContainerID} docker rmi `docker images|grep wahyd4/aria2-ui|awk '{print $3}'` #Remove Download Folder rm -rf ~/data
rm -rf /home/gdrive


References


via Blogger https://ift.tt/3fxrZVZ
May 29, 2021 at 03:42PM Cloud, Docker
0 Comments

Automatically Update Docker Image to Latest - Watchtower

5/28/2021

0 Comments

 
Automatically Update Docker Image to Latest - Watchtower

Updating Docker image is a pain if you do it manually. This post is going to show you all the methods I found from Internet how to update your docker image to latest. Using Watchtower definitely helps a lot to expedite this updating process. 


Manual Update Dockers


1  Standard Four Steps 
  • Stop the container:docker stop <CONTAINER>
  • Delete the container:docker rm <CONTAINER>
  • Update mirror:docker pull <IMAGE>
  • Start the container:docker run <ARG> ... <IMAGE>
2  Simplified Three Steps
  • Delete the container:docker rm <CONTAINER> -f
  • Update mirror:docker pull <IMAGE>
  • Start the container:docker run <ARG> ... <IMAGE>


Use Script to Automatic Update Dockers


We can use a script which checks if a running container is started with the latest image. We also use upstart init scripts for starting the docker image.

#!/usr/bin/env bash
set -e
BASE_IMAGE="registry"
REGISTRY="registry.hub.docker.com"
IMAGE="$REGISTRY/$BASE_IMAGE"
CID=$(docker ps | grep $IMAGE | awk '{print $1}')
docker pull $IMAGE

for im in $CID
do
    LATEST=`docker inspect --format "{{.Id}}" $IMAGE`
    RUNNING=`docker inspect --format "{{.Image}}" $im`
    NAME=`docker inspect --format '{{.Name}}' $im | sed "s/\///g"`
    echo "Latest:" $LATEST
    echo "Running:" $RUNNING
    if [ "$RUNNING" != "$LATEST" ];then
        echo "upgrading $NAME"
        stop docker-$NAME
        docker rm -f $NAME
        start docker-$NAME
    else
        echo "$NAME up to date"
    fi
done

And init looks like

docker run -t -i --name $NAME $im /bin/bash


Introduction of Watchtower

Watchtower is a practical tool that can automatically update the Docker base image and container. It monitors the running container and related mirrors. When it detects that the mirror in the registry is different from the local mirror, it will pull the latest mirror and restart the corresponding container with the same parameters as in the initial deployment.

GitHub Repository: containrrr/watchtower

Documentation Website: https://containrrr.dev/watchtower.


root@opc-ubuntu-docker:/var/run# docker run --rm containrrr/watchtower -h

        Watchtower automatically updates running Docker containers whenever a new image is released.
        More information available at https://github.com/containrrr/watchtower/.

Usage:
  watchtower [flags]

Flags:
  -a, --api-version string                          api version to use by docker client (default "1.25")
  -c, --cleanup                                     remove previously used images after updating
  -d, --debug                                       enable debug mode with verbose logging
      --enable-lifecycle-hooks                      Enable the execution of commands triggered by pre- and post-update lifecycle hooks
  -h, --help                                        help for watchtower
  -H, --host string                                 daemon socket to connect to (default "unix:///var/run/docker.sock")
      --http-api-metrics                            Runs Watchtower with the Prometheus metrics API enabled
      --http-api-token string                       Sets an authentication token to HTTP API requests.
      --http-api-update                             Runs Watchtower in HTTP API mode, so that image updates must to be triggered by a request
      --include-restarting                          Will also include restarting containers
  -S, --include-stopped                             Will also include created and exited containers
  -i, --interval int                                poll interval (in seconds) (default 86400)
  -e, --label-enable                                watch containers where the com.centurylinklabs.watchtower.enable label is true
  -m, --monitor-only                                Will only monitor for new images, not update the containers
      --no-color                                    Disable ANSI color escape codes in log output
      --no-pull                                     do not pull any new images
      --no-restart                                  do not restart any containers
      --no-startup-message                          Prevents watchtower from sending a startup message
      --notification-email-delay int                Delay before sending notifications, expressed in seconds
      --notification-email-from string              Address to send notification emails from
      --notification-email-server string            SMTP server to send notification emails through
      --notification-email-server-password string   SMTP server password for sending notifications
      --notification-email-server-port int          SMTP server port to send notification emails through (default 25)
      --notification-email-server-tls-skip-verify   Controls whether watchtower verifies the SMTP server's certificate chain and host name.
                                                    Should only be used for testing.
      --notification-email-server-user string       SMTP server user for sending notifications
      --notification-email-subjecttag string        Subject prefix tag for notifications via mail
      --notification-email-to string                Address to send notification emails to
      --notification-gotify-tls-skip-verify         Controls whether watchtower verifies the Gotify server's certificate chain and host name.
                                                    Should only be used for testing.
      --notification-gotify-token string            The Gotify Application required to query the Gotify API
      --notification-gotify-url string              The Gotify URL to send notifications to
      --notification-msteams-data                   The MSTeams notifier will try to extract log entry fields as MSTeams message facts
      --notification-msteams-hook string            The MSTeams WebHook URL to send notifications to
      --notification-slack-channel string           A string which overrides the webhook's default channel. Example: #my-custom-channel
      --notification-slack-hook-url string          The Slack Hook URL to send notifications to
      --notification-slack-icon-emoji string        An emoji code string to use in place of the default icon
      --notification-slack-icon-url string          An icon image URL string to use in place of the default icon
      --notification-slack-identifier string        A string which will be used to identify the messages coming from this watchtower instance (default "watchtower")
      --notification-template string                The shoutrrr text/template for the messages
      --notification-url stringArray                The shoutrrr URL to send notifications to
  -n, --notifications strings                        notification types to send (valid: email, slack, msteams, gotify, shoutrrr)
      --notifications-level string                  The log level used for sending notifications. Possible values: panic, fatal, error, warn, info or debug (default "info")
      --remove-volumes                              remove attached volumes before updating
      --revive-stopped                              Will also start stopped containers that were updated, if include-stopped is active
      --rolling-restart                             Restart containers one at a time
  -R, --run-once                                    Run once now and exit
  -s, --schedule string                             the cron expression which defines when to update
      --scope string                                Defines a monitoring scope for the Watchtower instance.
  -t, --stop-timeout duration                       timeout before a container is forcefully stopped (default 10s)
  -v, --tlsverify                                   use TLS and verify the remote
      --trace                                       enable trace mode with very verbose logging - caution, exposes credentials
      --warn-on-head-failure string                 When to warn about HEAD pull requests failing. Possible values: always, auto or never
root@opc-ubuntu-docker:/var/run#


Install


1  Quick Start from GitHub

From Command line:
$ docker run -d \
    --name watchtower \
    -v /var/run/docker.sock:/var/run/docker.sock \
    containrrr/watchtower
From Portainer:


Also make sure restart policy is selected as Unless stopped.


2  Auto Clean Up Old Images option

Official default startup command  can accumulate a lot of old images with tags for none after a long time use.  If left in system, it will take up a lot of disk space. To avoid this, you can add an option --cleanupoption, so each update will clean out the old mirror.


docker run -d \
    --name watchtower \
    --restart unless-stopped \
    -v /var/run/docker.sock:/var/run/docker.sock \
    containrrr/watchtower \
    --cleanup

--cleanupOptions can be abbreviated as -c:


docker run -d \
    --name watchtower \
    --restart unless-stopped \
    -v /var/run/docker.sock:/var/run/docker.sock \
    containrrr/watchtower -c

2  Set automatic update check frequency


By default, Watchtower will poll every 24 hours. If you think this frequency is not good for you, you can use the following options to control the frequency of update checks, but you can only choose one of the two.

  • --interval, -i-Set the update detection time interval, in seconds. For example, check for updates every 1 hour:

docker run -d \
    --name watchtower \
    --restart unless-stopped \
    -v /var/run/docker.sock:/var/run/docker.sock \
    containrrr/watchtower -c \
    --interval 3600

You can set those options from Portainer's Command settings textbox.


  • --schedule, -s-Set the timing detection update time. The format is a 6-field Cron expression, instead of the traditional 5-field, that is, the first digit is seconds. For example, check for updates at 2 AM every day:

docker run -d \
    --name watchtower \
    --restart unless-stopped \
    -v /var/run/docker.sock:/var/run/docker.sock \
    containrrr/watchtower -c \
    --schedule "0 0 2 * * *"

For other options, such as control the list which docker can be upgraded or excluded from upgrading, please check original documentation page. 


References

  • Watchtower - 自动更新 Docker 镜像与容器


via Blogger https://ift.tt/3vyRjQK
May 28, 2021 at 07:53PM Docker
0 Comments

Kali Pen Test Lab - 4. Active Information Gathering

5/26/2021

0 Comments

 
This video shows different active information gathering tools at Data Link layer, Network layer and Transport layer. Related post: https://ift.tt/3wy48ei ==================================================================== If you found this video has some useful information, please give me a thumb up and subscribe this channel to get more updates: https://www.youtube.com/c/Netsec?sub_confirmation=1 Learning and Sharing - 海内存知己,天涯若比邻 - http://51sec.org

Watch video on YouTube here: https://youtu.be/AJsWCHShcI8 by Johnny Netsec
0 Comments

Install Docker Docker-Compose Portainer & Nginx on CentOS8

5/24/2021

0 Comments

 
Install Docker, Docker-Compose, Portainer & Nginx on CentOS8
This post is to summarize all installation steps for a new CentOS8 and get Docker and Docker-Compose and Portainer installed. Nginx will also be installed and configured as reverse proxy for Portainer with Cloudflare managed custom domain. Cert-Bot will be installed on Nginx to enable https for Portainer's web interface. 

The steps are same as CentOS7 and other Debian based release. 


System Update

Check System Public IP:

[root@OCP1-CentOS8-Aria-Rclone-Portainer ~]# curl https://ip.51sec.org/api
132.145.100.226

Update system to latest:

 [root@OCP1-CentOS8-Aria-Rclone-Portainer ~]# yum upgrade -y && yum update -y


Install NodeQuery Monitor Agent


Add a new server into your NodeQuery Account or select Reinstall to get code for agent installation.


[root@OCP1-CentOS8-Aria-Rclone-Portainer ~]# wget -N --no-check-certificate https://raw.github.com/nodequery/nq-agent/master/nq-install.sh && bash nq-install.sh Zb8Ge0oBFXvx24SM6YgfpH


SWAP Size change

Based on your VPS's default configuration, it might need to increase swap size. It will dramatically increase your service's stable ability for those small memory VPS (less than 2GB). 


[root@OCP1-CentOS8-Aria-Rclone-Portainer ~]# free
              total        used        free      shared  buff/cache   available
Mem:         823684      258292      120892        1904      444500      553072
Swap:       8388604        8532     8380072


Check post  "Change SWAP Size to Improve Low Memory Cloud VM Reliability "for how to change your swap size. 

Basic command: 
wget https://raw.githubusercontent.com/51sec/swap/main/swap.sh && bash swap.sh


Install Docker and Docker Compose

Docker:

curl -sSL https://get.docker.com/ | sh 
systemctl start docker 
systemctl enable docker


Docker Compose:
Important: Check the latest version of docker-compose  from https://docs.docker.com/compose/release-notes/ then modify following command with latest version number.  (I got 1.29.2 for this installation)


curl -L "https://get.daocloud.io/docker/compose/releases/download/1.29.2/docker-compose-$(uname -s)-$(uname -m)" -o /usr/local/bin/docker-compose
chmod +x /usr/local/bin/docker-compose

ln -s /usr/local/bin/docker-compose /usr/bin/docker-compose
Check Version:

[root@OCP1-CentOS8-Aria-Rclone-Portainer ~]# /usr/local/bin/docker-compose version
docker-compose version 1.29.2, build 5becea4c
docker-py version: 5.0.0
CPython version: 3.7.10
OpenSSL version: OpenSSL 1.1.0l  10 Sep 2019

[root@OCP1-CentOS8-Aria-Rclone-Portainer ~]# docker version
Client: Docker Engine - Community
 Version:           20.10.6
 API version:       1.41
 Go version:        go1.13.15
 Git commit:        370c289
 Built:             Fri Apr  9 22:44:36 2021
 OS/Arch:           linux/amd64
 Context:           default
 Experimental:      true

Server: Docker Engine - Community
 Engine:
  Version:          20.10.6
  API version:      1.41 (minimum version 1.12)
  Go version:       go1.13.15
  Git commit:       8728dd2
  Built:            Fri Apr  9 22:43:02 2021
  OS/Arch:          linux/amd64
  Experimental:     false
 containerd:
  Version:          1.4.4
  GitCommit:        05f951a3781f4f2c1911b05e61c160e9c30eaa8e
 runc:
  Version:          1.0.0-rc93
  GitCommit:        12644e614e25b05da6fd08a38ffa0cfe1903fdec
 docker-init:
  Version:          0.19.0
  GitCommit:        de40ad0
[root@OCP1-CentOS8-Aria-Rclone-Portainer ~]#


Install Portainer

Please make sure your VPS's firewall port 80, 443 and 9000 has been opened. We can close 9000 later.

[root@OCP1-CentOS8-Aria-Rclone-Portainer ~]# docker volume create portainer_data
portainer_data
[root@OCP1-CentOS8-Aria-Rclone-Portainer ~]# docker run -d -p 9000:9000 --name portainer --restart always -v /var/run/docker.sock:/var/run/docker.sock -v portainer_data:/data portainer/portainer-ce:latest
Unable to find image 'portainer/portainer-ce:latest' locally
latest: Pulling from portainer/portainer-ce
94cfa856b2b1: Pull complete
49d59ee0881a: Pull complete
f220caeff793: Pull complete
Digest: sha256:67e3edef02ba465d18663cd273cc24ec2764b27686ea5afbe8f392317a70ed72
Status: Downloaded newer image for portainer/portainer-ce:latest
d0ff883b063156b5929a8999593d38837501e6c16ffcefcbefb221ebe0301a32
[root@OCP1-CentOS8-Aria-Rclone-Portainer ~]#


Verify Portainer from Internet by visiting http://<VPS's Public IP>:9000


Install Nginx using Portainer


From Portainer Portal, click App Templates menu, then choose Nginx template to deploy:


Make sure you put port 80 and port 443 mapping as show below:


Now you should get your Ngix page from http://<VPS's public ip>


Configure Nginx as Reverse Proxy 


In this section, Nginx will be configured as reverse proxy to redirect all traffic for portainer1.51sec.eu.org on port 80 and 443 to proxied docker website Portainer. Connect into Nginx console from Portainer portal or command: docker exec -it nginx bin/bash. 

root@ba4a30ab7371:/# apt update -y && apt install nano -y

nano /etc/nginx/conf.d/portainer.conf


server {
    listen       80;
    server_name  portainer1.51sec.eu.org;

location / {
    proxy_pass       http://172.31.23.170:6080;
    proxy_http_version         1.1;
    proxy_read_timeout 300;
    proxy_set_header Upgrade $http_upgrade;
    proxy_set_header Connection "upgrade";
    proxy_set_header Host $http_host;
    proxy_set_header X-Real-IP $remote_addr;
    proxy_set_header X-Real-PORT $remote_port;
           }
}


root@ba4a30ab7371:/# apt update -y && apt install nano -y


Visit https://ift.tt/3veqJMG through Google Incognito window to verify the access and configuration. 

Enable Https for Nginx

Connect into Nginx console from Portainer portal or command: docker exec -it nginx bin/bash. 


apt update
apt install certbot python-certbot-nginx
certbot --nginx


root@ba4a30ab7371:/# certbot --nginx
Saving debug log to /var/log/letsencrypt/letsencrypt.log
Plugins selected: Authenticator nginx, Installer nginx
Enter email address (used for urgent renewal and security notices) (Enter 'c' to
cancel): [email protected]

- - - - - - - - - - - - - - - - - - - - - - - - - - - - - - - - - - - - - - - -
Please read the Terms of Service at
https://letsencrypt.org/documents/LE-SA-v1.2-November-15-2017.pdf. You must
agree in order to register with the ACME server at
https://acme-v02.api.letsencrypt.org/directory
- - - - - - - - - - - - - - - - - - - - - - - - - - - - - - - - - - - - - - - -
(A)gree/(C)ancel: A

- - - - - - - - - - - - - - - - - - - - - - - - - - - - - - - - - - - - - - - -
Would you be willing to share your email address with the Electronic Frontier
Foundation, a founding partner of the Let's Encrypt project and the non-profit
organization that develops Certbot? We'd like to send you email about our work
encrypting the web, EFF news, campaigns, and ways to support digital freedom.
- - - - - - - - - - - - - - - - - - - - - - - - - - - - - - - - - - - - - - - -
(Y)es/(N)o: N

Which names would you like to activate HTTPS for?
- - - - - - - - - - - - - - - - - - - - - - - - - - - - - - - - - - - - - - - -
1: portainer1.51sec.eu.org
- - - - - - - - - - - - - - - - - - - - - - - - - - - - - - - - - - - - - - - -
Select the appropriate numbers separated by commas and/or spaces, or leave input
blank to select all options shown (Enter 'c' to cancel): 1
Obtaining a new certificate
Performing the following challenges:
http-01 challenge for portainer1.51sec.eu.org
2021/05/24 19:49:48 [notice] 1330#1330: signal process started
Waiting for verification...
Cleaning up challenges
2021/05/24 19:49:53 [notice] 1332#1332: signal process started
Deploying Certificate to VirtualHost /etc/nginx/conf.d/portainer.conf
2021/05/24 19:49:56 [notice] 1334#1334: signal process started

Please choose whether or not to redirect HTTP traffic to HTTPS, removing HTTP access.
- - - - - - - - - - - - - - - - - - - - - - - - - - - - - - - - - - - - - - - -
1: No redirect - Make no further changes to the webserver configuration.
2: Redirect - Make all requests redirect to secure HTTPS access. Choose this for
new sites, or if you're confident your site works on HTTPS. You can undo this
change by editing your web server's configuration.
- - - - - - - - - - - - - - - - - - - - - - - - - - - - - - - - - - - - - - - -
Select the appropriate number [1-2] then [enter] (press 'c' to cancel): 1

- - - - - - - - - - - - - - - - - - - - - - - - - - - - - - - - - - - - - - - -
Congratulations! You have successfully enabled https://portainer1.51sec.eu.org

You should test your configuration at:
https://www.ssllabs.com/ssltest/analyze.html?d=portainer1.51sec.eu.org
- - - - - - - - - - - - - - - - - - - - - - - - - - - - - - - - - - - - - - - -

IMPORTANT NOTES:
 - Congratulations! Your certificate and chain have been saved at:
   /etc/letsencrypt/live/portainer1.51sec.eu.org/fullchain.pem
   Your key file has been saved at:
   /etc/letsencrypt/live/portainer1.51sec.eu.org/privkey.pem
   Your cert will expire on 2021-08-22. To obtain a new or tweaked
   version of this certificate in the future, simply run certbot again
   with the "certonly" option. To non-interactively renew *all* of
   your certificates, run "certbot renew"
 - Your account credentials have been saved in your Certbot
   configuration directory at /etc/letsencrypt. You should make a
   secure backup of this folder now. This configuration directory will
   also contain certificates and private keys obtained by Certbot so
   making regular backups of this folder is ideal.
 - If you like Certbot, please consider supporting our work by:

   Donating to ISRG / Let's Encrypt:   https://letsencrypt.org/donate
   Donating to EFF:                    https://eff.org/donate-le

root@ba4a30ab7371:/# 


After this step, both http and https should work for your portainer site. 


Custom Bridge Network


Create a new bridge network to join your Containers into same network. In this way, they can access it through their name directly.


Get your Docker Container to join into your new created bridge network.

In this way, we can directly use container's name to access each other. After this, we can close firewall's port 9000. 


root@ba4a30ab7371:/# ping portainer
PING portainer (172.20.20.3) 56(84) bytes of data.
64 bytes from portainer.mybridge (172.20.20.3): icmp_seq=1 ttl=64 time=0.104 ms
64 bytes from portainer.mybridge (172.20.20.3): icmp_seq=2 ttl=64 time=0.080 ms
64 bytes from portainer.mybridge (172.20.20.3): icmp_seq=3 ttl=64 time=0.081 ms
64 bytes from portainer.mybridge (172.20.20.3): icmp_seq=4 ttl=64 time=0.079 ms
^C
--- portainer ping statistics ---
4 packets transmitted, 4 received, 0% packet loss, time 53ms
rtt min/avg/max/mdev = 0.079/0.086/0.104/0.010 ms
root@ba4a30ab7371:/# 


nano /etc/nginx/conf.d/portainer.conf

server {
    listen       80;
    server_name  portainer1.51sec.eu.org;

location / {
    proxy_pass       http://portainer:6080;
    proxy_http_version         1.1;
    proxy_read_timeout 300;
    proxy_set_header Upgrade $http_upgrade;
    proxy_set_header Connection "upgrade";
    proxy_set_header Host $http_host;
    proxy_set_header X-Real-IP $remote_addr;
    proxy_set_header X-Real-PORT $remote_port;
           }
}


Install Network Utilities in Container

Most of times, the docker image is not including following network utilities which can help you troubleshooting your network connectivity, such as ping, ifconfig, tracert, telnet etc. You might want to install them for yourself.


root@ba4a30ab7371:/# cat /etc/*-release
PRETTY_NAME="Debian GNU/Linux 10 (buster)"
NAME="Debian GNU/Linux"
VERSION_ID="10"
VERSION="10 (buster)"
VERSION_CODENAME=buster
ID=debian
HOME_URL="https://www.debian.org/"
SUPPORT_URL="https://www.debian.org/support"
BUG_REPORT_URL="https://bugs.debian.org/"
root@ba4a30ab7371:/# 


root@26a4cc3a312a:/# apt-get update
root@26a4cc3a312a:/# apt-get install iputils-ping
root@26a4cc3a312a:/# apt-get install telnet
root@26a4cc3a312a:/# apt-get install traceroute
root@26a4cc3a312a:/# apt-get install net-tools

Note: net-tools will include ifconfig / netstat commands


via Blogger https://ift.tt/3ffxJU4
May 24, 2021 at 04:13PM Docker
0 Comments

Pen Test Lab - 3.Active Information Gathering

5/23/2021

0 Comments

 
Pen Test Lab - 3.Active Information Gathering
Unlike passive information gathering, which involves an intermediate system for gathering information, active information gathering involves a direct connection with the target.The client probes for information directly with the target with no intermediate system in between. While this technique may reveal much more information than passive information gathering, there's always a chance of security alarms going off on the target system. Since there's a direct connection with the target system, all the information requests would be logged and can later be traced back to the source. The following diagram depicts active information gathering where the client is directly probing the target system:


OSI Model / TCP/IP Model

The Open Systems Interconnection model (OSI model) is a conceptual model that characterises and standardises the communication functions of a telecommunication or computing system without regard to its underlying internal structure and technology. Its goal is the interoperability of diverse communication systems with standard communication protocols.


The TCP/IP model is a concise version of the OSI model. It contains four layers, unlike seven layers in the OSI model. The layers are:
  1. Process/Application Layer
  2. Host-to-Host/Transport Layer
  3. Internet Layer
  4. Network Access/Link Layer


Mapping between OSI Model and TCP/IP Model:


Difference between TCP/IP and OSI Model:

                       TCP/IP                      OSI
TCP refers to Transmission Control Protocol. OSI refers to Open Systems Interconnection.
TCP/IP has 4 layers. OSI has 7 layers.
TCP/IP is more reliable OSI is less reliable
TCP/IP does not have very strict boundaries. OSI has strict boundaries
TCP/IP follow a horizontal approach. OSI follows a vertical approach.
TCP/IP uses both session and presentation layer in the application layer itself. OSI uses different session and presentation layers.
TCP/IP developed protocols then model. OSI developed model then protocol.
Transport layer in TCP/IP does not provide assurance delivery of packets. In OSI model, transport layer provides assurance delivery of packets.
TCP/IP model network layer only provides connection less services. Connection less and connection oriented both services are provided by network layer in OSI model.
Protocols cannot be replaced easily in TCP/IP model. While in OSI model, Protocols are better covered and is easy to replace with the change in technology.

Layer 2 Discovery - Arping / netdiscover

Layer 2 tools can act faster than layer 3 but it can not go to another network. The packets stays in the same network.


┌──(root?kali)-[~]
└─# arping 192.168.2.1 -c 3                                                                                                      1 ⨯
ARPING 192.168.2.1
60 bytes from 00:78:cd:00:fd:f4 (192.168.2.1): index=0 time=4.034 msec
60 bytes from 00:78:cd:00:fd:f4 (192.168.2.1): index=1 time=2.622 msec
60 bytes from 00:78:cd:00:fd:f4 (192.168.2.1): index=2 time=3.788 msec

--- 192.168.2.1 statistics ---
3 packets transmitted, 3 packets received,   0% unanswered (0 extra)
rtt min/avg/max/std-dev = 2.622/3.481/4.034/0.616 ms
                                                                                                                                     
┌──(root?kali)-[~]
└─# 

Mac Address Look Up: https://ift.tt/3ffrLCJ


┌──(root?kali)-[~]
└─# netdiscover -i eth0 -r 192.168.2.0/24    

 Currently scanning: Finished!   |   Screen View: Unique Hosts                                                                      
                                                                                                                                    
 172 Captured ARP Req/Rep packets, from 30 hosts.   Total size: 10320                                                               
 _____________________________________________________________________________
   IP            At MAC Address     Count     Len  MAC Vendor / Hostname      
 -----------------------------------------------------------------------------
 0.0.0.0         08:ea:40:f8:48:a2     48    2880  SHENZHEN BILIAN ELECTRONIC CO.,LTD                                             
 0.0.0.0         08:ea:40:fc:48:f3     46    2760  SHENZHEN BILIAN ELECTRONIC CO.,LTD                                             
 0.0.0.0         08:ea:40:f8:44:63     36    2160  SHENZHEN BILIAN ELECTRONIC CO.,LTD                                             
 192.168.2.1     00:78:cd:00:fd:f4      1      60  Ignition Design Labs                                                             
 192.168.2.2     08:cc:68:40:71:c1      1      60  Cisco Systems, Inc                                                               
 192.168.2.4     00:0c:29:1b:b7:e1      1      60  VMware, Inc.      


┌──(root?kali)-[~]
└─# netdiscover -p   

 Currently scanning: (passive)   |   Screen View: Unique Hosts                                                                      
                                                                                                                                    
 307 Captured ARP Req/Rep packets, from 12 hosts.   Total size: 18420                                                               
 _____________________________________________________________________________
   IP            At MAC Address     Count     Len  MAC Vendor / Hostname      
 -----------------------------------------------------------------------------
 0.0.0.0         08:ea:40:f8:44:63     94    5640  SHENZHEN BILIAN ELECTRONIC CO.,LTD                                             
 192.168.2.155   24:be:05:e2:40:8f     13     780  Hewlett Packard                                                                  
 0.0.0.0         08:ea:40:f8:48:a2     82    4920  SHENZHEN BILIAN ELECTRONIC CO.,LTD                                             
 0.0.0.0         08:ea:40:fc:48:f3     82    4920  SHENZHEN BILIAN ELECTRONIC CO.,LTD                                             
 0.0.0.0         00:78:cd:03:d3:00      6     360  Ignition Design Labs                                                             
 192.168.2.163   00:78:cd:03:d3:00      2     120  Ignition Design Labs                                                             
 192.168.2.157   5c:cf:7f:73:26:55     13     780  Espressif Inc.                                                                   
 0.0.0.0         00:78:cd:01:05:b8      6     360  Ignition Design Labs                                                             
 0.0.0.0         00:78:cd:03:d7:40      4     240  Ignition Design Labs


Layer 3 Discovery - Ping

Layer 3 tools can be used to discover different networks. 


Ping

Traceroute

hping / fping
  • Use traceroute mode (–traceroute), be verbose (-V) in ICMP mode (-1) against the target (www.xxx.com):
    • root@kali:~# hping3 --traceroute -V -1 www.xxx.com
  • -q: brief output. -c: packets numbers. -d:packet site. -S:SYN packets.  -p:Port Number. -w:tcp window size. --flood: shoot at discretion, replies will be ignored. --rand-source: hide source ip using a fake random ip. 
    • hping3 -q -c 10 -d 120 -S -w 64 -p 80 --flood --rand-source www.xxx.com 

Fping
  • fping -g 192.168.2.0/24 -c 1 | grep ms > results.txt


Layer 4 Discovery - Nmap

According to the official Nmap website –

"Nmap  is a free and open source utility for network discovery and security auditing. Many systems and network administrators also find it useful for tasks such as network inventory, managing service upgrade schedules, and monitoring host or service uptime. Nmap uses raw IP packets in novel ways to determine what hosts are available on the network, what services (application name and version) those hosts are offering, what operating systems (and OS versions) they are running, what type of packet filters/firewalls are in use, and dozens of other characteristics. It was designed to rapidly scan large networks, but works fine against single hosts. "

Nmap Target Selection

Scan a single IP nmap 192.168.2.1
Scan a host nmap www.test.com
Scan a range of IPs nmap 192.168.2.1-20
Scan a subnet nmap 192.168.2.0/24
Scan targets from a text file nmap -iL list-of-ips.txt

Nmap Port Selection

Scan a single Port nmap -p 22 192.168.2.1
Scan a range of ports nmap -p 1-100 192.168.2.1
Scan 100 most common ports (Fast) nmap -F 192.168.2.1
Scan all 65535 ports nmap -p- 192.168.2.1

Nmap Port Scan types

Scan using TCP connect nmap -sT 192.168.2.1
Scan using TCP SYN scan (default) nmap -sS 192.168.2.1
Scan UDP ports nmap -sU -p 123,161,162 192.168.2.1
Scan selected ports - ignore discovery nmap -Pn -F 192.168.2.1

Service and OS Detection

Detect OS and Services nmap -A 192.168.2.1
Standard service detection nmap -sV 192.168.2.1
More aggressive Service Detection nmap -sV --version-intensity 5 192.168.2.1
Lighter banner grabbing detection nmap -sV --version-intensity 0 192.168.2.1

Nmap Output Formats

Save default output to file nmap -oN outputfile.txt 192.168.2.1
Save results as XML nmap -oX outputfile.xml 192.168.2.1
Save results in a format for grep nmap -oG outputfile.txt 192.168.2.1
Save in all formats nmap -oA outputfile 192.168.2.1

Digging deeper with NSE Scripts

Scan using default safe scripts nmap -sV -sC 192.168.2.1
Get help for a script nmap --script-help=ssl-heartbleed
Scan using a specific NSE script nmap -sV -p 443 –script=ssl-heartbleed.nse 192.168.2.1
Scan with a set of scripts nmap -sV --script=smb* 192.168.2.1

A scan to search for DDOS reflection UDP services

Scan for UDP DDOS reflectors nmap –sU –A –PN –n –pU:19,53,123,161 –script=ntp-monlist,dns-recursion,snmp-sysdescr 192.168.2.0/24

HTTP Service Information

Gather page titles from HTTP services nmap --script=http-title 192.168.2.0/24
Get HTTP headers of web services nmap --script=http-headers 192.168.2.0/24
Find web apps from known paths nmap --script=http-enum 192.168.2.0/24

Detect Heartbleed SSL Vulnerability

Heartbleed Testing nmap -sV -p 443 --script=ssl-heartbleed 192.168.2.0/24

IP Address information

Find Information about IP address nmap --script=asn-query,whois,ip-geolocation-maxmind 192.168.2.0/24


Scapy 


>>> ARP().display()
###[ ARP ]### 
  hwtype= 0x1
  ptype= IPv4
  hwlen= None
  plen= None
  op= who-has
  hwsrc= 00:0c:29:fc:11:ce
  psrc= 192.168.2.20
  hwdst= 00:00:00:00:00:00
  pdst= 0.0.0.0
>>> sr1(ARP(pdst="192.168.2.1"))
Begin emission:
Finished sending 1 packets.
*
Received 1 packets, got 1 answers, remaining 0 packets
<ARP  hwtype=0x1 ptype=IPv4 hwlen=6 plen=4 op=is-at hwsrc=00:78:cd:00:fd:f4 psrc=192.168.2.1 hwdst=00:0c:29:fc:11:ce pdst=192.168.2.20 |<Padding  load='\x00\x00\x00\x00\x00\x00\x00\x00\x00\x00\x00\x00\x00\x00\x00\x00\x00\x00' |>>                                     
>>> 


>> IP().display()
###[ IP ]### 
  version= 4
  ihl= None
  tos= 0x0
  len= None
  id= 1
  flags= 
  frag= 0
  ttl= 64
  proto= hopopt
  chksum= None
  src= 127.0.0.1
  dst= 127.0.0.1
  \options\

>>> ICMP().display()
###[ ICMP ]### 
  type= echo-request
  code= 0
  chksum= None
  id= 0x0
  seq= 0x0

>>> sr1(IP(dst="192.168.2.1")/ICMP(),timeout=1)
Begin emission:
Finished sending 1 packets.
*
Received 1 packets, got 1 answers, remaining 0 packets
<IP  version=4 ihl=5 tos=0x0 len=28 id=50232 flags= frag=0 ttl=64 proto=icmp chksum=0x3143 src=192.168.2.1 dst=192.168.2.20 |<ICMP  type=echo-reply code=0 chksum=0xffff id=0x0 seq=0x0 |<Padding  load='\x00\x00\x00\x00\x00\x00\x00\x00\x00\x00\x00\x00\x00\x00\x00\x00\x00\x00' |>>>                                                                                                                        


Half open port scanning


>>> TCP().display()
###[ TCP ]### 
  sport= ftp_data
  dport= http
  seq= 0
  ack= 0
  dataofs= None
  reserved= 0
  flags= S
  window= 8192
  chksum= None
  urgptr= 0
  options= []

>>> sr1(IP(dst="192.168.2.1")/TCP(flags="S",dport=80),timeout=1)
Begin emission:
Finished sending 1 packets.
.*
Received 2 packets, got 1 answers, remaining 0 packets
<IP  version=4 ihl=5 tos=0x0 len=44 id=0 flags=DF frag=0 ttl=64 proto=tcp chksum=0xb566 src=192.168.2.1 dst=192.168.2.20 |<TCP  sport=http dport=ftp_data seq=3654116272 ack=1 dataofs=6 reserved=0 flags=SA window=29200 chksum=0x62bd urgptr=0 options=[('MSS', 1460)] |<Padding  load='\x00\x00' |>>>
>>> 


via Blogger https://ift.tt/3yIWPT4
May 23, 2021 at 02:54PM Threat Hunting
0 Comments

Deploy Web App to Vercel for Free to Show Visitor's Public IP Using Your Own Custom Domain

5/23/2021

0 Comments

 
This video is to show you how easy and completely free you can deploy your own web application in the cloud SaaS provider, such as Vercel.com. I am using a python script as an example , which is only a few lines of codes to show visitor's public ip address. Even it is a free plan, it is enough for your personal project as I shown for your example. If you have your own domain, it can also assign to it. I am using Cloudflare, but it is similar configuration as other dns management provider. If you need free domain, check my following two videos: Free PP.UA Subdomain - https://youtu.be/zrhxb8swVGM Free Subdomain from EU.ORG - https://youtu.be/V1xnhqqg4Rw For Cloudflare related topics, check playlist: https://www.youtube.com/playlist?list=PLg7bL1bMpwPXv7qK44hjAsvkosv1aYmQ_ ==================================================================== If you found this video has some useful information, please give me a thumb up and subscribe this channel to get more updates: https://www.youtube.com/c/Netsec?sub_confirmation=1 Learning and Sharing - 海内存知己,天涯若比邻 - http://51sec.org

Watch video on YouTube here: https://youtu.be/rnbQIQe2M4Y by Johnny Netsec
0 Comments

Free 1TB Cloud Storage - Terabox

5/22/2021

0 Comments

 
Free 1TB Cloud Storage - Terabox

Terabox provides 1TB free space and provides web version plus IOS & Android clients for end user. It was just renamed from Dubox to Terabox recently. Dubox was launched on September 14, 2020, by  C Popin, a Japanese subsidiary of Chinese search engine company Baidu. This product may actually be an overseas version of Baidu Netdisk(百度网盘). Baidu Netdisk asked for mobile phone numbers in mainland China around 2018, so foreign users couldn’t use the service. This may be why Baidu launched Dubox. Dubox provides free storage space up to 1TB (1,024 GB), and there is no limit on upload and download speed at this stage. But it banned access from users in Chinese mainland areas, which caused controversy on Weibo.

With the long history about Baidu Netdisk and the reputation for  limiting free user's download speed, also deleting pirated content privately stored on Baidu Netdisk, in the future Terabox might use same strategy as Netdisk, which is thotting free user's ability then allowing user to pay for higher download speed and censor the content you stored privately. 

Terabox Feature List

Free Terabox Features:

  • 1024GB of free cloud storage to back up all your files.
  • Upload multiple types of files to TeraBox.
  • Multiple privacy protections.
  • Safely storage your files with any devices.
  • Quickly access recent and important files.
  • Intelligent classified album.
  • Sharing the files privately.

Premium Commercial Features:

  • 2TB large space, 
  • download high-speed channel, 
  • video 2.0x speed playback, 
  • video automatic backup, 
  • 1080P playback, 
  • super large file upload


Subscription Price:

  • $2.99 /month for consecutive months purchase, 
  • $3.99 /month for non-consecutive months purchase, 
  • $10.99 for non-consecutive quarters purchase, 
  • $38.99 /year for non-consecutive years purchase


Sharing

It is pretty easy to share through Terabox , which is another major reason why I liked it. File sharing can be done directly from the file list page by clicking sharing icon. You can choose a sharing validity period from 7 days, 30 days or Permanent validity. It also provides private sharing with a password protection although password is randomly generated. 


Remote Downloading by Uploading Torrent file

Tested with torrent file by creating a new BT task, it works well. You can close task window and tasks will continue run in background as long as you keep Terabox page opening. 


From Create a new link task, it says supporting magnet link, but it never worked for me. That is a bit disappointing since most download sites are only providing magnet links now. 


Picture, Video & Music Playback directly

You can directly see the thumbnail of pictures and videos. Click it and watch the video from separate screen with 720p resolution for free user. 


App 

It is a pity Terabox does not provide a desktop client to sync from computer folders to cloud. But it does provide an IOS and Android app for mobile users. 

You can customize the sync folders and enable automatic backup feature, which is quite standard function. Sync speed is a bit slower than other cloud storage apps from my testing. 


Common Cloud Storage Providers Limitations

1. Limited Free Space

Name Link Free Space
Ice Drive https://icedrive.net/ 10GB
pCloud https://www.pcloud.com/ 10GB
Mega https://mega.nz/ 50GB
workdrive https://www.zoho.com/workdrive/ 20GB
OneDrive https://onedrive.live.com/about/en-us/ 5GB
Google Drive https://www.google.com/drive/ 15GB
Dropbox https://www.dropbox.com/ 2GB
IDrive https://www.idrive.com/ 5GB
Amazon Drive https://www.amazon.com/b?ie=UTF8&node=15547130011 5GB
Sync https://www.sync.com/ 5GB
Box https://www.box.com/en-gb/drive 10GB
iCloud https://www.apple.com/in/icloud/ 5GB
Yandex Disk https://disk.yandex.com/ 50GB
Media Fire https://www.mediafire.com/ 10GB
Koofr https://koofr.eu/ 10GB
MiMedia http://www.mimedia.com 10GB
Jumpshare https://jumpshare.com/ 2GB

Note: https://ift.tt/31n05TR


2. Single File size restriction

from 100MB to 2GB 

Baidu Netdisk is allowing 4GB for single file and paid user can go up to 20GB. Not able to find out any written statement, I am guessing Terabox might be using same limitation. 


via Blogger https://ift.tt/344hYJh
May 21, 2021 at 10:29PM Cloud
0 Comments

Pen Test Lab - 3. Information gathering

5/19/2021

0 Comments

 
Continue showing my pen testing lab. In this video, I am showing some of passive information gathering tools and websites. Blog Post: https://ift.tt/3f1Zgbl ==================================================================== If you found this video has some useful information, please give me a thumb up and subscribe this channel to get more updates: https://www.youtube.com/c/Netsec?sub_confirmation=1 Learning and Sharing - 海内存知己,天涯若比邻 - http://51sec.org

Watch video on YouTube here: https://youtu.be/nJDj6YNy5_s by Johnny Netsec
0 Comments
<<Previous

    Categories

    All
    Architecture
    Blog
    Checkpoint
    Cisco
    Cloud
    CyberArk
    F5
    Fortigate
    Guardium
    Juniper
    Linux
    Network
    Others
    Palo Alto
    Qualys
    Raspberry Pi
    Security
    SIEM
    Software
    Vmware
    VPN
    Wireless

    Archives

    March 2024
    February 2024
    January 2024
    December 2023
    November 2023
    October 2023
    September 2023
    August 2023
    July 2023
    June 2023
    May 2023
    April 2023
    March 2023
    February 2023
    January 2023
    December 2022
    November 2022
    October 2022
    September 2022
    August 2022
    July 2022
    June 2022
    May 2022
    April 2022
    March 2022
    February 2022
    January 2022
    December 2021
    November 2021
    October 2021
    September 2021
    August 2021
    July 2021
    June 2021
    May 2021
    April 2021
    March 2021
    February 2021
    January 2021
    December 2020
    November 2020
    October 2020
    September 2020
    August 2020
    July 2020
    October 2019
    September 2019
    June 2019
    July 2018
    May 2018
    December 2017
    August 2017
    April 2017
    March 2017
    January 2017
    December 2016
    November 2016
    October 2016
    September 2016
    August 2016
    July 2016
    June 2016
    May 2016
    April 2016
    March 2016
    February 2016
    January 2016
    December 2015
    November 2015
    October 2015
    September 2015
    August 2015
    July 2015
    June 2015
    May 2015
    April 2015
    March 2015

    Print Page:

    RSS Feed

    Email Subscribe
Powered by Create your own unique website with customizable templates.
  • Blog
  • Sitemap
    • Categories
  • Contact
  • About
  • Resources
  • Tools
  • 51sec.org