Info Security Memo
  • Blog
  • Sitemap
    • Categories
  • Contact
  • About
  • Resources
  • Tools
  • 51sec.org

Build Confidence

Focusing on Information Security 

Info Security Notes

[5 Mins Docker] Deploy A Light Weight Super Fast and Nice Personal Navigation Site - Flame (Docker Run & Fly.io)

2/27/2023

0 Comments

 
[5 Mins Docker] Deploy A Light Weight, Super Fast and Nice Personal Navigation Site - Flame (Docker Run & Fly.io)
Based on Github project page, Flame is self-hosted startpage for your server. Its design is inspired (heavily) by SUI. Flame is very easy to setup and use. With built-in editors, it allows you to setup your very own application hub in no time - no file editing necessary.

There is similar projected , Flare, which is more like a Chinese version of Flame. It does provide quite a few enhancements on features and speed, but one thing it is missing from Flare is the authentication, although Flare seems much nicer and faster. 

In this post, I am going to show you how to get both projects up and running in the cloud, and more specifically, how to run in in Fly.io platform. 

Introduction

Flame: https://github.com/pawelmalak/flame

Flame is self-hosted startpage for your server. Easily manage your apps and bookmarks with built-in editors.


Flare: https://github.com/soulteary/docker-flare

Flare  Lightweight, high performance and fast self-hosted navigation pages, resource utilization rate is <1% CPU, MEM <30 M, Docker Image < 10M


Flare project was inspired from another similar project Flame in Github: https://github.com/pawelmalak/flame

Feature list:


  •  Create, update, delete your applications and bookmarks directly from the app using built-in GUI editors
  •  Pin your favourite items to the homescreen for quick and easy access
  •  Integrated search bar with local filtering, 11 web search providers and ability to add your own
  •  Authentication system to protect your settings, apps and bookmarks
  •  Dozens of options to customize Flame interface to your needs, including support for custom CSS, 15 built-in color themes and custom theme builder
  •  Weather widget with current temperature, cloud coverage and animated weather status
  •  Docker integration to automatically pick and add apps based on their labels

Docker Run & Docker Compose


Flame:


docker run -p 5005:5005 -v /path/to/data:/app/data -e PASSWORD=flame_password pawelmalak/flame

Docker-compose.yml

version: '3.6'

services:
  flare:
    image: soulteary/flare
    restart: always
    # 默认无需添加任何参数,如有特殊需求
    # 可阅读文档 https://github.com/soulteary/docker-flare/blob/main/docs/advanced-startup.md
    command: flare
    # 启用账号登陆模式
    # command: flare --nologin=0
    # environment:
      # 如需开启用户登陆模式,需要先设置 `nologin` 启动参数为 `0`
      # 如开启 `nologin`,未设置 FLARE_USER,则默认用户为 `flare`
      # - FLARE_USER=flare
      # 指定你自己的账号密码,如未设置 `FLARE_USER`,则会默认生成密码并展示在应用启动日志中
      # - FLARE_PASS=your_password
      # 是否开启“使用向导”,访问 `/guide`
      # - FLARE_GUIDE=1
    ports:
      - 5005:5005
    volumes:
      - ./app:/app


docker-compose up -d


Flare:


docker run --rm -it -p 5005:5005 -v `pwd`/app:/app soulteary/flare


Docker-compose.yml

version: '3.6'

services:
  flame:
    image: pawelmalak/flame
    container_name: flame
    volumes:
      - /path/to/host/data:/app/data
      - /var/run/docker.sock:/var/run/docker.sock # optional but required for Docker integration
    ports:
      - 5005:5005
    secrets:
      - password # optional but required for (1)
    environment:
      - PASSWORD=flame_password
      - PASSWORD_FILE=/run/secrets/password # optional but required for (1)
    restart: unless-stopped

# optional but required for Docker secrets (1)
secrets:
  password:
    file: /path/to/secrets/password

docker-compose up -d


Deploy to Fly.io


https://fly.io/docs/getting-started/
https://fly.io/docs/hands-on/

Install flyctl:

Run the Powershell install script:

powershell -Command "iwr https://fly.io/install.ps1 -useb | iex"

  • If this is your first time with Fly.io, your next step will be to Sign up.
  • If you already have a Fly.io account, then your next step is to Sign in to Fly.io.


PS C:\Users\netsec> fly auth login
Opening https://fly.io/app/auth/cli/c41ccd9759be02c0a0dd2d2a096d58 ...
Waiting for session... Done
successfully logged in as [email protected]
PS C:\Users\netsec>
PS C:\Users\netsec>
PS C:\Users\netsec> flyctl launch
Creating app in C:\Users\netsec
Scanning source code
Could not find a Dockerfile, nor detect a runtime or framework from source code. Continuing with a blank app.
? Choose an app name (leave blank to generate one):
? Select Organization: 51Sec (51sec)
Some regions require a paid plan (fra, maa).
See https://fly.io/plans to set up a plan.
? Choose a region for deployment: Toronto, Canada (yyz)
Created app broken-brook-3157 in organization 51sec
Admin URL: https://fly.io/apps/broken-brook-3157
Hostname: broken-brook-3157.fly.dev
Wrote config file fly.toml
PS C:\Users\netsec> notepad fly.toml
PS C:\Users\netsec> fly volumes create flare_data --size 1
Some regions require a paid plan (fra, maa).
See https://fly.io/plans to set up a plan.
? Select region: Toronto, Canada (yyz)
        ID: vol_g67340kkkk2vydxw
      Name: flare_data
       App: broken-brook-3157
    Region: yyz
      Zone: acc6
   Size GB: 1
 Encrypted: true
Created at: 27 Feb 23 03:18 UTC
PS C:\Users\netsec> notepad fly.toml
PS C:\Users\netsec> fly launch
An existing fly.toml file was found for app broken-brook-3157
App is not running, deploy...
==> Building image
Searching for image 'soulteary/flare:0.3.1' remotely...
image found: img_0lq747o9nd5v6x35
==> Creating release
--> release v2 created
--> You can detach the terminal anytime without stopping the deployment
==> Monitoring deployment
Logs: https://fly.io/apps/broken-brook-3157/monitoring
 1 desired, 1 placed, 1 healthy, 0 unhealthy [health checks: 1 total, 1 passing]
--> v0 deployed successfully
PS C:\Users\netsec>


Flame:

Use notepad to edit fly.toml file, which was generated by "flyctl launch" command. 

# fly.toml file generated for broken-brook-3157 on 2023-02-26T19:11:40-08:00
app = "51flame"
kill_signal = "SIGINT"
kill_timeout = 5
processes = []
[build]
  image = "soulteary/flare:0.3.1"
[env] PASSWORD = "Flare1234!"
[mounts]
  source="flame_data"
  destination="/app/data"
[experimental]
  auto_rollback = true
[[services]]
  http_checks = []
  internal_port = 5005
  processes = ["app"]
  protocol = "tcp"
  script_checks = []
  [services.concurrency]
    hard_limit = 25
    soft_limit = 20
    type = "connections"
  [[services.ports]]
    force_https = true
    handlers = ["http"]
    port = 80
  [[services.ports]]
    handlers = ["tls", "http"]
    port = 443
  [[services.tcp_checks]]
    grace_period = "1s"
    interval = "15s"
    restart_limit = 0
    timeout = "2s"


Flare:

Use notepad to edit fly.toml file, which was generated by "flyctl launch" command. 

# fly.toml file generated for broken-brook-3157 on 2023-02-26T19:11:40-08:00
app = "51flare"
kill_signal = "SIGINT"
kill_timeout = 5
processes = []
[build]
  image = "soulteary/flare:0.3.1"
[env]
[mounts]
  source="flare_data"
  destination="/app"
[experimental]
  auto_rollback = true
[[services]]
  http_checks = []
  internal_port = 5005
  processes = ["app"]
  protocol = "tcp"
  script_checks = []
  [services.concurrency]
    hard_limit = 25
    soft_limit = 20
    type = "connections"
  [[services.ports]]
    force_https = true
    handlers = ["http"]
    port = 80
  [[services.ports]]
    handlers = ["tls", "http"]
    port = 443
  [[services.tcp_checks]]
    grace_period = "1s"
    interval = "15s"
    restart_limit = 0
    timeout = "2s"


Usage

Flame:

/settings

/applications

/


Authenticated user has access to:

  • all apps
  • all categories
  • all bookmarks
  • all editors
  • all settings

Guest user has access to:

  • all apps set to public (homescreen - only pinned, apps - all public apps)
  • all categories set to public (homescreen - only pinned, bookmarks - all public categories)
  • all bookmarks set to public (homescreen/bookmarks - only if parent category is set to public)
  • Theme and App sections of settings

Flare:


/editor


/config

/guide


/help


Test Performance using Google Chrome Lighthouse:


Flame


PS C:\Users\netsec> fly auth login
Opening https://fly.io/app/auth/cli/c41ccd9759be02c0a0dd2d2a096d58 ...
Waiting for session... Done
successfully logged in as [email protected]
PS C:\Users\netsec>
PS C:\Users\netsec>
PS C:\Users\netsec> flyctl launch
Creating app in C:\Users\netsec
Scanning source code
Could not find a Dockerfile, nor detect a runtime or framework from source code. Continuing with a blank app.
? Choose an app name (leave blank to generate one):
? Select Organization: 51Sec (51sec)
Some regions require a paid plan (fra, maa).
See https://fly.io/plans to set up a plan.
? Choose a region for deployment: Toronto, Canada (yyz)
Created app broken-brook-3157 in organization 51sec
Admin URL: https://fly.io/apps/broken-brook-3157
Hostname: broken-brook-3157.fly.dev
Wrote config file fly.toml
PS C:\Users\netsec> notepad fly.toml
PS C:\Users\netsec> fly volumes create flame_data --size 1

PS C:\Users\netsec> notepad fly.toml
PS C:\Users\netsec> fly launch
An existing fly.toml file was found for app broken-brook-3157
App is not running, deploy...
==> Building image
Searching for image 'soulteary/flare:0.3.1' remotely...
image found: img_0lq747o9nd5v6x35
==> Creating release
--> release v2 created
--> You can detach the terminal anytime without stopping the deployment
==> Monitoring deployment
Logs: https://fly.io/apps/broken-brook-3157/monitoring
 1 desired, 1 placed, 1 healthy, 0 unhealthy [health checks: 1 total, 1 passing]
--> v0 deployed successfully
PS C:\Users\netsec>


Use notepad to edit fly.toml file, which was generated by "flyctl launch" command. 

# fly.toml file generated for flare51 on 2023-02-26T20:00:01-08:00
app = "flare51"
kill_signal = "SIGINT"
kill_timeout = 5
processes = []
[build]
  image = "pawelmalak/flame"
[env]
  PASSWORD = "flame"
[experimental]
  auto_rollback = true
[mounts]
  destination = "/app/data"
  source = "flame_data"
[[services]]
  http_checks = []
  internal_port = 5005
  processes = ["app"]
  protocol = "tcp"
  script_checks = []
  [services.concurrency]
    hard_limit = 25
    soft_limit = 20
    type = "connections"
  [[services.ports]]
    force_https = true
    handlers = ["http"]
    port = 80
  [[services.ports]]
    handlers = ["tls", "http"]
    port = 443
  [[services.tcp_checks]]
    grace_period = "1s"
    interval = "15s"
    restart_limit = 0
    timeout = "2s"


Videos


References

  • 【好玩儿的Docker项目】10分钟搭建一个轻量、快速、美观的个人导航页面——Flare
  • Flare 制作记录:应用前后端性能优化


via Blogger http://blog.51sec.org/2023/02/5-mins-docker-deploy-light-weight-super.html
February 27, 2023 at 01:54PM Docker
0 Comments

Revive Old PC (1G RAM 1Core CPU 10G HD) With Tiny11 (Lite Win11 Without TPM Required)

2/26/2023

0 Comments

 
This video shows a way to install a light weight lite Windows 11/Windows 10 on your old PC, even with only 1G RAM, Single Core CPU, 10G Hard Drive. Tiny11 or Tiny10 can be a good alternative for your OS installed on your low end PC. Related Post: ✍https://itprosec.com/index.php/2023/02/25/tiny10-tiny11-a-lightweight-windows-10-11/ Download Link: 1. Backup links are in the blog post 2. Tiny11 - https://archive.org/details/tiny-11_202302 3. Tiny10 - https://archive.org/details/tiny-10-NTDEV Windows 11 Related Videos: ?Install Windows11 Free into VMWare Workstation - https://youtu.be/FlhzA1gIVjU ?Easily Upgrade From Windows 7/10 To Windows 11 Without Minimum System Requirement - https://youtu.be/dejYRyUkTcU ?Fix Windows 11 Minimum System Requirements Installation Issue - https://youtu.be/cmLt0gD4xrk ?Using Ventoy to Make a Bootable USB to Install Windows 11 on Old Computer HP ThinClient T620 - https://youtu.be/0iFhMrDvYpY ?Chapters: 0:00 - Introduction 0:55 - Lets start it 2:49 - Download Tiny11 4:18 - Installation of Tiny11 12:23 - Check out the resources usage and Tiny10 17:10 - End Scene ✅#51Sec #NetSec ====================================================================== If you found this video has some useful information, please give me a thumb up and subscribe this channel to get more updates: ⚡https://www.youtube.com/c/Netsec?sub_confirmation=1 ⚡Resource Collection and Bookmarks: https://sites.51sec.org/ Learning and Sharing - ?海内存知己,天涯若比邻! Discord: https://discord.gg/fCW9phn Blog: https://blog.51sec.org

Watch video on YouTube here: https://youtu.be/j_9dPQVYPQg by NetSec
0 Comments

[5 Minutes Docker] Deploy Memos to Record Your Life

2/25/2023

0 Comments

 
[5 Minutes Docker] Deploy Memos to Record Your Life

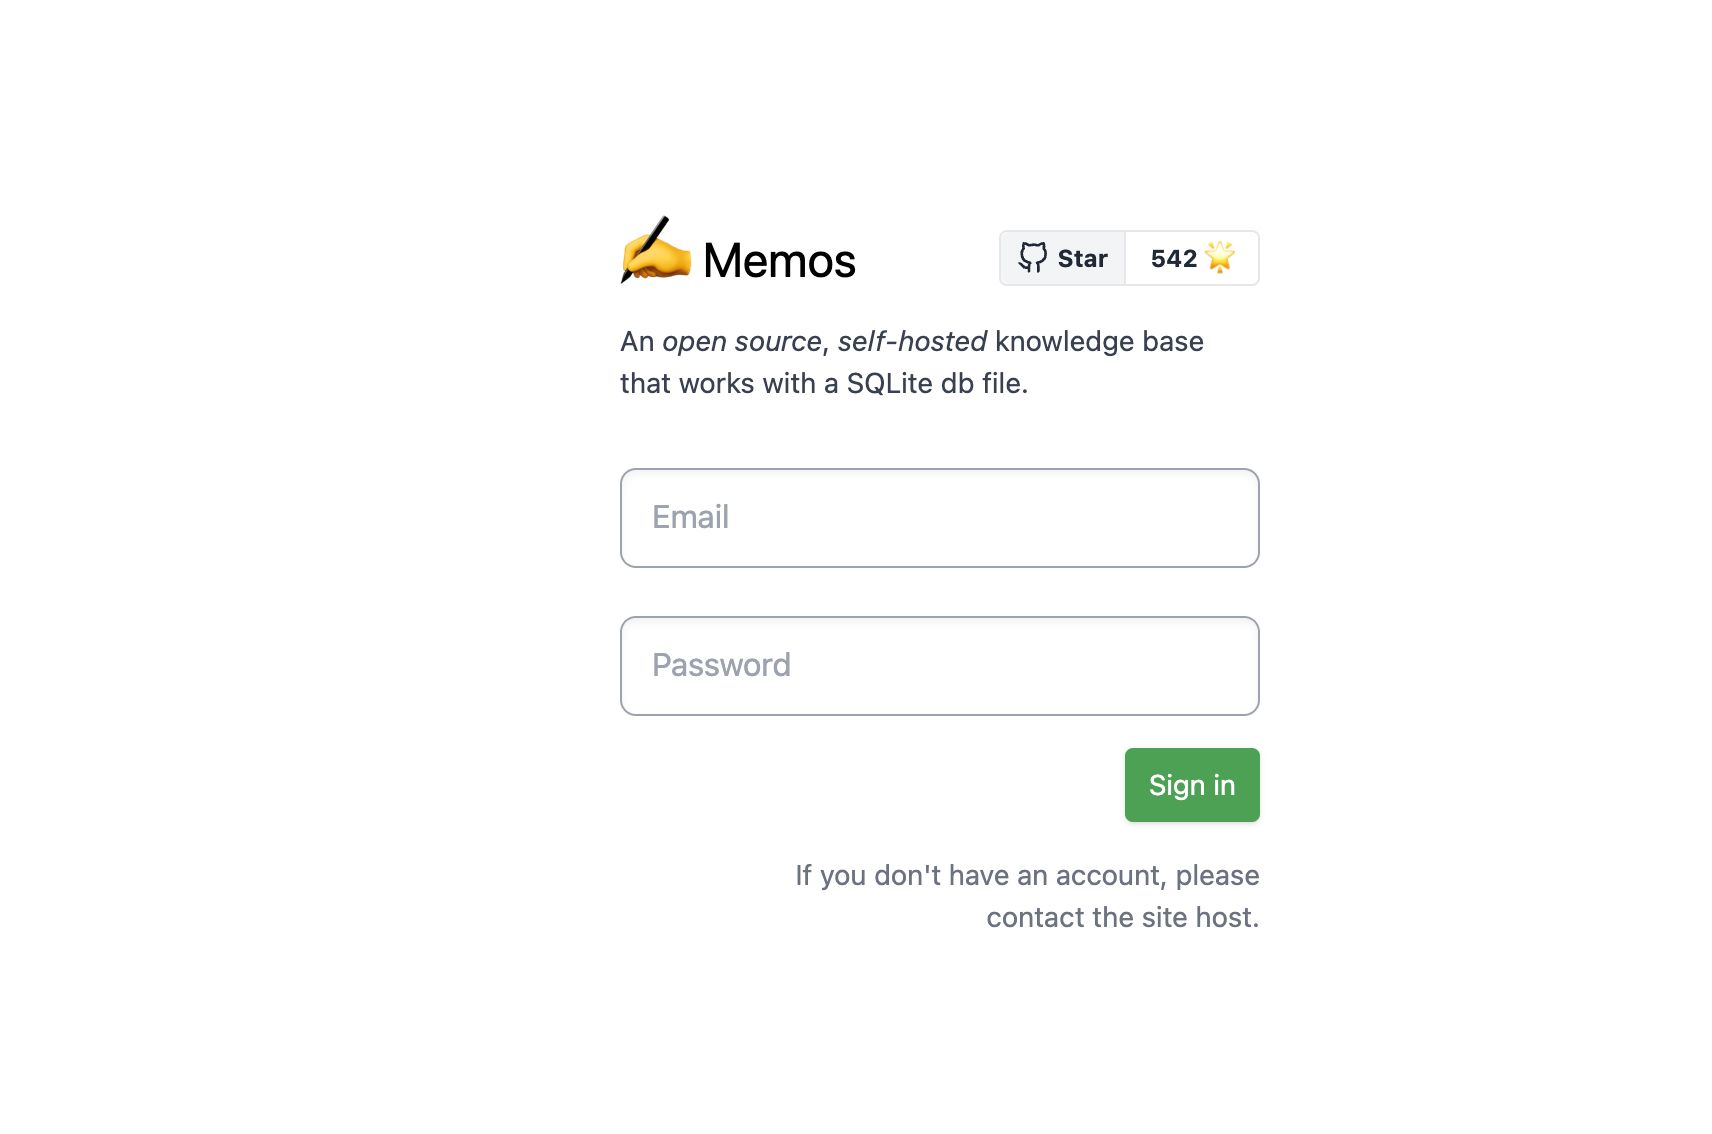
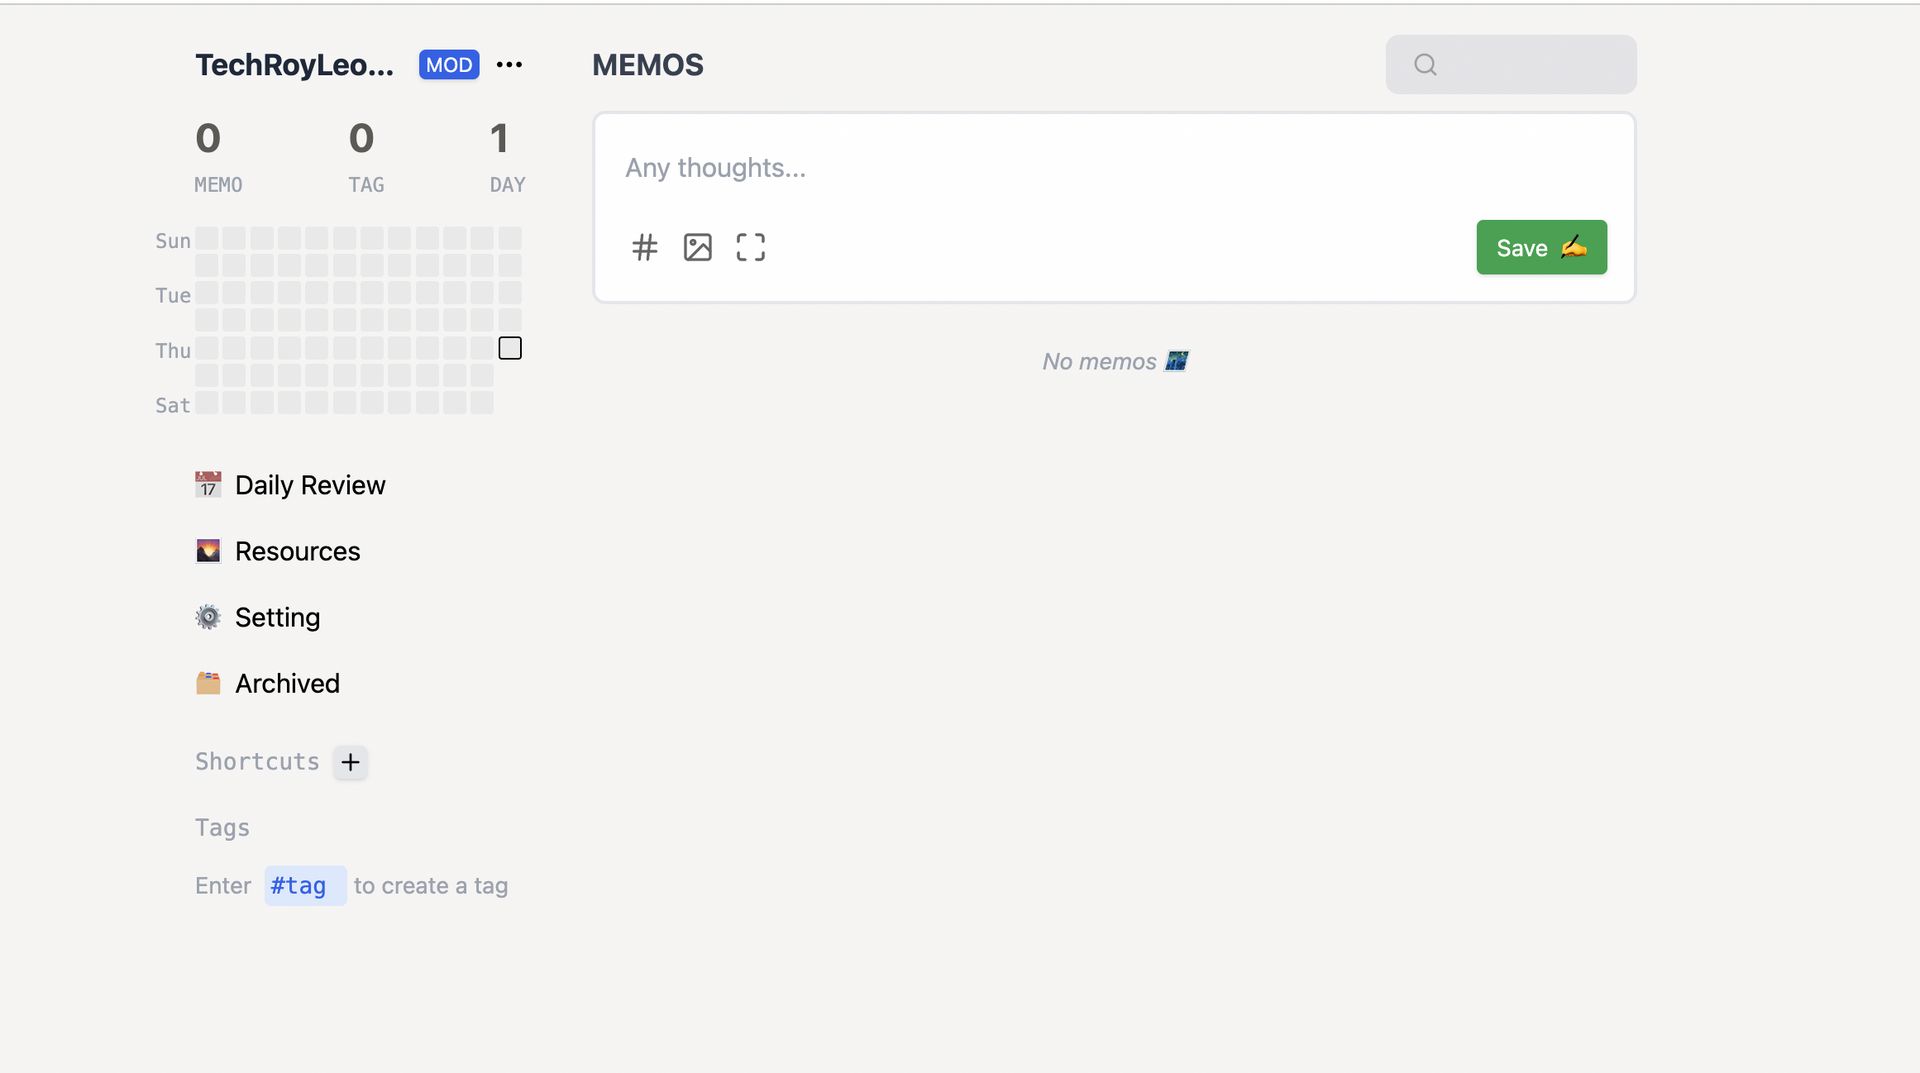
Memos is a Github project which you can deploy it easily in 5 minutes and use it ro record some of your thinking, or record some interesting things. In this post, I am going to show you a couple of ways to deploy it quickly and easily. 


c54228760b767d2fe6f84c535d129144.png

  • ? Easy to record daily/weekly plan
  • ? Convenient to record some whimsical ideas
  • ? You can write your reflections by hand
  • ?️ Sometimes it can replace the "file transfer assistant" often used on WeChat, the memo of the mobile phone
  • ? You can create your own lightweight "card" notebook

Features

  •  Open source and free forever
  •  Support for self-hosting with Docker in seconds
  •  Plain textarea first and support some useful Markdown syntax
  •  Set memo private or public to others
  •  RESTful API for self-service
  •  Embed memos on other sites using iframe
  •  Hashtags for organizing memos
  •  Interactive calendar view
  •  Easy data migration and backups


8491cbb78e30d5d8c1c942201fcca153.png

Deploy with Docker Run Command

Check if Port 5230 Used 


lsof -i:5230  #Check if tcp port 5230 occupied by other application. 

If the output shows command not found, you can use following command to install lsof

  • apt install lsof


Docker Run

docker run -d --name memos -p 5230:5230 -v ~/.memos/:/var/opt/memos neosmemo/memos:latest

~/.memos/ will be used as the data directory in your machine and /var/opt/memos is the directory of the volume in Docker and should not be modified.


Upgrade:

docker stop memos
docker rm -f memos
cp -r /root/data/docker_data/memos/.memos /root/data/docker_data/memos/.memos.archive  # backup data
docker pull neosmemo/memos:latest  # pull latest image

docker run -it -d \
  --name memos \
  --publish 5230:5230 \
  --volume /root/data/docker_data/memos/.memos/:/var/opt/memos \
  neosmemo/memos:latest \
  --mode prod \
  --port 5230

Access application using http://<public ip>:5230

You can find your public ip using the following commands :
  • curl ip.sb

Deploy Using Docker Compose File


  • vi docker-compose.yaml 


version: "3.0"
services:
  memos:
    image: neosmemo/memos:latest
    container_name: memos
    volumes:
      - ~/.memos/:/var/opt/memos
    ports:
      - 5230:5230

  • docker-compose up -d


Upgrade to latest version memos

  • docker-compose down && docker image rm neosmemo/memos:latest && docker-compose up -d


cd /root/data/docker_data/memos
docker-compose down 
cp -r /root/data/docker_data/memos/.memos /root/data/docker_data/memos/.memos.archive  # backup

docker-compose pull

docker-compose up -d 

docker image prune  # prune comand to clearn up not used docker images。Delete all images not been tagged or not been used by docker container.


Remove / Uninstall memos application


docker stop memos

docker rm -f memos  # remove container memos, but will not delete mapped volumes

rm -rf /root/data/docker_data/memos  # remove all mapped volumes


Deploy To Fly.io 

 https://github.com/hu3rror/memos-on-fly
  • Follow the instructions to install fly's command-line interface flyctl.
  • log into flyctl.


1 flyctl auth login


2 flyctl launch

This command creates a fly.toml file.


3 Edit your fly.toml


# fly.toml file generated for memos

app = "memos_example"                                               # change to whatever name you want if the name is not occupied
kill_signal = "SIGINT"
kill_timeout = 5
processes = []

[build]
  image = "hu3rror/memos-fly:latest"                                # Do not change unless you build your own image

[env]
  DB_PATH = "/var/opt/memos/memos_prod.db"                          # do not change

  # Details see: https://litestream.io/guides/backblaze/
  LITESTREAM_REPLICA_BUCKET = "your_bucket_name"                    # change to your litestream bucket name
  LITESTREAM_REPLICA_ENDPOINT = "s3.us-west-000.backblazeb2.com"    # change to your litestream endpoint url
  LITESTREAM_REPLICA_PATH = "memos_prod.db"                         # keep the default or change to whatever path you want

[mounts]
  source="memos_data"                                               # change to your fly.io volume name
  destination="/var/opt/memos"                                      # do not change

[experimental]
  allowed_public_ports = []
  auto_rollback = true

[[services]]
  http_checks = []
  internal_port = 5230                                              # change to port 5230
  processes = ["app"]
  protocol = "tcp"
  script_checks = []
  [services.concurrency]
    hard_limit = 25
    soft_limit = 20
    type = "connections"

  [[services.ports]]
    force_https = true
    handlers = ["http"]
    port = 80

  [[services.ports]]
    handlers = ["tls", "http"]
    port = 443

  [[services.tcp_checks]]
    grace_period = "1s"
    interval = "15s"
    restart_limit = 0
    timeout = "2s"

[build]
  image = "hu3rror/memos-fly:latest"
[env]
  DB_PATH = "/var/opt/memos/memos_prod.db"  # do not change
  LITESTREAM_REPLICA_BUCKET = "<filled_later>"  # change to your litestream bucket name
  LITESTREAM_REPLICA_ENDPOINT = "<filled_later>"  # change to your litestream endpoint url
  LITESTREAM_REPLICA_PATH = "memos_prod.db"  # keep the default or change to whatever path you want


flyctl volumes create memos_data --region <your_region> --size <size_in_gb>

For example:

flyctl volumes create memos_data --region hkg --size 1
[mounts]
  source="memos_data"
  destination="/var/opt/memos"


[[services]]
  internal_port = 5230


4 flyctl deploy


Videos


References


  • Demo: https://demo.usememos.com/
  • GitHub: https://github.com/usememos/memos


via Blogger http://blog.51sec.org/2023/02/5-minutes-docker-deploy-memos-to-record.html
February 24, 2023 at 11:14PM Docker
0 Comments

How to Enable Azure AD Password Writeback

2/20/2023

0 Comments

 
How to Enable Azure AD Password Writeback

With Azure Active Directory (Azure AD) self-service password reset (SSPR), users can update their password or unlock their account using a web browser. We recommend this video on How to enable and configure SSPR in Azure AD. In a hybrid environment where Azure AD is connected to an on-premises Active Directory Domain Services (AD DS) environment, this scenario can cause passwords to be different between the two directories.

Password writeback can be used to synchronize password changes in Azure AD back to your on-premises AD DS environment. Azure AD Connect provides a secure mechanism to send these password changes back to an existing on-premises directory from Azure AD.


Prerequisites

To complete this task, you need the following resources and privileges:

  • A working Azure AD tenant with at least an Azure AD Premium P1 or trial license enabled.
    • If needed, create one for free.
    • For more information, see Licensing requirements for Azure AD SSPR.
  • An account with Hybrid Identity Administrator.
  • Azure AD configured for self-service password reset.
    • If needed, complete the previous tutorial to enable Azure AD SSPR.
  • An existing on-premises AD DS environment configured with a current version of Azure AD Connect.
    • If needed, configure Azure AD Connect using the Express or Custom settings.
    • To use password writeback, domain controllers can run any supported version of Windows Server.

1. Configure account permissions for Azure AD Connect


Azure AD Connect lets you synchronize users, groups, and credential between an on-premises AD DS environment and Azure AD. You typically install Azure AD Connect on a Windows Server 2016 or later computer that's joined to the on-premises AD DS domain.

To correctly work with SSPR writeback, the account specified in Azure AD Connect must have the appropriate permissions and options set. If you're not sure which account is currently in use, open Azure AD Connect and select the View current configuration option. The account that you need to add permissions to is listed under Synchronized Directories. The following permissions and options must be set on the account:

  • Reset password
  • Write permissions on lockoutTime
  • Write permissions on pwdLastSet
  • Extended rights for "Unexpire Password" on the root object of each domain in that forest, if not already set.


If you don't assign these permissions, writeback may appear to be configured correctly, but users encounter errors when they manage their on-premises passwords from the cloud. When setting "Unexpire Password" permissions in Active Directory, it must be applied to This object and all descendant objects, This object only, or All descendant objects, or the "Unexpire Password" permission can't be displayed.

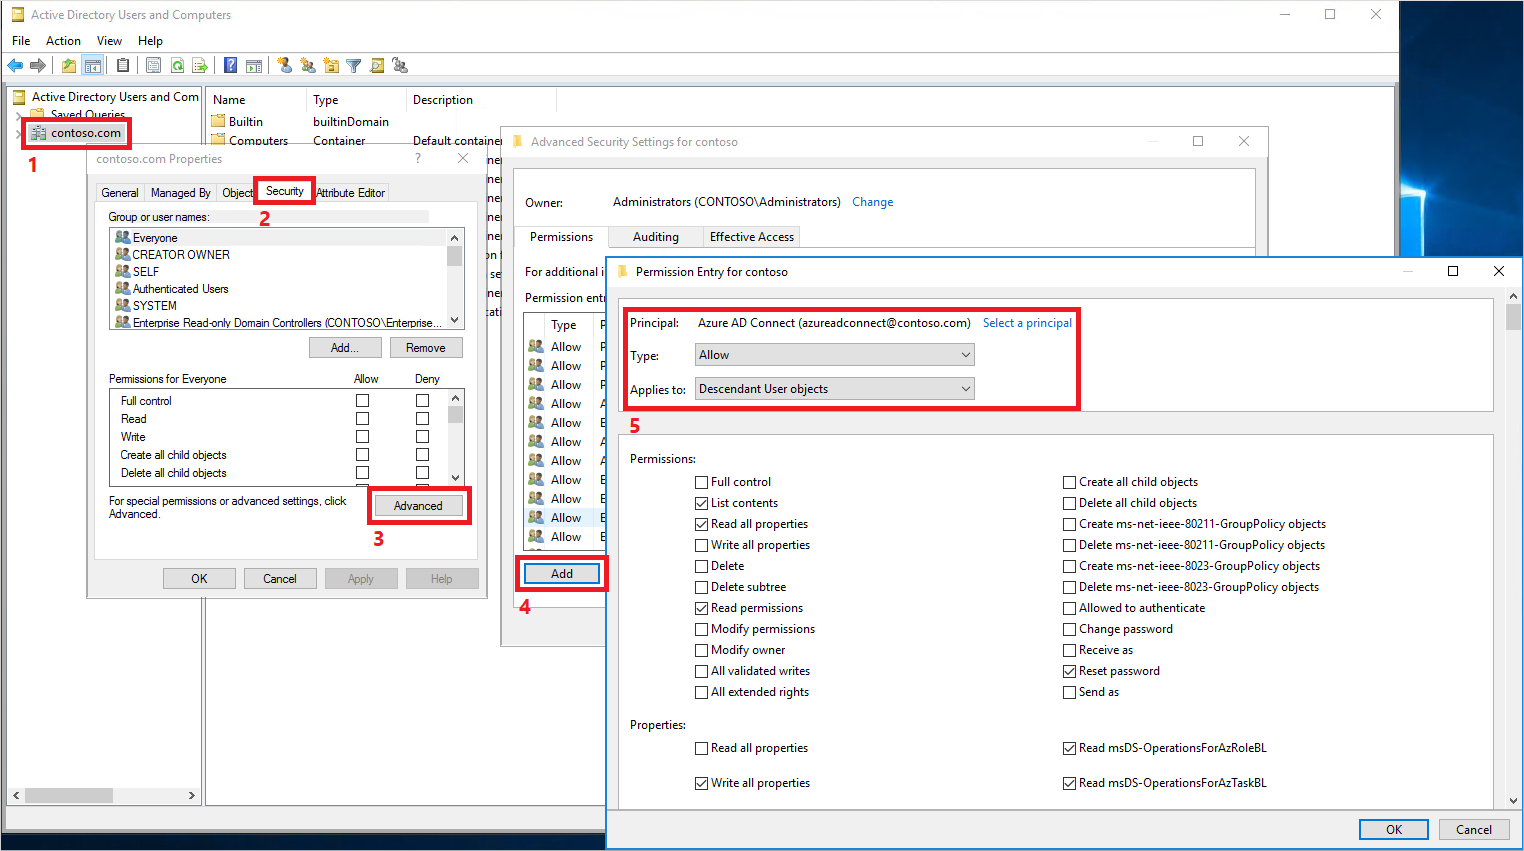
To set up the appropriate permissions for password writeback to occur, complete the following steps:

  1. In your on-premises AD DS environment, open Active Directory Users and Computers with an account that has the appropriate domain administrator permissions.

  2. From the View menu, make sure that Advanced features are turned on.

  3. In the left panel, right-select the object that represents the root of the domain and select Properties > Security > Advanced.

  4. From the Permissions tab, select Add.

  5. For Principal, select the account that permissions should be applied to (the account used by Azure AD Connect).

  6. In the Applies to drop-down list, select Descendant User objects.

  7. Under Permissions, select the box for the following option:

    • Reset password
  8. Under Properties, select the boxes for the following options. Scroll through the list to find these options, which may already be set by default:

    • Write lockoutTime
    • Write pwdLastSet

    Set the appropriate permissions in Active Users and Computers for the account that is used by Azure AD Connect

  9. When ready, select Apply / OK to apply the changes.

  10. From the Permissions tab, select Add.

  11. For Principal, select the account that permissions should be applied to (the account used by Azure AD Connect).

  12. In the Applies to drop-down list, select This object and all descendant objects

  13. Under Permissions, select the box for the following option:

    • Unexpire Password
  14. When ready, select Apply / OK to apply the changes and exit any open dialog boxes.

When you update permissions, it might take up to an hour or more for these permissions to replicate to all the objects in your directory.

Password policies in the on-premises AD DS environment may prevent password resets from being correctly processed. For password writeback to work most efficiently, the group policy for Minimum password age must be set to 0. This setting can be found under Computer Configuration > Policies > Windows Settings > Security Settings > Account Policies within gpmc.msc.

If you update the group policy, wait for the updated policy to replicate, or use the gpupdate /force command.


2. Enable password writeback in Azure AD Connect


One of the configuration options in Azure AD Connect is for password writeback. When this option is enabled, password change events cause Azure AD Connect to synchronize the updated credentials back to the on-premises AD DS environment.

To enable SSPR writeback, first enable the writeback option in Azure AD Connect. From your Azure AD Connect server, complete the following steps:

  1. Sign in to your Azure AD Connect server and start the Azure AD Connect configuration wizard.

  2. On the Welcome page, select Configure.

  3. On the Additional tasks page, select Customize synchronization options, and then select Next.

  4. On the Connect to Azure AD page, enter a global administrator credential for your Azure tenant, and then select Next.

  5. On the Connect directories and Domain/OU filtering pages, select Next.

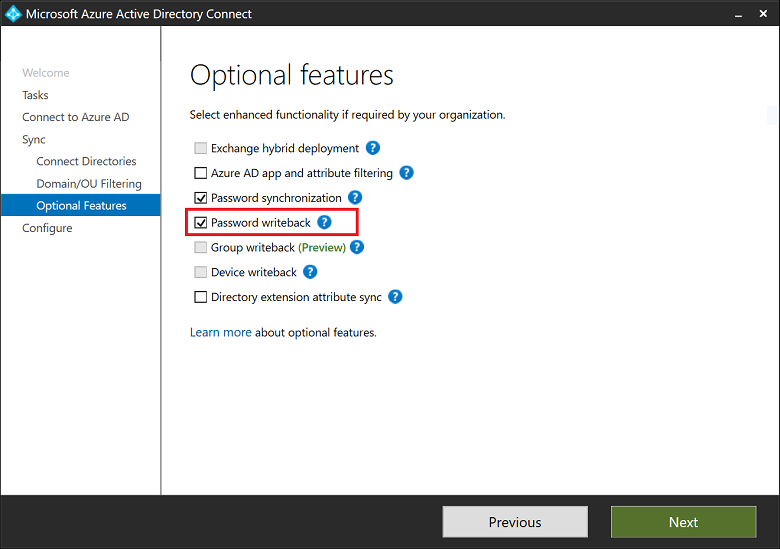
  6. On the Optional features page, select the box next to Password writeback and select Next.

    Configure Azure AD Connect for password writeback

  7. On the Directory extensions page, select Next.

  8. On the Ready to configure page, select Configure and wait for the process to finish.

  9. When you see the configuration finish, select Exit.


3. Enable password writeback for SSPR

 With password writeback enabled in Azure AD Connect, now configure Azure AD SSPR for writeback. SSPR can be configured to writeback through Azure AD Connect sync agents and Azure AD Connect provisioning agents (cloud sync). When you enable SSPR to use password writeback, users who change or reset their password have that updated password synchronized back to the on-premises AD DS environment as well.

To enable password writeback in SSPR, complete the following steps:

  1. Sign in to the Azure portal using a Hybrid Identity Administrator account.

  2. Search for and select Azure Active Directory, select Password reset, then choose On-premises integration.

  3. Check the option for Write back passwords to your on-premises directory .

  4. (optional) If Azure AD Connect provisioning agents are detected, you can additionally check the option for Write back passwords with Azure AD Connect cloud sync.

  5. Check the option for Allow users to unlock accounts without resetting their password to Yes.

  6. If there is an error, it might relate to the insufficent privilege or license AAD P1 or P2. 

  7. When ready, select Save.


Videos


References

  • Enable Azure Active Directory self-service password reset writeback to an on-premises environment
  • How does self-service password reset writeback work in Azure Active Directory?


via Blogger http://blog.51sec.org/2023/02/how-to-enable-azure-password-writeback.html
February 20, 2023 at 03:35PM Cloud
0 Comments

Deploy Alist Into Replit with Your Own Domain (No VPS Required All Free)

2/18/2023

0 Comments

 
This video is to show you a completely free way to deploy Alist (A File List Program for Multiple Cloud Disk Drives), with free cloud platform (Replit.com) to run Alist, and free deployment. Replit seems blocked Alist app to run and download for installation. This video will show you how to bypass that restriction. It also shows how to integrate with your own domain and how to keep it alive 24*7*365 using UptimeRobot's free monitoring service. Related Post: ✍https://blog.51sec.org/2022/12/5-minutes-docker-series-deploy-free.html ✍https://blog.51sec.org/2023/01/alist-advanced-usages.html Related Videos: ?Deploy AList using Portainer and Install AList in Winodws - https://youtu.be/SE8ZuGKw4Eg ?Using Docker Run to Deploy AList - A File Index App for Local/Cloud Storages - https://youtu.be/9ZFgm-5w8HY ?Get Free Subdomain from EU.ORG & Integrate with Cloudflare - https://youtu.be/V1xnhqqg4Rw ?Chapters: 0:00 - Introduction 1:33 - Lets start it 2:12 - 1. create Your Own Alist Repl 7:57 - 2. Link Alist Repl to Your Own Domain and Use UptimRobot to Wake it Up 9:48 - 3. Check New Created Alist Website Using Own Domain 11:10 - End Scene ✅#51Sec #NetSec ====================================================================== If you found this video has some useful information, please give me a thumb up and subscribe this channel to get more updates: ⚡https://www.youtube.com/c/Netsec?sub_confirmation=1 ⚡Resource Collection and Bookmarks: https://sites.51sec.org/ Learning and Sharing - ?海内存知己,天涯若比邻! Discord: https://discord.gg/fCW9phn Blog: https://blog.51sec.org

Watch video on YouTube here: https://youtu.be/MoO0fStWoHM by NetSec
0 Comments

Never Idle Your Oracle Cloud Free Tier VMs to Avoid OCI Reclaim Them

2/11/2023

0 Comments

 
Oracle Cloud is starting to reclaim those idle computing resources. That is expected and also reasonable although it might disappoint lots of free tier users. There are a couple of ways to increase your usage with some scripts we found online. This video shows you how to use NeverIdle script from Github project to control the cpu, memory and network usage. Related Post: ✍https://blog.51sec.org/2023/02/oracle-cloud-cleaning-up-idle-compute.html Related Videos: ?Oracle Cloud Account Sign Up and Create a New Computing Instance - https://youtu.be/ZYvkJLoIhjY ?Benchmark Oracle Cloud Free Tier VM (1/8 OCPU and 1GB memory) - https://youtu.be/qHsedxUrvYE ?Get Two Free and Permanent VPS from Oracle Cloud Platform - https://youtu.be/E9dHA3NBbN8 ?Oracle Cloud Free ARM Compute Instance (4 oCPUs and 24GB RAM) - https://youtu.be/FbihlMBNuro ?Create VNC Console Connection for Oracle Cloud Instances - https://youtu.be/JZlp9Xfg980 ?Chapters: 0:00 - Introduction 2:00 - Lets start it 3:33 - 1. Effects after implemented 4:38 - 2. Steps to Run NerverIdle Script 10:30 - 3. Tips and Other Methods 11:53 - End Scene ✅#51Sec #NetSec ====================================================================== If you found this video has some useful information, please give me a thumb up and subscribe this channel to get more updates: ⚡https://www.youtube.com/c/Netsec?sub_confirmation=1 ⚡Resource Collection and Bookmarks: https://sites.51sec.org/ Learning and Sharing - ?海内存知己,天涯若比邻! Discord: https://discord.gg/fCW9phn Blog: https://blog.51sec.org

Watch video on YouTube here: https://youtu.be/nEwGDrocrg4 by NetSec
0 Comments

[5 Mins Docker] Deploy FreshRSS - Docker Run & Fly.io (All Free No VPS Required)

2/6/2023

0 Comments

 
This post shows you how to deploy FreshRSS using Docker Run command and deploy it to Fly.io. It also shows how to integrate with your own domain and use https certificate. All components are free, such as , free domain from eu.org, free dns management from CloudFlare, free hosting from fly.io. Related Post: ✍https://blog.51sec.org/2023/01/5-minutes-docker-deploy-freshrss-using.html#point5 Related Videos: ?Deploy Minimalist By Portainer & Enable HTTPS with Basic Auth By NPM - Part 2 - https://youtu.be/vWyE6qn-46o ? Install A Web Notepad App - Minimalist - https://youtu.be/8Ea1-6Knl-g ? Install An Open Source Personal Music Streaming Server - koel - https://youtu.be/9ZrGV0zFbSw ? Deploy Wordpress in CentOS 7 with Docker - https://youtu.be/9whAlZIfEKE ? Using Portainer Deploy Minimalist Online Notepad & Using NPM Enable HTTPS with Basic Authentication - https://youtu.be/vWyE6qn-46o ? Deploy A File Index App for Local / Cloud Storages - AList - https://youtu.be/9ZFgm-5w8HY Free Related Videos: ⚡Get Free Subdomain from EU.ORG & Integrate with Cloudflare - https://youtu.be/V1xnhqqg4Rw ⚡Create Your Own Domain Free Web App & Running 24x7x365 Using Replit's Free Plan - https://youtu.be/DtgIDw1ciyU ⚡Free Playlist in my channel - https://www.youtube.com/watch?v=l-GsCak2fLM&list=PLg7bL1bMpwPV3C5N4KcbKK9k_bYMSEqIb Demo Sites ?https://demo.freshrss.org/ ?https://reader.51sec.org ?Chapters: 0:00 - Introduction 1:42 - Lets start it! 2:40 - 1. Docker Run Deploy in Play-With-Docker 5:34 - 2. Fly.io introduction 7:16 - 3. Deploy FreshRss into Fly.io 10:54 - 4. Install Certification with Own Domain 14:47- End Scene ✅#51Sec #NetSec ====================================================================== If you found this video has some useful information, please give me a thumb up and subscribe this channel to get more updates: ⚡https://www.youtube.com/c/Netsec?sub_confirmation=1 ⚡Resource Collection and Bookmarks: https://sites.51sec.org/ Learning and Sharing - ?海内存知己,天涯若比邻! Discord: https://discord.gg/fCW9phn Blog: https://blog.51sec.org

Watch video on YouTube here: https://youtu.be/l-GsCak2fLM by NetSec
0 Comments

Oracle Cloud Cleaning Up Idle Compute Instances & How to Keep it

2/5/2023

0 Comments

 
Oracle Cloud Cleaning Up Idle Compute Instances & How to Keep it

Recently some Oracle Cloud Free Tier users received a email regarding their compute instances identified as idle. And the those identified idle instances will be stopped in one week. Also Orcle Cloud Infrastructure (OCI) suggested to convert the account to Pay As You Go (PAYG) to avoid stopping. 


Here is the email content from Reddit

Oracle Cloud Infrastructure Customer,

Oracle Cloud Infrastructure (OCI) will be reclaiming idle Always Free compute resources from Always Free customers. Reclaiming idle resources allows OCI to efficiently provide services to Always Free customers. Your account has been identified as having one or more compute instances that have been idle for the past 7 days. These idle instances will be stopped one week from today, January 30,2023. If your idle Always Free compute instance is stopped, you can restart it as long as the associated compute shape is available in your region. You can keep idle compute instances from being stopped by converting your account to Pay As You Go (PAYG). With PAYG, you will not be charged as long as your usage for all OCI resources remains within the Always Free limits.


History

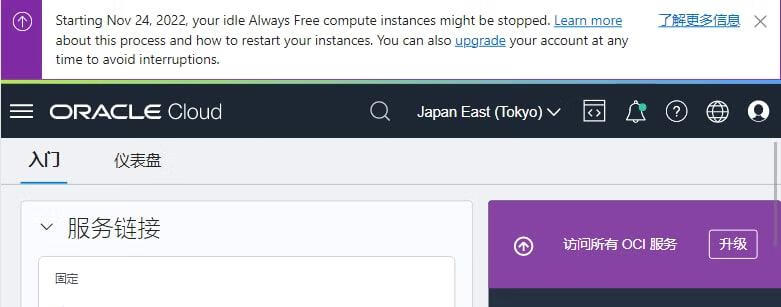
Nov 15 2022, a new announcement regarding idle resources might subject stopping were added into OCI website. 

从 2022 年 11 月 24 日开始,您闲置的 Always Free 计算实例可能会停止。 详细了解此过程以及如何重启您的实例。 您还可以随时升级您的帐户以避免中断。

仅限未付费的免费套餐帐户。Idle Always未付费免费套餐帐户的免费资源可以随时回收,恕不另行通知。回收包括停止或终止等操作。


Nov 19 2022, this announcement disappeared

End of Jan 2023, this announcement came back again at https://docs.oracle.com/en-us/iaas/Content/FreeTier/freetier_topic-Always_Free_Resources.htm

Idle Compute Instances

 Important

Reclamation of Idle Compute Instances

Idle Always Free compute instances may be reclaimed by Oracle. Oracle will deem virtual machine and bare metal compute instances as idle if, during a 7-day period, the following are true:

  • CPU utilization for the 95th percentile is less than 10%
  • Network utilization is less than 10%
  • Memory utilization is less than 10% (applies to A1 shapes only)

Based on what I am reading, it will need all those conditions met to make your free tier instances subject to be stopped. Unfortunately, there are no more details or explaination coming out. Strongly suggest free tier users to upgrade to Pay As You Go plan since all free tier resources will not be charged after you upgraded, but your idle resources will not subject to this stopping. 

Here are some methods found online which might help to keep your idle computing resources in Oracle Cloud. But there is no guarantee those will work. I will keep an eye on the Internet regarding how effective they are. 

NeverIdle Github Project Method to Keep it

 
NeverIdle - Github project: https://github.com/layou233/NeverIdle


Steps:

1 install dependencies

You might need to install wget and screen those two applications:

Based on your OS ,  this is command

  • yum install -y wget screen
  • apt install -y wget screen


2 Download script

# AMD Server

  • wget https://github.com/layou233/NeverIdle/releases/download/0.1/NeverIdle-linux-amd64 -O NeverIdle

# ARM Server

  • wget https://github.com/layou233/NeverIdle/releases/download/0.1/NeverIdle-linux-arm64 -O NeverIdle

3 Change file permission

  • chmod 777 NeverIdle

4 Run Command

  • screen -R baohuo
Command Explaination:

./NeverIdle -c 2h1m2s -m 2 -n 4h

-c : for cpu consumption. every 2 hour 1 minute 2 second (format is 2h1m2s), it will waste CPU once

-m : enable memory occupation. 2 means 2GB

-n : execute once to waste network for Ookla Speed Test. It will show the output on your screen.


5 Detaching and Reattaching screen session

To detach from screen and leave the window running in the background, use the keystroke:

Detach: Ctrl + a + d

Reattach: screen -r


Other screen commands:

  • Ctrl + a and c â€“ Open a new screen window.
  • Ctrl + a and " â€“ List all open windows.
  • Ctrl + a and 0 â€“ Switch to window 0 (or any other numbered window).
  • Ctrl + a and A â€“ Rename the current window.
  • Ctrl + a and S - Split the screen horizontally, with the current window on top.
  • Ctrl + a and | - Split the screen vertically, with the current window on the left.
  • Ctrl + a and tab â€“ Switch focus between areas of the split screen.
  • Ctrl + a and Ctrl + a â€“ Switch between current and previous windows.
  • Ctrl + a and n â€“ Switch to the next window.
  • Ctrl + a and p â€“ Switch to the previous window.
  • Ctrl + a and Q â€“ Quit all other windows except the current one..
  • Ctrl + a and X â€“ Lock the current window.
  • Ctrl + a and H â€“ Create a running log of the session.
  • Ctrl + a and M â€“ Monitor a window for output (a notification pops up when that window has activity).
  • Ctrl + a and _ - Watch a window for absence of output (such as when a file finishes downloading or a compiler finishes).


Other Methods to Keep Your Idle Resources


Shell Scripts


  • curl https://keeporacle.pages.dev/ -o keeporacle.sh && chmod +x keeporacle.sh && ./keeporacle.sh
  • or
  • wget https://keeporacle.pages.dev/ -O keeporacle.sh && chmod +x keeporacle.sh && ./keeporacle.sh

Source:https://hostloc.com/thread-1131732-1-1.html


lookbusy


  • lookbusy -c 50 # 占用所有 CPU 核心各 50%
  • lookbusy -c 50 -n 2 # 占用两个 CPU 核心各 50%
  • lookbusy -c 50-80 -r curve # 占用所有 CPU 核心在 50%-80% 左右浮动
  • lookbusy -c 0 -m 128MB -M 1000 # 每 1000 毫秒,循环释放并分配 128MB 内存
  • lookbusy -c 0 -d 1GB -b 1MB -D 10 # 每 10 毫秒,循环进行 1MB 磁盘写入,临时文件不超过 1GB


Calculate Pi


  • nohup echo "scale=99999999;4*a(1)" | bc -lq > /dev/null &
  • nohup cpulimit -l 30 -p 22489 >/dev/null &
  • scale那个代表小数点后的位数,数越大计算时间越长
  • -l 那里可以控制cpu使用率0-200
  • -p 那里写程序的PID,通过top命令查找,或者 ps -aux | grep bc

Source:https://hostloc.com/thread-1131769-1-1.html


References

  • 甲骨文云(Oracle Cloud)要清理闲置实例资源,附保活教程


via Blogger http://blog.51sec.org/2023/02/oracle-cloud-cleaning-up-idle-compute.html
February 05, 2023 at 02:24PM Cloud
0 Comments

List Your Folder / Files NTFS Permission into CSV File For Audit Check

2/3/2023

0 Comments

 
List Your Folder / Files NTFS Permission into CSV File For Audit Check

Managers and compliance auditors often ask IT admins or security admins to present a report listing file share permissions granted to a group or a particular user. To save them some time, I have tried to find out some useful tools or scripts to put them together in this post for easy to choose which one to use. 


List for folders


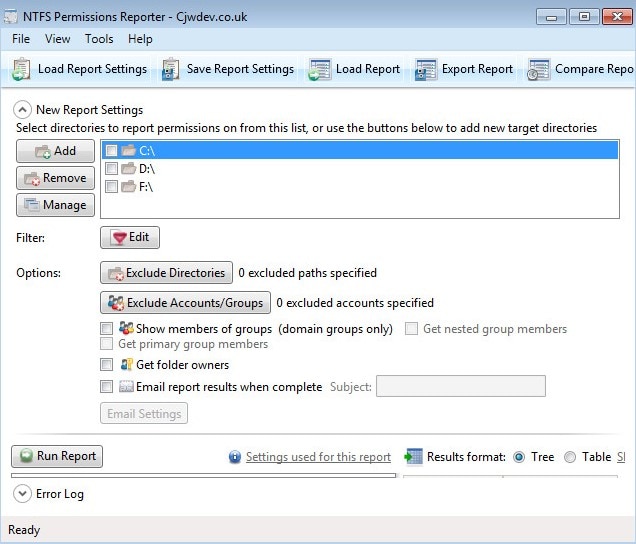
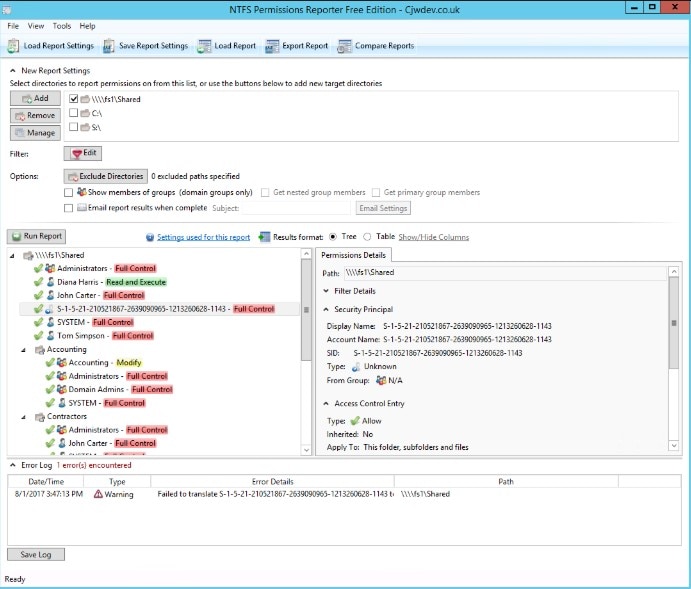
CJWDEV’s NTFS Permissions Reporter

1. CJWDEV’s NTFS Permissions Reporter

The NTFS Permissions Reporter by CJWDEV is an extremely adept tool for tracking access permissions. It displays group users with either direct or nested access for an entire file system directory. The report can be generated in either a tree or table format with color-coded access levels.

Only issue to me is not showing the file's permission.


List for specific user or group

Netwrix Effective Permissions Reporting Tool

2. Netwrix Effective Permissions Reporting Tool

Netwrix Effective Permissions Reporting Tool is excellent freeware for basic needs. While it misses out on many of the more comprehensive functions included in similar software, it does help admins ensure compliance on a user-by-user basis.

With Netwrix Effective Permissions Reporting Tool, admins can search a user or group throughout their entire IT infrastructure. The tool then generates a permissions report for an active directory or file share, including how users gained access, that can be exported as an HTML file. This information, though much more limited than reports generated by other tools, allows admins to guard against excessive user permissions by making sure they only have the appropriate permissions for their roles at the company.


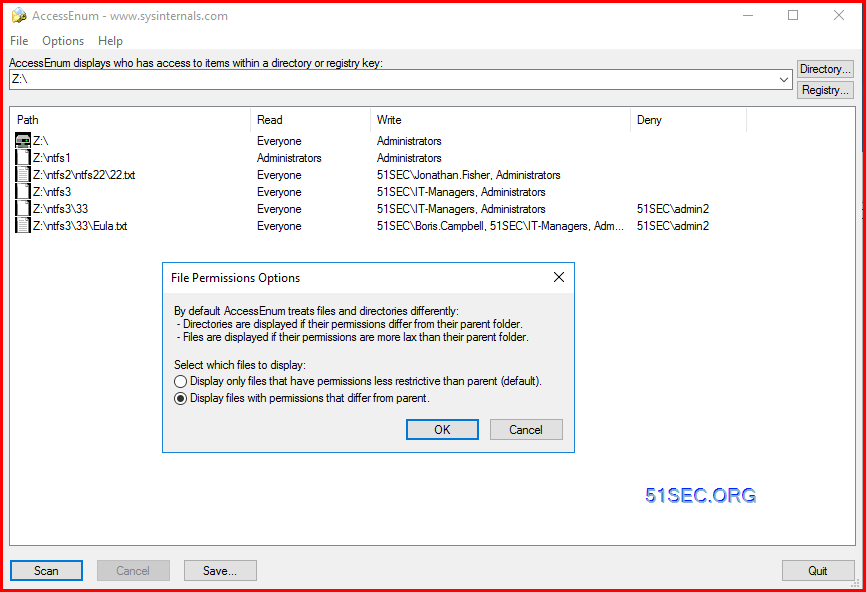
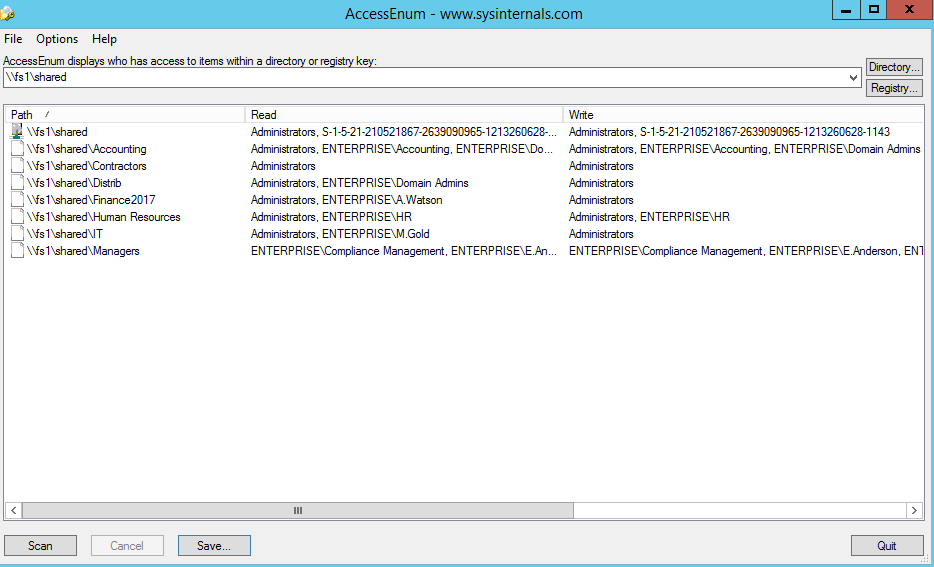
Microsoft tool - AccessEnum

As there’s no built-in way to quickly view user accesses to a tree of directories or keys, Microsoft Windows SysInternals tools may come handy. AccessEnum is one of SysInternals tools which gives you a full view of your file system and Registry security settings in seconds, and provides a table view of all permissions on your file share or registry. However, you can export only to .txt format, which is rather complicated to read. If you want the information in .xls format, you’ll need to copy it from the .txt file manually.


NTFS Permissions Tools Enum1


Other tools I did quick test

FolderSecurityViewer

NTFS Permissions Reporter: Get your easy-to-use NTFS permissions tool to analyze and report NTFS security!

It only shows you specific folder's permission in free edition. Not much useful. Maybe paid version can give you more but not worth trying this one. 


Scripts

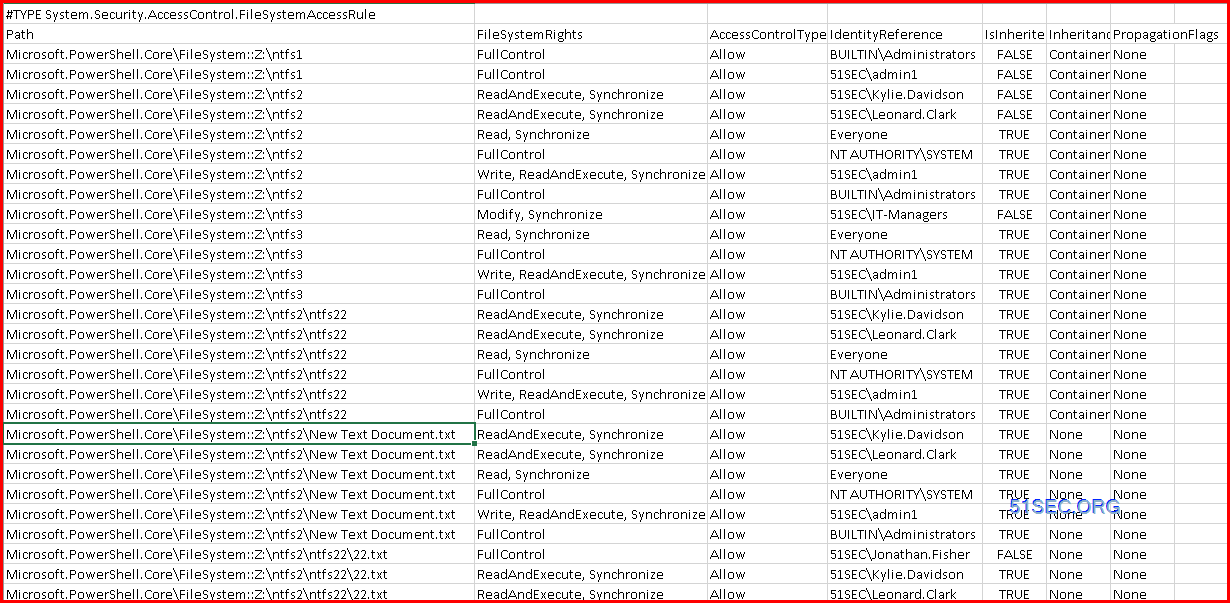
Here is a quick powershell one liner commands to export the NTFS permissions for a root folders or with Sub folders, or folders and files.

For folders:


Get-Childitem -path z:\ -recurse | Where-Object {$_.PSIsContainer} | Get-ACL| Select-Object Path -ExpandProperty Access | Export-CSV C:\Temp\Ntfs_Subfolders.csv


For Folders and Files


Get-Childitem -path z:\ -recurse | Get-ACL| Select-Object Path -ExpandProperty Access | Export-CSV C:\Temp\Ntfs_Subfolders.csv


Another script to export folder permission:


$OutFile = "C:\Temp\permissions.csv"
$Header = "Folder Path,IdentityReference,AccessControlType,IsInherited,InheritanceFlags,PropagationFlags"
Del $OutFile
Add-Content -Value $Header -Path $OutFile
$RootPath = "\\fs1\shared"
$Folders = dir $RootPath -recurse | where {$_.psiscontainer -eq $true}
foreach ($Folder in $Folders){
$ACLs = get-acl $Folder.fullname | ForEach-Object { $_.Access }
Foreach ($ACL in $ACLs){
$OutInfo = $Folder.Fullname + "," + $ACL.IdentityReference + "," + $ACL.AccessControlType + "," + $ACL.IsInherited + "," + $ACL.InheritanceFlags + "," + $ACL.PropagationFlags
Add-Content -Value $OutInfo -Path $OutFile
}}


References


  • Export folder permission using PowerShell
  • https://renjithmenon.com/export-folder-and-sub-folder-permissions-to-csv/


via Blogger http://blog.51sec.org/2023/02/list-your-folder-files-ntfs-permission.html
February 03, 2023 at 03:42PM Security
0 Comments

Create Your Own Domain Web App & Keep Running 24x7x365 Using Replit's Free Plan

2/1/2023

0 Comments

 
Replit provides you a way to create and host your web application online. This video shows you how to use UptimeRobot and Cloudflare's service to make this web app to use your own domain and running 24x7x365. Related Post: ✍https://blog.51sec.org/2023/01/replit-free-online-ide-saas-website.html ✍https://github.com/51sec/myip/blob/main/main.py Related Videos: ?Get Free Subdomain from EU.ORG & Integrate with Cloudflare - https://youtu.be/V1xnhqqg4Rw ?Five Minutes Build Your Own Free Website Monitoring Site with UptimeRobot - https://youtu.be/dJ4-tvb1pSc ?Chapters: 0:00 - Introduction 1:45 - Lets start it 3:37 - Sign Up (Registration) 4:56 - Quick look from inside of Repl 9:33 - 3. Myip Python App 12:25 - 4. UptimeRobot to Avoid Sleeping 14.18 - 5. Using Your Own Domain 18:30 - End Scene ✅#51Sec #NetSec ====================================================================== If you found this video has some useful information, please give me a thumb up and subscribe this channel to get more updates: ⚡https://www.youtube.com/c/Netsec?sub_confirmation=1 ⚡Resource Collection and Bookmarks: https://sites.51sec.org/ Learning and Sharing - ?海内存知己,天涯若比邻! Discord: https://discord.gg/fCW9phn Blog: https://blog.51sec.org

Watch video on YouTube here: https://youtu.be/DtgIDw1ciyU by NetSec
0 Comments

    Categories

    All
    Architecture
    Blog
    Checkpoint
    Cisco
    Cloud
    CyberArk
    F5
    Fortigate
    Guardium
    Juniper
    Linux
    Network
    Others
    Palo Alto
    Qualys
    Raspberry Pi
    Security
    SIEM
    Software
    Vmware
    VPN
    Wireless

    Archives

    March 2024
    February 2024
    January 2024
    December 2023
    November 2023
    October 2023
    September 2023
    August 2023
    July 2023
    June 2023
    May 2023
    April 2023
    March 2023
    February 2023
    January 2023
    December 2022
    November 2022
    October 2022
    September 2022
    August 2022
    July 2022
    June 2022
    May 2022
    April 2022
    March 2022
    February 2022
    January 2022
    December 2021
    November 2021
    October 2021
    September 2021
    August 2021
    July 2021
    June 2021
    May 2021
    April 2021
    March 2021
    February 2021
    January 2021
    December 2020
    November 2020
    October 2020
    September 2020
    August 2020
    July 2020
    October 2019
    September 2019
    June 2019
    July 2018
    May 2018
    December 2017
    August 2017
    April 2017
    March 2017
    January 2017
    December 2016
    November 2016
    October 2016
    September 2016
    August 2016
    July 2016
    June 2016
    May 2016
    April 2016
    March 2016
    February 2016
    January 2016
    December 2015
    November 2015
    October 2015
    September 2015
    August 2015
    July 2015
    June 2015
    May 2015
    April 2015
    March 2015

    Print Page:

    RSS Feed

    Email Subscribe
Powered by Create your own unique website with customizable templates.
  • Blog
  • Sitemap
    • Categories
  • Contact
  • About
  • Resources
  • Tools
  • 51sec.org