Info Security Memo
  • Blog
  • Sitemap
    • Categories
  • Contact
  • About
  • Resources
  • Tools
  • 51sec.org

Build Confidence

Focusing on Information Security 

Info Security Notes

Install OpenSpeedTest Docker Easily to Test Home Network and Internet Speed

7/28/2021

0 Comments

 
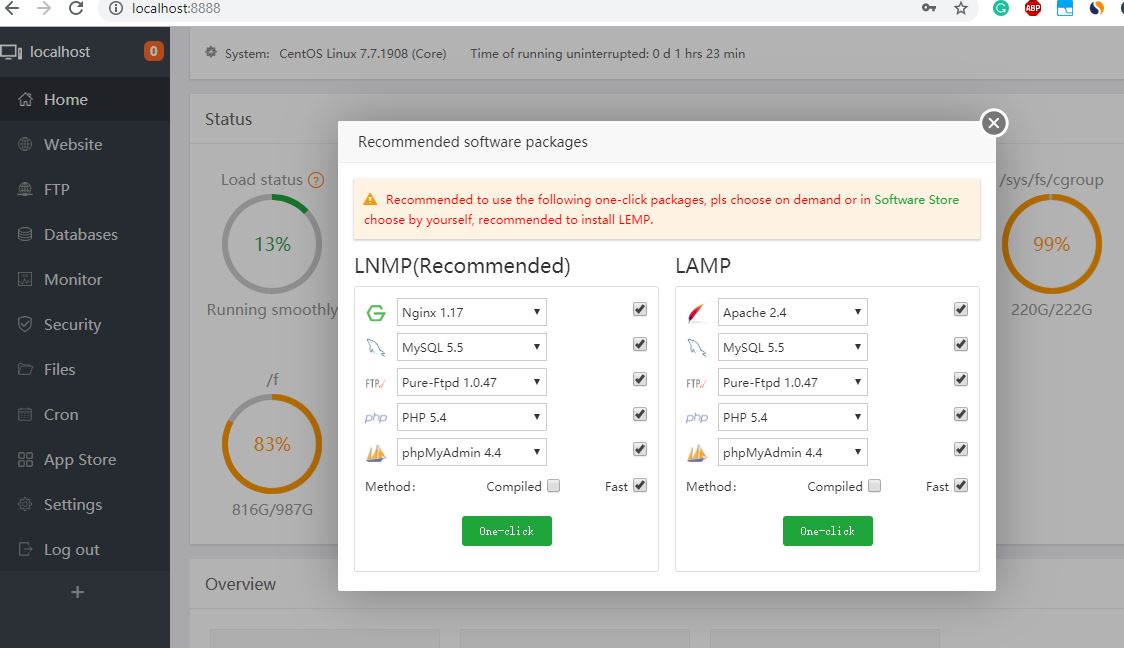
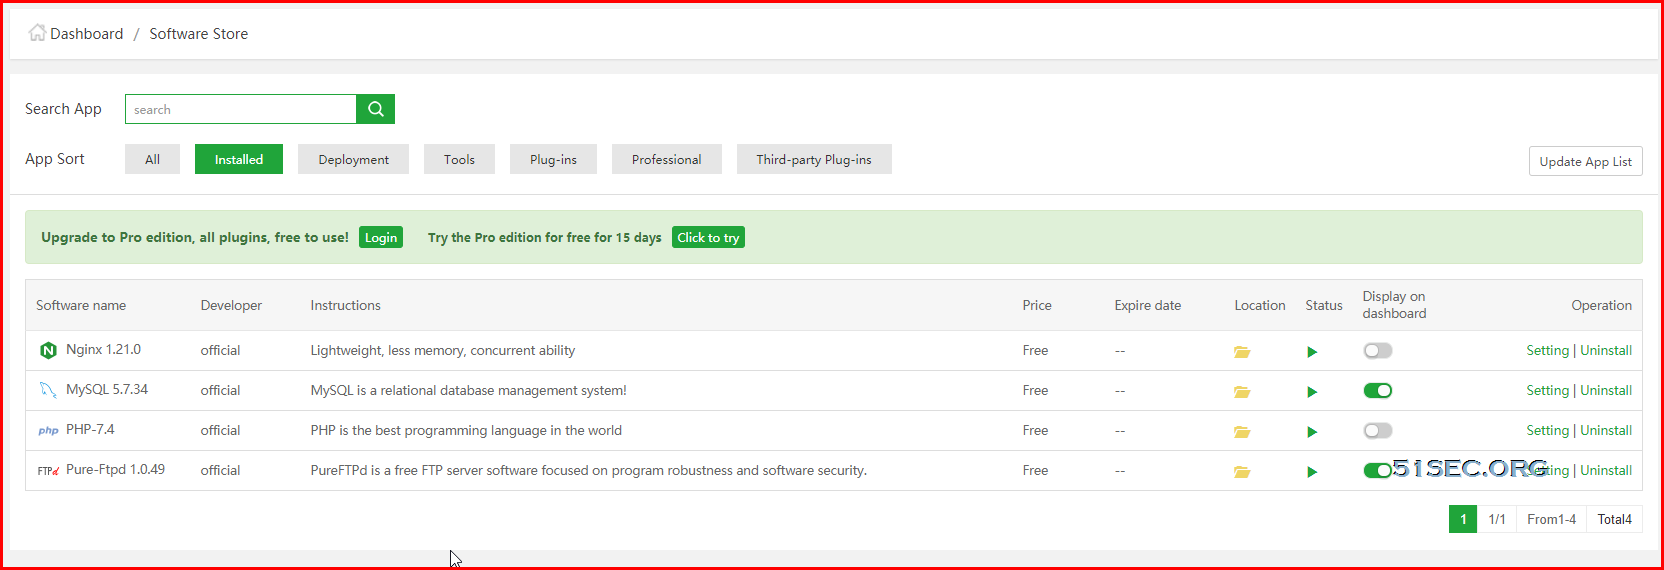
OpenSpeedTest can be easily installed into you home network for testing your network speed using browser. This video shows how to install it using Portainer and how to test it for home internal network bandwidth or internet bandwidth. You also can install in your own VPS in the cloud and create your own speed test website with your own sub-domain. ⚡Website: https://ift.tt/2WvyaCO ⚡Install Docker / Docker Compose / Portainer: https://ift.tt/3l1XlqO ⚡Docker/Portainer related videos: https://www.youtube.com/watch?v=FbihlMBNuro&list=PLg7bL1bMpwPXYeLITF_yHR0g3CQr37-Nj ✅OpenSpeedTest Docker installation command: docker run --restart=unless-stopped --name=openspeedtest -d -p 3000:3000 openspeedtest/latest ==================================================================== If you found this video has some useful information✍, please give me a thumb up ✅ and subscribe this channel ?to get more updates?: ⚡https://www.youtube.com/c/Netsec?sub_confirmation=1 Learning and Sharing - 海内存知己,天涯若比邻 - ⚡http://51sec.org ?

Watch video on YouTube here: https://youtu.be/K6IqEK2idcQ by Johnny Netsec
0 Comments

Thycotic Secret Server Cloud - 5. Web Password Filler

7/26/2021

0 Comments

 
This video shows how to install Thycotic Web Password Filler (WPF) into your browser and how to connect it to your secret server. It also shows how to onboard your web password into Thycotic secret server and automatically fill in when you access your web password authentication/login page. Thycotic SS Playlist: https://www.youtube.com/playlist?list=PLg7bL1bMpwPVDES-E5aaT8bIef8O4sq9- Thycotic Secret Server Cloud Series: 1. Get TSS Cloud Trial - https://youtu.be/L-Gss2HEHZY 2. Local Login and Install Distributed Engine - https://youtu.be/iGIUoHaJ_Sc 3. AD integration and Remote Password Chagne - https://youtu.be/jNe9HPLO5wU 4. Install and Configure Connection Manager - https://youtu.be/yA-xcHBSAwo 5. Web Password Filler - https://youtu.be/0kD60CXYOL4 Related post: https://ift.tt/3iHrSHC ==================================================================== If you found this video has some useful information✍, please give me a thumb up ✅ and subscribe this channel ?to get more updates?: ⚡https://www.youtube.com/c/Netsec?sub_confirmation=1 Learning and Sharing - 海内存知己,天涯若比邻 - ⚡http://51sec.org ?

Watch video on YouTube here: https://youtu.be/0kD60CXYOL4 by Johnny Netsec
0 Comments

Install BT (aaPanel) in Oracle ARM-based Virtual Instance with Oracle Linux 8

7/24/2021

0 Comments

 
Install BT (aaPanel) in Oracle ARM-based Virtual Instance with Oracle Linux 8

Oracle’s newly exited ARM can actually have up to 4 cores, 24G memory, 4G bandwidth, and 200G storage instances. But the CPU is an arm architecture, so in actual use, when installing the pagoda panel, we encountered some problems and could not complete the installation. Actually, it was caused by associated software.


Many people will install Debian through DD, but this is risky. Many people are deleted by Oracle because they are detected to be idle by the system. The DD system will cause some detection functions to fail, so this is not recommended. The following is the default installation under Oracle Linux 8.


Update System


First update the system software package:


Update Oracle Linux 8 system to latest:

 [root@arm1 ~]# yum upgrade -y && yum update -y


Download & Install aaPanel (BT)

For aaPanel:

InstallationView detailed tutorial >>
Centos / Oracle Linux:yum install -y wget && wget -O install.sh http://www.aapanel.com/script/install_6.0_en.sh && bash install.sh aapanel
Ubuntu/Deepin:wget -O install.sh http://www.aapanel.com/script/install-ubuntu_6.0_en.sh && sudo bash install.sh aapanel
Debian:wget -O install.sh http://www.aapanel.com/script/install-ubuntu_6.0_en.sh && bash install.sh aapanel
For BT: (Chinese Version of aaPanel)
curl -sSO http://download.bt.cn/install/install_panel.sh && bash install_panel.sh


Install all dependencies


To install LNMP software, you will need some dependencies installed first. 

For example, to Install LNMP (Nginx2.2.4 ,PHP 8.0, Mysql 5.7)


  • yum install gcc build-essential
  • yum install gcc gcc-c++ autoconf automake
  • yum -y install zlib zlib-devel openssl openssl-devel pcre pcre-devel


If you got a message to say:
No match for argument: build-essential
Error: Unable to find a match: build-essential


We can try :
  • yum install gcc gcc-c++ make

This works equivalent of build-essential in CentOS.


You might also need following package, Libiconv

  • wget http://ftp.gnu.org/pub/gnu/libiconv/libiconv-1.13.1.tar.gz
  • tar zxvf libiconv-1.13.1.tar.gz
  • cd libiconv-1.13.1
Configure libiconv:

  • ./configure -prefix=/usr/local --build arm-pc-linux
Compile and install:

  • make
  • make install

Create a link to Libiconv (创建文件链接到Libiconv库)

  • ln -s /usr/local/lib/libiconv.so /usr/lib
  • ln -s /usr/local/lib/libiconv.so.2 /usr/lib/libiconv.so.2


If install Nginx 1.21 through aaPanel or BT panel, no matter using compiled method or fast method, you will meet Error: The HTTP image filter module requires the GD library, the easy fix is to install gd and gd-devel packages.
  • yum install gd gd-devel


Install LNMP


Log in to aaPanel using the link and credentials showing in the command line:


[root@ocp3arm1oracle ~]# bt
===============aaPanel CLI==================
(1) Restart panel                           (8) Change panel port
(2) Stop panel                              (9) Clear panel cache
(3) Start panel                             (10) Clear login limit
(4) Reload panel                            (11) Cancel entrance limit
(5) Change panel password                   (12) Cancel domain binding limit
(6) Change panel username                   (13) Cacel IP access limit
(7) Forcibly change MySQL root password     (14) View panel default info
(22) Display panel error log                (15) Clear system rubbish
(23) Turn off BasicAuth authentication      (16) Repair panel (check for errors and update panel files to the latest version)
(24) Turn off Google Authenticator          (17) Set log cutting on/off compression
(25) Set whether to back up the panel automatically  (18) Set whether to save a historical copy of the file
(26) Keep/Remove local backup when backing up to cloud storage
(0) Cancel
===============================================
Pls enter command number:14
===============================================
EXECUTING
===============================================
==================================================================
aaPanel default info!
==================================================================
aaPanel Internet Address: http://120.28.16.109:8888/2e939bb
aaPanel Internal Address: http://10.0.0.243:8888/2e939bb
username: nkbrpcr
password: a211621
Warning:
If you cannot access the panel,
release the following port (8888|888|80|443|20|21) in the security group
==================================================================
[root@ocp3arm1oracle ~]#


After you logged in Web Gui, it will prompt you for recommended software packages, either LNMP or LAMP.

If there is any installation for LNMP not completed, you will need to install dependencies following the previous section's instruction. 


Eventually, you will have folloing packages installed. 


Install LNMP


Enable BBR

Google developed a TCP Congestion Control Algorithm (CCA) called TCP Bottleneck Bandwidth and RRT (BBR) that overcomes many of the issues found in both Reno and CUBIC (the default CCAs). This new algorithm not only achieves significant bandwidth improvements, but also lower latency. TCP BBR is already employed with google.com servers, and now you can make it happen--so long as your Linux machine is running kernel 4.9 or newer.

BBR is a new TCP congestion control algorithm that uses estimated congestion rather than loss to determine when to back off.

wget -N --no-check-certificate https://github.com/teddysun/across/raw/master/bbr.sh && chmod +x bbr.sh && bash bbr.sh

Check if BBR has been installed and started:


sysctl net.ipv4.tcp_available_congestion_control
sysctl net.ipv4.tcp_congestion_control
sysctl net.core.default_qdisc
lsmod | grep bbr
ps -ef | grep bbr


References

  • 甲骨文ORACLE CLOUD ARM实例宝塔下NGINX+ PHP+MYSQL的安装


via Blogger https://ift.tt/3BB0eVp
July 24, 2021 at 07:07PM Cloud
0 Comments

Thycotic Secret Server Discovery

7/24/2021

0 Comments

 
Thycotic Secret Server Discovery

 What is discovery in Thycotic Secret Server:

  • Discovery finds secrets in an IT environment and imports them into secret server.
  • Secret server is most effective when it covers all privileged accoutns
  • Discovery helps to eliminate,
    • Unknown privileged accounts
    • Backdoor Access
    • Gaps in security
  • Auditors want automated processes to reduce human mistakes


Discovery types

Out-of-box:

  • AD (using LDAPs and WMI)
    • Domain Computers' local accounts
    • Domain accounts
    • Domain accounts running 
      • Window Services
      • Scheduled Tasks
      • IIS Application Pools
      • IIS Application Pool Recycles
  • Unix/Linux Local accounts
    • Machines - finds out Operating System first then local accounts
    • Non-Daemon Users - most other user accounts
    • All users - built-in accounts
    • Scanning accounts
      • need to be able to connect over ssh
      • read /etc/passwd
      • minimum permissions for taking over account during import sudoer permissions
      • sudoer permissions on /etc/passwd
    • Define host range
      • IP address
      • Host name
      • IP address range
  • Hypervisor ESXi accounts
    • vSphere PowerCLI 5.5 release 2 - API installed on your Secret server
    • PowerShell 3 or greater on your secret server
    • Scanning accounts
      • Shell Access
      • Query VRM policy permission
    • Define host range
      • IP address
      • Host name
      • IP address range
  • Amazon Web services
    • AWS accounts
      • AWS access key
      • AWS console account
    • one secret using Amazon IAM secret template
    • Amazon IAM access key permissions
      • Iam:ListUsers
      • Iam:GetLoginProfile
      • Iam:ListAccessKeys
  • Google Cloud platform
    • Discovery and password changing of IAM service account users
    • Discovery of instances associated to the projects
    • Heartbeat and password changing of GCP service accounts
    • Token rotation for GCP service accounts


Custom (Extensible)

  • Anything - leverages PowerShell scripts
  • SQL accounts & DB links
  • Networking equipment
  • Embedded password


Accounts Discovery Flow Charts


AD accounts discovery flow chart:

Unix/Linux accounts discovery flow chart:


Vmware ESX/ESXi accounts discovery flow chart:


AWS accounts discovery flow chart:


GCP accounts discovery flow chart:


Steps to Use Discovery


  1. Enable Globally
  2. Configure Settings
  3. Add Discovery Sources and Rules
  4. Run Discovery
  5. Import Accounts


via Blogger https://ift.tt/3zAbhfs
July 24, 2021 at 06:58PM Thycotic
0 Comments

Thycotic Web Password Filler (WPF)

7/24/2021

0 Comments

 
Thycotic Web Password Filler (WPF)

 What is Web Password Filler (WPF)?

  • Help Users log on to their websites by
    • Finding and entering credentials from secret server.
    • Add new secrets to secret server
    • Generating strong passwords
    • Updating secrets stored in secret server
  • Enables session recording for web secret sessions. 

Plugs are available for Chrome, Firefox, Opera and Edge (Chromium)

  • Authenticate to secret server directly from the web extension
  • Includes support for two factor authentication such as DUO
  • Web session recording


Download

Chrome: https://ift.tt/3x2Icb5
Firefox:  https://ift.tt/3eUzhlU
Edge: https://ift.tt/3iI3DZJ


Configure

Depends on your secret server is on prem or cloud, your url might be different. 
Usually, you will choose use secret server to login.


Video


via Blogger https://ift.tt/3rxmMBK
July 24, 2021 at 03:43PM Thycotic
0 Comments

Thycotic Connection Manager

7/24/2021

0 Comments

 
Thycotic Connection Manager

What is Connection Manager:

  • Launch ad-hoc connections to manage sessions with remote resources
  • Supports RDP and SSH
  • Makes the management of multiple active session is easy
  • Use as a stand-alone product or in conjunction with a secret server 


Advantages using Thycotic free tool,  Connection Manager,  which is a unified management tool of remote sessions:

  • 1. Remote Access
  • 2. Session Management
  • 3. Centralized Control
  • 4. Session Recording
  • 5. Tracking & Auditing

Limitation:

  • only RDP and SSH


Download

Download Link: https://ift.tt/3iLRfYK

Login will be required.


To complete your Thycotic authentication process you must generate a token.
Generate Token
Performing this action will create a valid token for this session. This token can be used by Thycotic tools to access Secret Server. Only click this button if you were directed to this page by a Thycotic product.


Installation

  • Installation Files are in Thycotic Support Portal
  • Installation files have Windows and Mac version.
  • Installation steps are different in different platform
  • Connection manager must be able to reach secret server.
  • Connection manager creates a lock encrypted file storage for saving local connections and Secure Server(s) connectivity information.


Video


via Blogger https://ift.tt/3y2IsYQ
July 24, 2021 at 03:38PM Thycotic
0 Comments

Thycotic Secret Server Cloud - 4. Install and Configure Connection Manager

7/23/2021

0 Comments

 
This video shows the process how to download and configure Connection Manager. It also shows the installation of Protocol Handler and how to use RDP launcher to log into a remote server. Thycotic SS Playlist: https://www.youtube.com/playlist?list=PLg7bL1bMpwPVDES-E5aaT8bIef8O4sq9- Thycotic Secret Server Cloud Series: 1. Get TSS Cloud Trial - https://youtu.be/L-Gss2HEHZY 2. Local Login and Install Distributed Engine - https://youtu.be/iGIUoHaJ_Sc 3. AD integration and Remote Password Chagne - https://youtu.be/jNe9HPLO5wU 4. Install and Configure Connection Manager - https://youtu.be/yA-xcHBSAwo ==================================================================== If you found this video has some useful information✍, please give me a thumb up ✅ and subscribe this channel ?to get more updates?: ⚡https://www.youtube.com/c/Netsec?sub_confirmation=1 Learning and Sharing - 海内存知己,天涯若比邻 - ⚡http://51sec.org ?

Watch video on YouTube here: https://youtu.be/yA-xcHBSAwo by Johnny Netsec
0 Comments

Using AutoIT to Create Launchers (SSMS SQL auth)

7/22/2021

0 Comments

 
Using AutoIT to Create Launchers (SSMS SQL auth)

AutoIT is basically a way of automating stuff in the windows GUI and has lots of uses. 

Here is an working launcher and example script for SSMS with SQL Authentication since ssms.exe >v.18.0 no longer supports command line arguments. All steps:

  • Install AUTO IT on to the RDS server

  • Create attached scrtipt and compile into an executable

  • Create security template and custom launcher to pass credentials and host information to the AutoIt script executable.


Install AutoIt

Install AutoIT on your user’s machines who will be using these launchers. If using session connector install on the RDS server: (https://ift.tt/3zn9sCG)

Download url : https://ift.tt/3zn9sCG


Create and Compile AutoIt Script

 Copy the attached script and open with SciTE (built in Auto IT script editor, convert to .au3)


Below is the example script to launch SSMS.exe and complete SQL Auth : 

;Thycotic ssms.exe with sql credential launcher script

;set filepath of ssms.exe
$Path = "C:\Program Files (x86)\Microsoft SQL Server Management Studio 18\Common7\IDE\Ssms.exe"

;execute ssms.exe
ShellExecute($Path)

;Wait for the 'connect to server' window to appear
WinWaitActive("Connect to Server", "", 0)

;set auth mode to SQL authenticaiton
ControlSend("Connect to Server" , "" , "[NAME:comboBoxAuthentication]", "[NAME:SQL]")

;set server instance to servername passed from Secret Server launcher in cmd line parameter 1
ControlSetText("Connect to Server", "", "[NAME:serverInstance]", $CmdLine[1],1)

;set username to username passed from Secret Server launcher in cmd line parameter 2
ControlSetText("Connect to Server", "", "[NAME:userName]", $CmdLine[2],1)

;set password to password passed from Secret Server launcher in cmd line parameter 3
ControlSetText("Connect to Server", "", "[NAME:password]", $CmdLine[3],1)

;reactivate the connect to server window, required for the click of buttons within the window
WinActivate ("Connect to Server")

;click the connect button
ControlClick("Connect to Server", "", "[NAME:connect]")


Compile (go to Tools on toolbar and select Compile)


Save .exe to a location accessible to all users (c:\autoit in my case)


Create Launcher

Create a launcher with the following settings (note double quotes around variables):


Create a regular session connector launcher and use the above child launcher

Create a new secret template and pass servername, username and password.


via Blogger https://ift.tt/3BukjMR
July 22, 2021 at 09:31AM Thycotic
0 Comments

Oracle Cloud Free ARM Compute Instance (4 oCPUs and 24GB RAM)

7/21/2021

0 Comments

 
This video shows how to create an ARM based instance in Oracle Cloud and how to install Docker, Docker computer, Portainer docker and Ubuntu Desktop docker with novnc installed. Oracle Cloud Platform released most generous free tier offer at the early of June, ARM based compute instance , which has 4 oCPUs and 24G Ram. You also can choose to create 4 ARM compute instances, each has 1 oCPUs and 6G RAM. Related video: ⚡Get Two Free and Permanent VPS from Oracle Cloud Platform - https://youtu.be/E9dHA3NBbN8 Related post: ⚡https://ift.tt/3rqx2M0 ==================================================================== If you found this video has some useful information✍, please give me a thumb up ✅ and subscribe this channel ?to get more updates?: ⚡https://www.youtube.com/c/Netsec?sub_confirmation=1 Learning and Sharing - 海内存知己,天涯若比邻 - ⚡http://51sec.org ?

Watch video on YouTube here: https://youtu.be/FbihlMBNuro by Johnny Netsec
0 Comments

AutoIt Scripts Examples

7/21/2021

0 Comments

 
AutoIt Scripts Examples

One of my projects is going to use AutoIt script to launch client application on Windows machine. It will usually require to auto-fill in some information on popped up windows. 

This post is to collect some useful scripts I found from Internet. Some of them are made by myself for certain purpose. 


AutoInstallation Script


;
; NComputing AutoInstallation Script v1.1.1.06262012
; AutoIt Version: 3.0
; Language: English
; Platform: Win7
; Author:    Matthew Roslevich
;    /email/
;
; Script Function:
; Opens NComputing vSpace Windows 7 x64 installer and fills in the registration information.
;


; Run vSpace installer
Run("vSpace_X-6.2.5.4_setup.exe")


; Wait for the vSpace installer window to become active - it is titled "NComputing vSpace"
WinWaitActive("NComputing vSpace")


; Now that the vSpace window is active, start the installer

; Initial installer screen
Sleep(1000)
Send("{TAB 2}")
Sleep(500)
Send("{ENTER}")


; vSpace End User License Agreement
Sleep(1000)
Send("{TAB}")
Sleep(500)
Send("{RIGHT}")
Sleep(500)
Send("{ENTER}")


; vSpace Terms of Use Agreement
Sleep(1000)
Send("{TAB}")
Sleep(500)
Send("{RIGHT}")
Sleep(500)
Send("{ENTER}")


; Initial Screen Resolution (default is 1024x768 16bpp 60Hz)
Sleep(1000)
Send("{ENTER}")


; Select Installation Folder (default is C:\Program Files\NComputing\NComputing vSpace\)
Sleep(1000)
Send("{ENTER}")


; Confirm Installation
Sleep(1000)
Send("{ENTER}")


; Now a screen will pop up and ask to install device software, the window is called
; "Windows Security" and has some text "Install" and "Don't Install"
WinWaitActive("Windows Security")
Sleep(1500)
Send("{LEFT 2}")
Sleep(500)
Send("{SPACE}")
Sleep(500)
Send("{RIGHT}")
Sleep(500)
Send("{ENTER}")


; Another screen will pop up with registration details, the window is called
; "License wizard" and has a form which needs filled out.
WinWait("License wizard")
Sleep(1000)
Send("Technology Department")
Sleep(500)
Send("{TAB}")
Sleep(500)
Send("School District X")
Sleep(500)
Send("{TAB 2}")
Sleep(500)
Send("Address 1")
Sleep(500)
Send("{TAB}")
Sleep(500)
Send("City")
Sleep(500)
Send("{TAB}")
Sleep(500)
Send("PA")
Sleep(500)
Send("{TAB}")
Sleep(500)
Send("17701")
Sleep(500)
Send("{TAB}")
Sleep(500)
Send("[email protected]")
Sleep(500)
Send("{TAB}")
Sleep(500)
Send("570-555-1212")
Sleep(500)
Send("{TAB}")
Sleep(500)
Send("NComputing")
Sleep(500)
Send("{TAB}")
Sleep(500)
Send("{DOWN}")
Sleep(500)
Send("{TAB}")
Sleep(500)
Send("{ENTER}")


; Yet another screen will pop up reminding user about attaching device(s) after installation finishes.
; The window is called "NComputing vSpace" and has an "OK" button.
WinWaitActive("NComputing vSpace")
Sleep(1000)
Send("{ENTER}")


; The installer is finished! Last thing is to press the "CLOSE" button.
WinWaitActive("NComputing vSpace")
Sleep(1000)
Send("{ENTER}")


; Standard [you must restart the system to have change take effect] window.
; The window is still called "NComputing vSpace", and has a "YES" and "NO" button.
WinWaitActive("NComputing vSpace")
Sleep(1000)
Send("{ENTER}")


; Finished!


Launch Application Windows and Fill in Password


;
;Thycotic xca.exe with password launcher script
;Author: Johnny Yan
;set filepath of ssms.exe
;$Path = "c:\tools\xca\xca.exe c:\tools\certs\ivari_xca.xdb"

$Path = "C:\tools\xca\xca.exe"
;execute xca.exe to open xdb
;ShellExecute($Path)
ShellExecute($Path, "c:\tools\certs\ivari_xca.xdb")

;Wait for the 'Password' window to appear
WinWaitActive("Password", "", 0)
;WinActivate ("Password")
;set password to password passed from Secret Server launcher in cmd line parameter 3
;ControlSetText("Password", "", "[NAME:password]", $CmdLine[3],1)
;ControlSetText("Password", "", "[NAME:password]", "Password1234")
Send("Password1234")
Sleep(500)


;reactivate the connect to server window, required Enter within the window
WinActivate ("Password")
;click the connect button
;ControlClick("Password", "", "[NAME:OK]")
Send("{Enter}")


; Finished!


OpenLinkInIE.au3


;
; this script copies an address from Mozilla Firefox and opens it in IE
; click in Firefox's address bar before running the script

Opt("WinTitleMatchMode", 2) ; this tells AutoIt to match any part of window title in the following window commands
WinActivate("Mozilla Firefox") ; activates the Mozilla Firefox window
WinWaitActive("Mozilla Firefox") ; waits for Mozilla Firefox to be the active window before continuing
Send("{HOME}") ; the Send command tells AutoIt to type text; this line simulates pressing the Home key
Send("+{END}") ; this line simulates pressing Shift+End
Send("^c") ; this line simulates CTRL+c
Run("C:\Program Files\Internet Explorer\iexplore.exe") ; starts IE; you may need to edit this path
WinActivate("Internet Explorer") ; activates the IE window
WinWaitActive("Internet Explorer") ; waits for IE to be the active window before continuing
Send("^t") ; opens new tab in IE
WinWaitActive("New Tab - Windows Internet Explorer") ; you may need to edit this text depending on you IE version 
Send("^v") ; pastes the contents of the clipboard
Send("{ENTER}") ; this line simulates pressing Enter


OpenLinkInIE.au3

Link: https://ift.tt/36TIyX0
;
; this script copies an address from Mozilla Firefox and opens it in IE
; click in Firefox's address bar before running the script

Opt("WinTitleMatchMode", 2) ; this tells AutoIt to match any part of window title in the following window commands
WinActivate("Mozilla Firefox") ; activates the Mozilla Firefox window
WinWaitActive("Mozilla Firefox") ; waits for Mozilla Firefox to be the active window before continuing
Send("{HOME}") ; the Send command tells AutoIt to type text; this line simulates pressing the Home key
Send("+{END}") ; this line simulates pressing Shift+End
Send("^c") ; this line simulates CTRL+c
Run("C:\Program Files\Internet Explorer\iexplore.exe") ; starts IE; you may need to edit this path
WinActivate("Internet Explorer") ; activates the IE window
WinWaitActive("Internet Explorer") ; waits for IE to be the active window before continuing
Send("^t") ; opens new tab in IE
WinWaitActive("New Tab - Windows Internet Explorer") ; you may need to edit this text depending on you IE version 
Send("^v") ; pastes the contents of the clipboard
Send("{ENTER}") ; this line simulates pressing Enter


CopyPasteNotepadToWord_2.au3

Link: https://ift.tt/36TIyX0
; This script copies and pastes 5 lines between two open Word documents.
; Before running this script, open two Word files and save one as old.docx (or old.doc)
; and one as new.docx. The names must be in lower case to match the script.
; Type 5 lines of text in the file named old.

Opt("WinTitleMatchMode", 2) ; configures AutoIt to find a search term in any part of the window title

Dim $x

WinActivate("old") ; activates window with old in the title
WinWaitActive("old") ; waits for the window to be active
Send("^{HOME}") ; simulates pressing CTRL+Home to go to top of document
For $x = 1 to 5 ; this is a loop that is done 5 times
   WinActivate("old") ; activates window with Old in the title
   WinWaitActive("old"); waits for the window to be active
   Send("{HOME}") ; simulates pressing the Home key
   Sleep(500) ; pauses for 1/2 a second; I added the pauses to show you what the script is doing
   Send("+{END}") ; simulates pressing Shit+End
   Sleep(500) ; pauses for 1/2 a second
   Send("^c") ; simulates pressing CTRL+c
   Send("{RIGHT}") ; simulates pressing the right arrow key
   Sleep(500) ; pauses for 1/2 a second
   WinActivate("new") ; activates window with new in the title
   WinWaitActive("new"); waits for the window to be active
   Send("^v")  ; simulates pressing CTRL+v
   Sleep(500) ; pauses for 1/2 a second
Next


MouseSwitchButtons.au3

Link: https://ift.tt/36TIyX0
; Switches right and left mouse buttons.
; This works with the standard Mouse Properties Control Panel.
; If you installed a program that changes the Mouse Properties control panel,
; it may not work.
; For a list of all the Control Panel applets,
; see http://en.wikipedia.org/wiki/Control_Panel_%28Windows%29
; or google "CPL list."

Run("control.exe main.cpl") ; Opens the Mouse Properties Control Panel applet 
WinWaitActive("Mouse Properties") ; Waits for the window to open
Sleep(1000) ; (Optional) Pauses one second so you can watch the script work
Send("!s{ENTER}") ; Types ALT+s then presses the Enter key


MouseSwitchButtons.au3


;Thycotic ssms.exe with sql credential launcher script


;set filepath of ssms.exe


$Path = "C:\Program Files (x86)\Microsoft SQL Server Management Studio 18\Common7\IDE\Ssms.exe"


;execute ssms.exe


ShellExecute($Path)


;Wait for the 'connect to server' window to appear


WinWaitActive("Connect to Server", "", 0)


;set auth mode to SQL authenticaiton


ControlSend("Connect to Server" , "" , "[NAME:comboBoxAuthentication]", "[NAME:SQL]")


;set server instance to servername passed from Secret Server launcher in cmd line parameter 1


ControlSetText("Connect to Server", "", "[NAME:serverInstance]", $CmdLine[1],1)


;set username to username passed from Secret Server launcher in cmd line parameter 2


ControlSetText("Connect to Server", "", "[NAME:userName]", $CmdLine[2],1)


;set password to password passed from Secret Server launcher in cmd line parameter 3


ControlSetText("Connect to Server", "", "[NAME:password]", $CmdLine[3],1)


;reactivate the connect to server window, required for the click of buttons within the window


WinActivate ("Connect to Server")


;click the connect button


ControlClick("Connect to Server", "", "[NAME:connect]")


via Blogger https://ift.tt/3hUYPRR
July 21, 2021 at 02:27PM Software
0 Comments
<<Previous

    Categories

    All
    Architecture
    Blog
    Checkpoint
    Cisco
    Cloud
    CyberArk
    F5
    Fortigate
    Guardium
    Juniper
    Linux
    Network
    Others
    Palo Alto
    Qualys
    Raspberry Pi
    Security
    SIEM
    Software
    Vmware
    VPN
    Wireless

    Archives

    March 2024
    February 2024
    January 2024
    December 2023
    November 2023
    October 2023
    September 2023
    August 2023
    July 2023
    June 2023
    May 2023
    April 2023
    March 2023
    February 2023
    January 2023
    December 2022
    November 2022
    October 2022
    September 2022
    August 2022
    July 2022
    June 2022
    May 2022
    April 2022
    March 2022
    February 2022
    January 2022
    December 2021
    November 2021
    October 2021
    September 2021
    August 2021
    July 2021
    June 2021
    May 2021
    April 2021
    March 2021
    February 2021
    January 2021
    December 2020
    November 2020
    October 2020
    September 2020
    August 2020
    July 2020
    October 2019
    September 2019
    June 2019
    July 2018
    May 2018
    December 2017
    August 2017
    April 2017
    March 2017
    January 2017
    December 2016
    November 2016
    October 2016
    September 2016
    August 2016
    July 2016
    June 2016
    May 2016
    April 2016
    March 2016
    February 2016
    January 2016
    December 2015
    November 2015
    October 2015
    September 2015
    August 2015
    July 2015
    June 2015
    May 2015
    April 2015
    March 2015

    Print Page:

    RSS Feed

    Email Subscribe
Powered by Create your own unique website with customizable templates.
  • Blog
  • Sitemap
    • Categories
  • Contact
  • About
  • Resources
  • Tools
  • 51sec.org