Enter into docker:
docker exec -it neko_1 bash
Install fonts in docker:
apt -y update apt -y install ttf-wqy-zenhei
exit and restart docker using docker-compose:
exit docker-compose restart

|
|
To make better control of my home network, in this video, I shows how to add OpenWRT into home network topology without making changes to existing configuration. You router configuration and topology will mostly be same as before, other than adding one virtual machine and dhcp configuration changes on the wireless router. OpenWRT image will be running in a virtual machine and acting as one-armed router (Router on the stick). In this way, your home wireless router continues providing wireless connection function and acting as gateway connecting to Internet, but all other traffic goes to OpenWRT first before it go out to internet from your Home Wireless Router. Main reason to use OpenWRT is because OpenWRT has thousands of software packages available to enhance the router's function, such as Adblock, DDNS. QoS, VPN, Traffic control, firewall, KMS etc. Related Videos: Easily Add One-Armed OpenWRT into Home Network As Bypassing Router - https://youtu.be/oOHsW9aOVvQ Install Docker and Portainer on Ubuntu 20.04 in Raspberry Pi - https://youtu.be/MjbInsvvGvw Related Posts: Install OpenWRT as Single-Arm Router Without Changing Your Home Network - https://ift.tt/39wqkfA ==================================================================== If you found this video has some useful information, please give me a thumb up and subscribe this channel to get more updates: https://www.youtube.com/c/Netsec?sub_confirmation=1 Learning and Sharing - 海内存知己,天涯若比邻 - http://51sec.org
Watch video on YouTube here: https://youtu.be/oOHsW9aOVvQ by Johnny Netsec
0 Comments
==================================================================== If you found this video has some useful information, please give me a thumb up and subscribe this channel to get more updates: https://www.youtube.com/c/Netsec?sub_confirmation=1 Learning and Sharing - 海内存知己,天涯若比邻 - http://51sec.org
Watch video on YouTube here: https://youtu.be/_jBqPmUIH0s by Johnny Netsec
Using Portainer to Deploy OpenWRT Docker
OpenWRT can be installed on physical machine, virtual machines, also docker environment. This post summarizes some steps how to get OpenWRT running into your docker environment. Docker Image : sulinggg/openwrt:latest https://ift.tt/39lTyxE Topology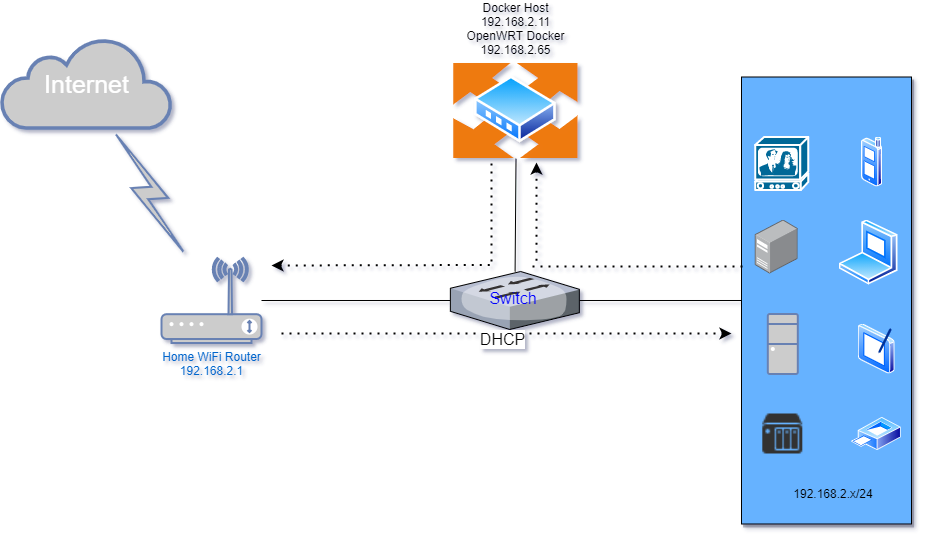
Create macvlan NetworkCreate macvlan configuration : 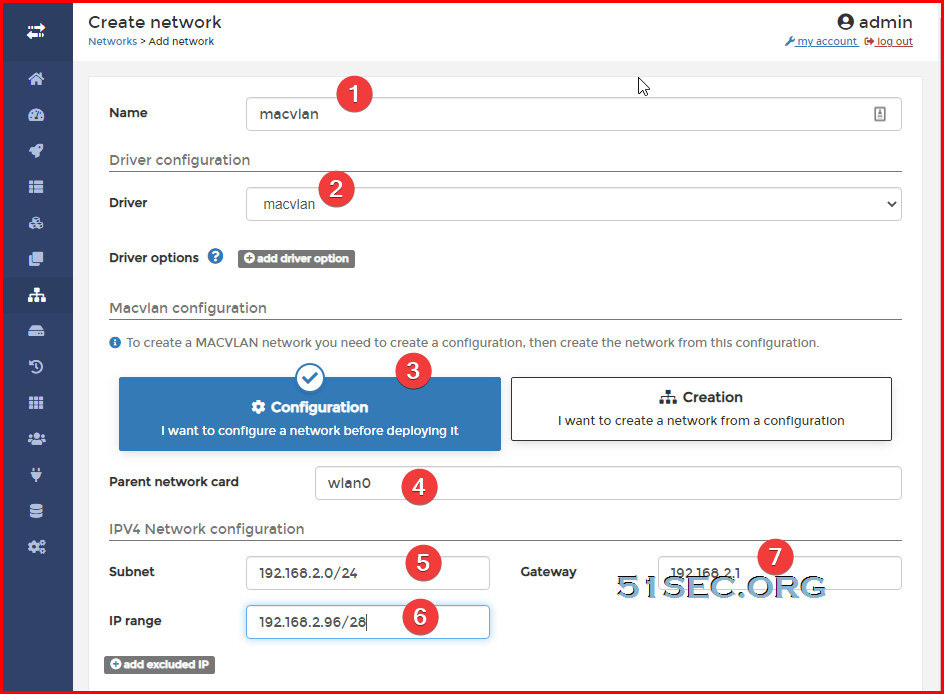
Create macvlan network: 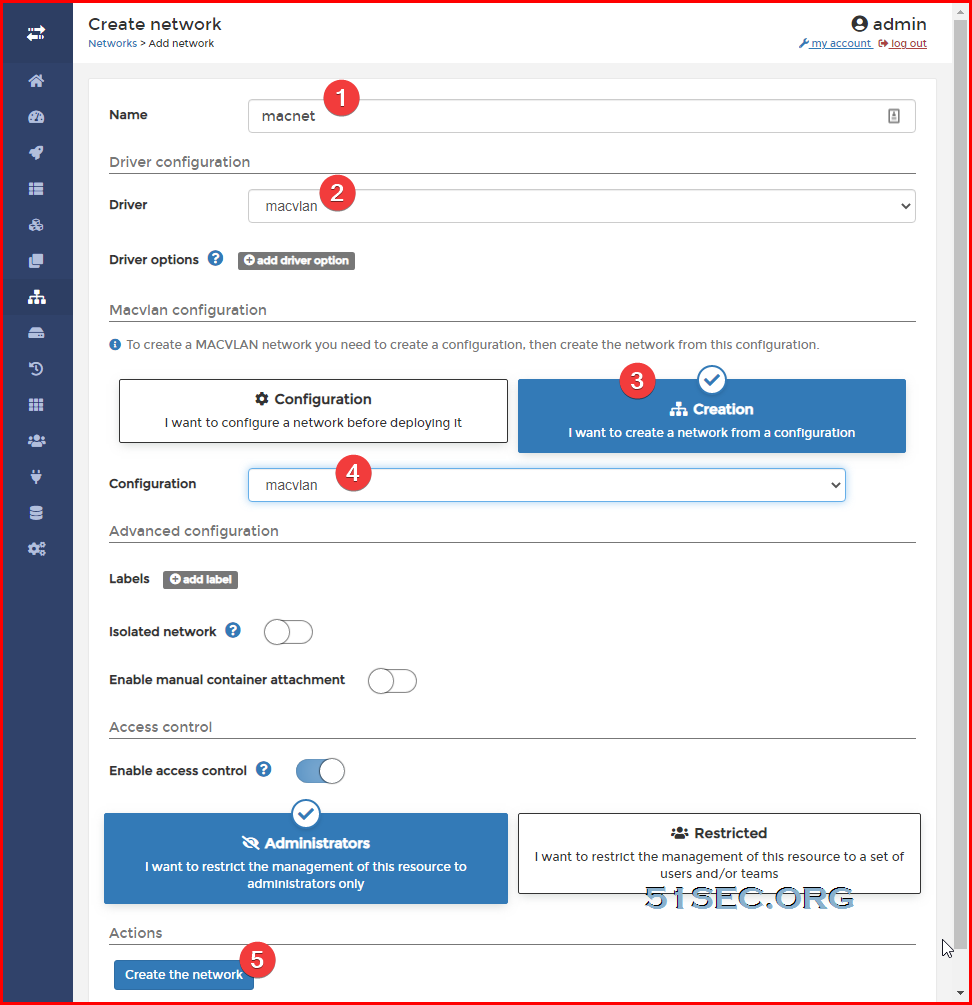
Command line:
docker network create -d macvlan --subnet=192.168.2.0/24 --gateway=192.168.2.1 -o parent=wlan0 macnet
root@ubuntu:/etc# docker network ls
NETWORK ID          NAME                DRIVER              SCOPE
0f5799ba3db3        bridge              bridge              local
ad41a2fa3a8a        host                host                local
af9991f302ea        macnet              macvlan             local
7a6c6991d92b        macvlan             null                local
74f1375fb8c1        none                null                local
Pull Image and Create ContainerFrom Portainer: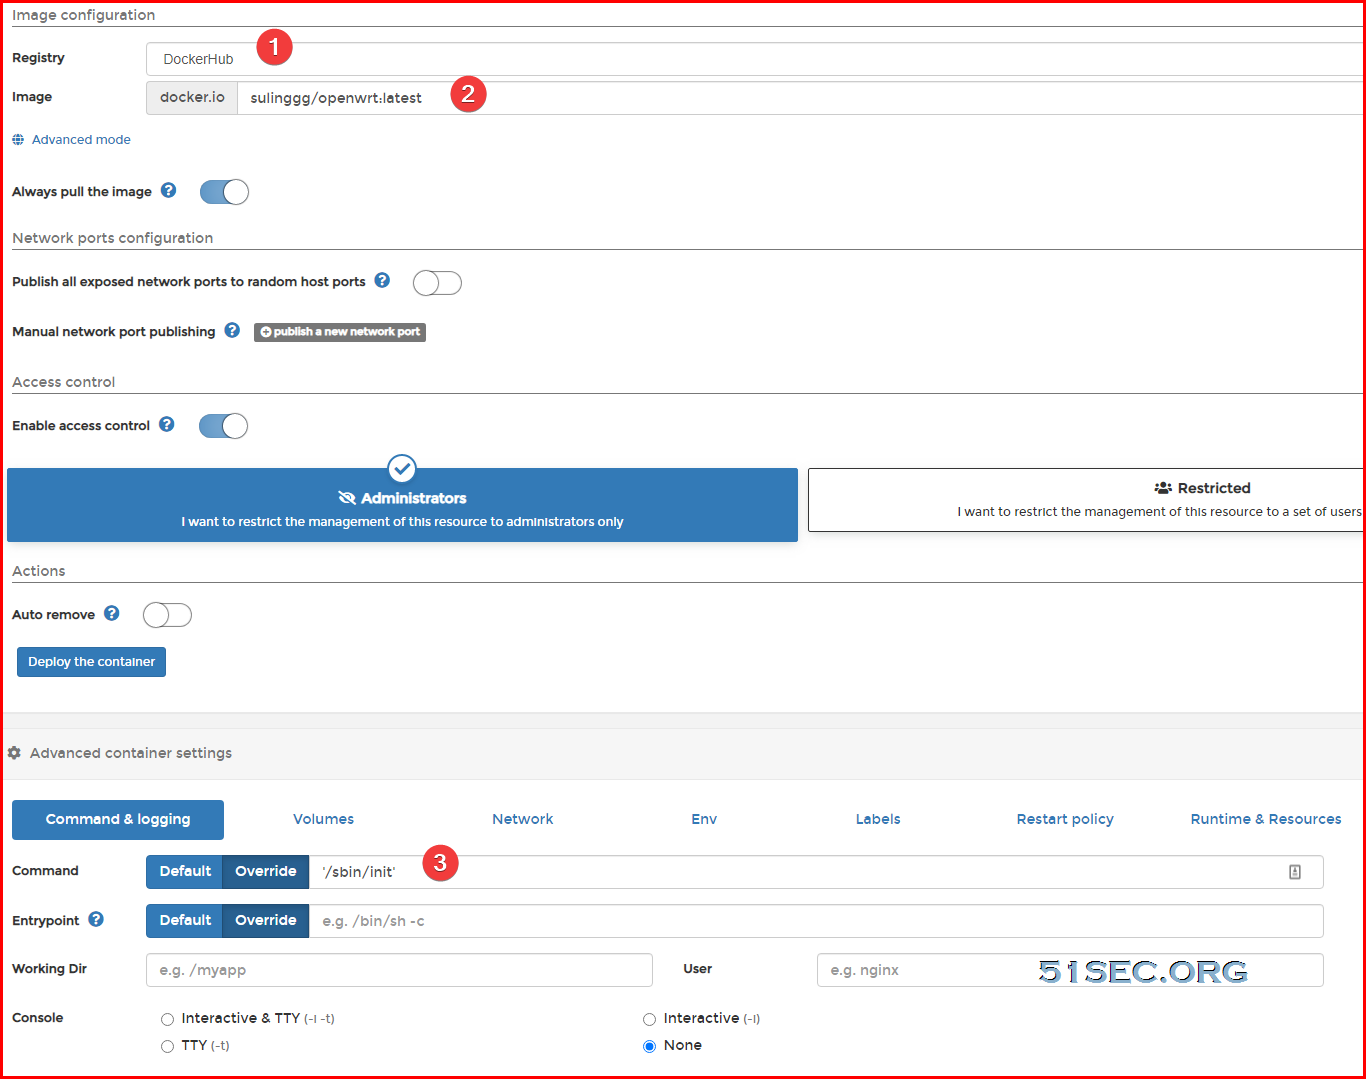
Other configuration :
network - choose macnet
Restart policy - Never (for testing)
Runtime & Resources - Privileged mode enable
If you had an already running container that you wanted to change the restart policy for, you could use the docker update command to change that:
docker update --restart unless-stopped container_id
docker pull sulinggg/openwrt:latest
docker run --restart always --name openwrt -d --network macnet --privileged sulinggg/openwrt:latest /sbin/init
After deployed the dock, check the ip address allocated from network macnet. You will need to manually set this ip into docker's /etc/config/network file.
bash-5.0# cd /etc/config
bash-5.0# nano network
bash-5.0# cat network

config interface 'loopback'
        option ifname 'lo'
        option proto 'static'
        option ipaddr '127.0.0.1'
        option netmask '255.0.0.0'

config globals 'globals'
        option ula_prefix 'fd7d:334c:6108::/48'

config interface 'lan'
        option type 'bridge'
        option ifname 'eth0'
        option proto 'static'
        option netmask '255.255.255.0'
        option ip6assign '60'
        option ipaddr '192.168.2.96'
        option gateway '192.168.2.1'
        option dns '8.8.8.8'

config interface 'vpn0'
        option ifname 'tun0'
        option proto 'none'

bash-5.0#
Now you should be able to access your OpenWRT web gui from http://192.168.2.96 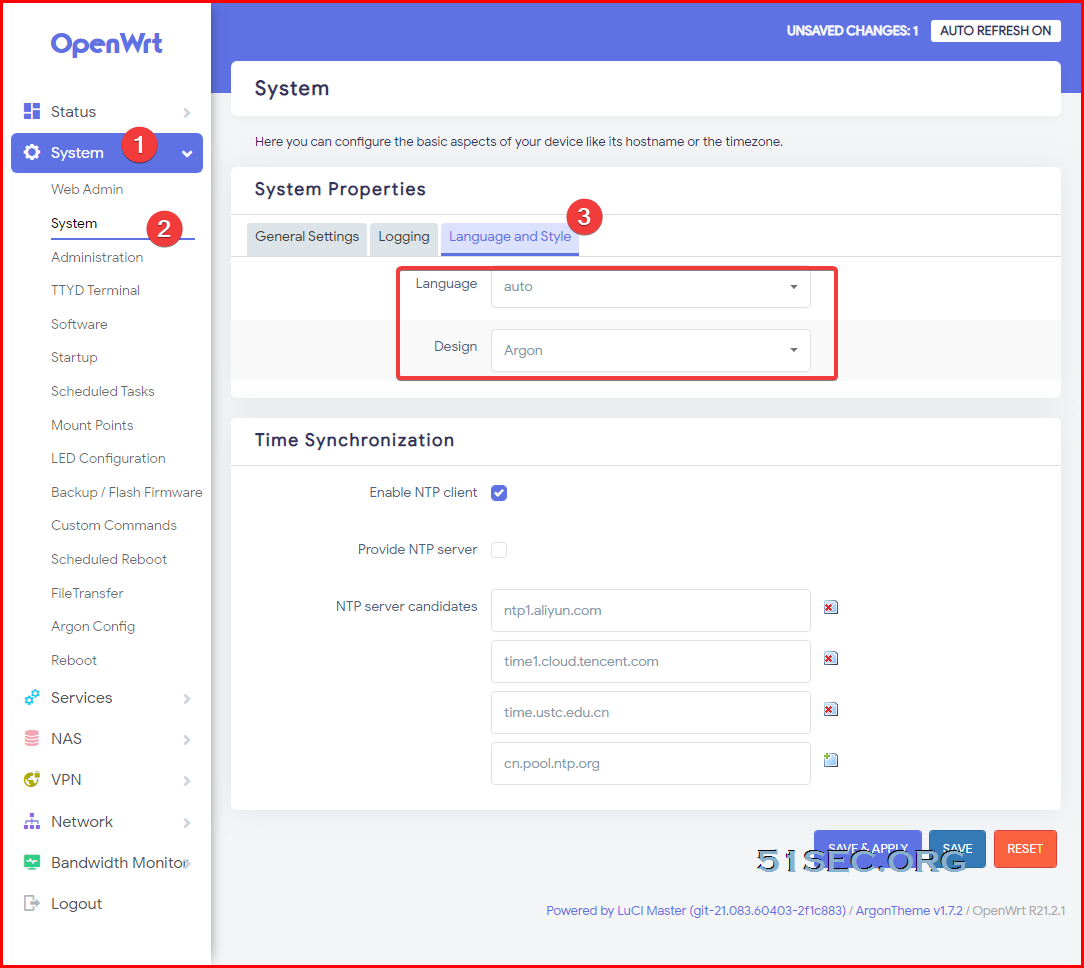
Note: Ubuntu has systemd-resolved listening on port 53 by default. In case you want to run your own DNS server, you can't because port 53 is already in use, so you'll get an error similar to this: "listen tcp 0.0.0.0:53: bind: address already in use". You have systemd-resolved enabled as the local DNS server. You can disable it by setting DNSStubListener=no in /etc/systemd/resolved.conf and then restart the systemd-resolved service. It will then start without binding to port 53, allowing dnsmasq to bind instead.[Resolve] DNS=1.1.1.1 #FallbackDNS= #Domains= #LLMNR=no #MulticastDNS=no #DNSSEC=no #DNSOverTLS=no #Cache=no DNSStubListener=no #ReadEtcHosts=yes via Blogger https://ift.tt/3swGXzg March 27, 2021 at 10:10PM Docker
My OpenWRT Packages
This post is to collect some of packages using on my OpenWRT router. The list is still adding. Once more packages tested and used, they will be added in this post for future reference. Terminal integration in LUCI: luci-app-ttyd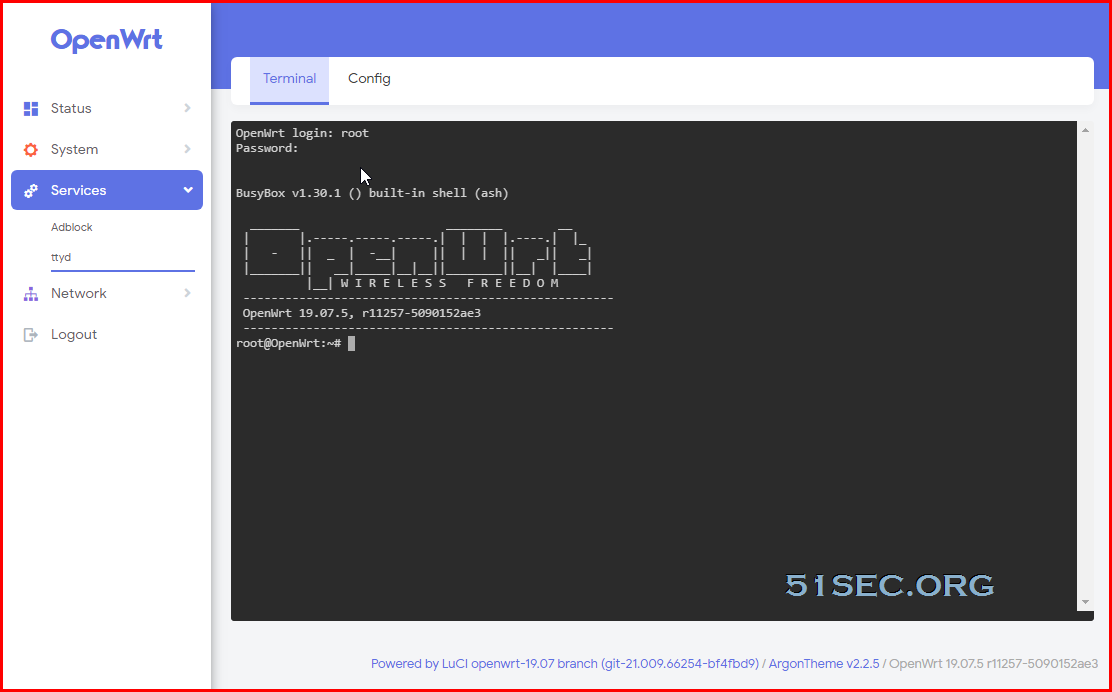
This package intigrates ttyd in LUCI. Two packages to install, ttyd and luci-app-ttyd. 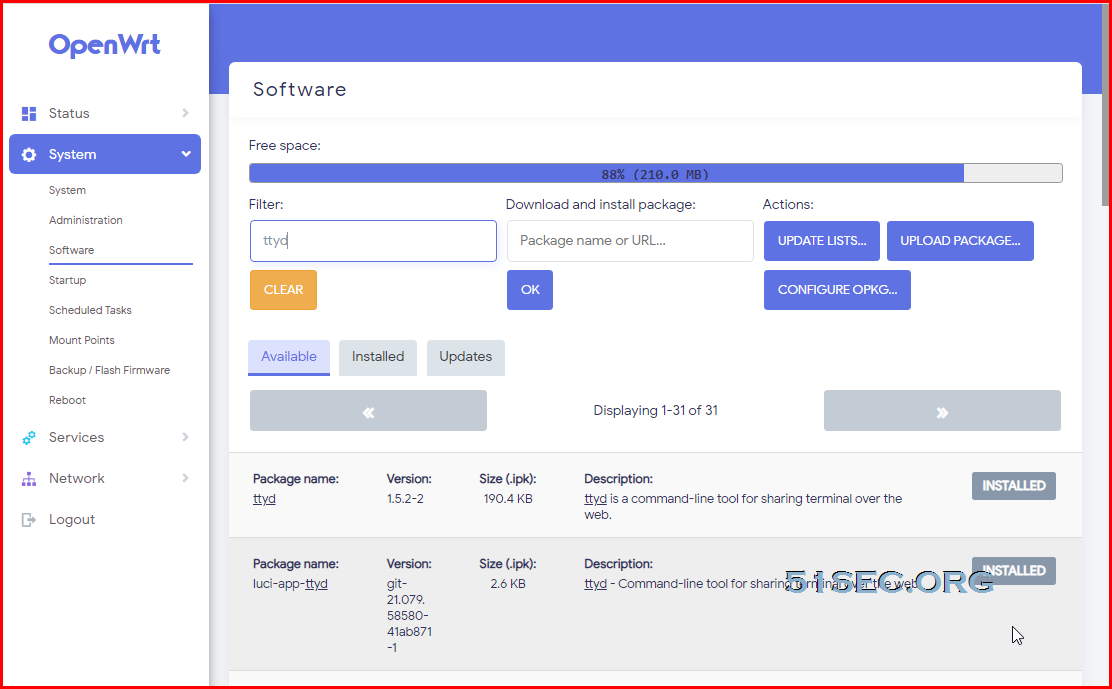
luci-theme-argon
Argon is a clean HTML5 theme for LuCI. Users may setup their own favorite logins, including beautiful pics and customized mp4 videos.
Github address: https://ift.tt/3asTw8U
You will have to use TTYD to do installation. For openwrt official 19.07 Snapshots LuCI master

DNS based ad/abuse domain blocking - AdblockGetting rid of annoying ads, trackers and other abuse sites (like facebook) is simple: block them with your OpenWRT router. Adblock on OpenWrt uses DNS to block Ads by becoming your first-hop DNS server, and returning IP address not found when the queried for the address of the an Ads server.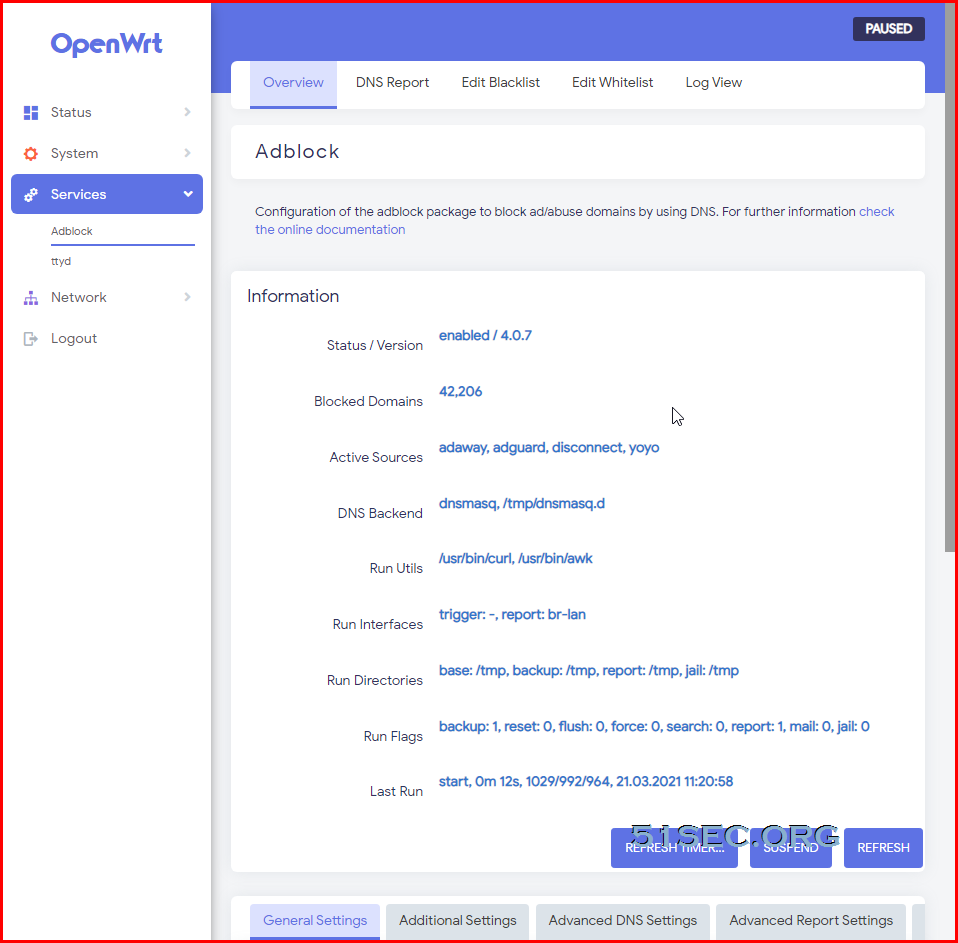 Github : https://ift.tt/2i9ZHUZ via Blogger https://ift.tt/3lWGZxW March 27, 2021 at 10:09PM Software
This video shows how to onboard linux account with ssh key. Unfortunately, if ssh key is protected by passphrase, CyberArk PAS will not recognize it and will give an format error. Without passphrase, the account with ssh key can be onboard and key can be managed and rotated by CPM. ==================================================================== If you found this video has some useful information, please give me a thumb up and subscribe this channel to get more updates: https://www.youtube.com/c/Netsec?sub_confirmation=1 Learning and Sharing - 海内存知己,天涯若比邻 - http://51sec.org
Watch video on YouTube here: https://youtu.be/Wzo6TZNQL-8 by Johnny Netsec
n.eko is a virtual browser project on Github, which has a beautiful Chrome/Firefox in a docker environment. It is also streaming sound from remote to local. System requirement is a bit high, but with changing swap size on linux os, I managed to run it in a 1vCPU and 1G Ram dock environment with Nginx and Portainer dockers. There is a similar noVNC video to show you a remote desktop environment in browser I made before: https://youtu.be/Y43FWu50BEE You can find related post for n.eko video : https://ift.tt/3rbSnXN ==================================================================== If you found this video has some useful information, please give me a thumb up and subscribe this channel to get more updates: https://www.youtube.com/c/Netsec?sub_confirmation=1 Learning and Sharing - 海内存知己,天涯若比邻 - http://51sec.org
Watch video on YouTube here: https://youtu.be/ISunHDh7WyQ by Johnny Netsec
Install OpenWRT as Single-Arm Router Without Changing Your Home Network
My home network is a flat network, one ISP Wireless Router connecting to a modem for Internet connection. Internally, a switch is connecting to this wireless router to provide more LAN ports for internal devices. The wireless router was provided by ISP. Performance and coverage is ok for my home. But since it is ISP router, lots of settings have been locked down or customized, I wont be able to do much. Since I am also lazy to make big change to my home network, I found OpenWRT can be used as a single arm router for my home network to make me have better control to the network traffic. Only thing you will need to do is to spin up a virtual machine and install OpenWRT in it. Of course, you might need to change the DHCP settings to let your clients to send traffic to OpenWRT rather than directly to Wireless router. TopologyBefore 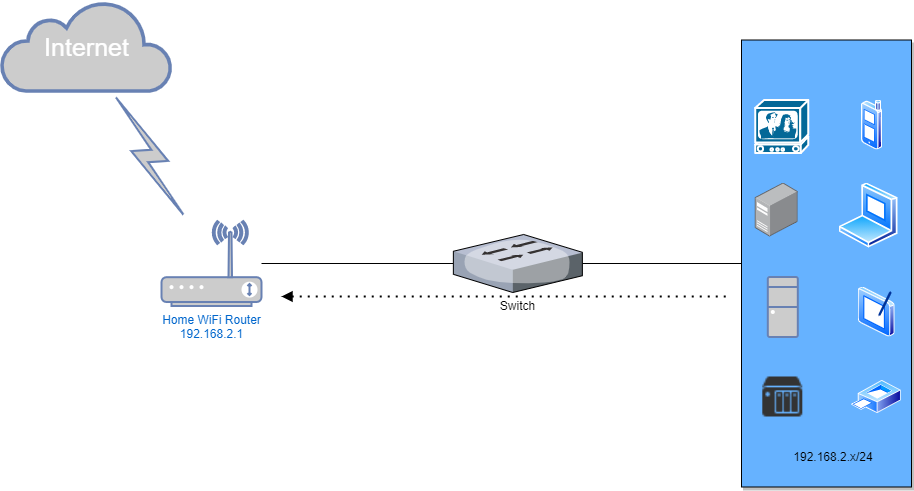
After: 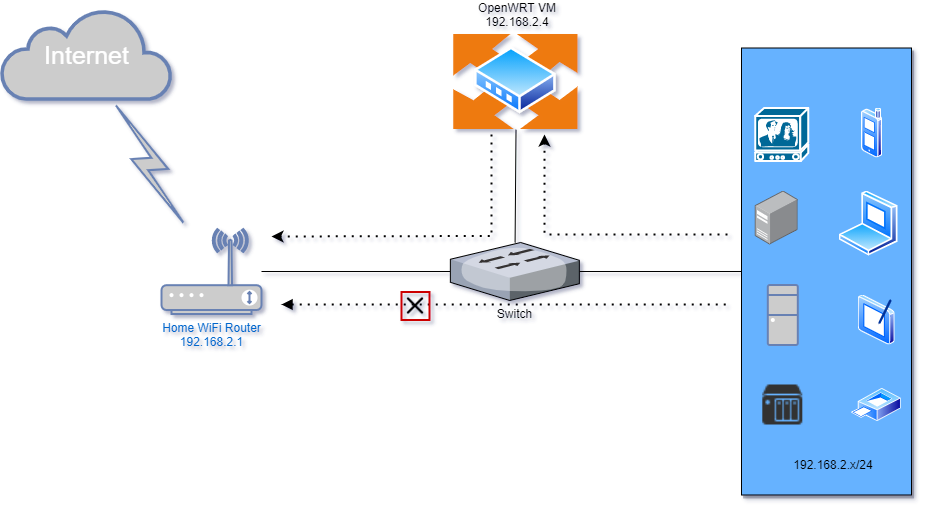
Download OpenWRT OVAYou can find out the OVA link from https://ift.tt/3o9nAJU if you do not want to convert it from image. Here is directly downloading link. The file size is only 18MB. Installation StepsDouble click the download file (OpenWRT_x86_64_19.07.05.ova) will trigger VMWare Workstation Import Virtual Machine wizard: 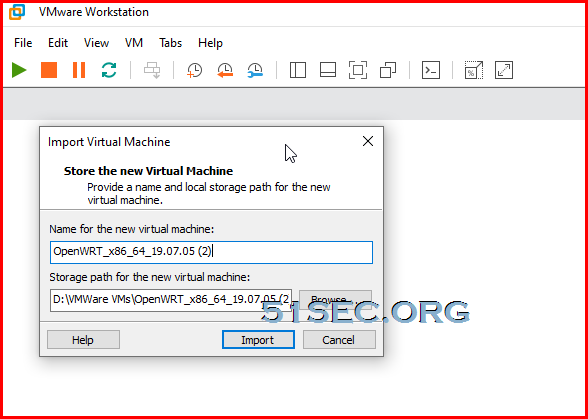
Follow the wizard to get it imported. After imported, you can edit the configuration to change Memory or processors. One thing you wont be able to change is Hard Disk (IDE) size, which is only 256MB. There is only way to DD this 256MB hard drive to another one. But it will be on different post to discuss. 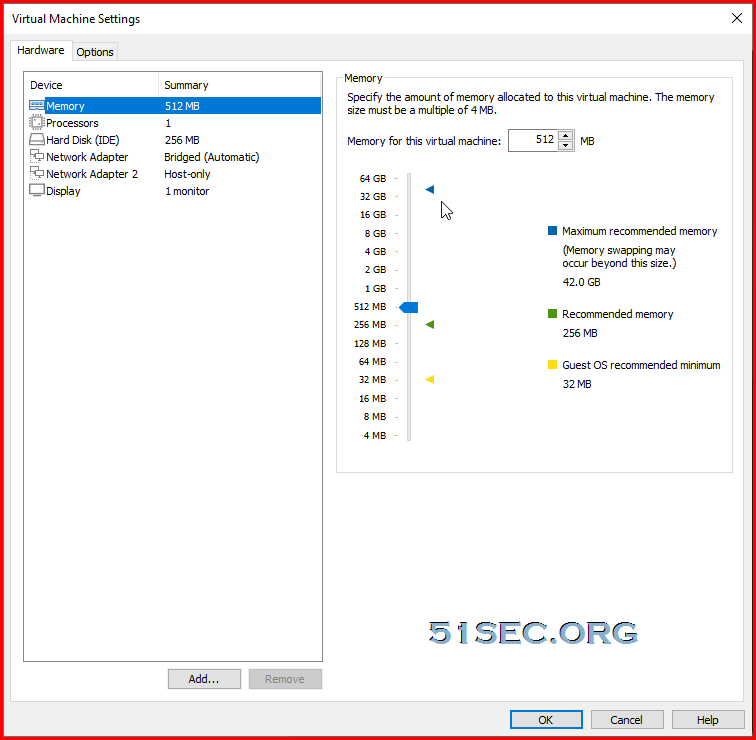
After VM started, that is how it looks like: 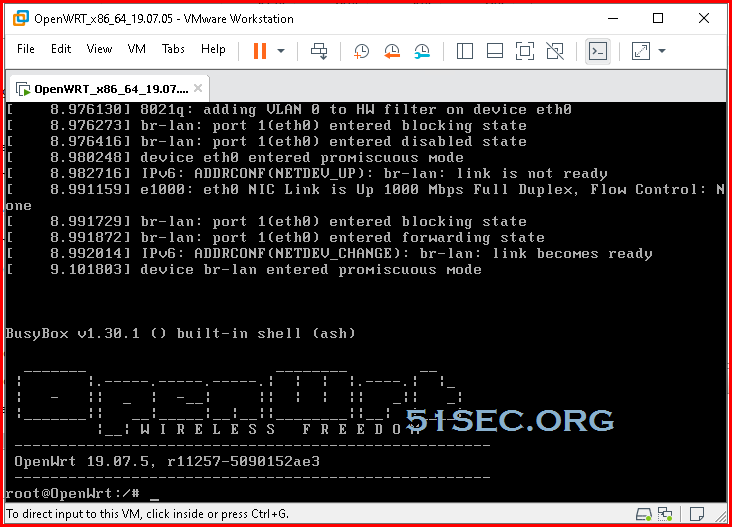
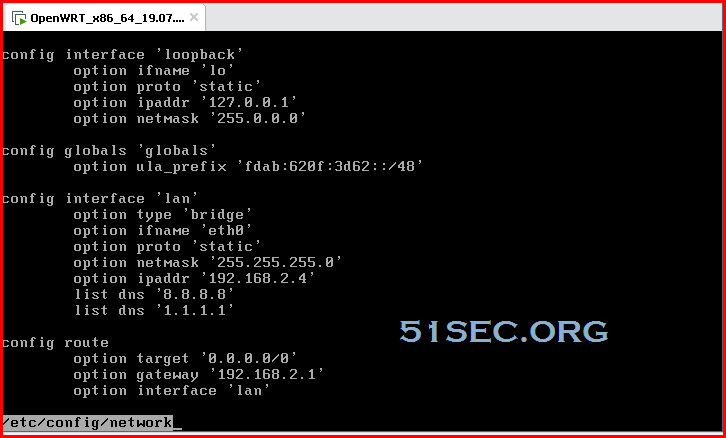
By default, it will use dhcp, but you might want to change it to static ip.
After that, you can use browser to access OpenWRT Luci Web UI: 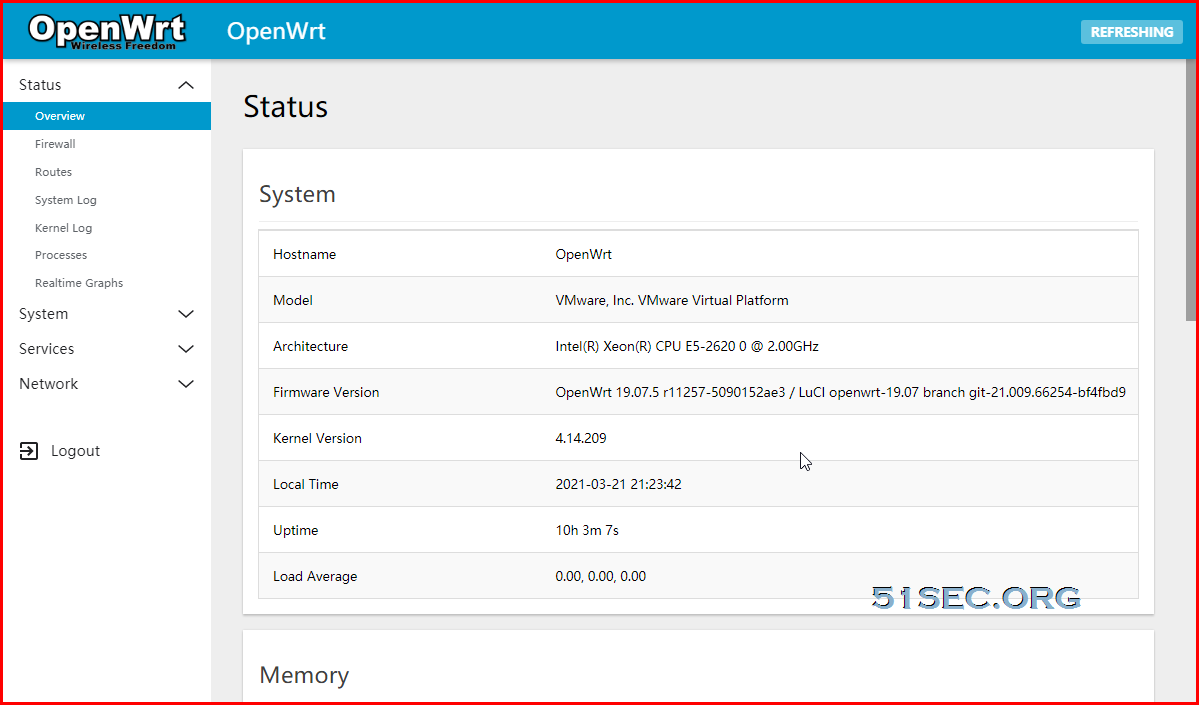
By default it is using Luci bootstrap theme. You might want to try another theme by installing it from software window. I am using luci-theme-material theme here. 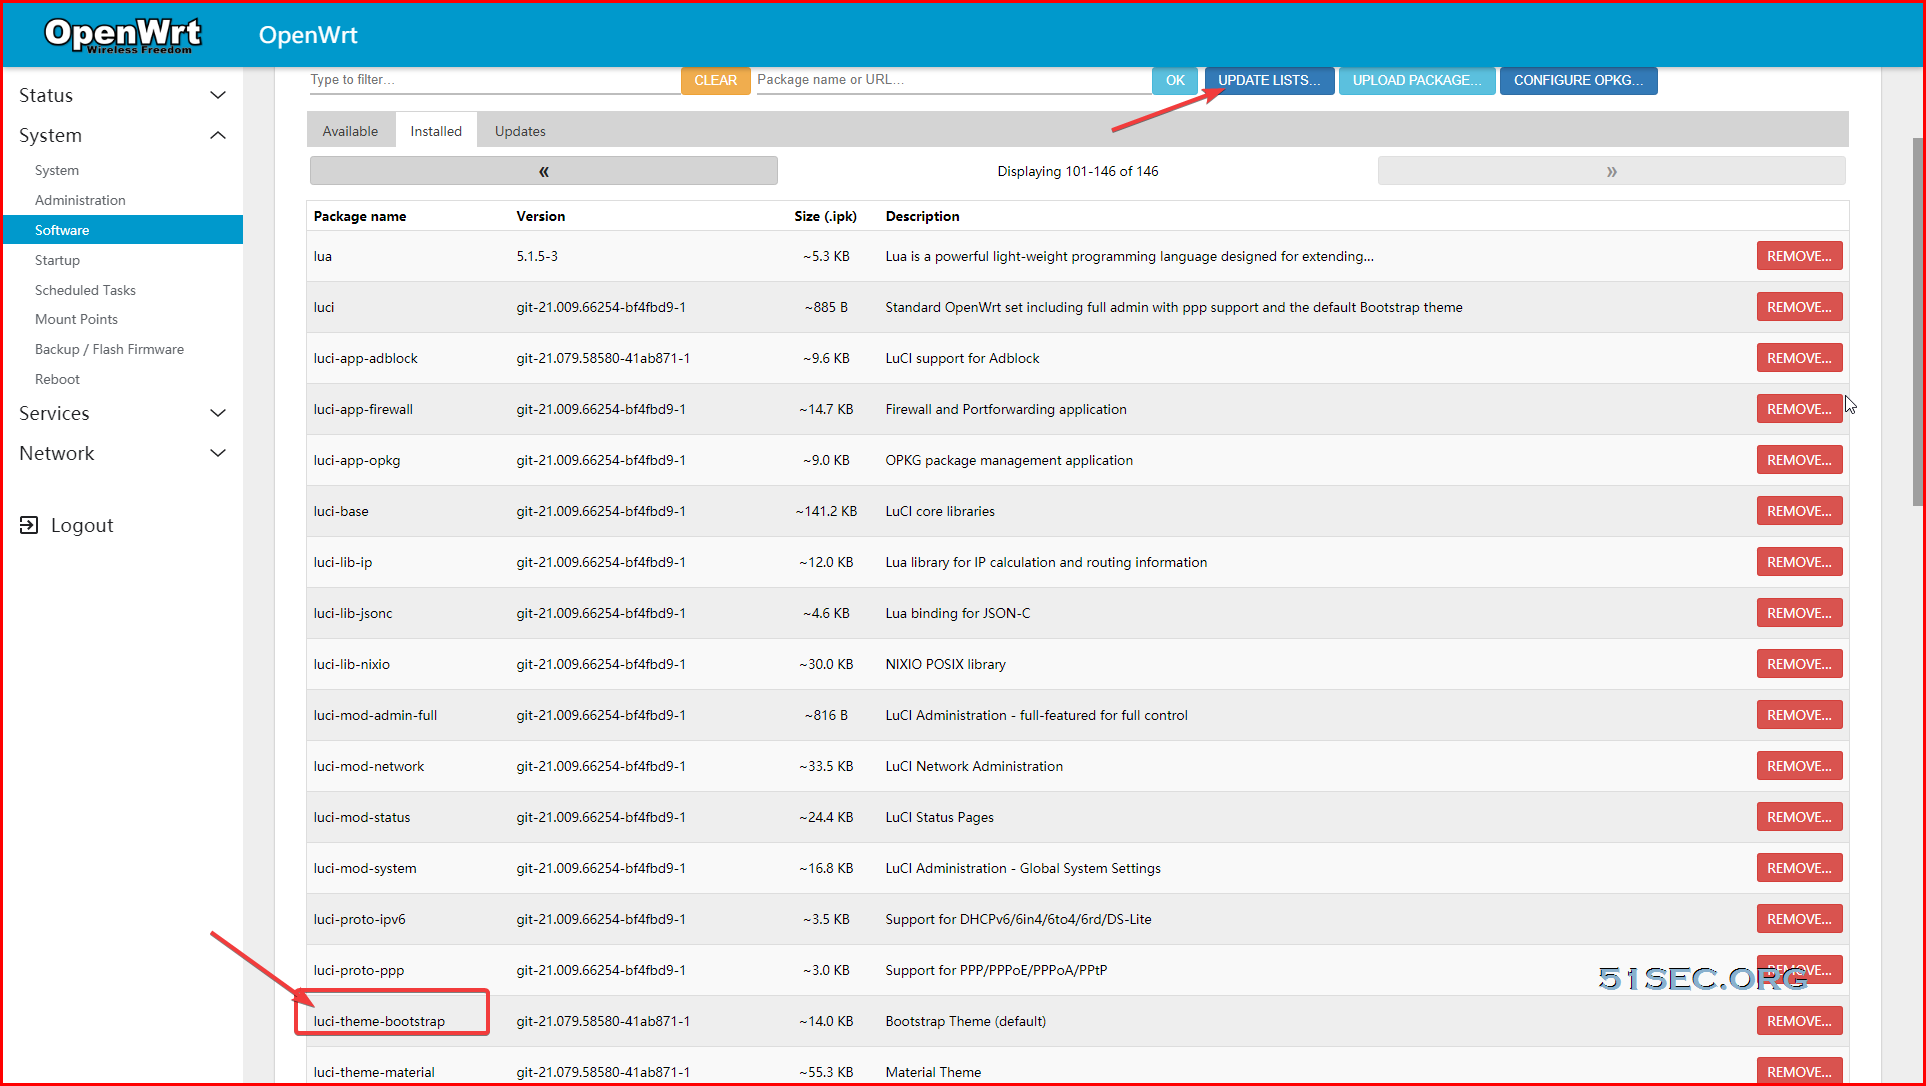
Client IPv4 Setting ChangeOn your client network configuration, you will need to change default gateway and dns to your OpenWRT ip address, which is 192.168.2.4, in my case.
It also can be observed the route change from tracert command. 192.168.2.4 becomes the first hop for the test machine. C:\Users\test>tracert www.google.ca Tracing route to www.google.ca [172.217.164.227] over a maximum of 30 hops: 1 9 ms 3 ms 7 ms OpenWrt.lan [192.168.2.4] 2 6 ms 4 ms 5 ms PORTAL-FDF4 [192.168.2.1] 3 20 ms 17 ms 21 ms 160.32.196.33 4 * 17 ms 17 ms 104.171.62.122 5 3727 ms * * 204.197.190.245 6 19 ms 18 ms 18 ms 135.0.199.97 7 22 ms 19 ms 19 ms 72.14.203.42 8 18 ms 23 ms 18 ms 74.125.244.161 9 18 ms 17 ms 19 ms 216.239.42.61 10 24 ms 20 ms 17 ms yyz12s05-in-f3.1e100.net [172.217.164.227] Trace complete. Referencesvia Blogger https://ift.tt/3cYw1nJ March 21, 2021 at 09:35PM Network
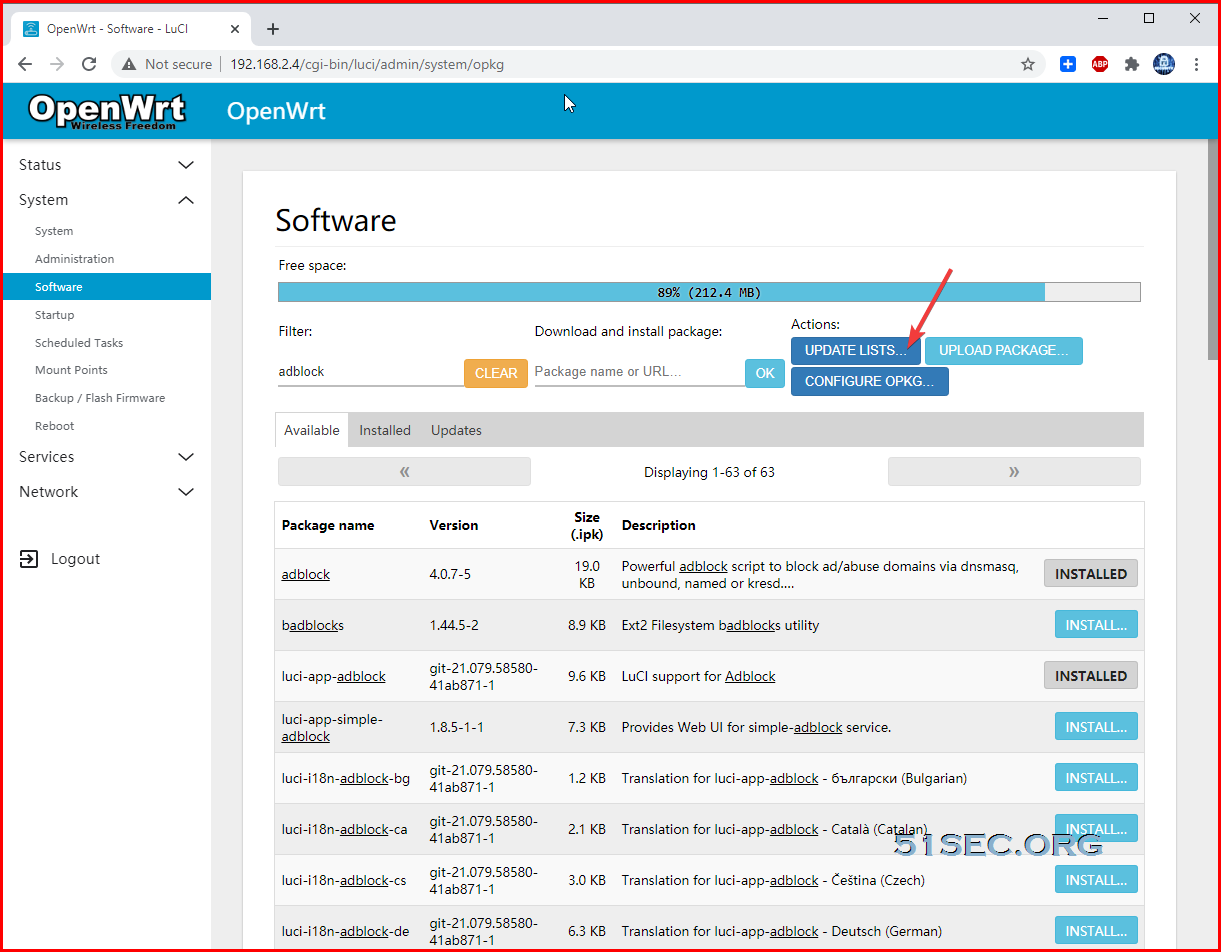
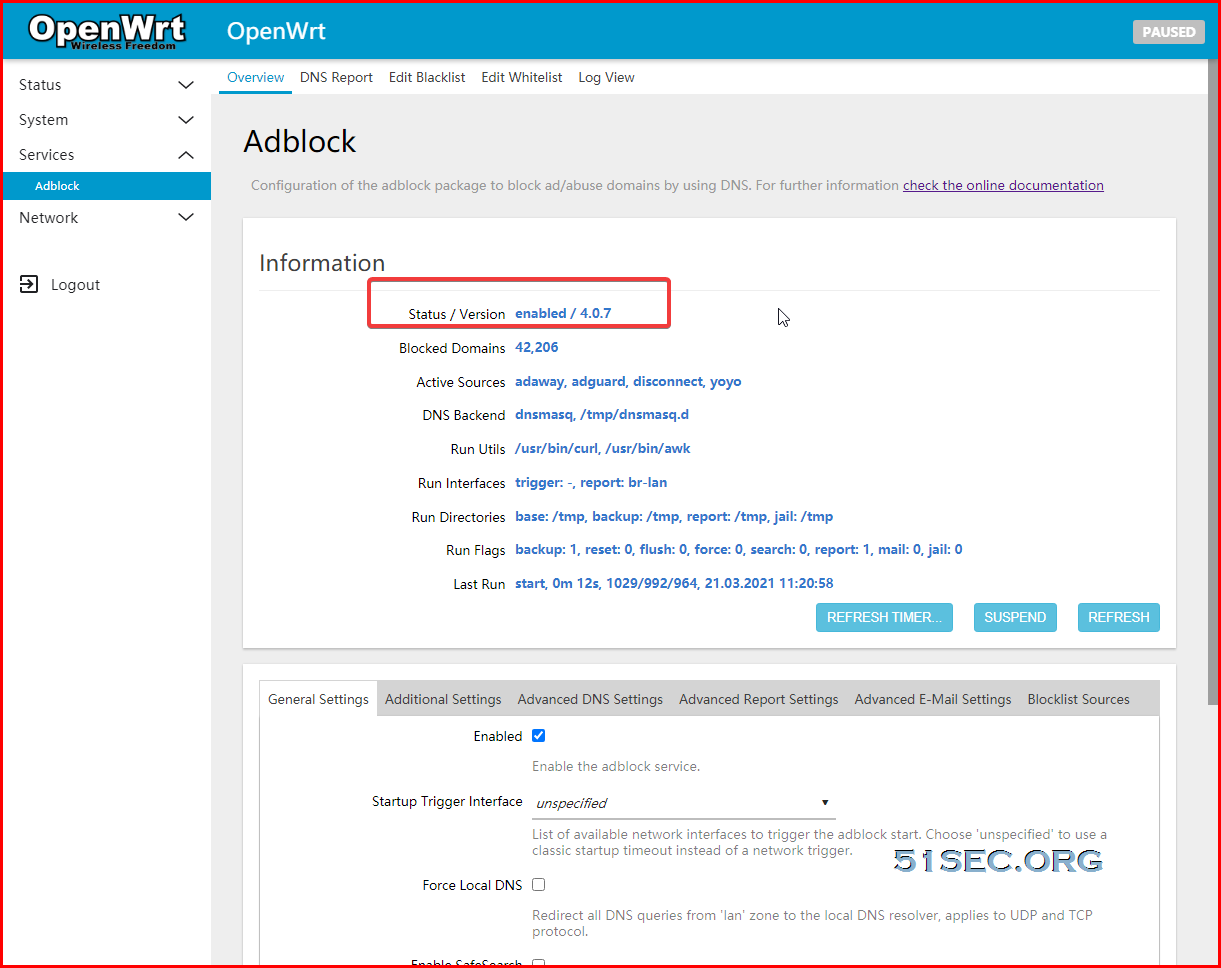
Install Adblock in your OpenWRT Router OS
Adblock software in OpenWRT is a script running in your OpenWRT gateway to sort out those DNS queries that ask for the resources recrds of ad servers and return a simple 'NSDOMAIN'. This action will make your browser not able to show those ads on the page you are surfing. Topology
Prerequisites
Installation StepsFrom OpenWRT Luci Web GUI:
From Console or SSH Session:
Referencesvia Blogger https://ift.tt/314u3wE March 21, 2021 at 02:00PM Security
This video shows how to install open source Password Manager Software Bitwarden docker and using Portainer to manager it. It also shows how to use Certbot to apply LetsEncrypt certificate and modify Nginx configuration to use this certificate. It enables https connection to Bitwarden service. ==================================================================== If you found this video has some useful information, please give me a thumb up and subscribe this channel to get more updates: https://www.youtube.com/c/Netsec?sub_confirmation=1 Learning and Sharing - 海内存知己,天涯若比邻 - http://51sec.org
Watch video on YouTube here: https://youtu.be/XIIvPNCng18 by Johnny Netsec
Install Neko (A Self Hosted Virtual Browser Docker) in Low Memory VPS (1GB)
Github project n.eko is a virtual browser based on the docker isolation environment, supports two types of browsers, Chrome and Firefox, and has built-in chat/simple user management functions. The UI design is very beautiful. 
Project address: https://github.com/nurdism/neko The program requires a relatively high configuration, see here for details:https://n.eko.moe/#/quick-start Here are recommended specs:
To run it in a low resource VPS, such as only 1GB RAM, 1vCPU, we will have to change SWAP size to make it more stable. Firewall Ports OpenPlease make sure following two firewall rules created on your cloud VPS's firewall.
1. tcp 8080
2. udp 59000-59100
Change SWAP Size
Command (not support OpenVZ) from root user:
When choose add swap, please enter number for size. Default metric is MB。
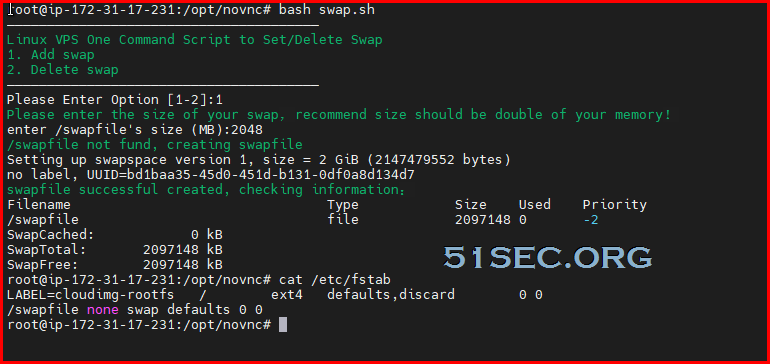
In screenshot, the priority is showing 0. Script in github has set to 100.
Github: https://github.com/51sec/swap
Install Docker and Docker-ComposeInstall docker:apt -y update apt -y install curl curl -sSL https://get.docker.com/ | sh systemctl start docker systemctl enable docker Install docker-compose: curl -L https://github.com/docker/compose/releases/download/1.25.4/docker-compose-`uname -s`-`uname -m` -o /usr/local/bin/docker-compose chmod +x /usr/local/bin/docker-compose Create docker-compose.yml and bring Neko docker upCreate a new docker-compose project directory and edit docker-compose.yml.
cd ~
mkdir neko
cd neko
vi docker-compose.yml
Put following code into docker-compose.yml file based on the browser type.
Chrome Image: version: '3.5' services: neko: image: nurdism/neko:chromium restart: always cap_add: - SYS_ADMIN ports: - "8080:8080" - "59000-59100:59000-59100/udp" environment: DISPLAY: :99.0 SCREEN_WIDTH: 1024 SCREEN_HEIGHT: 576 SCREEN_DEPTH: 24 NEKO_PASSWORD: neko NEKO_ADMIN: admin NEKO_BIND: :8080 Firefox Image: version: '3.5' services: neko: image: nurdism/neko:firefox restart: always shm_size: "1gb" ports: - "8080:8080" - "59000-59100:59000-59100/udp" environment: DISPLAY: :99.0 SCREEN_WIDTH: 1024 SCREEN_HEIGHT: 576 SCREEN_DEPTH: 24 NEKO_PASSWORD: neko NEKO_ADMIN: admin NEKO_BIND: :8080 Notes: SCREEN_DEPTH can be changed to 16 to save some resource usage on your host VPS. docker-compose up -dNow you should be able to browser to your Neko's web interface with this url : http://<public ip>:8080 Fix Chinese Font IssueEnter into docker: docker exec -it neko_1 bash Install fonts in docker: apt -y update apt -y install ttf-wqy-zenhei exit and restart docker using docker-compose: exit docker-compose restart
via Blogger https://ift.tt/3cK3EJD March 17, 2021 at 05:49PM Docker |
|
 RSS Feed
