
Blogger Usage Tips and Tricks
Here are some tips and tricks collections for bloggers from my blogger experience:
There are one related post in this blog:
If you would like to insert table using HTML code, here is an example:
Table 3x2 Example Code
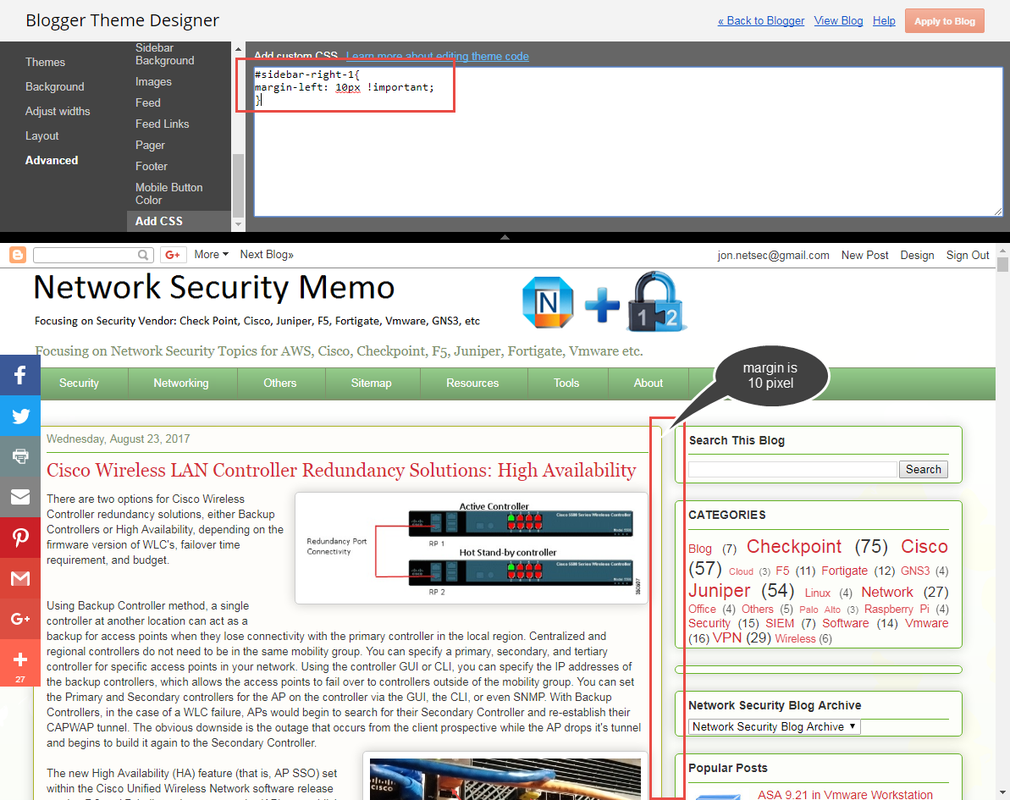
Sometimes, the space between main body posts section and right side bar is too wide. You may want to change it from 40px to 10 px. Here is the code I found from here:
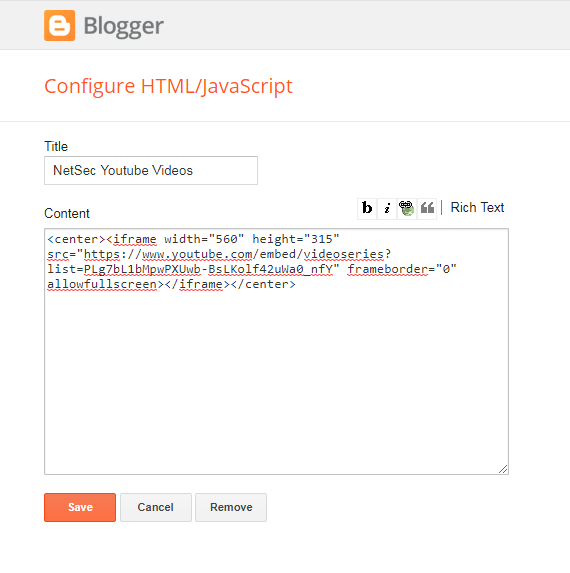
1 Generate html code from your youtube playlist
2 Add html code into your Blogger layout
It is best to put code between <center> and </center> to get better center location in your page.
During migrating my site from 51sec.blogspot.com to 91sec.blogspot.com, I have found following ways to do redirection from one blogspot site to another. The code will be inserted between <head> and </head>
a. This is current way I am using and found it is best so far.
b. It will only redirect all posts or pages to the homepage site, not passing url parameters.
c. The code works on some of URLs but some were got messed up.
Note: If you got three images to align side by side, the process is same as the steps shown above.
1 HTML Code 1
2 HTML Code 2
https://icanbuildablog.com/2015/08/how-to-add-a-drop-down-menu-to-a-blogger-blog-without-javascript/
<td align="left"><div><div style="float:right;margin-left:5px">
"ADSense Code"
</div></div></td>
*Step2 Edit theme html
*Step3 copy following code before </head>
via Blogger http://blog.51sec.org/2017/08/blogger-tips-and-tricks.html
October 15, 2021 at 08:58AM Blog
Here are some tips and tricks collections for bloggers from my blogger experience:
There are one related post in this blog:
How to quick and easy to insert a table
There is no simple way you can easily insert a table directly from Blogger editor interface, rather than using html code.
But by using Office Word to create a table with the style you required, then copy it into your Bolgger editor page will be one of most effective method to insert table.
If you would like to insert table using HTML code, here is an example:
Table 3x2 Example Code
<table>
<tbody>
    <tr>
        <td>Cell 1.1</td>
        <td>Cell 1.2</td>
    </tr>
    <tr>
        <td>Cell 2.1</td>
        <td>Cell 2.2</td>
    </tr>
    <tr>
        <td>Cell 3.1</td>
        <td>Cell 3.2</td>
    </tr>
</tbody>
</table>
Adjust Right Sidebar margin width
#sidebar-right-1{Add the code to Blogger Them Designer - Advanced - Add CSS section as show below.
position: relative;
left: 40px !important;
}
Add youtube Playlist into blogger
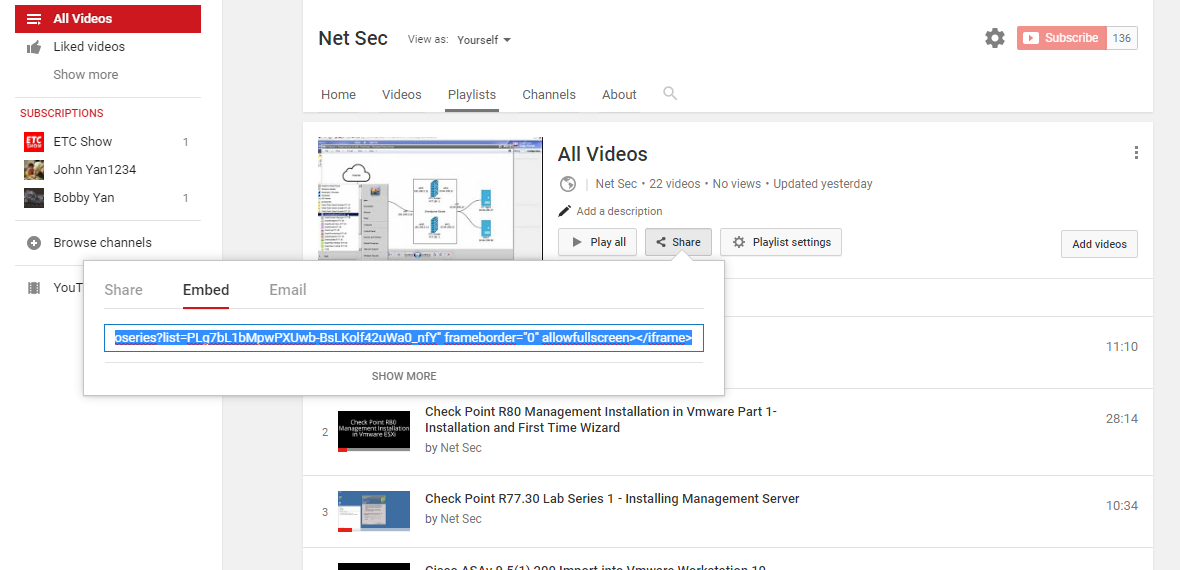
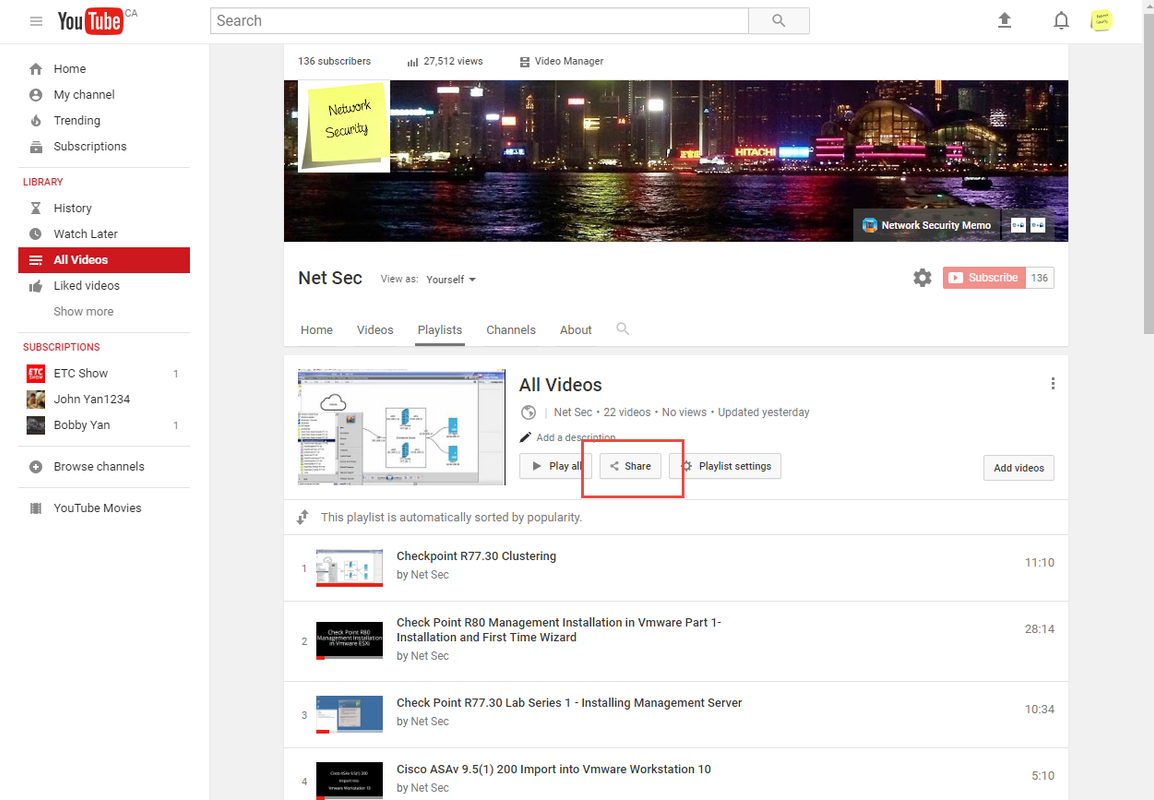
2 Add html code into your Blogger layout
It is best to put code between <center> and </center> to get better center location in your page.
<center><iframe width="560" height="315" src="https://www.youtube.com/embed/videoseries?list=PLg7bL1bMpwPXUwb-BsLKolf42uWa0_nfY" frameborder="0" allowfullscreen></iframe></center>
Add Third Party Domain
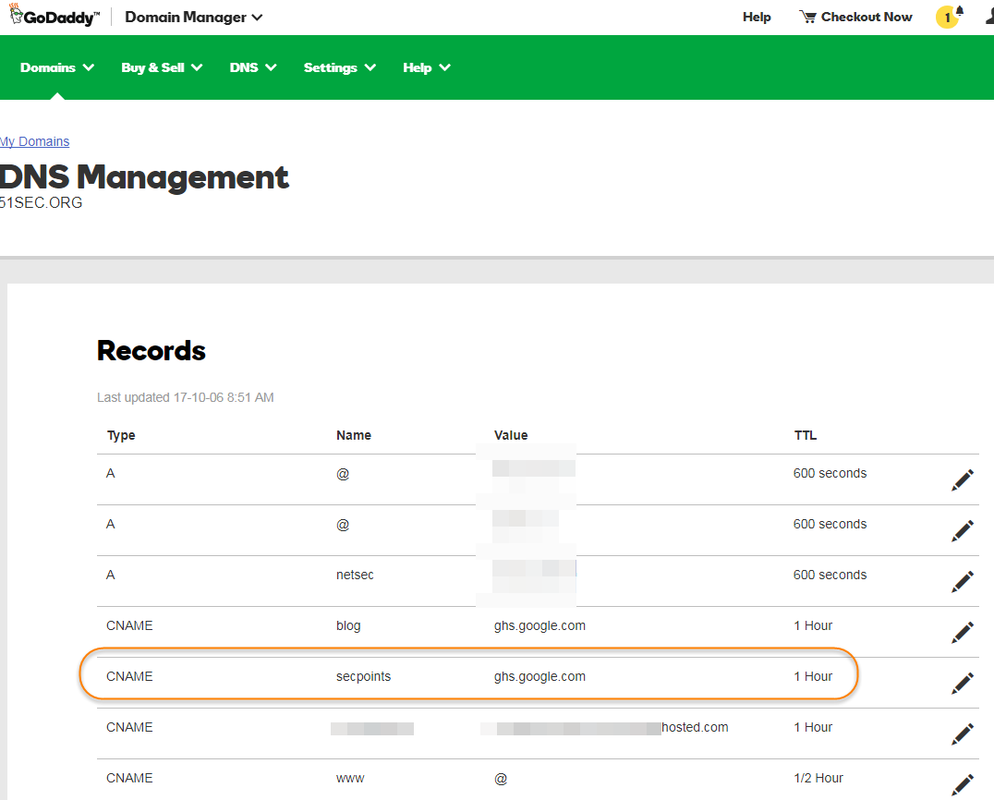
|
| GoDaddy CNAME Setting |
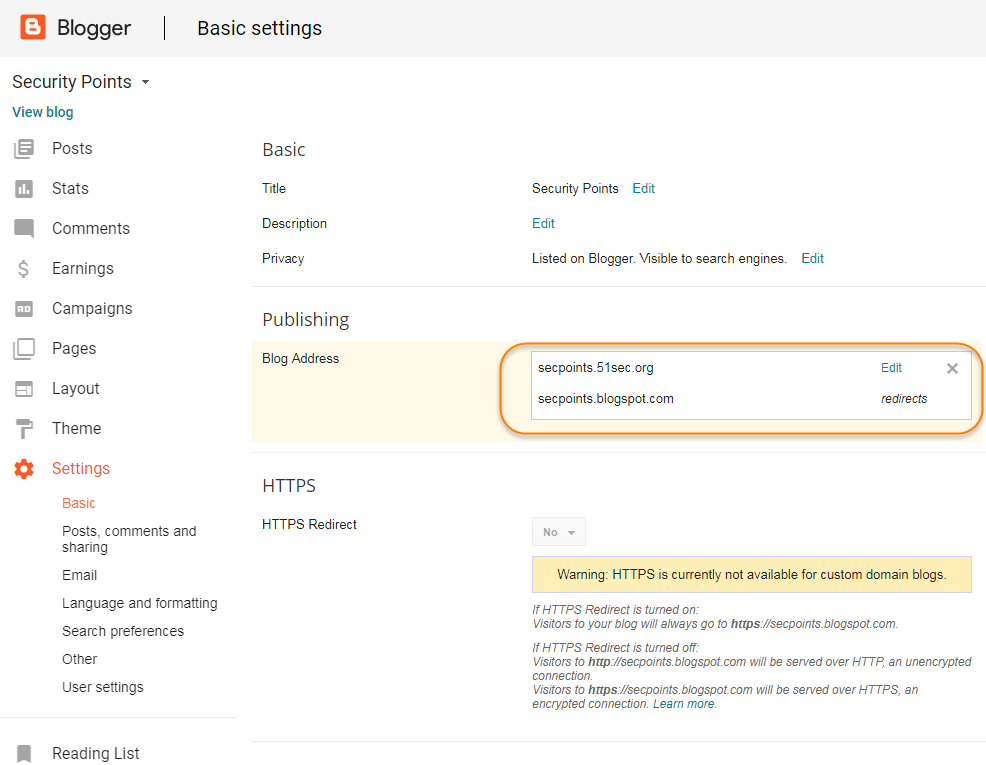
|
| Blogger Domain Settings |
Redirect Blogspot Site from One to Another
a. This is current way I am using and found it is best so far.
<script>
var oldURL = "51sec.blogspot.com";
var newURL = "blog.51sec.org";
var url = location.href;
var newURL = url.replace(document.domain,newURL);
window.location = newURL
</script>
b. It will only redirect all posts or pages to the homepage site, not passing url parameters.
<meta content='0;url=http://91sec.blogspot.com' http-equiv='refresh'/>
c. The code works on some of URLs but some were got messed up.
<script type='text/javascript'>
var d='<data:blog.url/>';
d=d.replace(/.*\/\/[^\/]*/,'');
location.href='http://91sec.blogspot.com'+d;
</script>
Put images side by side in Blogger's posts without any codes
- Put both images' size into small format to make editor easier to preview the layout of both images.
- Move any one of your images up or down to align well with anther one side by side.
- If they did not align very well, you can put your cursor in front of the image, press enter to make it align better.
- last step, change image size back to medium if you want them look bigger than small.
Note: If you got three images to align side by side, the process is same as the steps shown above.
Add a code section into your post
<table style="background-color: black; border-collapse: collapse; border-color: rgb(51, 102, 0); border-style: solid; border-width: 0px; font-family: "helvetica neue","arial","helvetica",sans-serif; width: 100%;"> <tbody> <tr> <td><div style="text-align: justify;"> <span style="color: lime;"><br /></span> <span style="color: lime;">test </span></div> <div style="text-align: justify;"> <span style="color: lime;">john </span></div> </td> </tr> </tbody></table>
2 HTML Code 2
<pre class="putty" style="background-color: rgb(0, 0, 0) !important; color: rgb(0, 255, 0) !important; font-family: "Courier New", monospace !important; font-size: 12px; margin: auto; padding: 2px; text-align: justify; white-space: pre-wrap; width: 650px;"> </pre>
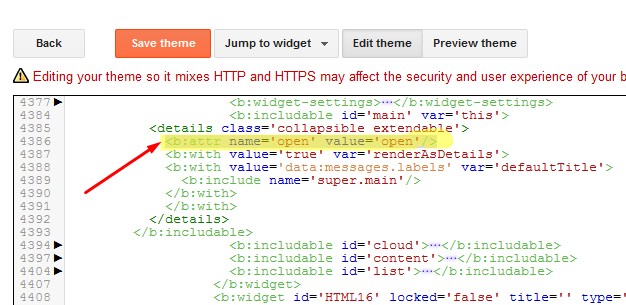
Add a drop down menu to Blogspot
Change Collapse Label to Expanded in New Theme
Edit Blogger HTML code
- Click on "Jump To Widget" and select the Label widget
- The Label widget will have code something like this-
<b:widget id='Label1' locked='false' title='Labels' type='Label' visible='true'>
- In the code for the Label Widget, look for "Main" or "collapsible extendable".
<b:includable id='main' var='this'><details class='collapsible extendable'>
- Expand this by clicking on the black arrow on the left
- Now look for <b:attr cond='data:view.isLabelSearch' name='open' value='open'/>
- Remove- cond='data:view.isLabelSearch' from the above line
Add Adsense Code into HTML page
<td align="left"><div><div style="float:right;margin-left:5px">
"ADSense Code"
</div></div></td>
Add Table of Contents into Posts - mbtTOC
*Step1 Goto Blogger website
*Step3 copy following code before </head>
Code:
<script type='text/javascript'>
//<![CDATA[
//*************TOC plugin by MyBloggerTricks.com
function mbtTOC() {var mbtTOC=i=headlength=gethead=0;
headlength = document.getElementById("post-toc").getElementsByTagName("h2").length;for (i = 0; i < headlength; i++)
{gethead = document.getElementById("post-toc").getElementsByTagName("h2")[i].textContent;document.getElementById("post-toc").getElementsByTagName("h2")[i].setAttribute("id", "point"+i);mbtTOC = "<li><a href='#point"+i+"'>"+gethead+"</a></li>";document.getElementById("mbtTOC").innerHTML += mbtTOC;}}function mbtToggle() {var mbt = document.getElementById('mbtTOC');if (mbt .style.display === 'none') {mbt .style.display = 'block';} else {mbt .style.display = 'none';}}
//]]>
</script>
* Step4 copy following code before " ]]></b:skin> "
Code:
     /*####Automatic TOC Plugin by MyBloggerTricks designed by Saroj-Tech####*/
        .mbtTOC {
            border: 3px solid #A2A9B1;
            box-shadow: 1px 1px 0 #EDE396;
            background-color: #F8F9FA;
            color: #830000;
            line-height: 1.4em;
            margin: 30px auto;
            padding: 20px 30px 20px 10px;
            font-family: Open Sans, arial;
            display: block;
            width: 70%;
            border-radius: 5px;
        }
        .mbtTOC ol,
        .mbtTOC ul {
            margin: 10;
            padding: 10;
        }
        .mbtTOC ul {
            list-style: none;
        }
        .mbtTOC ol li,
        .mbtTOC ul li {
            padding: 15px 0 0;
            margin: 0 0 0 30px;
            font-size: 15px;
        }
        .mbtTOC a {
            color: #0080ff;
            text-decoration: none;
        }
        .mbtTOC a:hover {
            text-decoration: underline;
        }
        .mbtTOC button {
            background: none;
            font-family: Open Sans, arial;
            font-size: 20px;
            position: relative;
            outline: none;
            cursor: pointer;
            border: none;
            color: #707037;
            padding: 0 0 0 15px;
        }
        .mbtTOC button:after {
            content: "\f022";
            font-family: FontAwesome;
            position: relative;
            left: 10px;
            font-size: 20px;
        }
Another better formatted code;
/*####Automatic TOC Plugin by MyBloggerTricks designed by Saroj-Tech####*/

.mbtTOC{
border:1px solid #000000;
border-style:solid;
border-style:dashed;
background-color:#FFFFE0;
line-height:1.4em;
margin:30px auto;
padding:10px 15px 10px 6px;
 display: block;width: 70%;
 }

 .mbtTOC button{
 background-color:transparent;
 font-family:Acme;
 font-size:20px;
font-weight:bold;
 position:relative;
 outline:none;
 border:none;
 color:#0fb5fc;
 padding:0 0 0 15px;
 }

 .mbtTOC button a {
 color:#3d1818;
 padding:0px 2px;
 cursor:pointer;
 }

.mbtTOC button a:hover{
 text-decoration:underline;
color:#fc0f2b;
 }

.mbtTOC button span {
font-size:12px; margin:0px 8px;
 }

.mbtTOC li{margin:8px 0;  }

.mbtTOC li a {
color:#3d1818;
 text-decoration:none;
 font-size:14px;
 text-transform:capitalize;
font-family:georgia;
 }

.mbtTOC li a:hover {
text-decoration: underline;
color:#fc0f2b;
}
.mbtTOC li li {margin:4px 0px;}

.mbtTOC li li a{
 color:#fc0f2b;
 font-size:12px;
 }
.mbtTOC li li a:hover{
 text-decoration: underline;
color:#fc0f2b;
 }

.mbtTOC ol{counter-reset:section1;list-style:none}
.mbtTOC ol ol{counter-reset:section2}
.mbtTOC ol ol ol{counter-reset:section3}
.mbtTOC ol ol ol ol{counter-reset:section4}
.mbtTOC ol ol ol ol ol{counter-reset:section5}
.mbtTOC li:before{content:counter(section1);counter-increment:section1;position:relative;padding:0 8px 0 0;font-size:18px;color:#fc0f2b;font-family:arial;}
.mbtTOC li li:before{content:counter(section1) "." counter(section2);counter-increment:section2;font-size:14px;color:#fc0f2b;font-family:arial;}
.mbtTOC li li li:before{content:counter(section1) "."counter(section2) "." counter(section3);counter-increment:section3}
.mbtTOC li li li li:before{content:counter(section1) "."counter(section2) "."counter(section3) "." counter(section4);counter-increment:section4}
.mbtTOC li li li li li:before{content:counter(section1) "."counter(section2) "."counter(section3) "." counter(section4)"." counter(section5);counter-increment:section5}
*Step5 Now again press " CTRL + F " and Search for " <data:post.body/> " and replace code with
" <div id="post-toc"><data:post.body/></div> " then hit on "save theme" . There are multiple entries for this search. Replace all of them. There are three matches.
*Step6 Save the theme
*Step7 Now go to the post where you want to show a table of content and click on HTML view at the top and paste the below code. Usually after first paragraph, but just before first h2 code
Code:
 <div class="mbtTOC">
 <button onclick="mbtToggle()">Table of Contents</button>
 <ol id="mbtTOC"></ol>
 </div>
* Step8: Place the code at the end of all HTML.
Code:
<script>mbtTOC();</script>
Add Table of Contents into Posts - toc-pro
Step1: add following code just after the </body> tag.
<script async='async' defer='defer'>
var head,newLine,el,title,link,ToC="<nav class='table-of-contents' role='navigation'><h4 onclick='toc()'>Contents</h4><ul style='display:none'>";$("article h2, article h3, article h4, article h5").attr("id",function(arr){return "point" + arr;});$("article h2, article h3, article h4, article h5").each(function(){el=$(this),title=el.text(),link="#"+el.attr("id"),ToC+=newLine="<li><a href='"+link+"'>"+title+"</a></li>"}),ToC+="</ul></nav>",$(".toc-pro").prepend(ToC);function toc() {$(".table-of-contents ul").toggle();}
</script>
If you would like to expand contents, change display:none to display:block.
Here is code for only showing h2 anchors and also expanding contents by default.
<script async='async' defer='defer'>
var head,newLine,el,title,link,ToC="<nav class='table-of-contents' role='navigation'><h4 onclick='toc()'>Table of Contents</h4><ul style='display:none'>";$("article h2, article h3, article h4, article h5").attr("id",function(arr){return "point" + arr;});$("article h2, article h3, article h4, article h5").each(function(){el=$(this),title=el.text(),link="#"+el.attr("id"),ToC+=newLine="<li><a href='"+link+"'>"+title+"</a></li>"}),ToC+="</ul></nav>",$(".toc-pro").prepend(ToC);function toc() {$(".table-of-contents ul").toggle();}
</script>
Step 2: Paste below CSS code just before the code ]]></b:skin>
/* TOC by techyleaf */
.table-of-contents{flex:auto;width:fit-content;background:#eee;font-size:14px;padding:11px;margin:8px 0 30px 0}
.table-of-contents li{margin:0 0 0.25em 0}
.table-of-contents a{color:#2a5365}
.table-of-contents h4{margin:0;cursor:pointer}
.table-of-contents h4:before{font-family:FontAwesome;content:"\f0c9";padding-right:7px;}
/* For Fontaweosme 5
.table-of-contents h4:before{font-family:'Font Awesome 5 Free';content:"\f0c9";padding-right:7px;}
*/
Step 3: Add following shortcode where you want to add TOC
<div class='toc-pro'></div>
References:
- Add a Read More button to Popular Blog Platforms
- Wordpress Attitude Theme Menu Bar Customize
- Add “Related Links” Widgets for Your Websites and Blogs
- Use Godaddy Domain with Openshift Apps
- Create a Sitemap Page or Table of Contents Page for Blogger
- Add Dropdown Menu in Blogger Website
- Collection of Website and Tools for Bloggers (Tips and Tricks)
- How to add Table of content in blogger [ 2 Methods ]
via Blogger http://blog.51sec.org/2017/08/blogger-tips-and-tricks.html
October 15, 2021 at 08:58AM Blog
 RSS Feed
