
 Group Policy is a feature of Windows Server using which admins can install software on all user computers. It can be done remotely without manual intervention. GPO is short for Group Policy. It becomes so popular among companies because it can make deployment clear and easy due to the technology of group policy.
 1. Deploy Windows MSI or MST package Using Group Policy Software Installation
YouTube GPO Deployment Video:
The GPSI feature is not available from the local Group Policy Object (i.e. by launching gpedit.msc). Microsoft did not implement this feature in the local GPO. Therefore, you’ll need an Active Directory installation to start using this feature. Once you’ve created a GPO using the Microsoft Group Policy Management Console (GPMC) or the AD Users and Computers MMC snap-in, edit that GPO to bring up the Group Policy editor MMC snap-in.
You can deploy software using GPSI as either a per-computer or per-user deployment. The per-computer feature can be found in the GP editor under Computer Configuration\Software Settings\Software Installation (see Figure 1 below), while the per-user deployment feature is under User Configuration\Software Settings\Software Installation.
1.1 Create a distribution point
The best way to deploy packages using GPSI is to use the Distributed File System (DFS) feature built into Windows Server. This features allows you to abstract the file path from the physical location of the file so that if you need to move application packages from one server to another, the file path stored in the GPO for that package will not need to change. This is especially important because the native GPSI feature does not support changing the package path forexisting packages--you need to create a new package, which has an impact on clients that have already installed the package via Group Policy.
The first step in deploying an MSI through GPO is to create a distribution point on the publishing server. This can be done by following these steps:
1.2 Create a Group Policy Object
An MSI package is deployed (distributed) through GPO as a Group Policy Object. In order to create an object for your package, you can follow these steps:

1.3 Assign an MSI package
A package can be assigned per-user or per-machine. Also, if the package is assigned, it will automatically be installed silently. In order to assign a package you can follow these steps:

1.4 Publish an MSI package
When using Group Policy, you can publish a package in order to allow the target user to install it by using Add or Remove programs. The steps for publishing a package are:
1.5 Redeploy an MSI package
Sometimes you may need to redeploy a package (for example when doing an upgrade). For redeploying a package you can follow these steps:
1.6 Remove an MSI package
Group Policy also allows you to remove packages which have been deployed in the past. Here are the steps for removing a package:
2. Deploy Software using Startup script via GPO
If the install packages are .exe and not .msi, you are not able to distribute via the normal "Computer Configuration\Policies\Software Settings\Software Installation" policy.
Hence, using a startup script under "Computer Configuration\Policies\Windows Settings\Scripts\Startup" is another choice to deploy your software. However, the software should only install once and not each startup. The popular way to do it is to record the installation results in a text file, which is then read on startup and if the file exists, then don't install. Here are all steps:
2.1 Create the Organizational Unit (OU) for each script.
2.2 Create a Group Policy Object (GPO) for the newly created OU.
2.3 To add the per-computer startup scripts
2.4 To deploy Software using Startup Script for Windows per-computer
2.5 To remove Software for Windows per-computer
Script Examples:
Notes:
If you would like to deploy the agent only on selected computers, follow the steps listed below, else the agent will be deployed to all computers in your chosen domain or organization unit.
References:

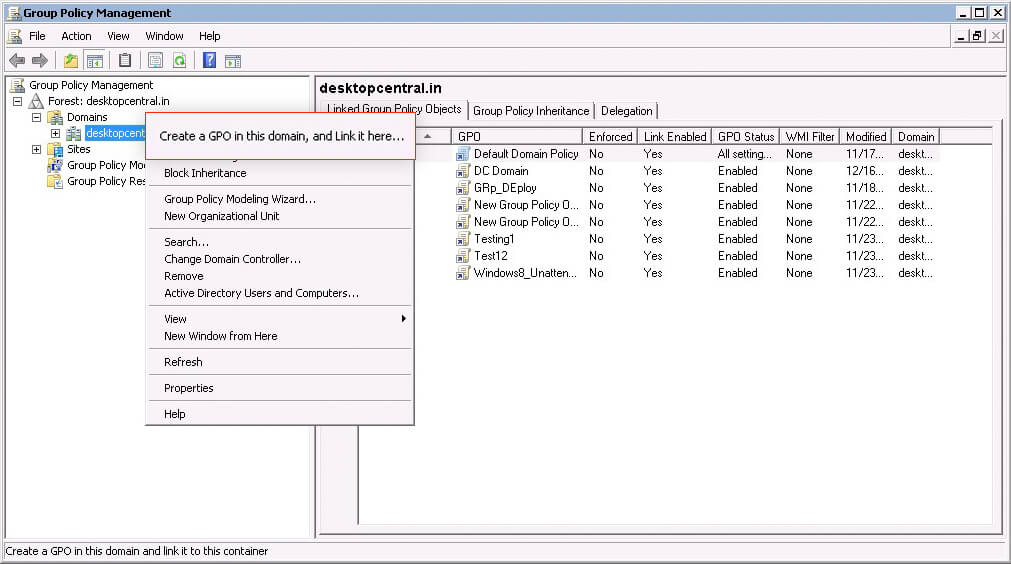
|
| Open Group Policy Management Console |
1.1 Create a distribution point
The best way to deploy packages using GPSI is to use the Distributed File System (DFS) feature built into Windows Server. This features allows you to abstract the file path from the physical location of the file so that if you need to move application packages from one server to another, the file path stored in the GPO for that package will not need to change. This is especially important because the native GPSI feature does not support changing the package path forexisting packages--you need to create a new package, which has an impact on clients that have already installed the package via Group Policy.
The first step in deploying an MSI through GPO is to create a distribution point on the publishing server. This can be done by following these steps:
- log on to the server as an Administrator user
- create a shared network folder (this folder will contain the MSI package)
- set permissions on this folder in order to allow access to the distribution package
- copy the MSI in the shared folder
1.2 Create a Group Policy Object
An MSI package is deployed (distributed) through GPO as a Group Policy Object. In order to create an object for your package, you can follow these steps:
- click on the Start button, go to Programs, select Administrative Tools and then select Active Directory Users and Computers
- right-click your domain name in the console tree and select the Properties context menu
- select the Group Policy tab and click New
- set the name of the policy (for example MyApplication)
- click Properties and select the Security tab
- check the Apply Group Policy checkbox only for the groups to which the policy will be applied
- click on the OK button
1.3 Assign an MSI package
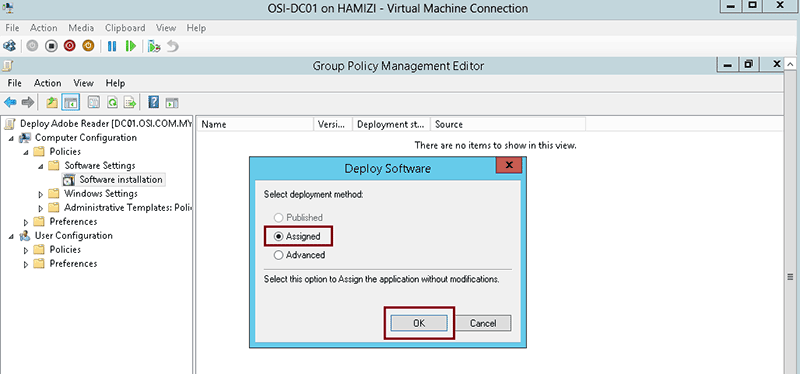
A package can be assigned per-user or per-machine. Also, if the package is assigned, it will automatically be installed silently. In order to assign a package you can follow these steps:
- click on the Start button, go to Programs, select Administrative Tools and then select Active Directory Users and Computers
- right-click your domain name in the console tree and select the Properties context menu
- go to the Group Policy tab, select the object you want and click Edit
- expand Software Settings under Computer Configuration
- right-click Software Installation, select the New context menu and then click on Package
- in the Open dialog type the full UNC path of the shared package you want to assign
- click on the Open button
- click on Assigned and then click OK (the package will be added to the right pane of the "Group Policy" window)
- close the Group Policy snap-in, click OK and exit the Active Directory Users and Computers snap-in
- when the client computers start, the assigned package will be installed automatically
1.4 Publish an MSI package
When using Group Policy, you can publish a package in order to allow the target user to install it by using Add or Remove programs. The steps for publishing a package are:
-
- click on the Start button, go to Programs, select Administrative Tools and then select Active Directory Users and Computers
- right-click your domain name in the console tree and select the Properties context menu
- go to the Group Policy tab, select the object you want and click Edit
- expand Software Settings under User Configuration
- right-click Software Installation, select the New context menu and then click on Package
- in the Open dialog type the full UNC path of the shared package you want to publish
- click on the Open button
- click on Publish and then click OK (the package will be added to the right pane of the "Group Policy" window)
- close the Group Policy snap-in, click OK and exit the Active Directory Users and Computers snap-in
- test the package:
-

gpupdate /foce - log on to the target computer
- click on the Start button and go to Control Panel
- double-click the Add or Remove programs applet and select Add New Programs
- in the Add programs from your network list select the program you published
- use the Add button to install the package
- click OK and then Close
1.5 Redeploy an MSI package
Sometimes you may need to redeploy a package (for example when doing an upgrade). For redeploying a package you can follow these steps:
- click on the Start button, go to Programs, select Administrative Tools and then select Active Directory Users and Computers
- right-click your domain name in the console tree and select the Properties context menu
- go to the Group Policy tab, select the object you used to deploy the package and click Edit
- expand the Software Settings element (per-user or per-machine) which contains the deployed package
- expand the Software Installation element which contains the deployed package
- right-click the package in the right pane of the Group Policy window
- select the All Tasks menu and click Redeploy application
- click the Yes button for reinstalling the application wherever it is installed
- close the Group Policy snap-in, click OK and exit the Active Directory Users and Computers snap-in
1.6 Remove an MSI package
Group Policy also allows you to remove packages which have been deployed in the past. Here are the steps for removing a package:
- click on the Start button, go to Programs, select Administrative Tools and then select Active Directory Users and Computers
- right-click your domain name in the console tree and select the Properties context menu
- go to the Group Policy tab, select the object you used to deploy the package and click Edit
- expand the Software Settings element (per-user or per-machine) which contains the deployed package
- expand the Software Installation element which contains the deployed package
- right-click the package in the right pane of the Group Policy window
- select the All Tasks menu and click Remove
- select from the following options:
- Immediately uninstall the software from users and computers
- Allow users to continue to use the software but prevent new installations
- click the OK button to continue
- close the Group Policy snap-in, click OK and exit the Active Directory Users and Computers snap-in
2. Deploy Software using Startup script via GPO
If the install packages are .exe and not .msi, you are not able to distribute via the normal "Computer Configuration\Policies\Software Settings\Software Installation" policy.
Hence, using a startup script under "Computer Configuration\Policies\Windows Settings\Scripts\Startup" is another choice to deploy your software. However, the software should only install once and not each startup. The popular way to do it is to record the installation results in a text file, which is then read on startup and if the file exists, then don't install. Here are all steps:
YouTube GPO Startup Script Deployment Example:
2.1 Create the Organizational Unit (OU) for each script.
2.2 Create a Group Policy Object (GPO) for the newly created OU.
2.3 To add the per-computer startup scripts
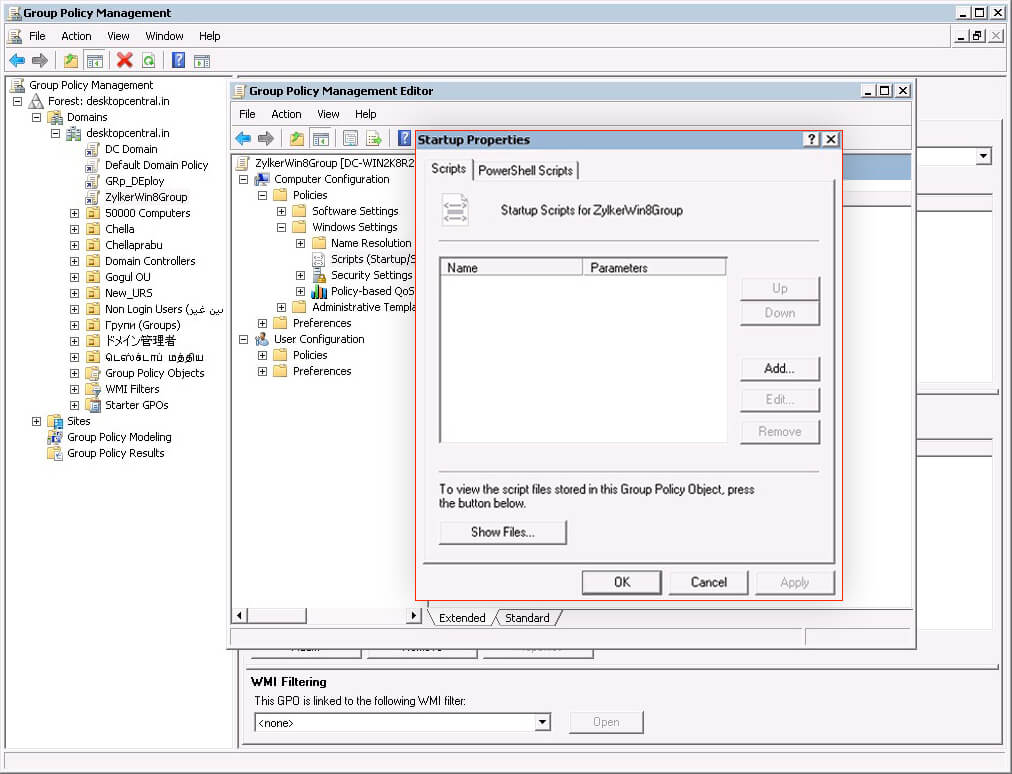
- Open the Group Policy Management Console.
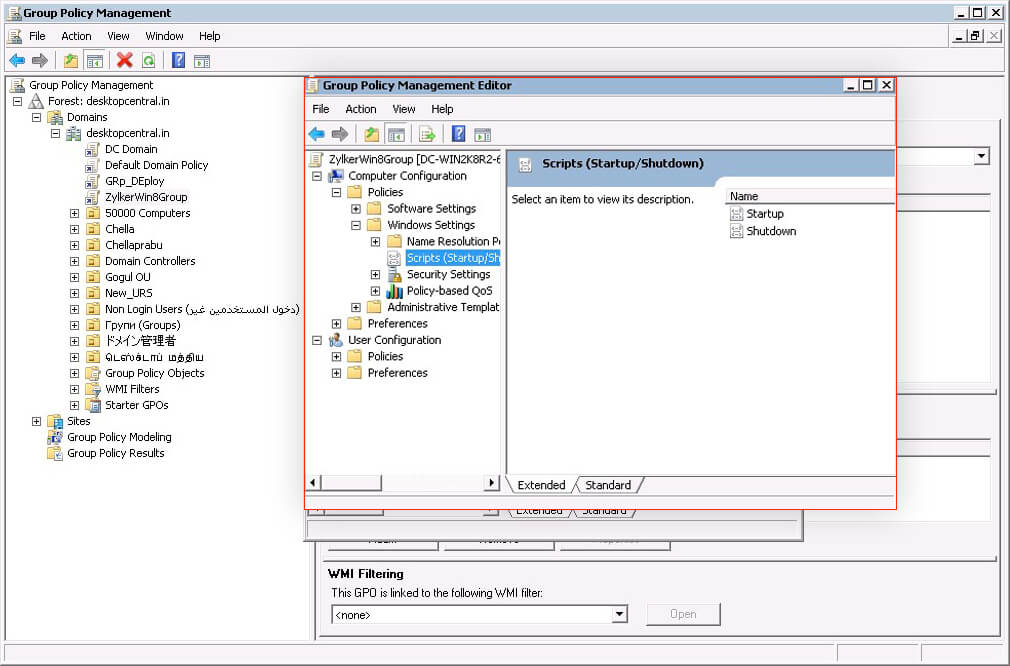
- Select Computer Configuration > Policies > Windows Settings > Scripts (Startup/Shutdown).
- In the right-hand pane of the Group Policy Management Console, select Startup.
- In the Properties menu, click Show Files, copy the appropriate script to the folder displayed, and then close the window.
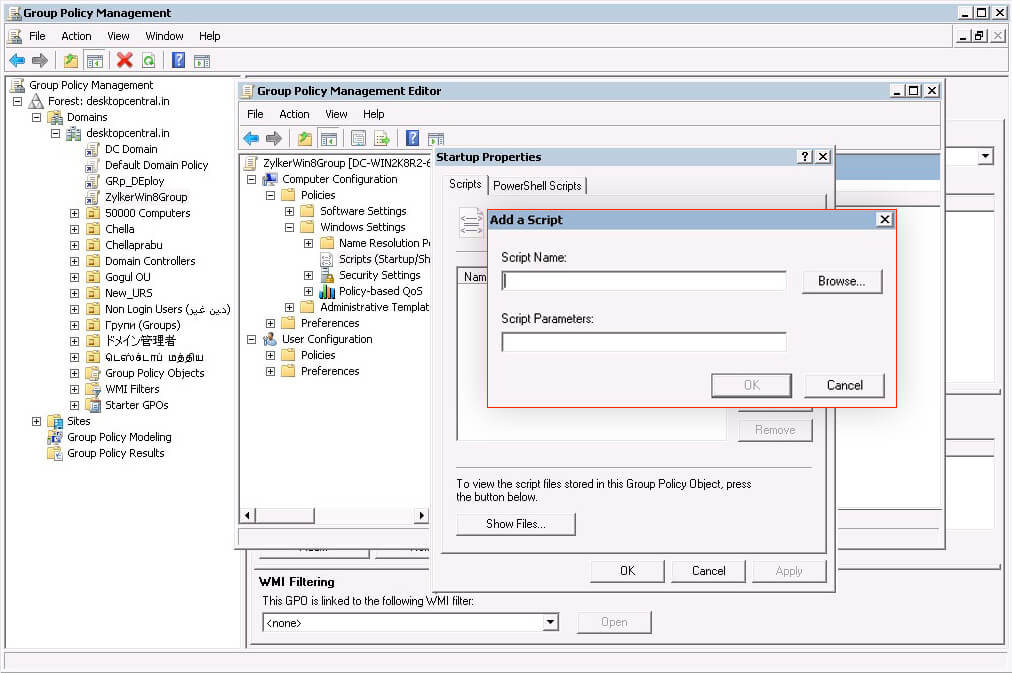
- In the Properties menu, click Add and use Browse to find and add the newly created script.
2.4 To deploy Software using Startup Script for Windows per-computer
- Move the user devices designated to receive this deployment to the OU you created.
- Reboot the user device and log on as any user.
- Verify that Program and Features (Add or Remove Programs in previous OS versions) contain the newly installed package.
2.5 To remove Software for Windows per-computer
- Move the user devices designated for the removal to the OU you created.
- Reboot the user device and log on as any user.
- Verify that Program and Features (Add or Remove Programs in previous OS versions) removed the previously installed package.
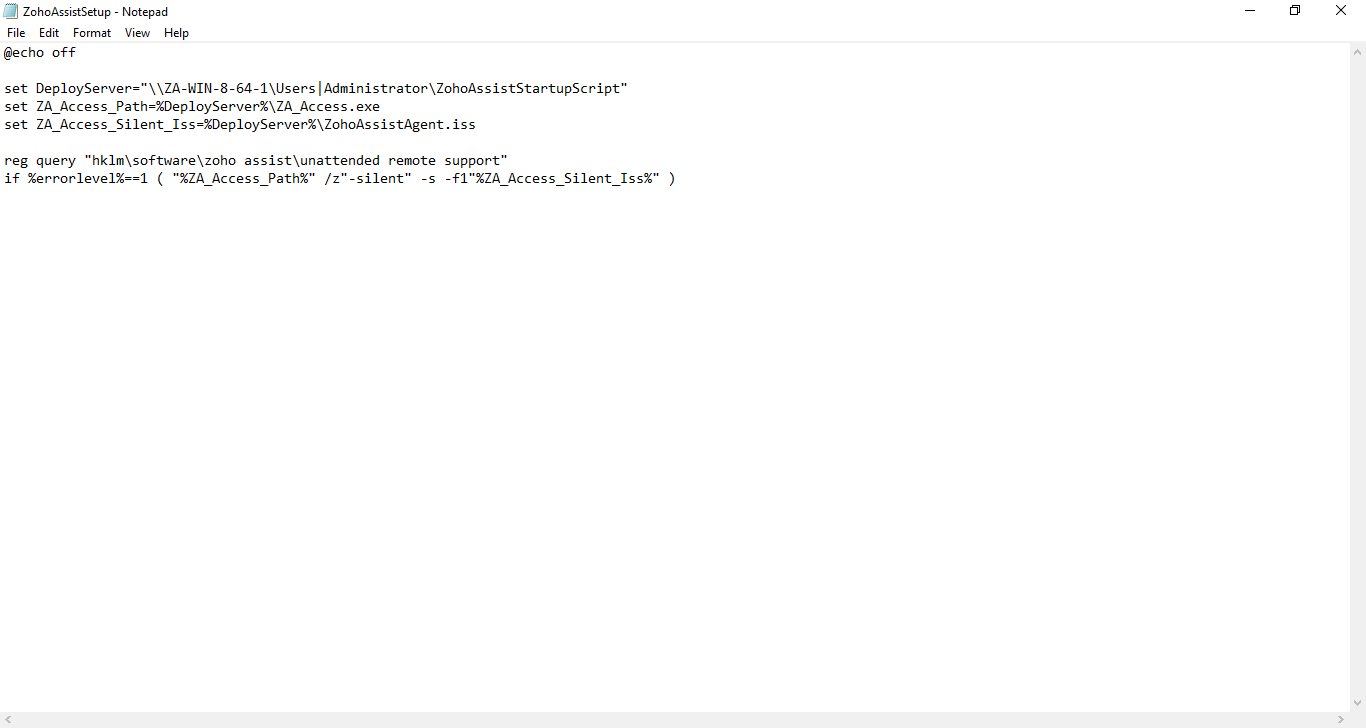
Script Examples:
IF EXIST "c:\vcredist_2010_x86.txt" GOTO END
IF EXIST "c:\vcredist_2010_x64.txt" GOTO END

:32-bit
if exist %SystemRoot%\SysWOW64 goto 64-bit
\\servername\sharename\C++Redist\2010\vcredist_2010_x86.exe /passive /norestart
echo "Installed Microsoft Visual C++ 2010 Redistributable - x86" > "c:\vcredist_2010_x86.txt"
goto END

:64-bit
\\servername\sharename\C++Redist\2010\vcredist_2010_x64.exe /passive /norestart
echo "Installed Microsoft Visual C++ 2010 Redistributable - x64" > "c:\vcredist_2010_x64.txt"

:END
:32-bit
if exist %SystemRoot%\SysWOW64 goto 64-bit
find | reg query "HKLM\SOFTWARE\Microsoft\VisualStudio\10.0\VC\VCRedist\x86"
If not ERRORLEVEL 1 \\servername\sharename\C++Redist\2010\vcredist_2010_x86.exe /passive /norestart
goto END

:64-bit
find | reg query "HKLM\SOFTWARE\Microsoft\VisualStudio\10.0\VC\VCRedist\x64"
If not ERRORLEVEL 1 \\servername\sharename\C++Redist\2010\vcredist_2010_x64.exe /passive /norestart

:END
if exist "c:\dlpagentinstalled.txt" then goto end
if not exist "c:\dlpagentinstalled.txt" goto install

:install

msiexec /i \\win2012dc\share\AgentInstall-x64_15_5.msi /q INSTALLDIR="%PROGRAMFILES%\Manufacturer\Endpoint Agent" ENDPOINTSERVER="10.94.200.36:10443" TOOLS_KEY="63F2FFF0B6BEE4" RANDOM_KEY="B105E5B47CB88272" UNINSTALLPASSWORDKEY="7213061A9CC9AD437CEED9785" SERVICENAME="EDPA" WATCHDOGNAME="WDP" ARPSYSTEMCOMPONENT="1" ENDPOINT_CERTIFICATE="\\win2012dc\share\endpoint_cert.pem" ENDPOINT_PRIVATEKEY="\\win2012dc\share\endpoint_priv.pem" ENDPOINT_PRIVATEKEY_PASSWORD="F4569BBD5AC9DF34D6AB0BFE86365E80F0FA471F932ADD4D78D51AA35CE26038CA73B34DAB4B989C7F652CE441A4F9BBFBDA8" ENDPOINT_TRUSTSTORE="\\win2012dc\share\endpoint_truststore.pem" LOGDETAILS="Yes" /L*v %SystemDrive%\installAgent.log

echo "Installed DLP Agent - x64" > "c:\dlpagentinstalled.txt"


:end
exit
Notes:
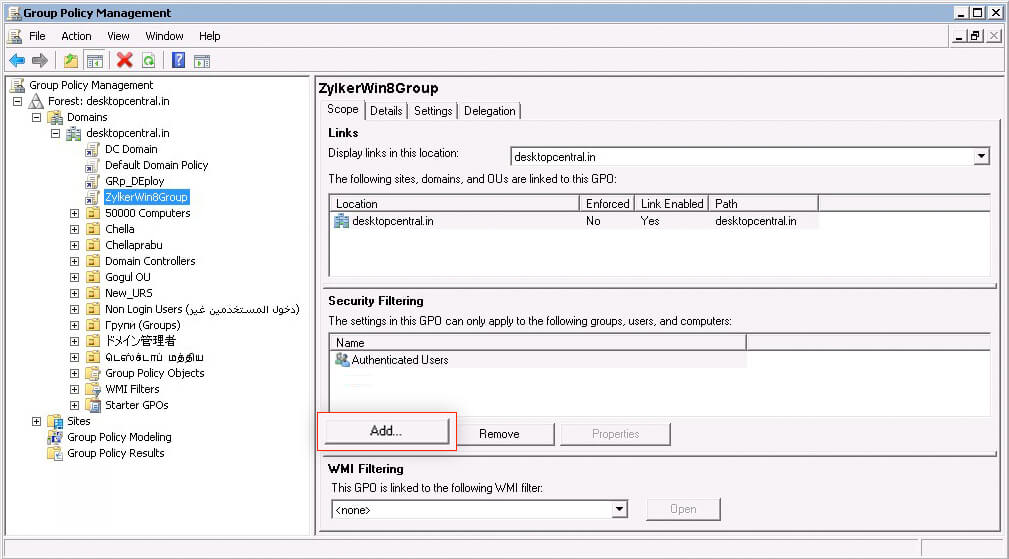
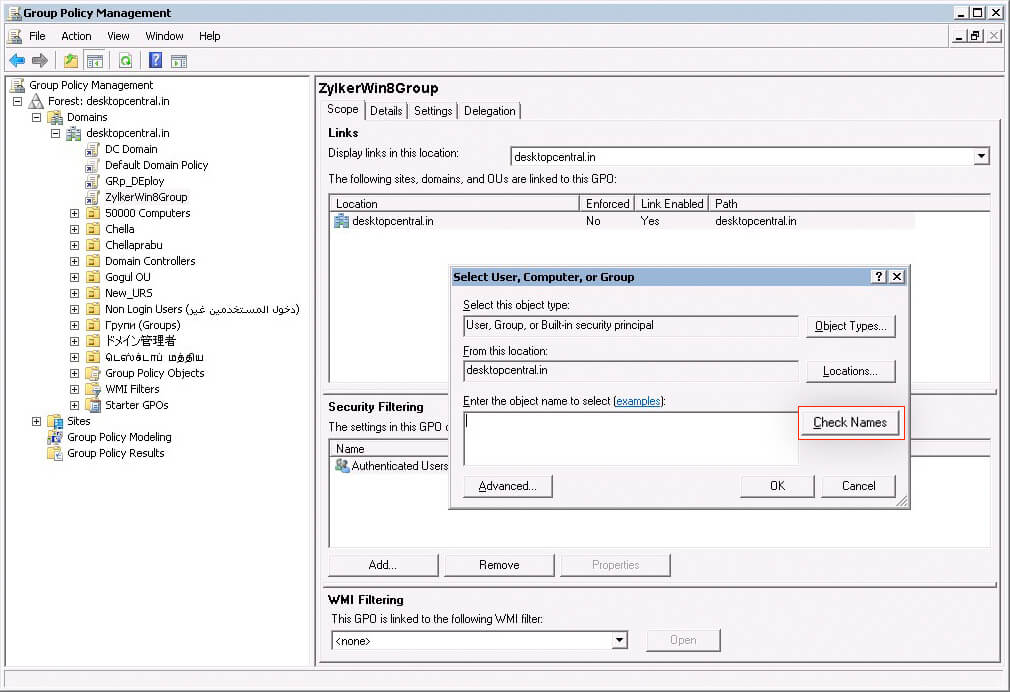
If you would like to deploy the agent only on selected computers, follow the steps listed below, else the agent will be deployed to all computers in your chosen domain or organization unit.
- Click Add in the Security Filtering tab.
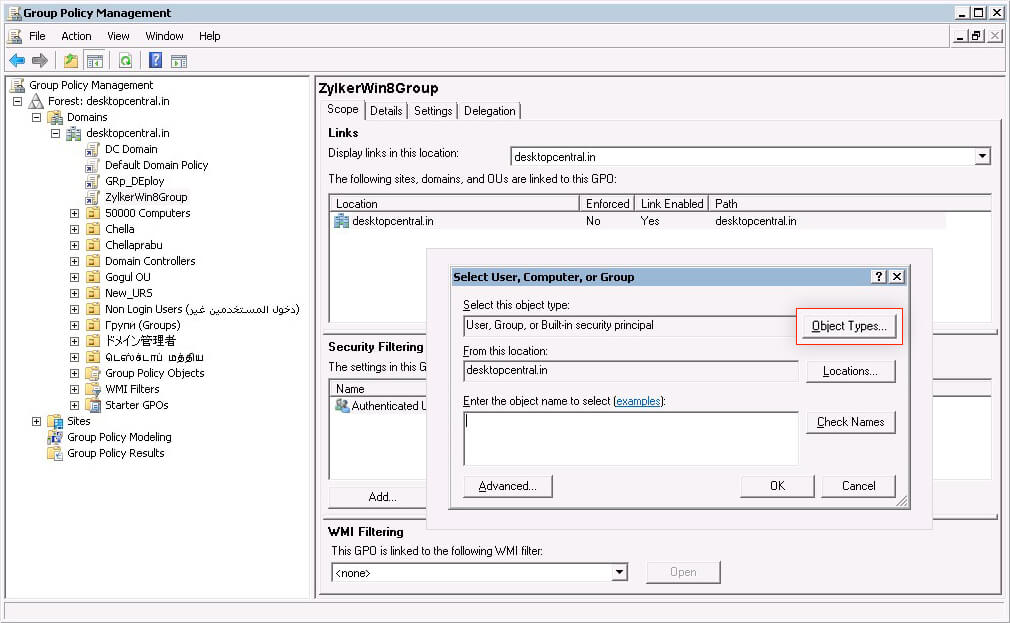
- It opens Select User, Computer, or Group dialog. Click Object Types.
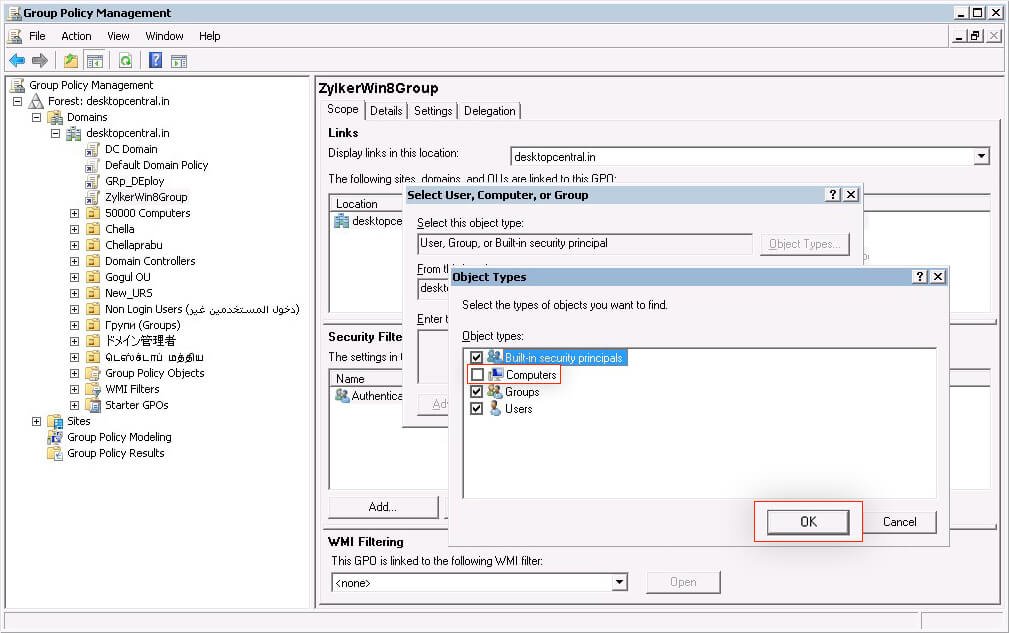
- Check Computers, and click OK.
- Enter the first few letters of the computer name, click Check Names to add computers and click OK.
References:
- Software installation startup-script via GPO
- How to use Group Policy to remotely install software in Windows Server 2008 and in Windows Server 2003
 RSS Feed
