
Click to set custom HTML
|
0 Comments
Enable SSL VPN on FortiGate and Connect SSL VPN Using FortiClient (Free Lab with Test Drive)4/29/2024 A secure sockets layer VPN (SSL VPN) enables individual users to access an organization's network, client-server applications, and internal network utilities and directories without the need for specialized software. SSL VPNs provide safe, secure communication via an encrypted connection for all types of devices, regardless of whether access to the network is via the public internet or another secure network. SSL VPN TypesThere are two major types of SSL VPNs:SSL Portal VPNIn this type of SSL VPN, a user visits a website and enters credentials to initiate a secure connection. The SSL portal VPN allows for a single SSL connection to a website. Additionally, the user can access a variety of specific applications or private network services as defined by the organization.Users can typically enter the gateway, or the hardware on a network that allows data to flow from one network to another, using any modern web browser, by entering the username and password provided by the VPN gateway service. SSL Tunnel VPNAn SSL tunnel VPN allows a web browser to securely access multiple network services that are not just web-based via a tunnel that is under SSL. These services could be proprietary networks or software built for corporate use only that cannot be accessed directly via the internet. This VPN tunneling technology may require a browser with additional applications, such as JavaScript or Flash, installed to display active content.In this post, we are using FortiGate VM in Azure to configure a SSL Tunnel VPN and using FortiClient to connect to it in our Test Drive environment. DiagramFor FortiGate Test Drive:
Go to https://azuremarketplace.microsoft.com/en-us/marketplace/apps/fortinet.fortinet-fortigate?ocid=FortiGate_202105_landingpage_en-us or https://www.fortigate-azure.com/. Choose a Test Drive, sign in and agree to the terms of use.
Related Posts:
Enable SSL-VPN Feature
Log into FortiGate
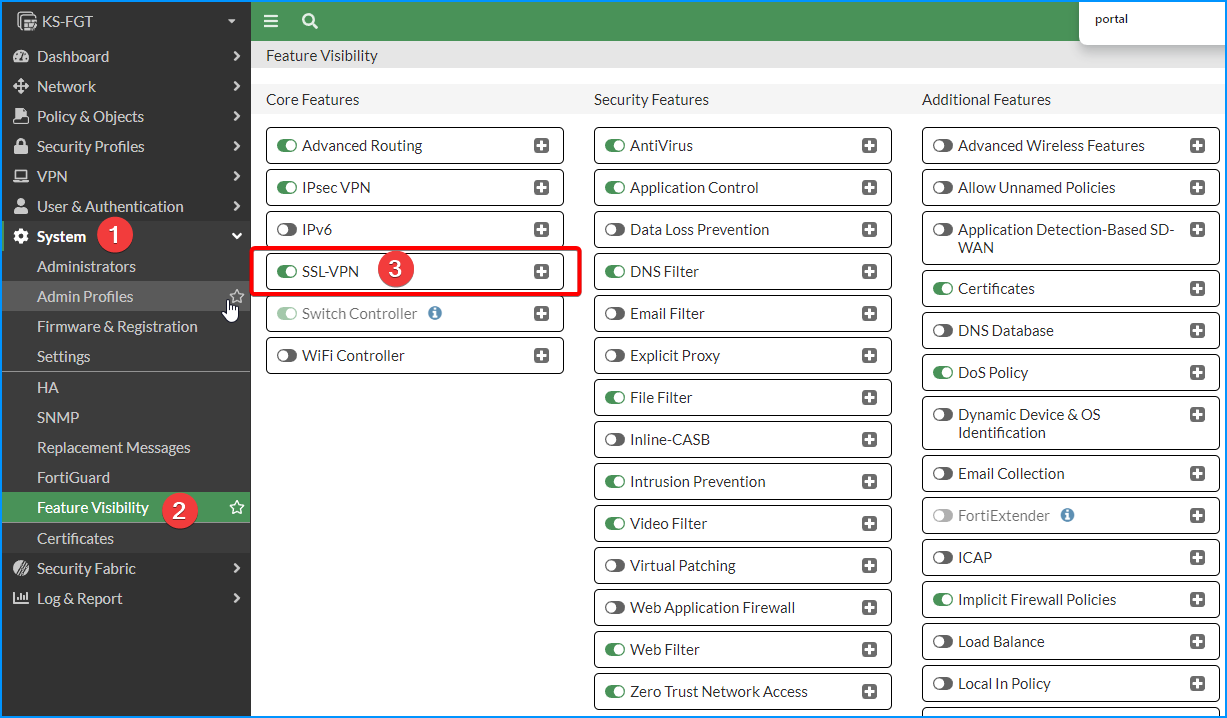
Go to System -> Feature Visibility -> Core Features
Enable SSL-VPN
Now, you should be able to SSL-VPN Section under VPN menu.
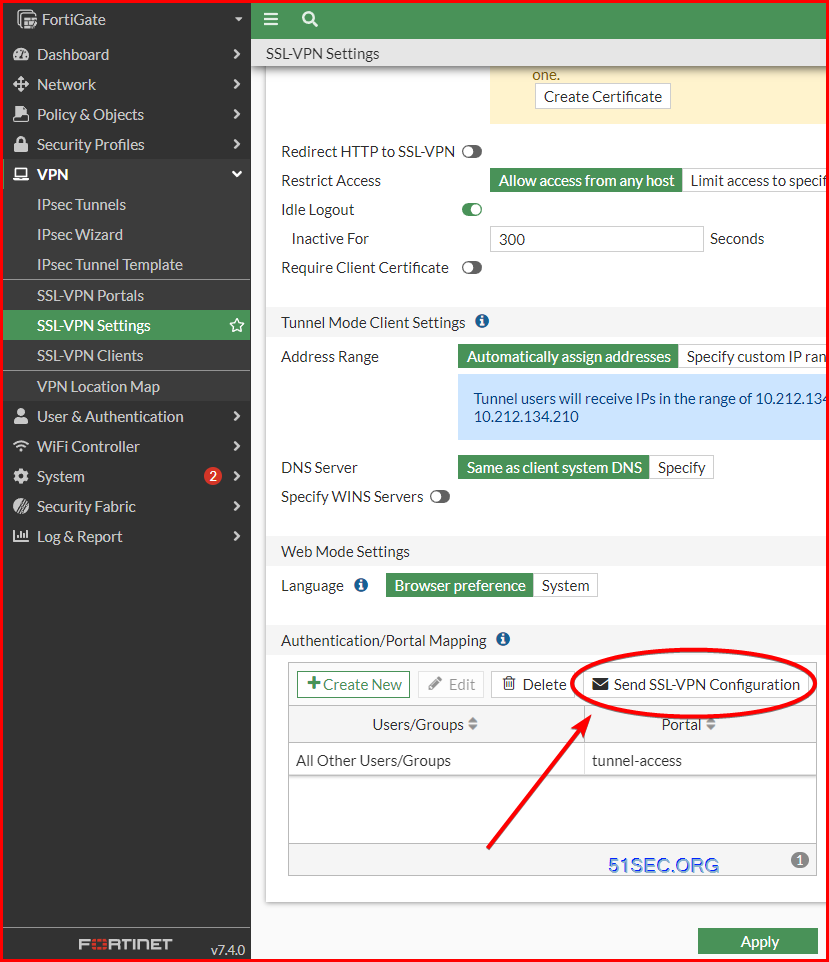
SSL-VPN Settings1 VPN -> SSL-VPN Settings Most settings are default. But you will need to add interface on the listen list. Ideally, change Listen on Port to a different port from 443. In this example, I am using 4443. 
note: Default tunnel user range is only 10 ip addresses. If you have more than 10, you might want to increase it by customizing a larger range there. 2 Autentication/Portal mapping Change All Other Users/Groups to have tunnel-access to Portal. You can have an admin group / users to have full-access to Portal. 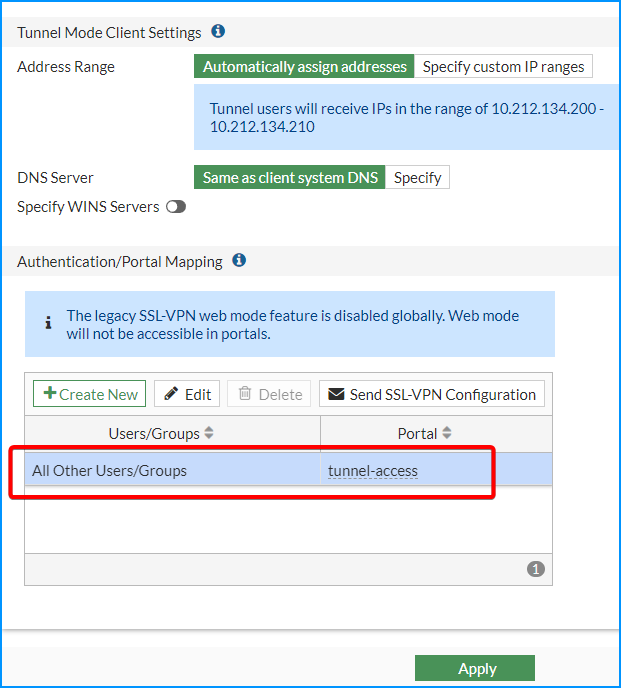
3 SSL VPN Client Address Range By default, it is automatically assigned by FortiGate. In the above screenshot, it uses automatically assign range: 10.212.134.200 -10.212.134.210 The range can be customized for larger numbers based on your usage. Use Fortinet_Factory Server CertificateTo make lab as simple as we can, we are gonna use Fortinet_Factory cert. 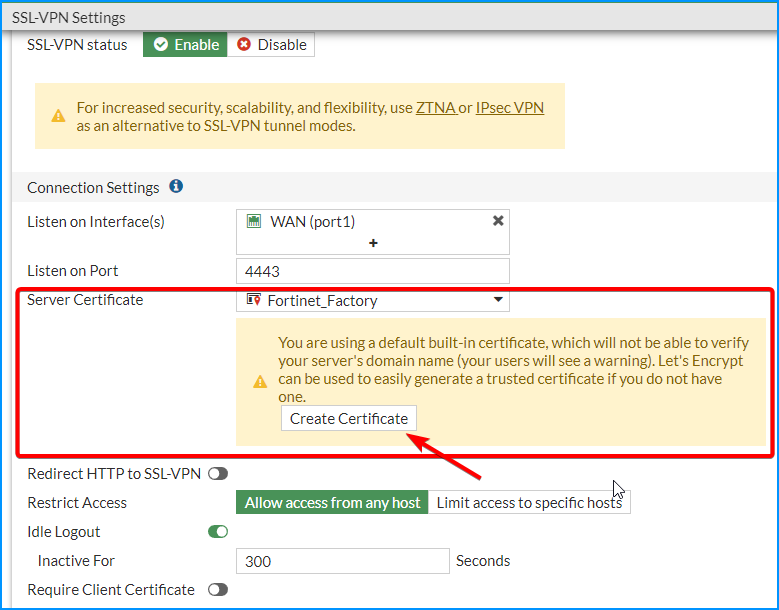
It is possible to directly create your own certificate using Let's Encrypt. You might get this cert warning message when you access the portal by using default cert since it wont be able verified: 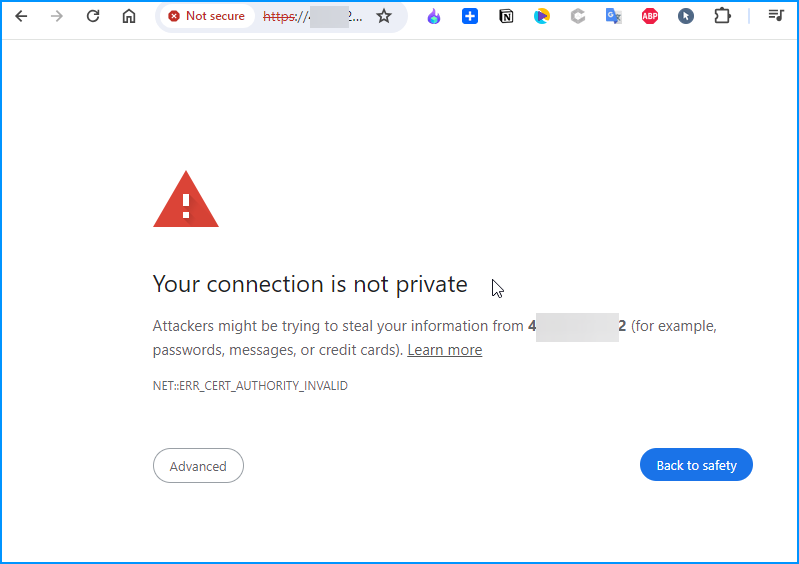
Policies and Users
1 SSL VPN > LAN This firewall rule is to allow SSL VPN network to access LAN (Internal) networks. You will need to choose incoming interface, outgoing interface, source (including users), destination, and services. Others, you can keep it as default. 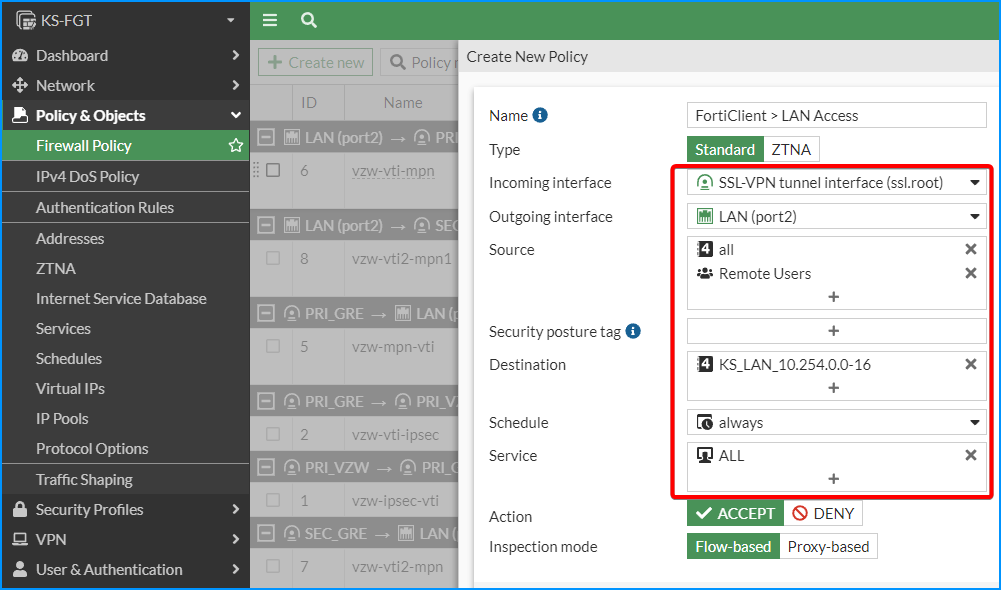
You can use NAT with outgoing interface address, which is your FortiGate LAN interface IP, or you can completely disable NAT. Logging is also can be enabled for all sessions. 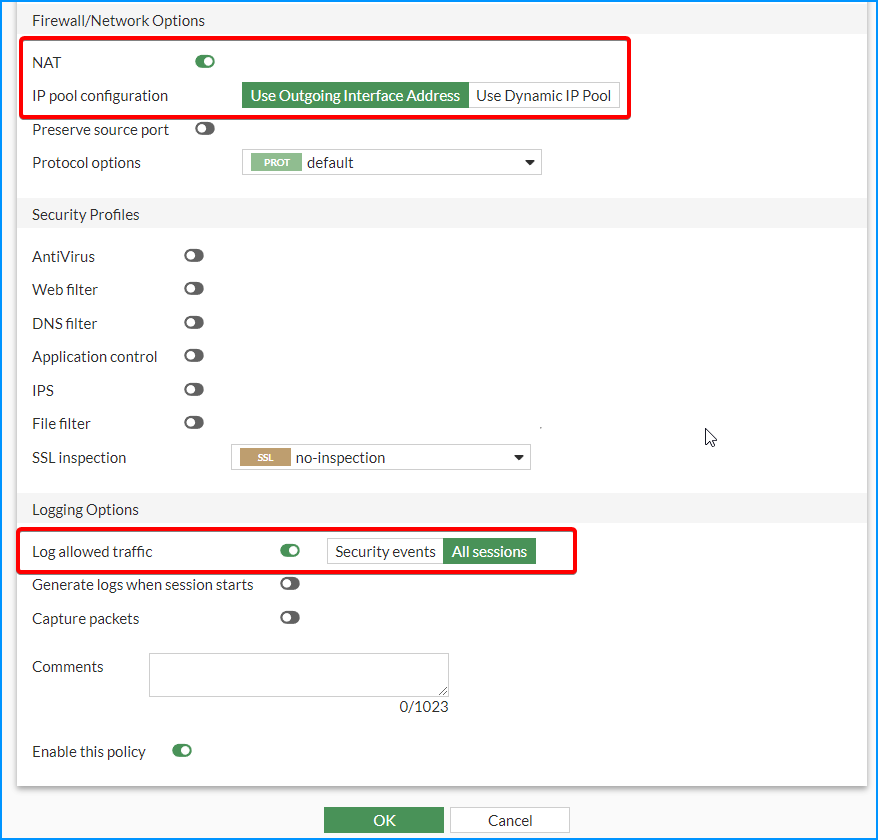

2 Remote Users and Group Create a Remote Users group. Add a couple of remote users into this group. 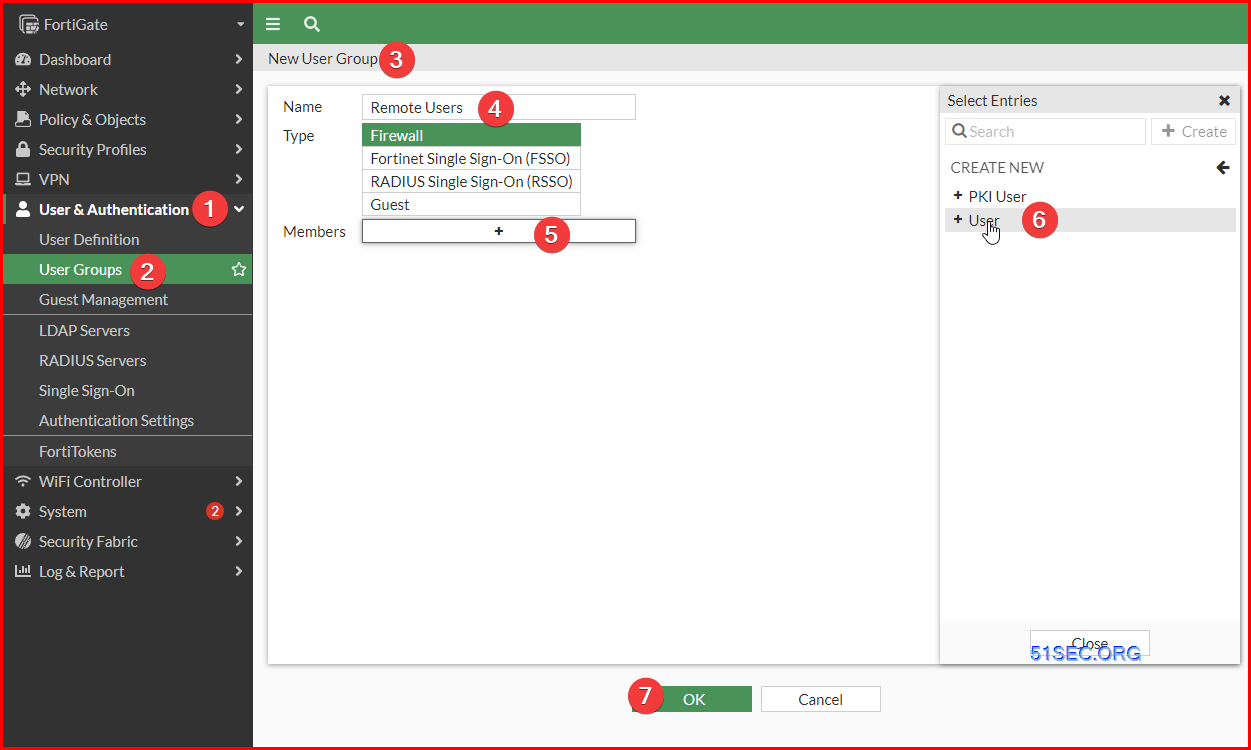
3 Check Forwarded Log since we enabled all sessions logging
FortiClient
1 Send SSL-VPN Configuration
2 Download FortiClient
https://www.fortinet.com/support/product-downloads
3 Install FortiClient
Double click the downloaded installation file "FortiClientVPNOnlineInstaller.exe" and follow installation wizard to complete installation.
4 Configure FortiClient to connect to remote FortiGate SSLVPN Gateway
Make sure put right public ip address and SSLVPN Port.
Remote Access VPN (IPSec)
Enable SSL VPN Web PortalSSL VPN web mode gets the error as below when configured with SAML authentication.
config vpn ssl web portal edit "full-access" set web-mode enable
Warning: Please note that the legacy SSL VPN web mode feature is disabled by the global sslvpn-web-mode setting.
Note:https://community.fortinet.com/t5/FortiGate/Technical-Tip-SSL-VPN-web-mode-showing-403-Forbidden-error/ta-p/297377
FortiGate # show vpn ssl web portal
config vpn ssl web portal
    edit "full-access"
        set tunnel-mode enable
        set ipv6-tunnel-mode enable
        set web-mode enable
        set ip-pools "SSLVPN_TUNNEL_ADDR1"
        set ipv6-pools "SSLVPN_TUNNEL_IPv6_ADDR1"
    next
    edit "web-access"
        set web-mode enable
    next
    edit "tunnel-access"
        set tunnel-mode enable
        set ipv6-tunnel-mode enable
        set ip-pools "SSLVPN_TUNNEL_ADDR1"
        set ipv6-pools "SSLVPN_TUNNEL_IPv6_ADDR1"
    next
end

FortiGate #
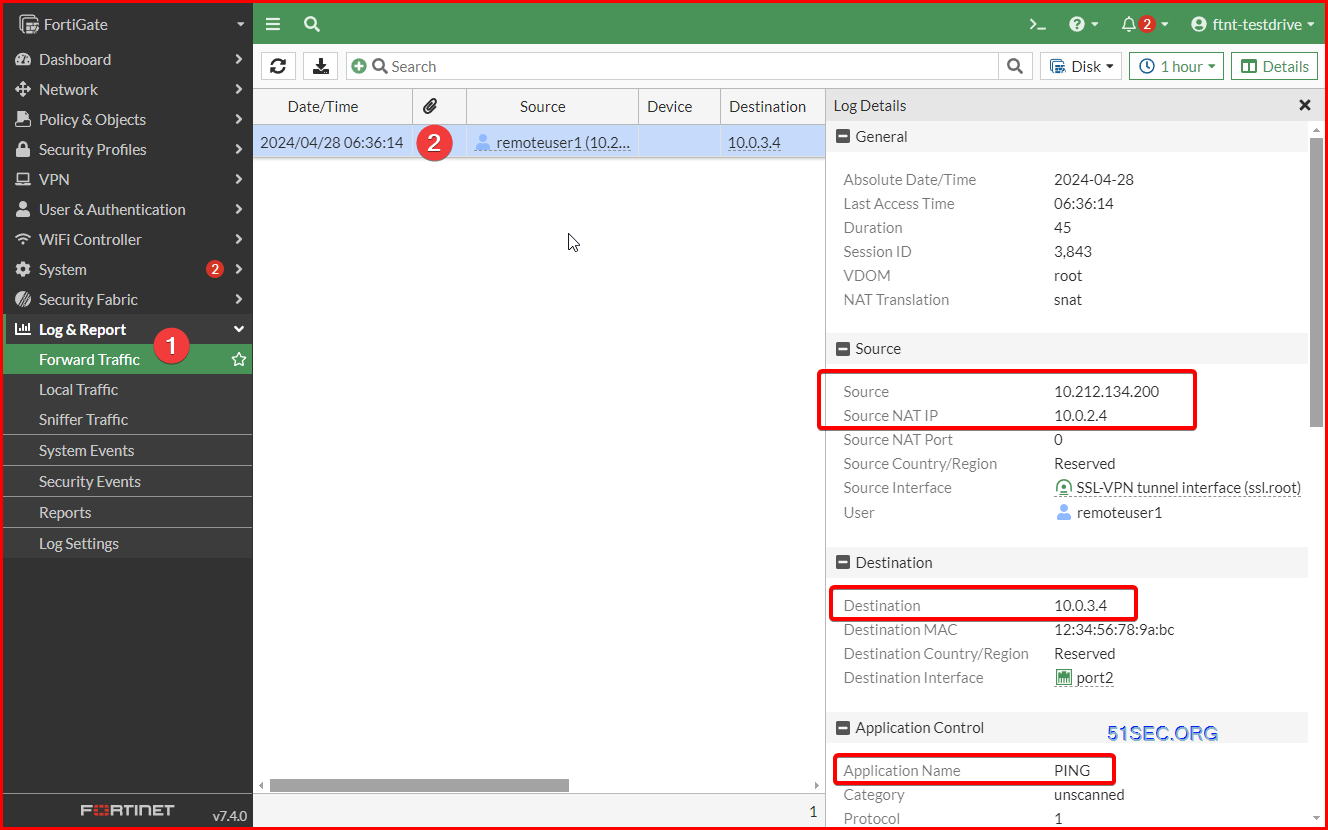
Quick test VPN tunnel by pinging to remote Ubuntu vm 10.0.3.4:
C:\Users\WDAGUtilityAccount>ping 10.0.3.4

Pinging 10.0.3.4 with 32 bytes of data:
Reply from 10.0.3.4: bytes=32 time=39ms TTL=63
Reply from 10.0.3.4: bytes=32 time=47ms TTL=63
Reply from 10.0.3.4: bytes=32 time=38ms TTL=63
Reply from 10.0.3.4: bytes=32 time=38ms TTL=63

Ping statistics for 10.0.3.4:
    Packets: Sent = 4, Received = 4, Lost = 0 (0% loss),
Approximate round trip times in milli-seconds:
    Minimum = 38ms, Maximum = 47ms, Average = 40ms

C:\Users\WDAGUtilityAccount>tracert 10.0.3.4

Tracing route to 10.0.3.4 over a maximum of 30 hops

  1    33 ms    36 ms    37 ms  10.212.134.200
  2    34 ms    35 ms    34 ms  10.0.3.4

Trace complete.
References
Via http://blog.51sec.org/2024/04/enable-ssl-vpn-on-fortigate-and-connect.html Tools to Keep Your Computer Awake and Screen ON (No Installation Required or Even No Download)4/28/2024
Click to set custom HTML
Revolutionizing Cloud Security: The Rise of Data Security Posture Management (12 Top DSPM Tools)4/25/2024
Click to set custom HTML
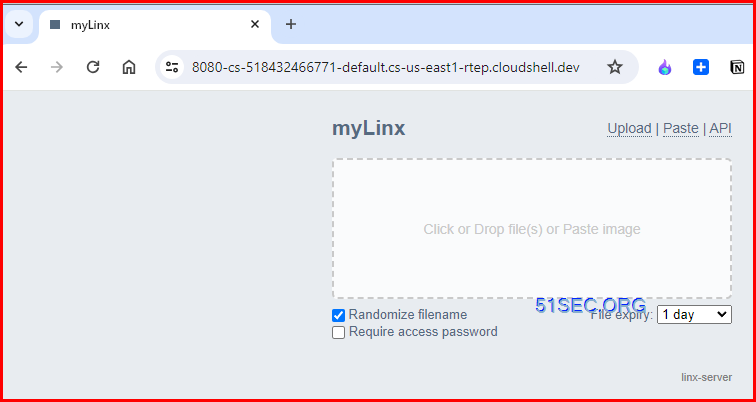
[5 Mins Docker] Create Paste & File Share Site with API Support in Command Line - Linx-Server4/23/2024 GitHub Project Linx-server is a self-hosted file/media sharing website project which you can use it to develop a temporary website to store your files or texts and share them to the world. I had other posts to introduct similar service such as transfer.sh or microbin. For this project, one of most interesting features is you can use command line to call the APi then upload files, which make it a best alternative for transfer.sh (transfer.sh site is down now). Transfer.sh project is at https://github.com/dutchcoders/transfer.sh, which you will be still able to use it to create your own site. In this post, I will show you how to quickly deploy Linx-server to your VPS and how you can use this Linx-server. Based on Github, the main features for Linx-server are:
Screenshots
Demo Site:
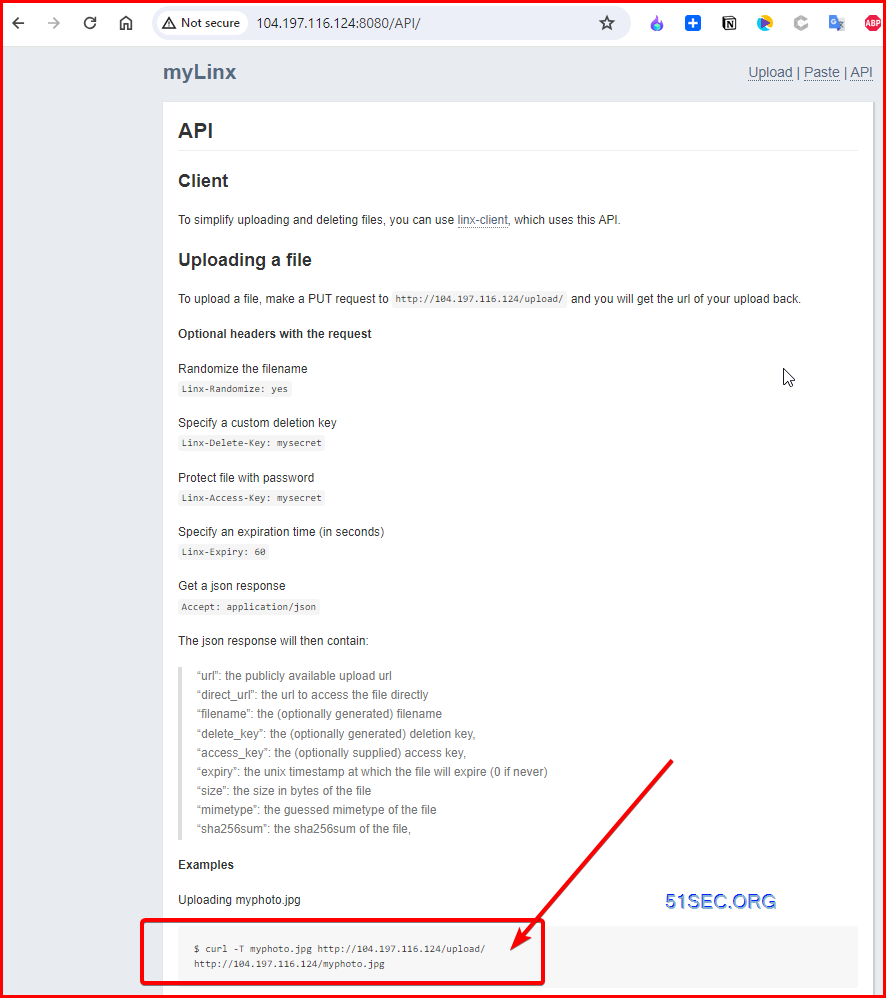
API page with example commands:
Installation Pre-requirementsFree resources you might need to complete this docker project:
Pre-installed services:
Steps1 Create folders and modify folder permissions
2 Create configuration file
vi /root/linx-server.conf
bind = 127.0.0.1:80
sitename = NetSec Linx
siteurl = http://<Server IP:Port>/
selifpath = s
maxsize = 4294967296
maxexpiry = 86400
allowhotlink = true
remoteuploads = true
nologs = true
force-random-filename = false
cleanup-every-minutes = 5
3 One Line Command to bring Docker Up docker run -d -p 80:8080 -v /root/linx-server.conf:/data/linx-server.conf -v /root/meta:/data/meta -v /root/files:/data/files andreimarcu/linx-server -config /data/linx-server.conf 4 Using docker-compose Example with docker-compose
Using NPM To Handle TLS CertificateRelated Posts:
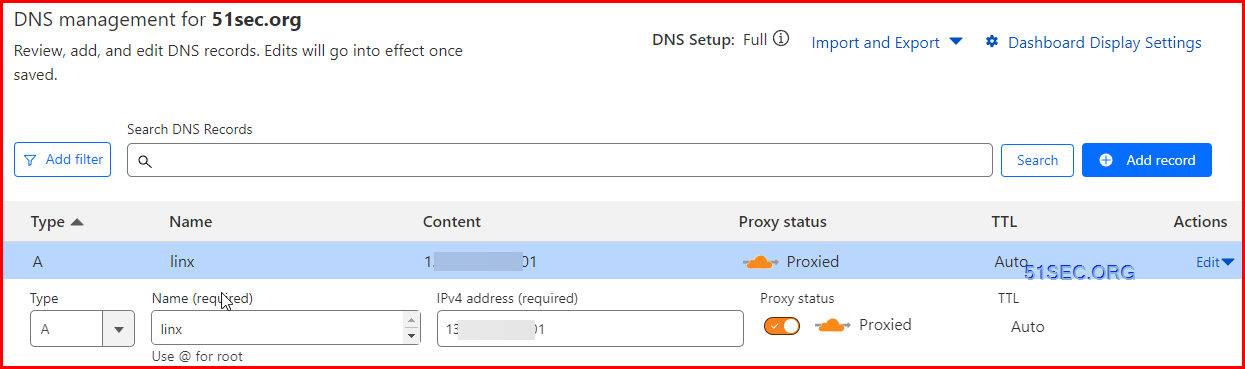
1 Create DNS Record
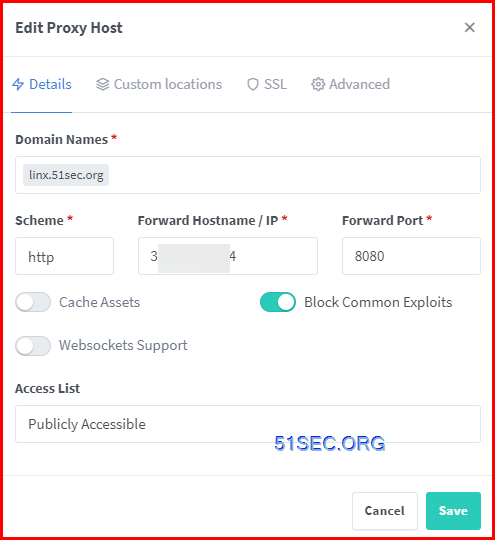
2 Configure NPM to do reverse proxy for Linx-Server
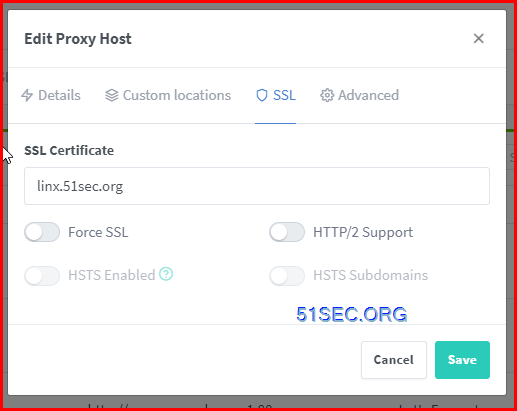
3 Enable SSL
4 Modify linx-server.conf file to reflect URL changes
5 Test results
root@ubuntu-linx-server:~# curl -T mytest.txt https://linx.51sec.org/upload
http://linx.51sec.org/1nr5ssmw.txt
root@ubuntu-linx-server:~# cd files
root@ubuntu-linx-server:~/files# ls
1nr5ssmw.txt 2rl0uulo.txt linx-server.conf qb8r8hiw.txt
root@ubuntu-linx-server:~/files#
Via http://blog.51sec.org/2024/04/5-mins-docker-your-paste-file-share.html
Click to set custom HTML
Click to set custom HTML
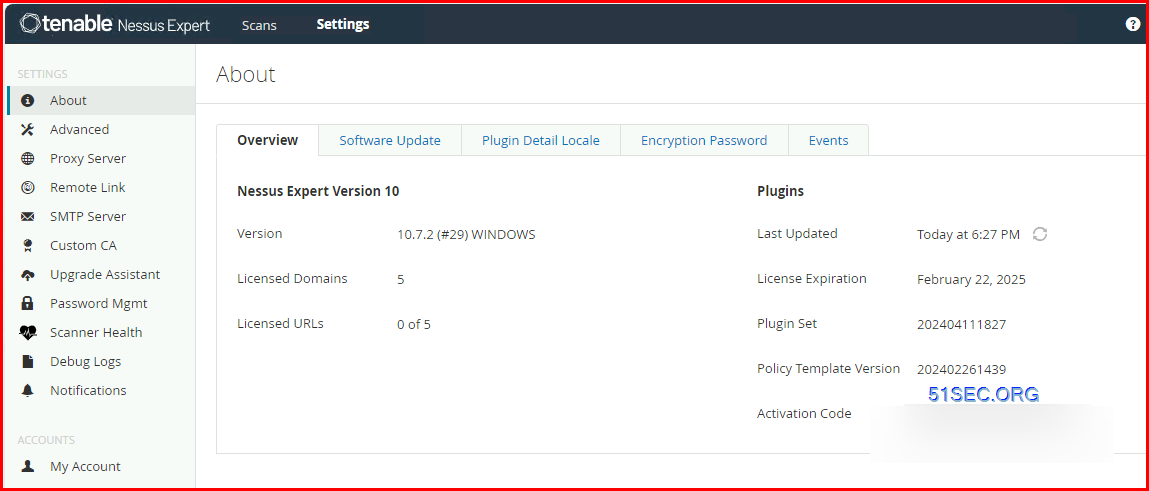
Nessus Expert, an enhancement to the Tenable’s flagship vulnerability assessment tool Nessus and building upon Nessus Professional, is designed to address emerging cyberthreats across cloud infrastructure by applying a “smarter and simplified approach to DevSecOps,†according to Tenable.
The key capabilities of Nessus Expert are external attack surface discovery that allows IT and security professionals to discover internet-facing assets in domains and subdomains associated with an organization, the company says. In addition, Nessus Expert features IaC scanning that establishes guardrails in automated GitOps and CI/CD processes to ensure secure deployments with minimal effort with up to 500 pre-built policies. Nessus Expert is essentially a more advanced version of Nessus Professional, offering external attack surface scanning, the ability to add domains and scan cloud infrastructure, all of which are not available with Nessus Professional. Products
Nessus : Essentials & Professional (More features)
Tenable.sc : (on prem) sc & sc+ (Nessus Network Monitor -NNM, Asset Criticality Rating - ACR)
Tenable.io : (cloud)
Tenable.ad : active directory
Tenable.cs : Cloud security
Tenable.ot :
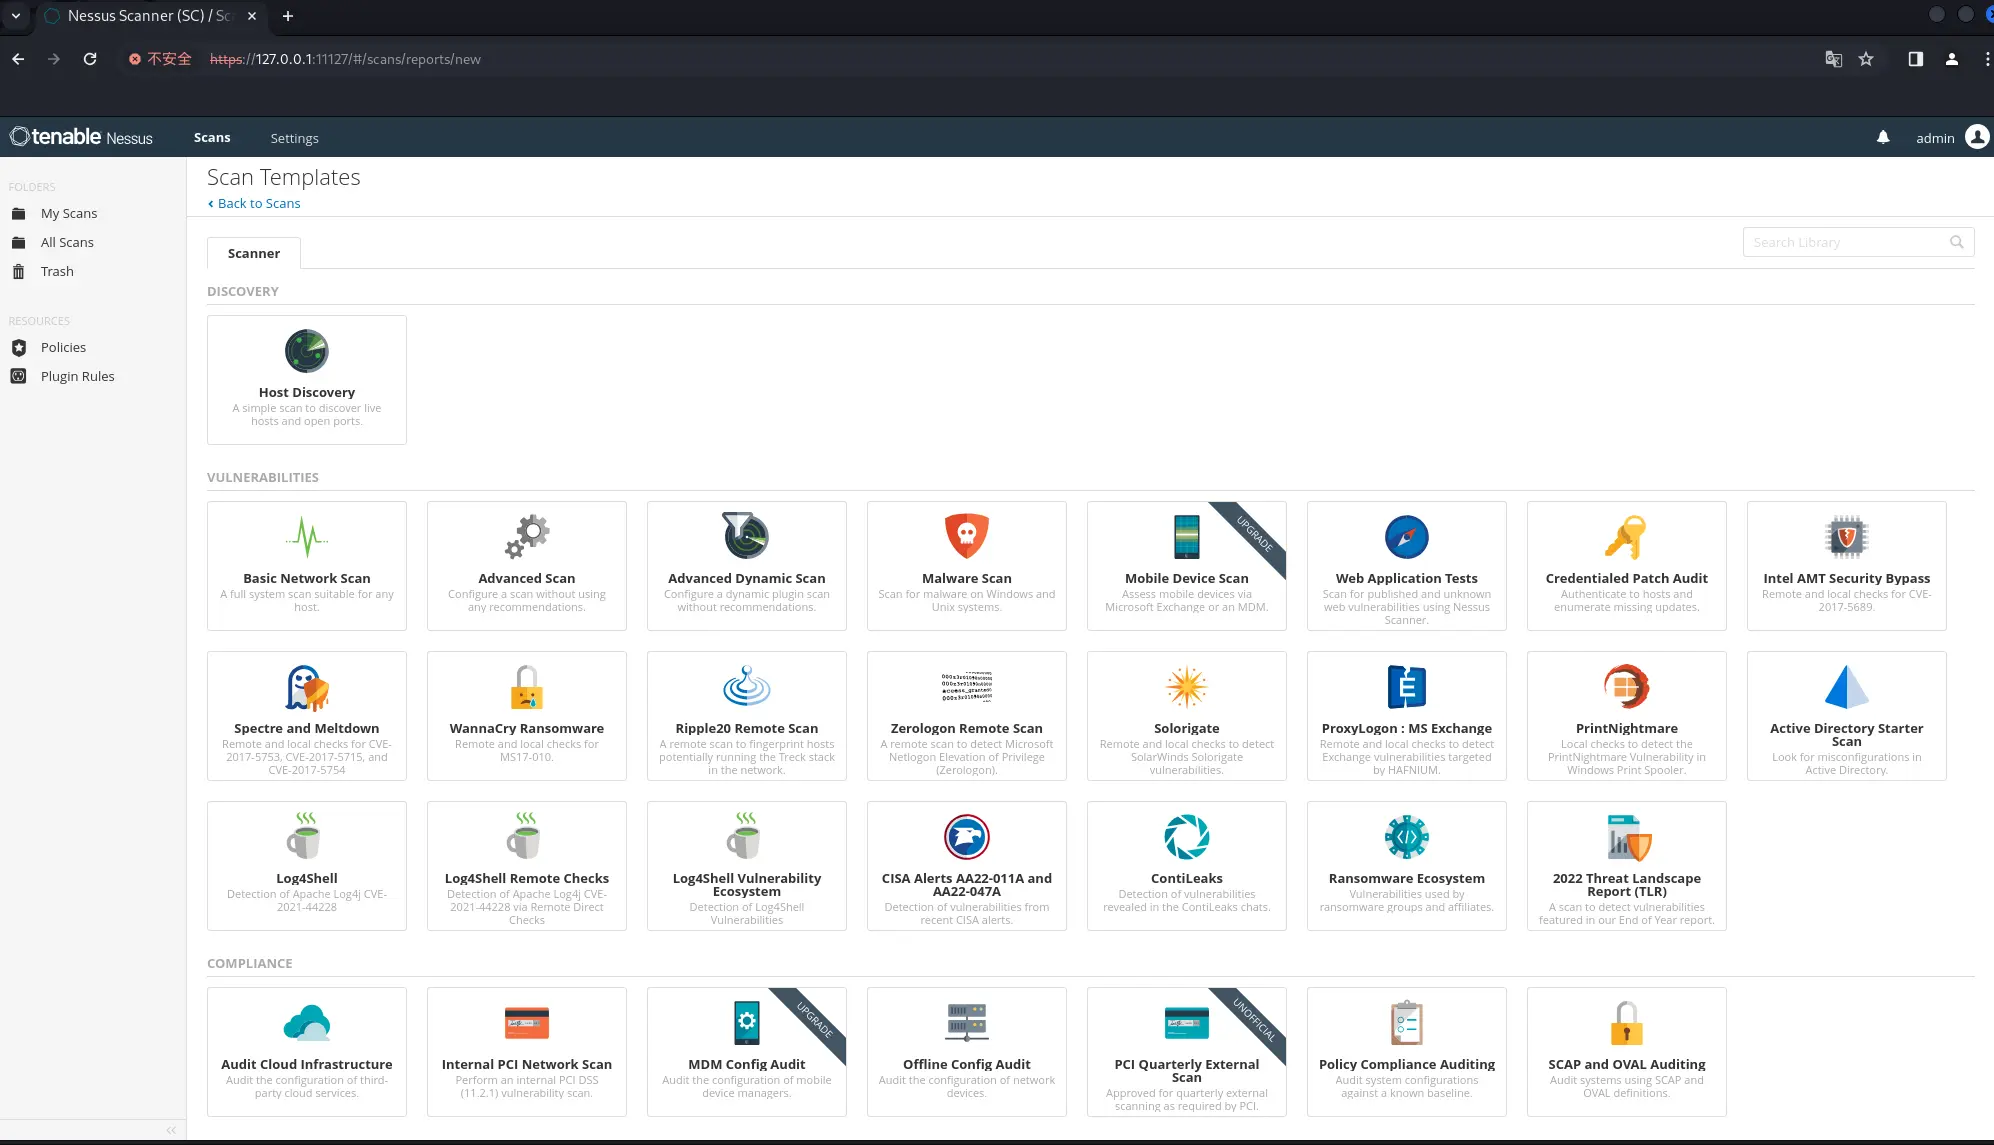
For Tenable Nessus, there are four versions::
RequirementsHardware requirements
System requirements:
While Tenable Nessus itself is installed directly on the host operating system, the web scanner portion of Tenable Nessus Expert is installed as a Docker image on the same host. To do this, your host must have Docker version 20.0.0 or later installed. The web application scanner cannot run if the host does not have Docker installed (all other Tenable Nessus functionality works as expected without Docker being installed).
Install Docker Desktop on WindowsWSL 2 Backend
1 Install WSL from Powershell command line (admin)
WSL --install
WSL --install -d Ubuntu
WSL --update
2 Install Docker Desktop
Note:
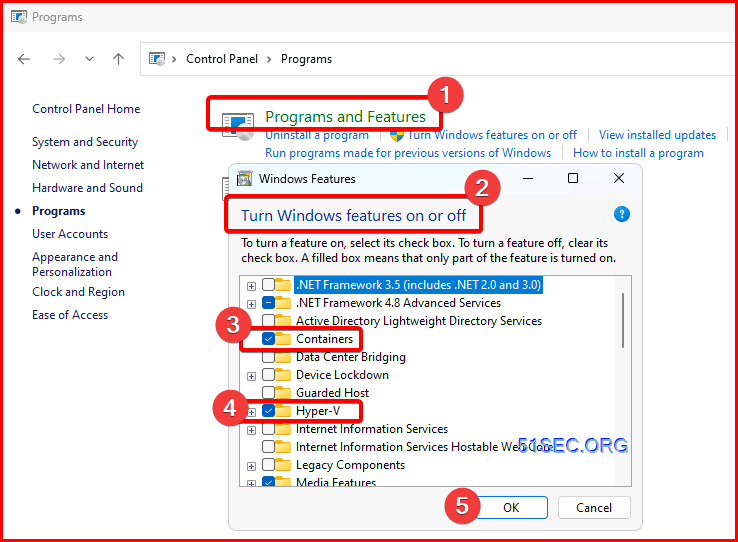
Hyper-V backend and Windows containers1 Install Hyper-V role and Container feature 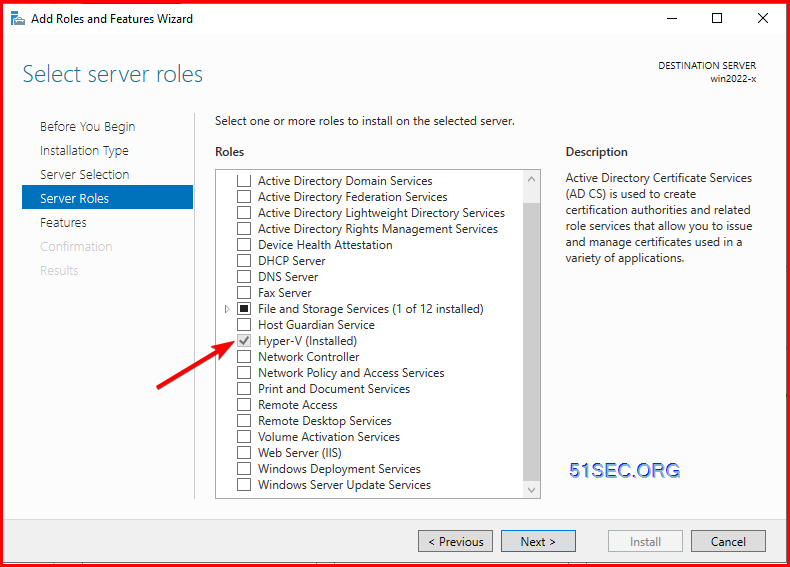
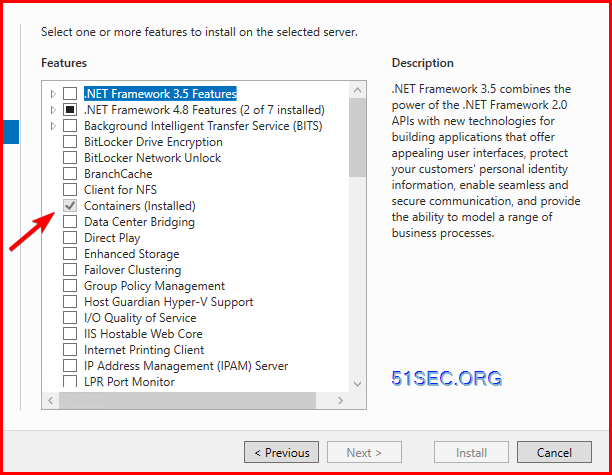
2 Install Docker Desktop Same steps as using WSL2 backend but no need to use WSL2 as backend. Tenable Nessus Expert Instalaltion with Web Application Scanner
1. Install Hyper-V and Containers
Here is an example of Windows 10/11 to enable both features.
Download and install Docker Desktop:
https://www.docker.com/products/docker-desktop/
2. Download and Install Tenable Nessus
https://www.tenable.com/downloads/nessus?loginAttempted=true
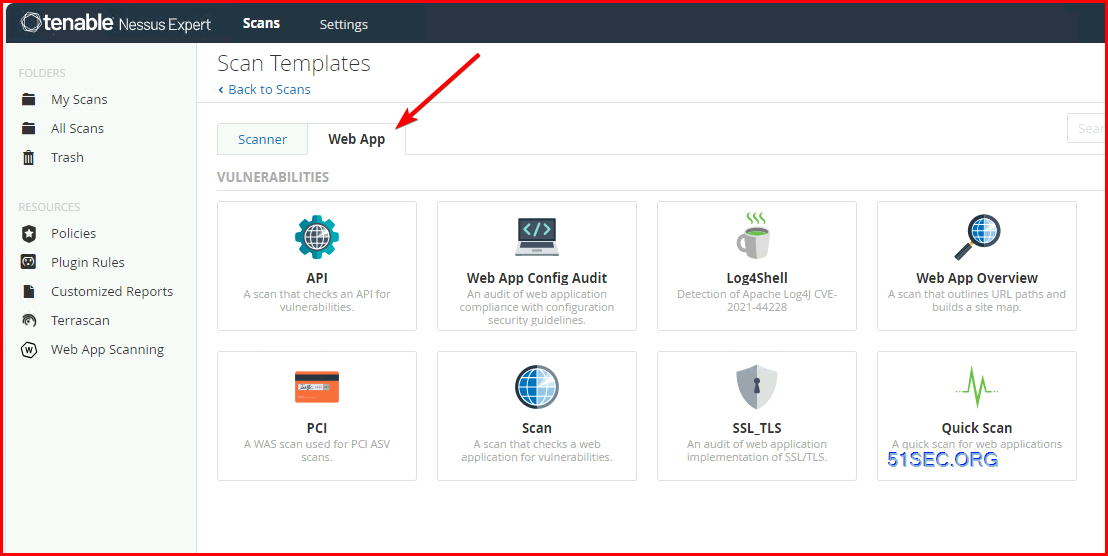
3. Enable WAS - Web Application Scanning
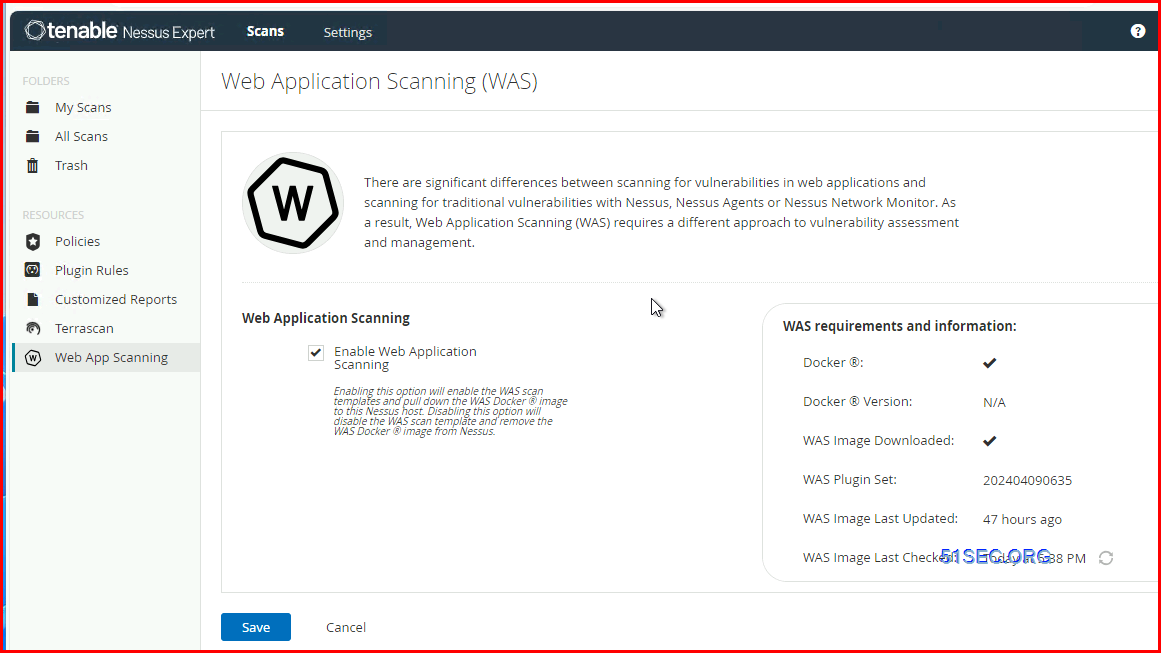
4. Web App Scanning
5. Settings,
Nessus Linux Installation CodeFor Debian:ã€1】Download nessus.sh script。
Download Address: nessus.sh
Or copy following code and save it as nessus.sh
ã€2】Grant execute permission for this script 
    Nessus stop and start commandsStart
或直接æœç´¢Nessus,点击nessus startå³å¯
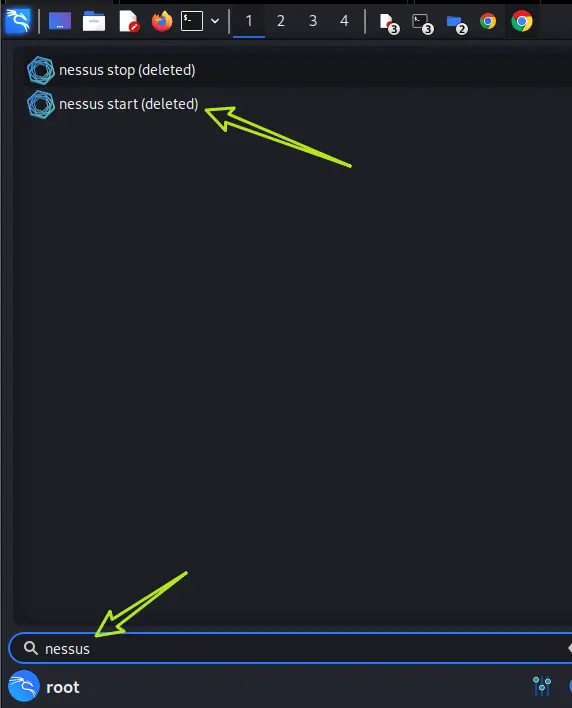 Stop
or directly search Nessus file,then run nessus stop.
For Ubuntu:
Same steps as Debian
Download address:nessus_ubuntu.sh
Or directly copy following code then save it as nessus_ubuntu.sh
Uninstall:
ã€1】stop Nessus service。
ã€2】change /opt/nessus/ folder's permission
ã€3】remove Nessus
Issue :After system or Nessus restarted,scan button might not enable yet to use。
Cause:Nessus is updating / re-compileing the plug-ins.
Solution:Wait for 3~5 minutes.
VideosReferences
Via http://blog.51sec.org/2024/02/tenable-fundamentals-101.html After you onboard Microsoft Sentinel into your workspace, use data connectors to start ingesting your data into Microsoft Sentinel. Microsoft Sentinel comes with many out of the box connectors for Microsoft services, which integrate in real time. For example, the Microsoft Defender XDR connector is a service-to-service connector that integrates data from Office 365, Microsoft Entra ID, Microsoft Defender for Identity, and Microsoft Defender for Cloud Apps. Built-in connectors enable connection to the broader security ecosystem for non-Microsoft products. For example, use Syslog, Common Event Format (CEF), or REST APIs to connect your data sources with Microsoft Sentinel. Microsoft Sentinel solutions provide packaged security content, including data connectors, workbooks, analytics rules, playbooks, and more. When you deploy a solution with a data connector, you get the data connector together with related content in the same deployment. Azure Arc - Add On-Prem Machine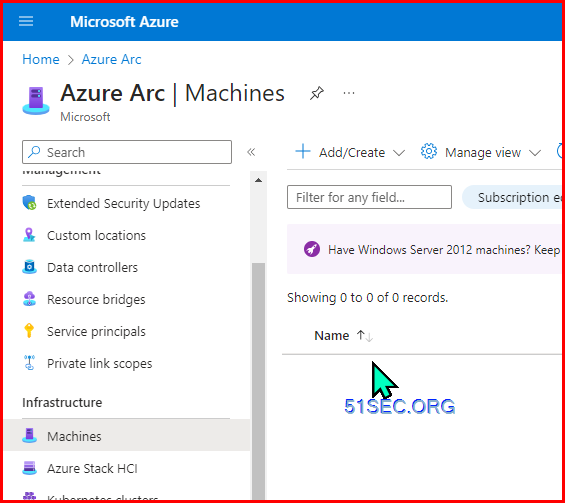
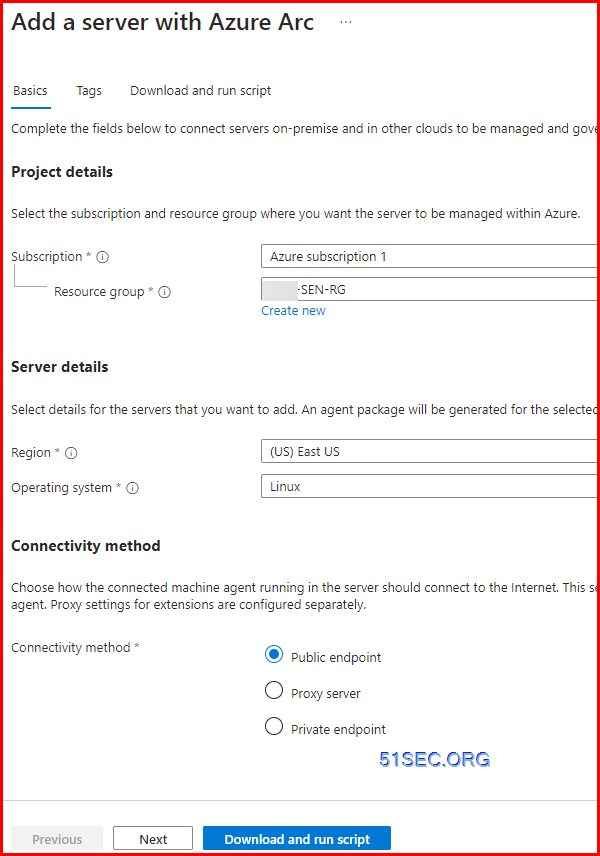
Download or Copy / Paste the code into Linux or Windows machine to run. It will download the installation package, then install the downloaded hybrid agent, eventually run the connect command to connect to ARC portal. try { Configure Linux Syslog ForwarderChange Ubuntu Ip from DHCP to Static
For ip address: ip a
For Gateway: ip r
For DNS: In Ubuntu 18.04 and 20.04 you can use systemd-resolve --status. In newer versions use resolvectl status.
or using nmcli command, you might need to install it first.
Add a super user in:
adduser test1
usermod -aG sudo test1
su - test1
sudo -i
sudo ls -la /root/
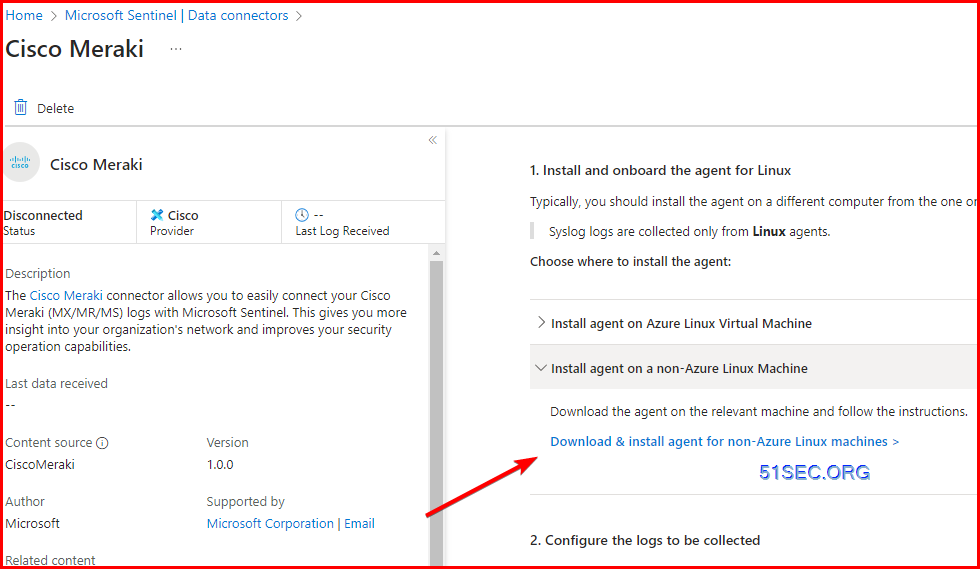
Meraki and Citrix vCenter
Since both are not using Azure Monitor Agent (AMA or MMA) to collect logs, and using Operation Management Suite (OMS) for it, I am putting both configuration steps in this section:
1 Install OMS agent
Download and install it in Linux Syslog Forwarder
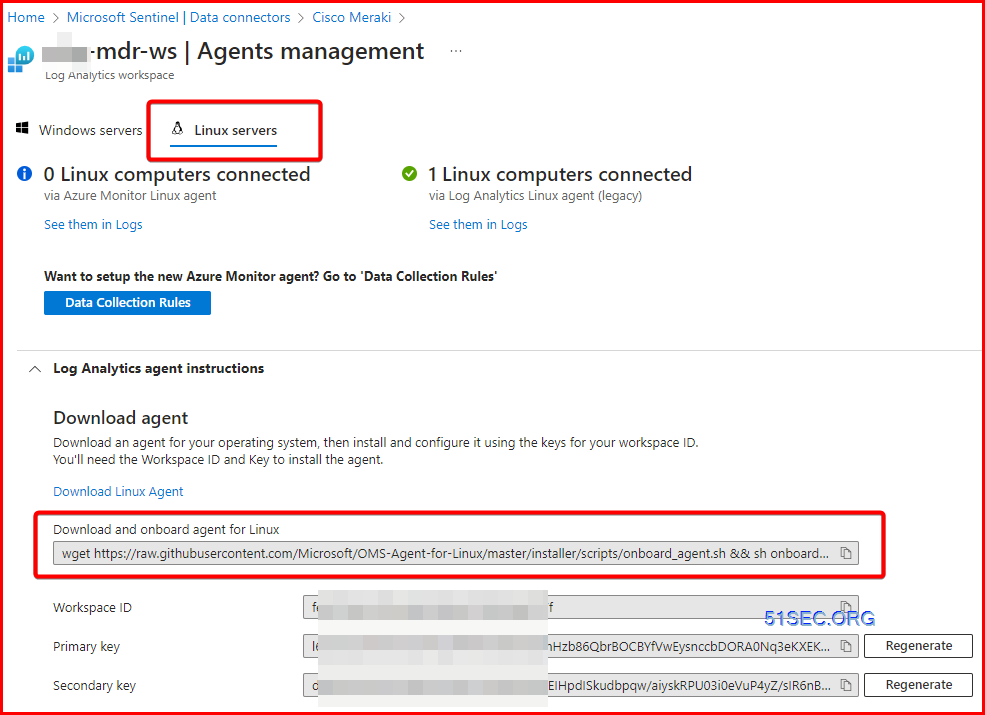
root@NSTEST-syslog:~# wget https://raw.githubusercontent.com/Microsoft/OMS-Agent-for-Linux/master/installer/scripts/onboard_agent.sh && sh onboard_agent.sh -w fe23134c-431b-4d69-8b3e-138943bb757f -s l6Ls25g1rIskJXIeTyoMi2LfMhlm3BeoSUljmHzb86QbrBOCBYfVwEysnccbDORA0Nq3eKXEK5fLgeqQ5EVaKg== -d opinsights.azure.com --2024-03-25 15:30:17-- https://raw.githubusercontent.com/Microsoft/OMS-Agent-for-Linux/master/installer/scripts/onboard_agent.sh Resolving raw.githubusercontent.com (raw.githubusercontent.com)... 185.199.111.133, 185.199.108.133, 185.199.109.133, ... Connecting to raw.githubusercontent.com (raw.githubusercontent.com)|185.199.111.133|:443... connected. HTTP request sent, awaiting response... 200 OK Length: 3848 (3.8K) [text/plain] Saving to: ‘onboard_agent.sh’ onboard_agent.sh 100%[===================>] 3.76K --.-KB/s in 0s 2024-03-25 15:30:17 (95.9 MB/s) - ‘onboard_agent.sh’ saved [3848/3848] --2024-03-25 15:30:17-- https://github.com/microsoft/OMS-Agent-for-Linux/releases/download/OMSAgent_v1.19.0-0/omsagent-1.19.0-0.universal.x64.sh Resolving github.com (github.com)... 140.82.114.3 Connecting to github.com (github.com)|140.82.114.3|:443... connected. HTTP request sent, awaiting response... 302 Found Location: https://objects.githubusercontent.com/github-production-release-asset-2e65be/43709699/86dbf012-12fc-49da-b79e-3301ce03d004?X-Amz-Algorithm=AWS4-HMAC-SHA256&X-Amz-Credential=AKIAVCODYLSA53PQK4ZA%2F20240325%2Fus-east-1%2Fs3%2Faws4_request&X-Amz-Date=20240325T153018Z&X-Amz-Expires=300&X-Amz-Signature=2a97a2aa8938b47de1e179bd20a74fe323ff6183397ca581374aa863182ebfcf&X-Amz-SignedHeaders=host&actor_id=0&key_id=0&repo_id=43709699&response-content-disposition=attachment%3B%20filename%3Domsagent-1.19.0-0.universal.x64.sh&response-content-type=application%2Foctet-stream [following] --2024-03-25 15:30:18-- https://objects.githubusercontent.com/github-production-release-asset-2e65be/43709699/86dbf012-12fc-49da-b79e-3301ce03d004?X-Amz-Algorithm=AWS4-HMAC-SHA256&X-Amz-Credential=AKIAVCODYLSA53PQK4ZA%2F20240325%2Fus-east-1%2Fs3%2Faws4_request&X-Amz-Date=20240325T153018Z&X-Amz-Expires=300&X-Amz-Signature=2a97a2aa8938b47de1e179bd20a74fe323ff6183397ca581374aa863182ebfcf&X-Amz-SignedHeaders=host&actor_id=0&key_id=0&repo_id=43709699&response-content-disposition=attachment%3B%20filename%3Domsagent-1.19.0-0.universal.x64.sh&response-content-type=application%2Foctet-stream Resolving objects.githubusercontent.com (objects.githubusercontent.com)... 185.199.110.133, 185.199.111.133, 185.199.108.133, ... Connecting to objects.githubusercontent.com (objects.githubusercontent.com)|185.199.110.133|:443... connected. HTTP request sent, awaiting response... 200 OK Length: 250004251 (238M) [application/octet-stream] Saving to: ‘omsagent-1.19.0-0.universal.x64.sh’ omsagent-1.19.0-0.u 100%[===================>] 238.42M 104MB/s in 2.3s 2024-03-25 15:30:20 (104 MB/s) - ‘omsagent-1.19.0-0.universal.x64.sh’ saved [250004251/250004251] Extracting OMS agent install bundle... ----- Upgrading package omi to version (omi-1.8.1-0.ulinux.s.x64) ----- Detected OpenSSL version 3.0.2 set as system default. Install/Upgrade will use package(s) from OMS bundle installer's 300 openssl directtory. Selecting previously unselected package omi. (Reading database ... 74617 files and directories currently installed.) Preparing to unpack .../omi-1.8.1-0.ulinux.s.x64.deb ... Creating omiusers group ... Creating omi group ... Creating omi service account ... Unpacking omi (1.8.1.0) ... Setting up omi (1.8.1.0) ... .......+.....+...+.+...+......+..+++++++++++++++++++++++++++++++++++++++++++++++++++++++++++++++++*...+..+...+.........+...+.+...........+...+++++++++++++++++++++++++++++++++++++++++++++++++++++++++++++++++*.........+....+......+...+..+......+.......+........+.......+..+.........+............+.........+.........+....+...+...............+...+..............+......+....+...+..+......+.+...............+........+.+......+...+..+......+....+...+..+......+..........+.....+.......+...............+.....+.+.....+.+.....+...................+.....+......+.............+...+...+............+..+...+.......+..+...+.+++++++++++++++++++++++++++++++++++++++++++++++++++++++++++++++++ ..+..+.............+.....+...+.+..................+......+++++++++++++++++++++++++++++++++++++++++++++++++++++++++++++++++*....+++++++++++++++++++++++++++++++++++++++++++++++++++++++++++++++++*..+...+.....+......................+..+.+.........+.....+...+...+.+...+..+....+............+...+..+....+...+..+...+...+...+.+......+..+.+.........+..+....+............+...+++++++++++++++++++++++++++++++++++++++++++++++++++++++++++++++++ ----- 2024-03-25 15:30:22 : Crontab not configured to update omi keytab automatically. Skip unconfigure ktutil not found Checking if cron is installed... Checking if cron/crond service is started... Set up a cron job to OMI logrotate every 15 minutes Configuring OMI service ... Created symlink /etc/systemd/system/multi-user.target.wants/omid.service → /lib/systemd/system/omid.service. Trying to start omi with systemctl omi is started. Trying to stop omi with systemctl omi is stopped. Trying to start omi with systemctl omi is started. ----- Upgrading package scx to version (scx-1.8.1-0.universal.s.x64) ----- Detected OpenSSL version 3.0.2 set as system default. Install/Upgrade will use package(s) from OMS bundle installer's 300 openssl directtory. Selecting previously unselected package scx. (Reading database ... 74680 files and directories currently installed.) Preparing to unpack .../scx-1.8.1-0.universal.s.x64.deb ... Unpacking scx (1.8.1.0) ... Setting up scx (1.8.1.0) ... Generating certificate with hostname="NSTEST-syslog" Trying to stop omi with systemctl omi is stopped. Trying to start omi with systemctl omi is started. ----- Upgrading package omsagent to version (omsagent-1.19.0-0.universal.x64) ----- Detected OpenSSL version 3.0.2 set as system default. Install/Upgrade will use package(s) from OMS bundle installer's 300 openssl directtory. Selecting previously unselected package omsagent. (Reading database ... 74725 files and directories currently installed.) Preparing to unpack .../omsagent-1.19.0-0.universal.x64.deb ... Creating omsagent group ... Creating omsagent service account ... Creating nxautomation group ... Creating nxautomation service account ... Unpacking omsagent (1.19.0.0) ... Setting up omsagent (1.19.0.0) ... -e info Reading onboarding params from: /etc/omsagent-onboard.conf Workspace 000000-1111-222222222-3333333333 already onboarded and agent is running. Symbolic links have not been created; re-onboarding to create them info Generating certificate ... -e info Agent GUID is 8a69e647-7047-434f-b3ad-79707c5945c4 -e info Onboarding success Configure syslog... Configuring rsyslog for OMS logging Restarting service: rsyslog Configure heartbeat monitoring agent... Configure log rotate for workspace 000000-1111-222222222-3333333333... INFO: Configuring OMS agent service 000000-1111-222222222-3333333333 ... -e error MetaConfig generation script not available at /opt/microsoft/omsconfig/Scripts/python3/OMS_MetaConfigHelper.py. For more details check logs in /var/opt/microsoft/omsconfig/omsconfig.log Trying to stop omi with systemctl omi is stopped. Trying to start omi with systemctl omi is started. Configure log rotate for workspace 000000-1111-222222222-3333333333... Applying Syslog conf hotfix... Removing omsconfig package as part of upgrade ----- Removing package: omsconfig ----- dpkg: warning: ignoring request to remove omsconfig which isn't installed ----- Upgrading package omsconfig to version (omsconfig-1.3.0-0.x64) ----- Detected OpenSSL version 3.0.2 set as system default. Install/Upgrade will use package(s) from OMS bundle installer's 300 openssl directtory. Selecting previously unselected package omsconfig. (Reading database ... 84211 files and directories currently installed.) Preparing to unpack 300/omsconfig-1.3.0-0.x64.deb ... Using python3 Cleanning up existing dsc_hosts... chmod: cannot access '/opt/dsc': No such file or directory Deployment operation type : install Cleanning directory /opt/dsc... Cleaned up existing dsc_hosts... Unpacking omsconfig (1.3.0.0) ... Setting up omsconfig (1.3.0.0) ... Using python3 Running python3, python version is , python3 VERBOSE from InstallModule.py: Extracting module zip file from /opt/microsoft/omsconfig/module_packages/nx_1.5.zip to /opt/microsoft/omsconfig/modules VERBOSE from InstallModule.py: Installing resource MSFT_nxGroupResource VERBOSE from InstallModule.py: Updated permissions of file: /opt/omi/lib/libMSFT_nxGroupResource_root-oms.so to 0o644 VERBOSE from InstallModule.py: Updated permissions of file: /opt/dsc/lib/MSFT_nxGroupResource/libMSFT_nxGroupResource.so to 0o644 VERBOSE from InstallModule.py: Updated permissions of file: /etc/opt/omi/conf/omiregister/root-oms/MSFT_nxGroupResource.reg to 0o644 VERBOSE from InstallModule.py: Installing resource MSFT_nxAvailableUpdatesResource VERBOSE from InstallModule.py: Updated permissions of file: /opt/omi/lib/libMSFT_nxAvailableUpdatesResource_root-oms.so to 0o644 VERBOSE from InstallModule.py: Updated permissions of file: /opt/dsc/lib/MSFT_nxAvailableUpdatesResource/libMSFT_nxAvailableUpdatesResource.so to 0o644 VERBOSE from InstallModule.py: Updated permissions of file: /etc/opt/omi/conf/omiregister/root-oms/MSFT_nxAvailableUpdatesResource.reg to 0o644 VERBOSE from InstallModule.py: Installing resource MSFT_nxPackageResource VERBOSE from InstallModule.py: Updated permissions of file: /opt/omi/lib/libMSFT_nxPackageResource_root-oms.so to 0o644 VERBOSE from InstallModule.py: Updated permissions of file: /opt/dsc/lib/MSFT_nxPackageResource/libMSFT_nxPackageResource.so to 0o644 VERBOSE from InstallModule.py: Updated permissions of file: /etc/opt/omi/conf/omiregister/root-oms/MSFT_nxPackageResource.reg to 0o644 VERBOSE from InstallModule.py: Installing resource MSFT_nxUserResource VERBOSE from InstallModule.py: Updated permissions of file: /opt/omi/lib/libMSFT_nxUserResource_root-oms.so to 0o644 VERBOSE from InstallModule.py: Updated permissions of file: /opt/dsc/lib/MSFT_nxUserResource/libMSFT_nxUserResource.so to 0o644 VERBOSE from InstallModule.py: Updated permissions of file: /etc/opt/omi/conf/omiregister/root-oms/MSFT_nxUserResource.reg to 0o644 VERBOSE from InstallModule.py: Installing resource MSFT_nxServiceResource VERBOSE from InstallModule.py: Updated permissions of file: /opt/omi/lib/libMSFT_nxServiceResource_root-oms.so to 0o644 VERBOSE from InstallModule.py: Updated permissions of file: /opt/dsc/lib/MSFT_nxServiceResource/libMSFT_nxServiceResource.so to 0o644 VERBOSE from InstallModule.py: Updated permissions of file: /etc/opt/omi/conf/omiregister/root-oms/MSFT_nxServiceResource.reg to 0o644 The result code is 0 VERBOSE from InstallModule.py: Extracting module zip file from /opt/microsoft/omsconfig/module_packages/nxOMSPerfCounter_2.3.zip to /opt/microsoft/omsconfig/modules VERBOSE from InstallModule.py: Installing resource MSFT_nxOMSPerfCounterResource VERBOSE from InstallModule.py: Updated permissions of file: /opt/omi/lib/libMSFT_nxOMSPerfCounterResource_root-oms.so to 0o644 VERBOSE from InstallModule.py: Updated permissions of file: /opt/dsc/lib/MSFT_nxOMSPerfCounterResource/libMSFT_nxOMSPerfCounterResource.so to 0o644 VERBOSE from InstallModule.py: Updated permissions of file: /etc/opt/omi/conf/omiregister/root-oms/MSFT_nxOMSPerfCounterResource.reg to 0o644 The result code is 0 VERBOSE from InstallModule.py: Extracting module zip file from /opt/microsoft/omsconfig/module_packages/nxOMSSyslog_2.5.zip to /opt/microsoft/omsconfig/modules VERBOSE from InstallModule.py: Installing resource MSFT_nxOMSSyslogResource VERBOSE from InstallModule.py: Updated permissions of file: /opt/omi/lib/libMSFT_nxOMSSyslogResource_root-oms.so to 0o644 VERBOSE from InstallModule.py: Updated permissions of file: /opt/dsc/lib/MSFT_nxOMSSyslogResource/libMSFT_nxOMSSyslogResource.so to 0o644 VERBOSE from InstallModule.py: Updated permissions of file: /etc/opt/omi/conf/omiregister/root-oms/MSFT_nxOMSSyslogResource.reg to 0o644 The result code is 0 VERBOSE from InstallModule.py: Extracting module zip file from /opt/microsoft/omsconfig/module_packages/nxOMSSudoCustomLog_2.8.zip to /opt/microsoft/omsconfig/modules VERBOSE from InstallModule.py: Installing resource MSFT_nxOMSSudoCustomLogResource VERBOSE from InstallModule.py: Updated permissions of file: /opt/omi/lib/libMSFT_nxOMSSudoCustomLogResource_root-oms.so to 0o644 VERBOSE from InstallModule.py: Updated permissions of file: /opt/dsc/lib/MSFT_nxOMSSudoCustomLogResource/libMSFT_nxOMSSudoCustomLogResource.so to 0o644 VERBOSE from InstallModule.py: Updated permissions of file: /etc/opt/omi/conf/omiregister/root-oms/MSFT_nxOMSSudoCustomLogResource.reg to 0o644 The result code is 0 VERBOSE from InstallModule.py: Extracting module zip file from /opt/microsoft/omsconfig/module_packages/nxOMSKeyMgmt_1.0.zip to /opt/microsoft/omsconfig/modules VERBOSE from InstallModule.py: Installing resource MSFT_nxOMSKeyMgmtResource VERBOSE from InstallModule.py: Updated permissions of file: /opt/omi/lib/libMSFT_nxOMSKeyMgmtResource_root-oms.so to 0o644 VERBOSE from InstallModule.py: Updated permissions of file: /opt/dsc/lib/MSFT_nxOMSKeyMgmtResource/libMSFT_nxOMSKeyMgmtResource.so to 0o644 VERBOSE from InstallModule.py: Updated permissions of file: /etc/opt/omi/conf/omiregister/root-oms/MSFT_nxOMSKeyMgmtResource.reg to 0o644 The result code is 0 VERBOSE from InstallModule.py: Extracting module zip file from /opt/microsoft/omsconfig/module_packages/nxFileInventory_1.4.zip to /opt/microsoft/omsconfig/modules VERBOSE from InstallModule.py: Installing resource MSFT_nxFileInventoryResource VERBOSE from InstallModule.py: Updated permissions of file: /opt/omi/lib/libMSFT_nxFileInventoryResource_root-oms.so to 0o644 VERBOSE from InstallModule.py: Updated permissions of file: /opt/dsc/lib/MSFT_nxFileInventoryResource/libMSFT_nxFileInventoryResource.so to 0o644 VERBOSE from InstallModule.py: Updated permissions of file: /etc/opt/omi/conf/omiregister/root-oms/MSFT_nxFileInventoryResource.reg to 0o644 The result code is 0 VERBOSE from InstallModule.py: Extracting module zip file from /opt/microsoft/omsconfig/module_packages/nxOMSGenerateInventoryMof_1.5.zip to /opt/microsoft/omsconfig/modules VERBOSE from InstallModule.py: Installing resource MSFT_nxOMSGenerateInventoryMofResource VERBOSE from InstallModule.py: Updated permissions of file: /opt/omi/lib/libMSFT_nxOMSGenerateInventoryMofResource_root-oms.so to 0o644 VERBOSE from InstallModule.py: Updated permissions of file: /opt/dsc/lib/MSFT_nxOMSGenerateInventoryMofResource/libMSFT_nxOMSGenerateInventoryMofResource.so to 0o644 VERBOSE from InstallModule.py: Updated permissions of file: /etc/opt/omi/conf/omiregister/root-oms/MSFT_nxOMSGenerateInventoryMofResource.reg to 0o644 The result code is 0 gpg: keybox '/etc/opt/omi/conf/omsconfig/keymgmtring.gpg' created gpg: directory '/etc/opt/omi/conf/omsconfig/.gnupg' created gpg: /etc/opt/omi/conf/omsconfig/.gnupg/trustdb.gpg: trustdb created gpg: key C4EC49E544BC4178: public key "Microsoft (Release Signing) <[email protected]>" imported gpg: Total number processed: 1 gpg: imported: 1 gpg: keybox '/etc/opt/omi/conf/omsconfig/keyring.gpg' created gpg: key 20541A3DDE321294: public key "Microsoft (Release Signing) <[email protected]>" imported gpg: Total number processed: 1 gpg: imported: 1 Reset ownership of files defined in /etc/sudoers.d/omsagent Trying to stop omi with systemctl omi is stopped. Trying to start omi with systemctl omi is started. Using python3 Running python3 VERBOSE from OMS_MetaConfigHelper.py: OMS config path being read: /etc/opt/microsoft/omsagent/000000-1111-222222222-3333333333/conf/omsadmin.conf VERBOSE from OMS_MetaConfigHelper.py: Output from3: /opt/microsoft/omsconfig/Scripts/python3/SetDscLocalConfigurationManager.py -configurationmof /etc/opt/omi/conf/omsconfig/generated_meta_config.mof: Opened the dsc host lock file at the path '/opt/dsc/dsc_host_lock' [2024/03/25 15:30:28] [11122] [INFO] [0] [/opt/microsoft/omsconfig/Scripts/python3/SetDscLocalConfigurationManager.py:0] dsc_host lock file is acquired by : SendMetaConfigurationApply Operation SendMetaConfigurationApply completed successfully. Operation was successful. Operation SendMetaConfigurationApply completed successfully. Operation was successful. VERBOSE from OMS_MetaConfigHelper.py: Successfully configured omsconfig. Applying DSC nxOMSSyslog hotfix... Trying to stop omi with systemctl omi is stopped. Trying to start omi with systemctl omi is started. ----- Updating bundled provider packages ----- Checking if Apache is installed ... Apache not found, will not install Checking if Docker is installed... Docker not found. Docker agent will not be installed. Checking if MySQL is installed ... MySQL not found, will not install Extracting... Updating auoms ... ----- Updating package: auoms (auoms-2.5.2-52.universal.x64) ----- Selecting previously unselected package auoms. (Reading database ... 84316 files and directories currently installed.) Preparing to unpack auoms-2.5.2-52.universal.x64.deb ... Unpacking auoms (2.5.2.52) ... Setting up auoms (2.5.2.52) ... OMS Troubleshooter is installed. You can run the Troubleshooter with the following command: $ sudo /opt/microsoft/omsagent/bin/troubleshooter OMS agent shell bundle exiting with status code 0 -e The Log Analytics agent is on a deprecation path and won't be supported after August 31, 2024. If you use the Log Analytics agent to ingest data to Azure Monitor, make sure to migrate to the new Azure Monitor agent (https://docs.microsoft.com/en-us/azure/azure-monitor/agents/azure-monitor-agent-migration) prior to that date. Other commands:
root@NSTEST-syslog:~# cat /etc/rsyslog.d/95-omsagent.conf
# OMS Syslog collection for workspace 000000-1111-222222222-3333333333
root@NSTEST-syslog:~# netstat
Active Internet connections (w/o servers)
Proto Recv-Q Send-Q Local Address           Foreign Address         State
tcp        0    240 NSTEST-syslog.communit:ssh ECOR-ITLT-17.comm:64202 ESTABLISHED
tcp        0      0 NSTEST-syslog.commun:56794 40.71.12.254:https      TIME_WAIT
Active UNIX domain sockets (w/o servers)
Proto RefCnt Flags       Type       State         I-Node   Path
unix  2      [ ]         DGRAM                    646443   /run/user/1000/systemd/notify
unix  3      [ ]         DGRAM      CONNECTED     19355    /run/systemd/notify
2 Create Meraki and vCenter Conf files
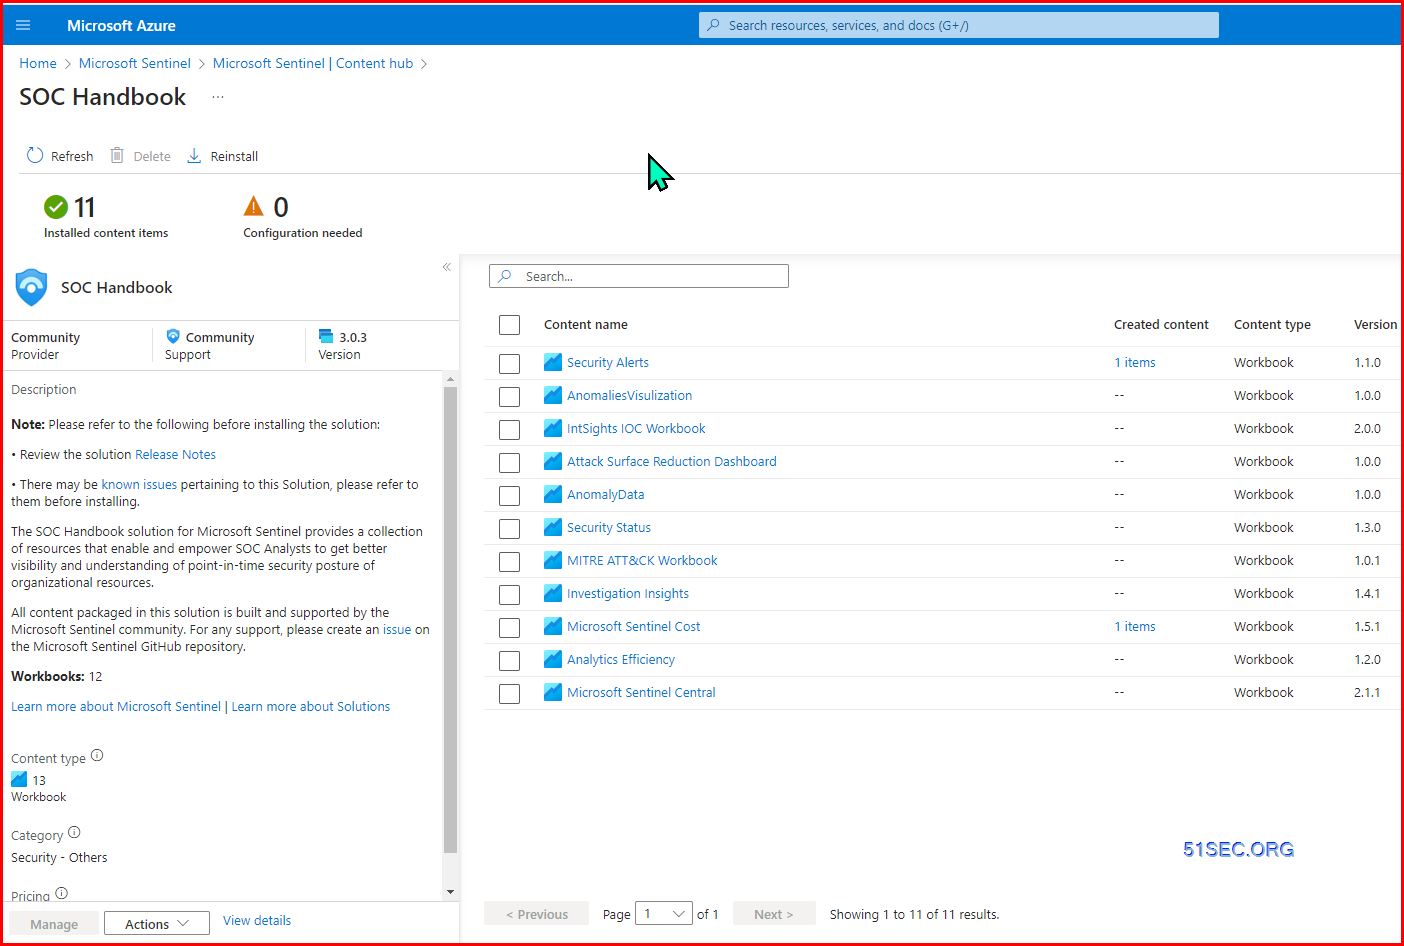
root@NSTEST-syslog:~# sudo netstat -tulnp | grep ruby 3 Change rsyslog conf file root@NSTEST-syslog:~# sudo netstat -tulnp | grep ruby 4 Restart services and verify ports root@NSTEST-syslog:/etc/rsyslog.d# systemctl restart rsyslog Install SOC Handbook Solution
The SOC Handbook solution for Microsoft Sentinel provides a collection of resources that enable and empower SOC Analysts to get better visibility and understanding of point-in-time security posture of organizational resources.
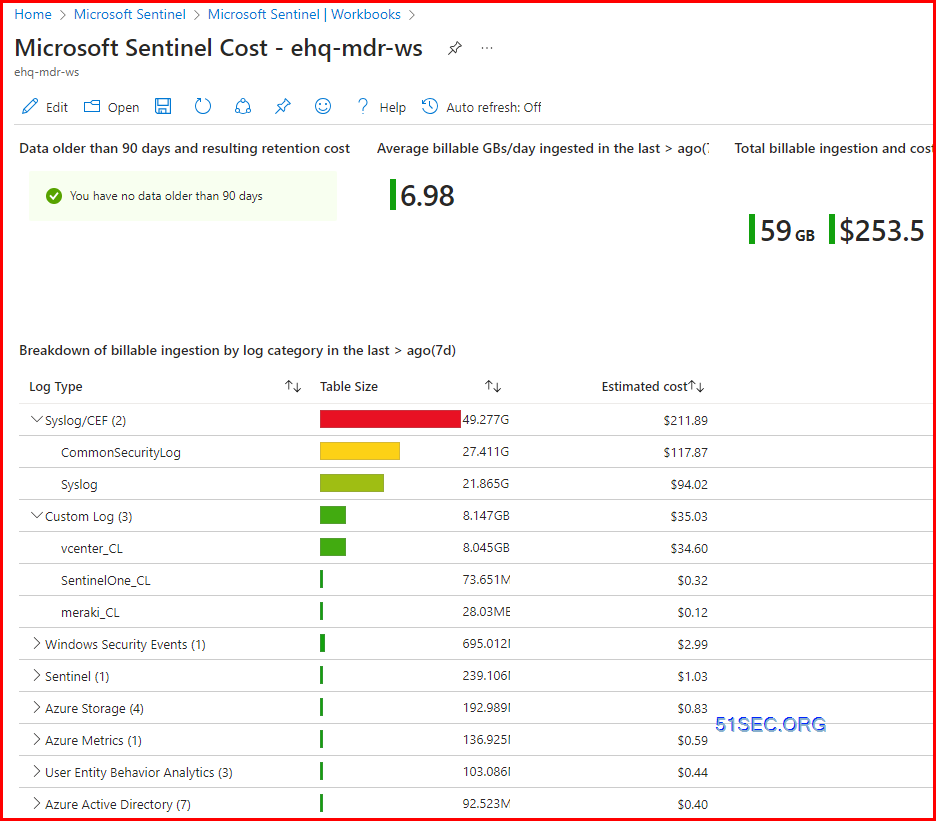
Checking cost for last 7 days:
Videos1 Create your own templates 2 Create Own Security Policies 3 Create Own Secret folder 4 Onboard Account ReferencesVia http://blog.51sec.org/2024/04/azure-sentinel-onboarding-log-sources.html Kusto Query Language is the language you will use to work with and manipulate data in Microsoft Sentinel. The logs you feed into your workspace aren't worth much if you can't analyze them and get the important information hidden in all that data. Kusto Query Language has not only the power and flexibility to get that information, but the simplicity to help you get started quickly. If you have a background in scripting or working with databases, a lot of the content of this article will feel very familiar. If not, don't worry, as the intuitive nature of the language quickly enables you to start writing your own queries and driving value for your organization. Search Keywords in Tablessearch in (CommonSecurityLog) "172.17.20.10" search in (Syslog) "172.17.20.10"
CommonSecurityLog
Syslog
| where Computer !contains "10"
Syslog
| summarize count() by Computer
CommonSecurityLog
| summarize count() by Activity Count Logs in a TableCheck Last 5 logs
SigninLogs
| sort by TimeGenerated desc
| take 5
Showing last 7 days log trending
let Now = now();
(range TimeGenerated from ago(7d) to Now-1d step 1d
| extend Count = 0
| union isfuzzy=true
(SecurityEvent
| summarize Count = count() by bin_at(TimeGenerated, 1d, Now))
| summarize Count=max(Count) by bin_at(TimeGenerated, 1d, Now)
| sort by TimeGenerated
| project Value = iff(isnull(Count), 0, Count), Time = TimeGenerated, Legend = "SecurityEvents") | render timechart
Check certain table's raw logs in last 1 hour:
meraki_CL
| where TimeGenerated > ago(1h)
| sort by TimeGenerated desc
Which Windows machine is sending logs through Azure Monitor Agemt?
Heartbeat | where OSType == 'Windows' | where Category != 'Azure Monitor Agent'| summarize arg_max(TimeGenerated, *) by SourceComputerId | sort by Computer | render table
Check Subscription ID
AzureActivity
| summarize by SubscriptionId
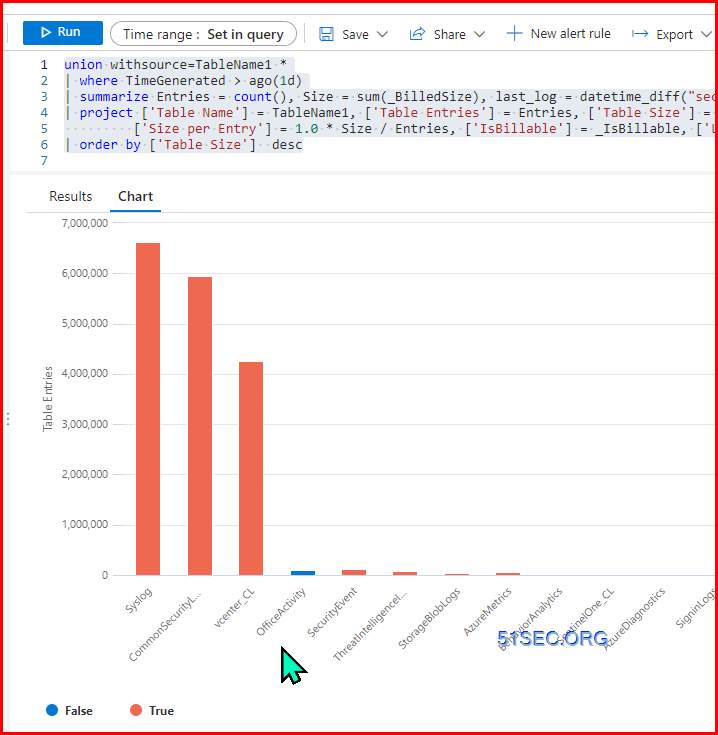
Price RelatedCheck Table Sizes and if Billable
union withsource=TableName1 *
| where TimeGenerated > ago(1d)
| summarize Entries = count(), Size = sum(_BilledSize), last_log = datetime_diff("second",now(), max(TimeGenerated)), estimate = sumif(_BilledSize, _IsBillable==true) by TableName1, _IsBillable
| project ['Table Name'] = TableName1, ['Table Entries'] = Entries, ['Table Size'] = Size,
['Size per Entry'] = 1.0 * Size / Entries, ['IsBillable'] = _IsBillable, ['Last Record Received'] = last_log , ['Estimated Table Price'] = (estimate/(1024*1024*1024)) * 0.0
| order by ['Table Size'] desc
Calculate Cost Per Table
let rate = 4.30; //<-- Effective per GB Price in EastUS (LAW & Sentinel per GB cost combined)
SecurityEvent //<-- We're querying the SecurityEvent table in this one
| where TimeGenerated >ago(30d) //<-- Let's look at the past month, which makes sense considering we're billed monthly
| summarize GB=sum(_BilledSize)/1024/1024/1024 //<-- Summarize billable volume in GB using the _BilledSize table column
| extend cost = GB*rate //<-- Multiply total GBs for the month by the effective rate (defined in first line of query)
VideosReferences
Via http://blog.51sec.org/2024/04/azure-sentinel-log-query-scripts.html |
|


 RSS Feed
