
For many IT workers remotely involved with networking, it is quite common to need to expose your Intranet application to the outside world in a secured manner. Unfortunately, we work most of the time from private IP networks, be that at the workplace, at home or at the coffee shop. The router(s) or firewall (s) that stands between our workstation and the internet makes it harder to expose a local socket to the outside. Most of the time, this is preferable for security.
A couple of solutions you can choose now:
1. Change your router / firewall configuration to do port forwarding or NAT from public to your application. But in many cases, you wont be able to make that changes or you even do not have that options.
2. Tunneling services : either self hosting or cloud services such as:
 Ngrok
Ngrok
Setup & Installation
1. Download ngrok
ngrok is easy to install. Download a single binary with zero run-time dependencies. There are following versions available to download : Winodws, Mac OS X Linux Mac (32-bit) Windows (32-bit)Linux (ARM) Linux (32-bit) FreeBSD (64-Bit)FreeBSD (32-bit)
A couple of solutions you can choose now:
1. Change your router / firewall configuration to do port forwarding or NAT from public to your application. But in many cases, you wont be able to make that changes or you even do not have that options.
2. Tunneling services : either self hosting or cloud services such as:
- Ngrok
- FRP
- Localtunnel
NgrokSetup & Installation
1. Download ngrok
ngrok is easy to install. Download a single binary with zero run-time dependencies. There are following versions available to download : Winodws, Mac OS X Linux Mac (32-bit) Windows (32-bit)Linux (ARM) Linux (32-bit) FreeBSD (64-Bit)FreeBSD (32-bit)
Note: Windows Ngrok is a command line tool. You will need to unzip it into a folder then use it from command line.
2. Unzip to install
3. Connect your account
Following screenshots are captured from Windows OS.
4. Fire it up
5. Expose a local webserver
Youtube Video for all steps in Windows 7 :
FRP (Fast Reverse Proxy)
What is frp?
frp is a fast reverse proxy to help you expose a local server behind a NAT or firewall to the internet. Now, it supports tcp, udp, http and https protocol when requests can be forwarded by domains to backward web services.
1. Deploy frps at server side.
Windows zip file name is frp_0.21.0_windows_386.zip (32bit) or frp_0.21.0_windows_amd64.zip (64bit). Download address :
Localtunnel.me
Localtunnel allows you to easily share a web service on your local development machine without messing with DNS and firewall settings.
Localtunnel will assign you a unique publicly accessible url that will proxy all requests to your locally running webserver.
Other Remote Control Softwares
(From: Neurohazard)
References:
2. Unzip to install
On Linux or OSX you can unzip ngrok from a terminal with the following command. On Windows, just double click ngrok.zip.
$ unzip /path/to/ngrok.zip
Most people keep ngrok in their user folder or set an alias for easy access.
3. Connect your account
Running this command will add your account's authtoken to your ngrok.yml file. This will give you more features and all open tunnels will be listed here in the dashboard.
$ ./ngrok authtoken ad7FeWDimD3GTj1Hqkh7_m3BRJfhTyqfiZbBV8dAJ
Following screenshots are captured from Windows OS.
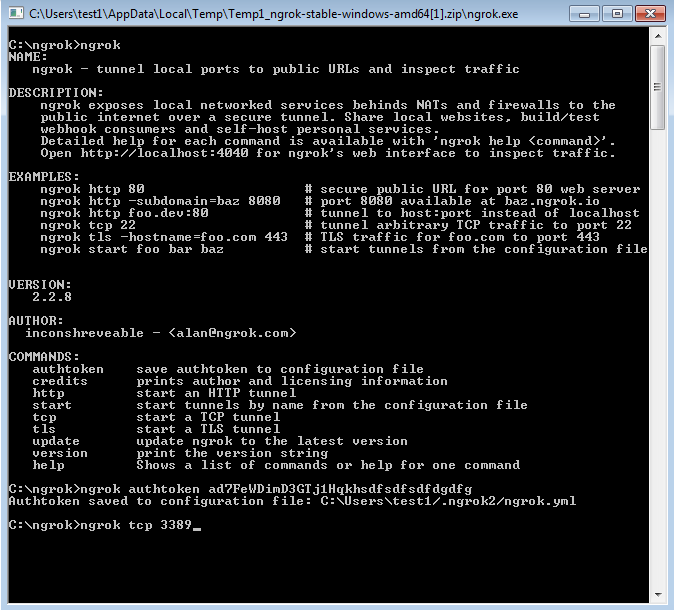
|
| Windows Command line ngrok commands |
|
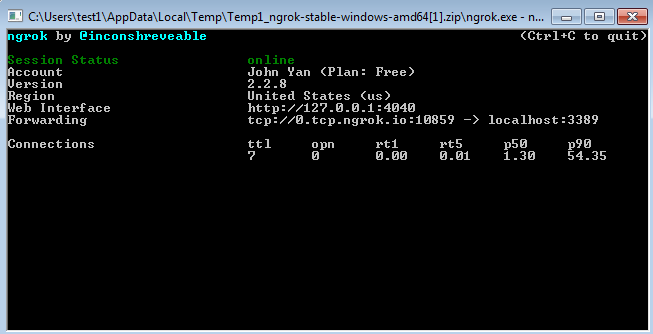
| Ngrok connection forwarding to localhost 3389 (Windows Remote Desktop Service) |
4. Fire it up
Read the documentation on how to use ngrok. Try it out by running it from the command line:
$ ./ngrok help
To start a HTTP tunnel on port 80, run this next:
$ ./ngrok http 80
5. Expose a local webserver
Once you've started a local webserver, fire up ngrok by pointing it to the port where your local server is running:
$ ./ngrok http 80
The output will list a forwarding URL, which will point to your local server. You'll also see any active tunnels listed on the status page.
Note: free ngrok accounts receive a random URL each time a tunnel is started. Upgrade for other options. Starting ngrok normally will generate a URL with a random subdomain (e.g. abc123.ngrok.io) for your tunnel. However, upgraded accounts can configure reserved ngrok.io subdomains so they're only available for use by their account. They can also enable custom domains to forward to their ngrok tunnels with CNAME records.
6. Setup a configuration file
If you regularly run tunnels with the same feature flags, you might wish to set defaults. No worries! Add all your tunnel settings to ngrok's configuration file (created when you added your authtoken). Once setup, you'll be able to fire up ngrok like this:
$ ./ngrok start demo
Here's a small configuration file example:
authtoken: ad7FeWDimD3GTj1Hqkh7_m3BRJfhTyqfiZbBV8dAJ

region: us
console_ui: true
web_addr: localhost:4040

tunnels:
  demo:
    proto: http
    addr: 9090
    hostname: demo.mysite.com
    inspect: false
    auth: "demo:secret"
Youtube Video for all steps in Windows 7 :
FRP (Fast Reverse Proxy)
What is frp?
frp is a fast reverse proxy to help you expose a local server behind a NAT or firewall to the internet. Now, it supports tcp, udp, http and https protocol when requests can be forwarded by domains to backward web services.
1. Deploy frps at server side.
cd
wget https://github.com/fatedier/frp/releases/download/v0.21.0/frp_0.21.0_linux_amd64.tar.gz
tar -xzvf frp_0.21.0_linux_amd64.tar.gz
cd frp_0.21.0_linux_amd64
Edit server configuration ini file:
vi frps.ini
enter following information:
[common]
bind_port = 8000
token = 'your password'
start frps service with new configuration:
./frps -c ./frps.ini
Once successfully started service, following information will show in your terminal window:
[root@testserver1 frp 0.21.0_1inux_amd64]# ./frps -c ./frps.ini
2018/11/25 19:20:00 [I] [service.go:130] frps tcp listen on 0.0.0.0:8000
2018/11/25 19:20:00 [I] root.:o:207 Start fris success
You can use screen to run this task in the backgroud:
yum -y install screen
screen -S frp
./frps -c ./frps.ini
2. Install Windows Client frpc
Download Windows Client release from https://github.com/fatedier/frp/releases
- https://github.com/fatedier/frp/releases/download/v0.21.0/frp_0.21.0_windows_386.zip
- https://github.com/fatedier/frp/releases/download/v0.21.0/frp_0.21.0_windows_amd64.zip
Edit client side configuration file frpc.ini
Enter following information:
[common]
server_addr = server public IP
server_port = 8000
token = "your password which is same as server side"

[testssh]
type = tcp
local_ip = 127.0.0.1
local_port = 2222
remote_port = 16316
This configuration means when we access our public ip's 16316 port, it will forward the access to local computer's 2222 port.
Start frpc service from CMD window:
frpc.exe -c frpc.ini
Once successfully launched this service, we will get following feedback from CMD window:
$ ./frpc -c ./frpc.ini
2018/11/25 12:21:23 [I] [proxy_manager.go:284] proxy removed: []
2018/01/25 12:21:23 [I] [proxy_manager.go:294] proxy added: [testssh]
2018/01/25 12:21:23 [I] [proxy_manager.go:317] visitor removed: []
2018/01/25 12:21:23 [I] [proxy_manager.go:326] visitor added: []
2018/01/25 12:21:23 [I] [control.go:240] [3b123131341cb] login to server success, get run id [3b123131341cb], server udp port [0]
2018/01/25 12:21:23 [I] [control.go:165] [3b123131341cb] [ssh] start proxy success
On the server side, you will see following messages as well:
2018/08/14 19:29:14 [I] [service.go:319] client login info: ip[3b123131341cb] version [0.21.0] hostname [] os [windows] arch [amd64]
2018/08/14 19:29:14 [I] [service.go:217] [3b123131341cb] [testssh] tcp proxy listen port [16316]
2018/08/14 19:29:14 [I] [control.go:335] [3b123131341cb] new proxy [testssh] success
So, FRP deployment is completed. Internal host's 2222 port has been successfully exposed to Internet.
Localtunnel.me
Localtunnel allows you to easily share a web service on your local development machine without messing with DNS and firewall settings.
Localtunnel will assign you a unique publicly accessible url that will proxy all requests to your locally running webserver.
Install Localtunnel globally (requires NodeJS) to make it accessible anywhere:
npm install -g localtunnel
Start a webserver on some local port (eg http://localhost:8000) and use the command line interface to request a tunnel to your local server:
lt --port 8000
You will receive a url, for example https://gqgh.localtunnel.me, that you can share with anyone for as long as your local instance of lt remains active. Any requests will be routed to your local service at the specified port.
Other Remote Control Softwares
(From: Neurohazard)
- TeamViewer (可免费使用情况下,属于性能较好的解决方案, UAC穿透能力弱)
(tv 在 server 上要 licence,,而且 tv 最大的缺点是更新频繁,低版本高版本混用,闹心~在 win10 上也容易被 uac 卡住,,目前能穿透 uac 的,只有 xt800 了) - Anydesk
- Citrix gotomypc (面向企业级用户,无社区版,体验良好,微软的远程桌面功能mstsc一部分是向Citrix购买的)
- Gotoassist
- VNC
- PCAnywhere
- kdt
- xt800
- splashtop
- uvnc
- RealVNC
- 向日葵 (Windows还行, Linux糟糕)
References:
- https://news.ycombinator.com/item?id=7585056
- frp内网穿透,这个有大用处!
- https://github.com/fatedier/frp
- https://localtunnel.me
- https://ngrok.com/pricing
 RSS Feed
